Access Manager
The Access Manager component provides governance and access control for Timbr’s ontology-based semantic layer. For information on configuring Single Sign-On (SSO) with Azure AD and syncing user groups, see the Installation & Configuration guide.
It enables users to create and manage users, roles, and policies that control access to the virtual knowledge graph, including business entities, relationships, and underlying data. Permissions can be defined based on projects, business functions, and data assets, with granular control to support secure and governed data access across the semantic layer.
The Access Manager is equipped with enterprise-grade access control and can integrate with Azure AD, AD Roles, and SSO mechanisms. Everything supported in the Access Manager can also be done using GRANT statements in SQL for those who prefer to code. This allows users to generate automated scripts based on input from other applications and always maintain controlled and governed access to data.
The Access Manager can be accessed through the Manage tab by clicking on Access Manager.
Introduction
Access control in Timbr is divided into two main aspects
- What a user can see - Access Permissions - The user's access to the knowledge graph, datasources (tables), concepts, mappings, views, and all other data elements that a user is exposed to and can view, query, create and edit. This also includes the ability to grant or revoke the creation or modification of users, and roles.
- What a user can do - Platform Permissions - The user's access to the different pages and components in the platform. This includes which components or pages a user has access to. For example the Ontology Explorer, Data Mapper, Graph Explorer, Knowledge Lineage, Access Manager, etc.
Getting Started
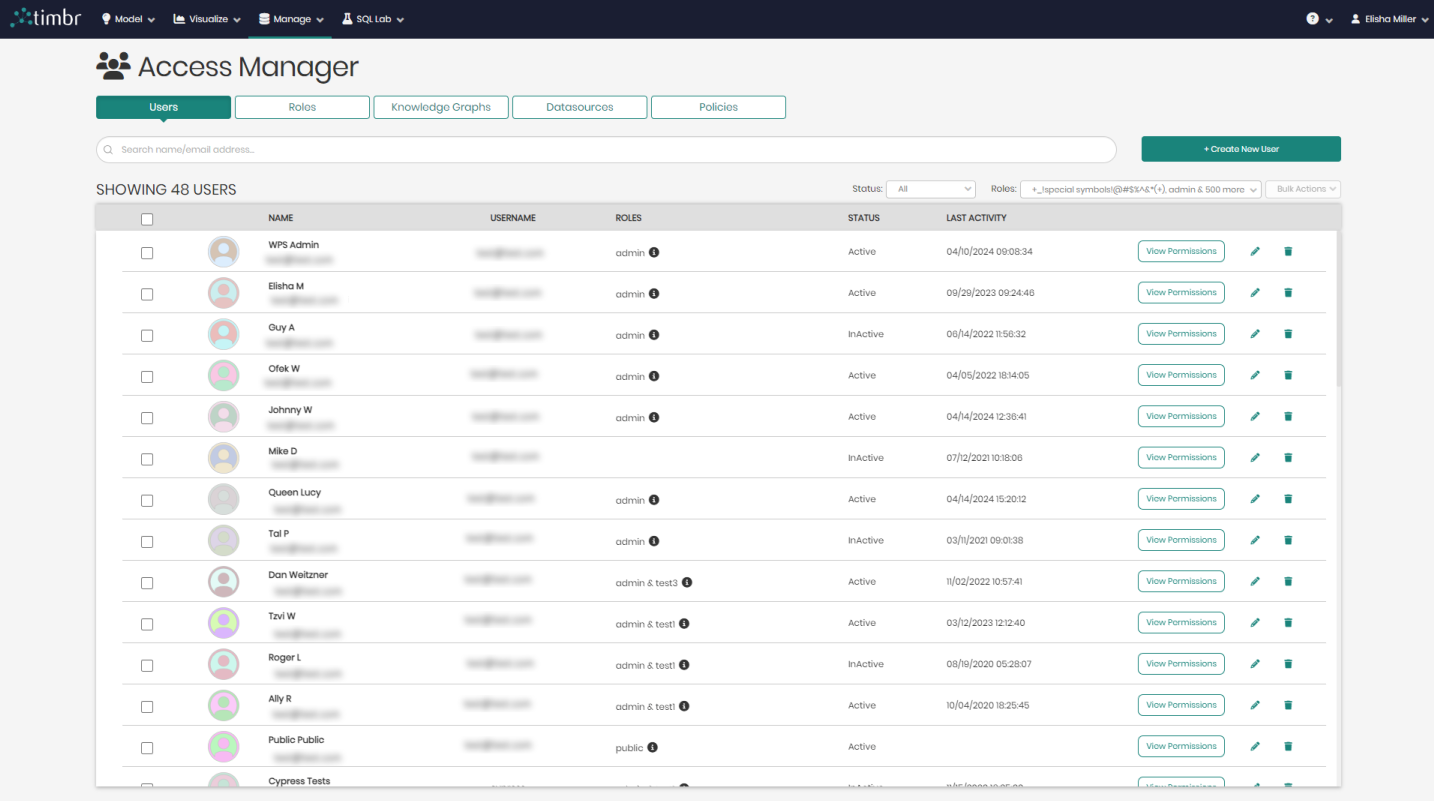
The Access Manager component can be accessed by clicking on the Manage tab and choosing Access Manager.
Once selected a list of all users will appear including their: Name, Username, Roles, Status, and Last Activity.
Above the list of users are five tabs that enable you to switch between viewing the Users, Roles, Knowledge Graphs, Datasources, and existing Policies.

Beneath the tabs is a search bar that can assist in finding specific users, roles, knowledge graphs, datasources or policies from the list.

In the default tab Users, to the right of the search bar is + Create New User which when clicked on will open a new box to create a new user.
Beneath + Create New User, are different filtering options as well as bulk actions that can be done. This includes:
![]()
- Status - Filtering the graph based on Active/Inactive users.
- Roles - Filtering the graph based on specifically created roles.
- Bulk Actions - Enabling users to select multiple users to perform the following bulk actions on.
- Set role to users - The ability to add a specific role to multiple users chosen from the list all in one click.
- Set active - The ability to add the active status to multiple users chosen from the list all in one click.
- Set inactive - The ability to add the inactive status to multiple users chosen from the list all in one click.
- Delete users - The ability to delete multiple users chosen from the list all in one click.
To the right of each user, there are the three following buttons:
![]()
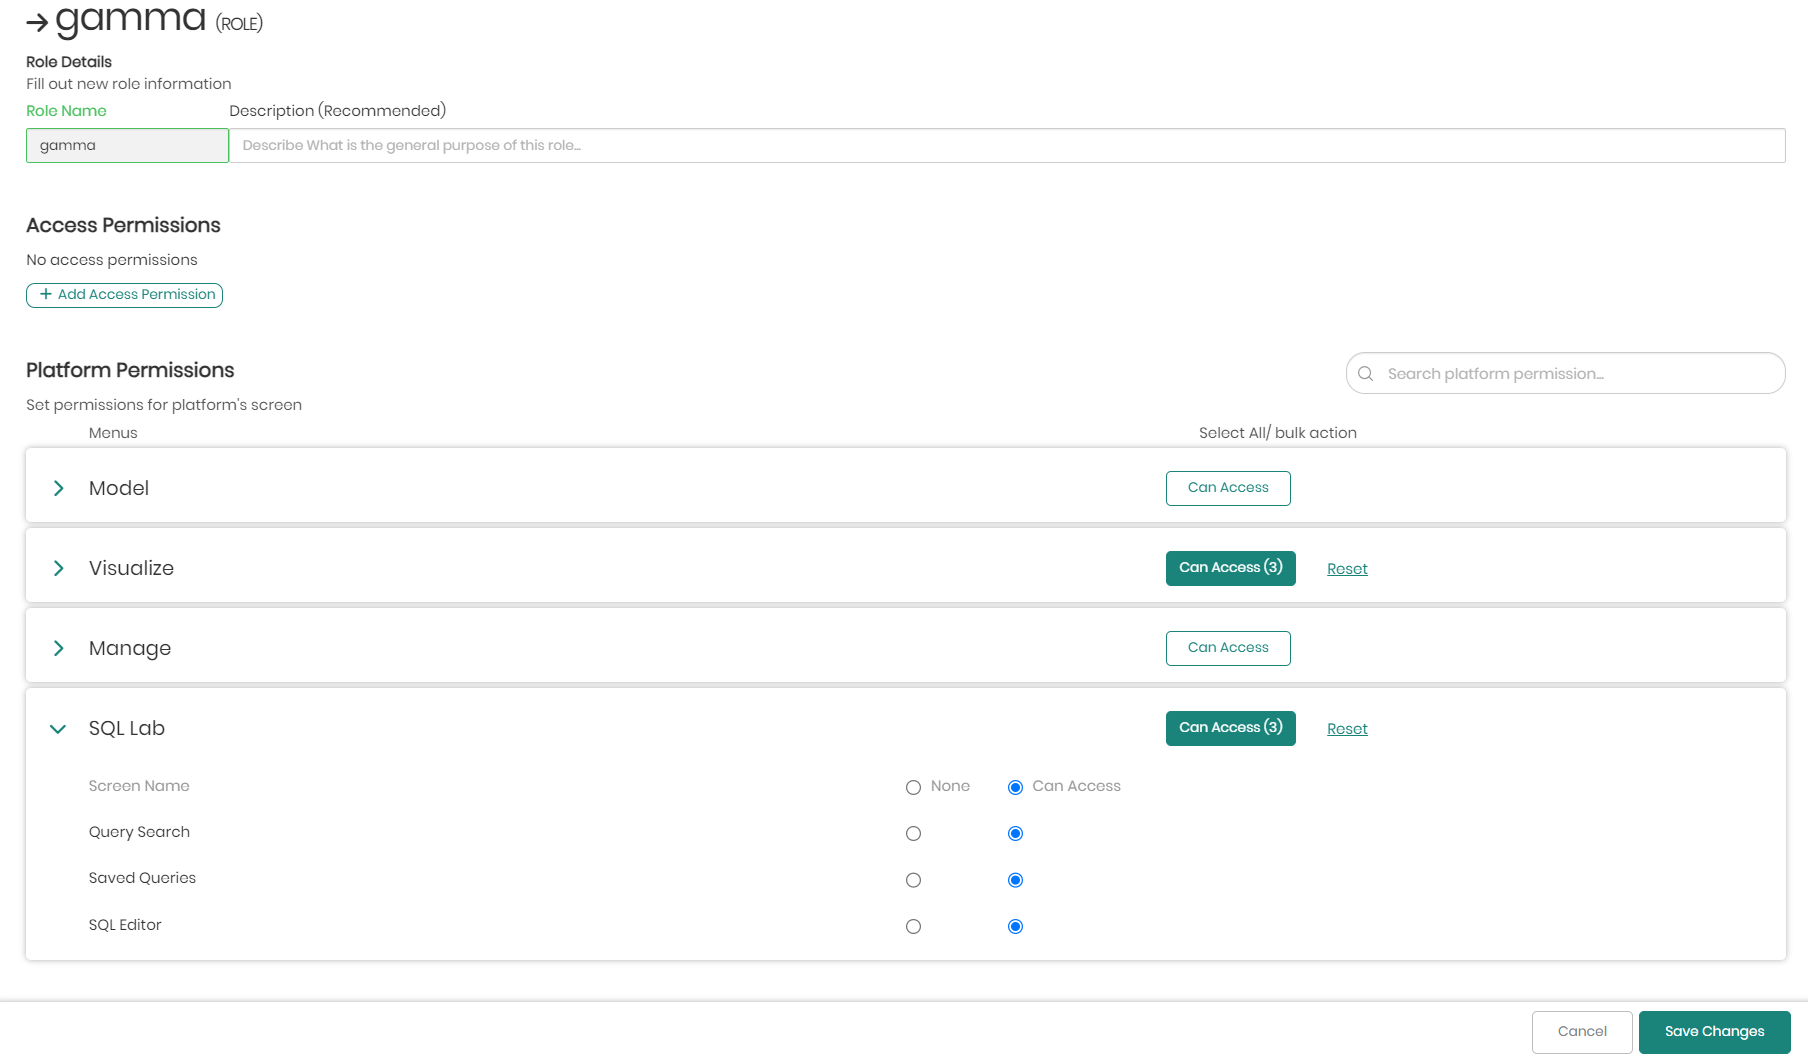
- View Permissions - This button will open a window with a detailed view of what roles the selected user has, as well as what permissions the selected user has in each aspect of the platform. In addition, here you will also be able to add permissions to the user by clicking on + Add Access Permissions.
- Show user policies - On the top right in view permissions is show user policies that when clicked on will open a window in order to add policies to a user or revoke them from the user.
Clicking on Open grant policy will open a dropdown with a list of the existing policies to choose from that can be added to the user.
To the right, clicking on Revoke policy will remove the policy from the chosen user.
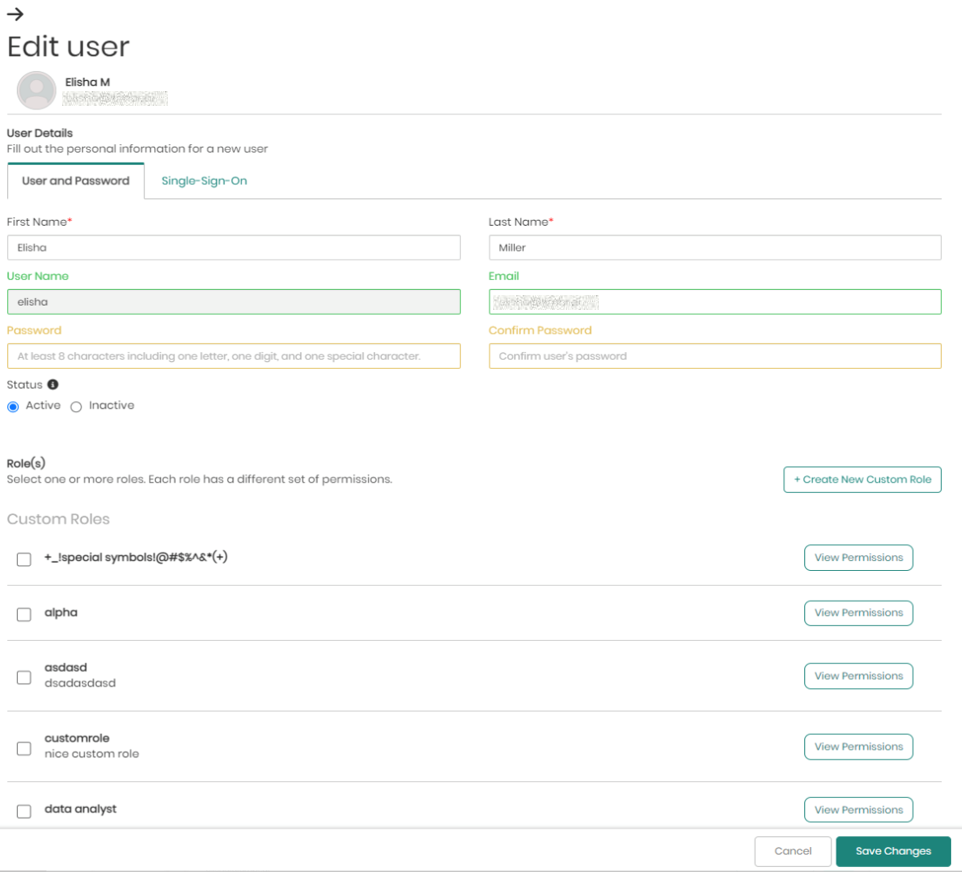
- Edit User - This button which appears both on the top right of view permissions as well as in the main user tab appearing as a pencil will open a window in order to edit the chosen user. This includes the user's login information, the user's status, and the different roles the user has in the platform. The only thing that can't be edited is the user's User Name.
- Delete User - The third button appearing in the users tab as a trash can, when clicked on will delete the selected user.

Creating a New User
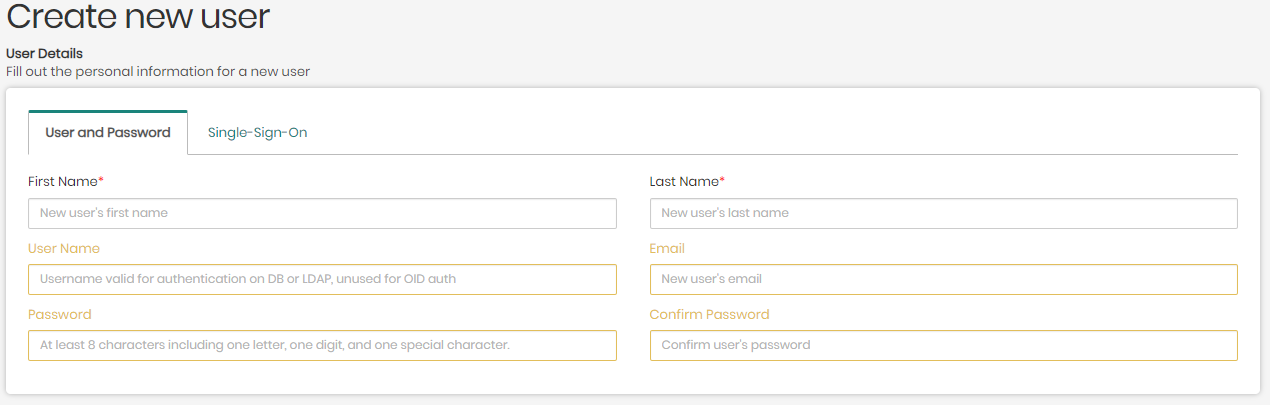
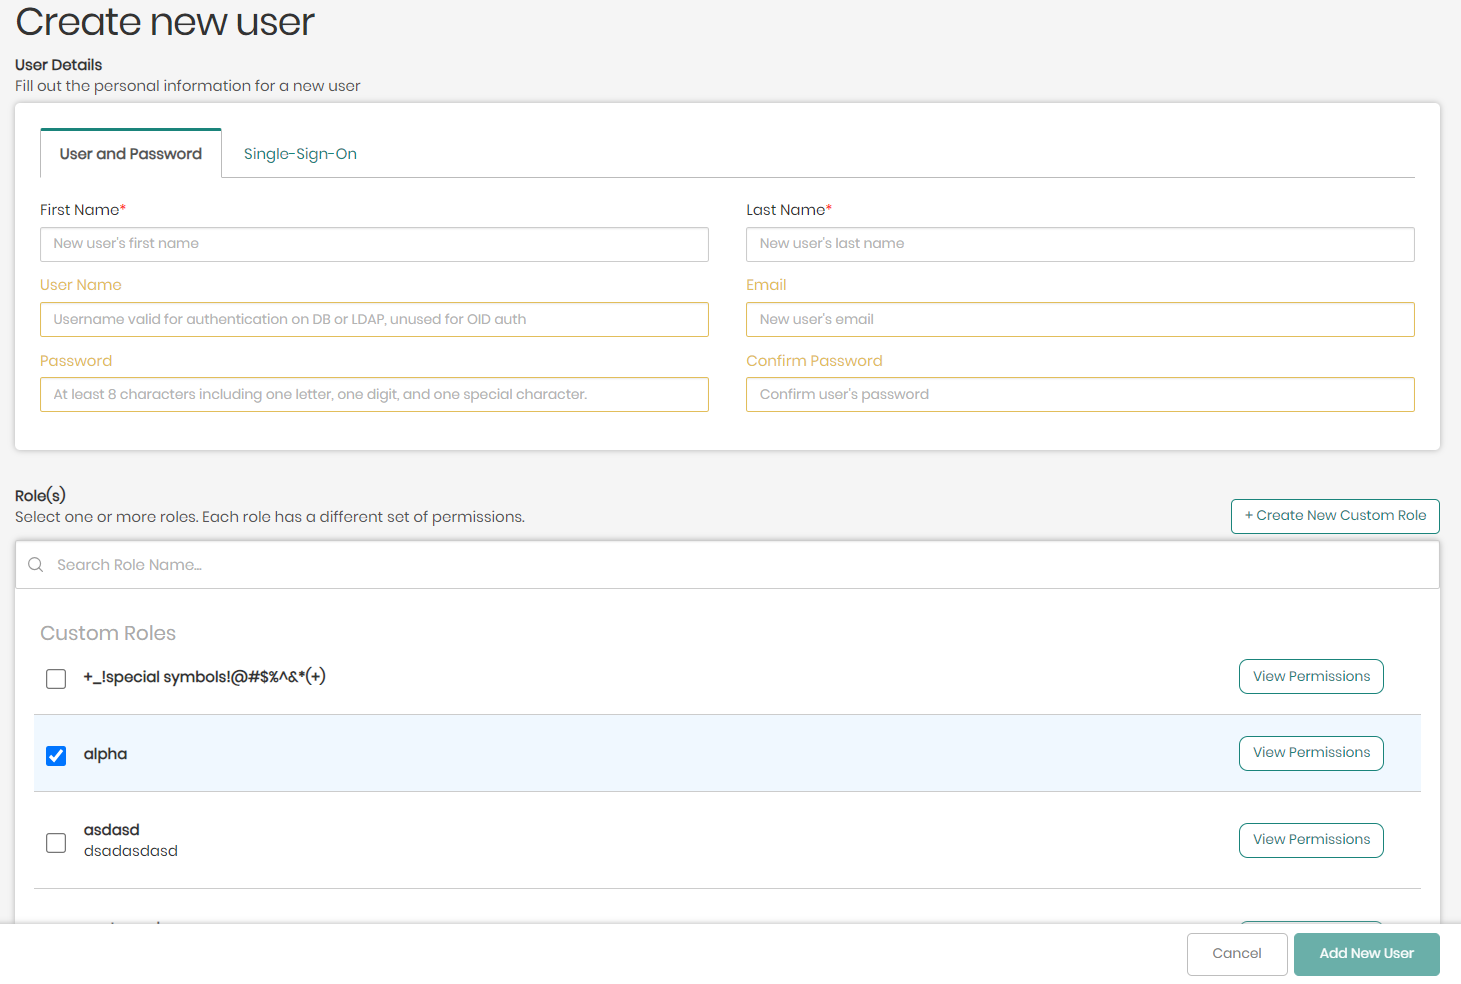
- In the main page of the access manager, click on + Create New User on the upper right side.

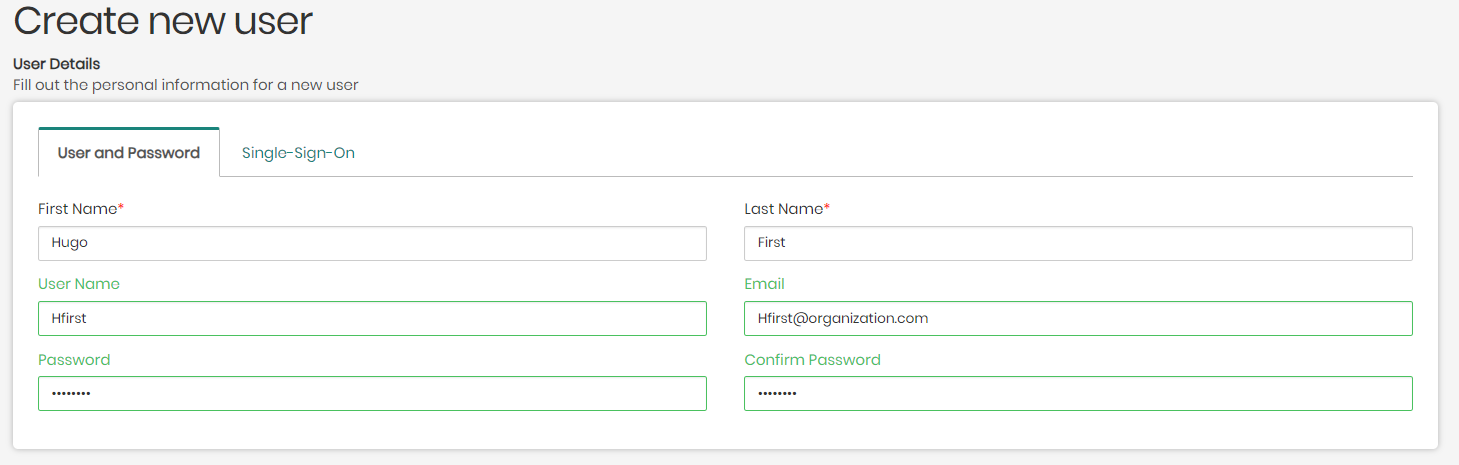
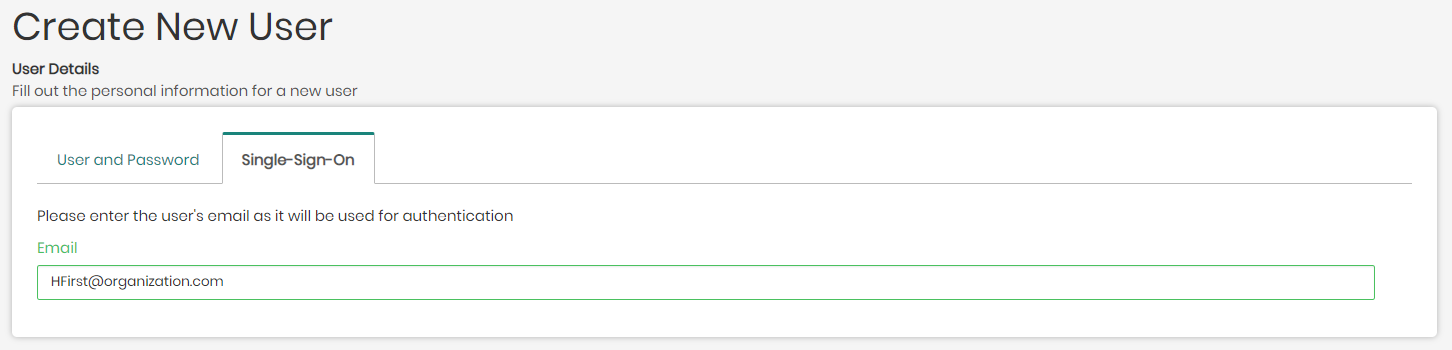
- In the new window, you will be asked to fill in the new user's information that will be used when signing in to the platform using one of the two following tabs:
- User and Password - To create a user using this option, the First and Last Name of the user will be required, as well as a Username, Email, and Password for the new user, which is connected to the relevant server of the user's organization.
- Single-Sign-On - To create a user using this option, the only thing required is the user's Email used and authorized by the user's organization and supported by either Google or Microsoft Azure.
Once the new user's information is inserted, the user can now be added by clicking on Add New User on the bottom right of the screen.
If however while creating a user you would like to add various roles to the user which contain unique permissions, this can be accomplished in the two following ways:
- Choosing existing roles - Beneath the user information inserted to create the new user, is the list of roles (Custom Roles, Default Roles, Default Datasource Roles, and Default Knowledge Graph Roles) that can be assigned to the different users. Each role's permissions can be revealed by clicking on View Permissions to the right of the role.
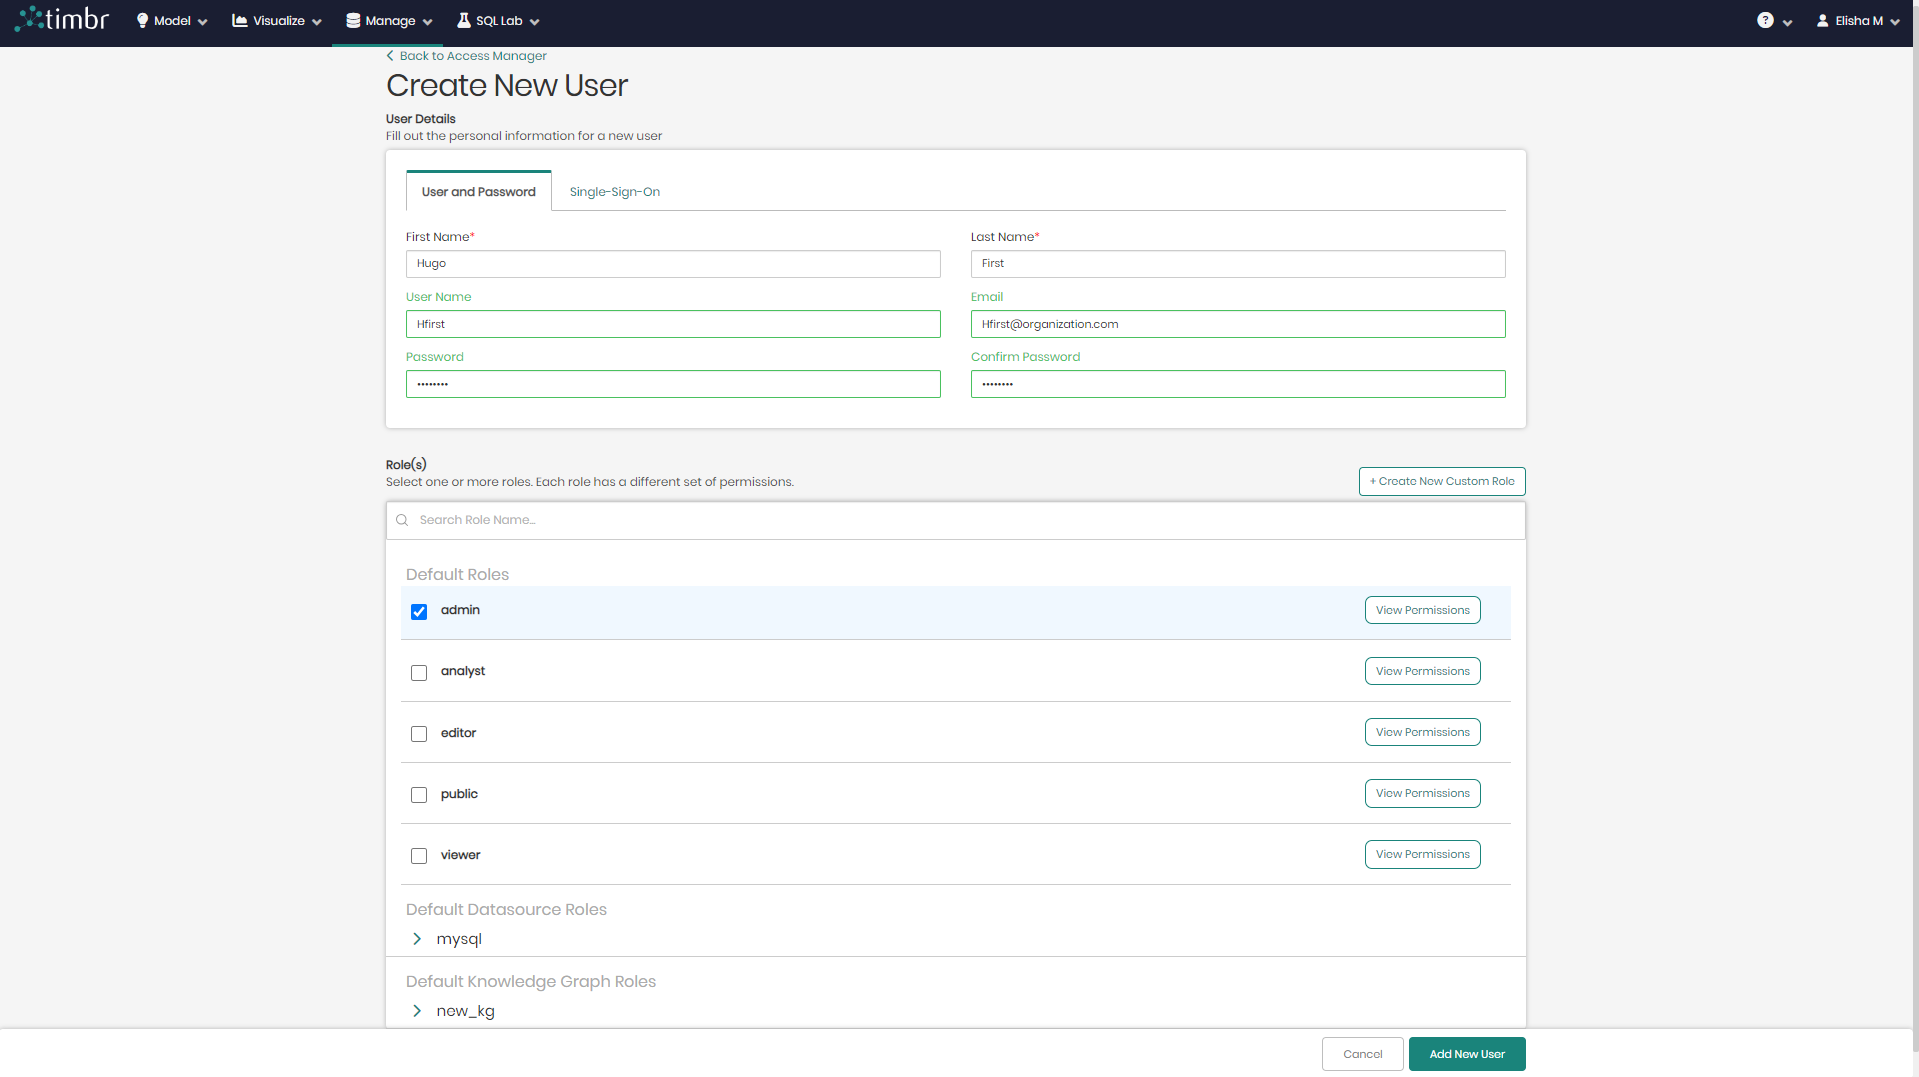
- Creating new custom roles - The second option to add roles to a user is to create the new roles from scratch by clicking on + Create New Custom Role located on the top right of the list of roles.

The full process and options for creating user roles can be found in depth in the next section.
Creating User Roles
- In the main Access Manager page switch from the default Users tab to the Roles tab.

You will now see all the different types of Roles that can be assigned to users divided by category which include:
Custom Roles - This category contains all the roles that were custom-made by the user.
Default Roles - This category contains Timbr's default roles which are included by default in the Timbr platform. The default roles are:
- Admin - Users given the Admin role will have full admin access and editing capabilities in the platform.
- Analyst - Users given the Analyst role will be able to query every resource in the platform, but will not have the ability to create or edit data sources and knowledge graphs.
- Editor - Users given the Editor role will be able to create, edit and query everything in the platform.
- Public - Users given the Public role will have external access to a resource without needing to sign into the Timbr platform. Usually, users use this role for web applications connected to the Timbr platform to see dashboards and graph explorations or to enable access to Timbr components that were embedded in external applications.
- Viewer - Users given the Viewer role will have access only to the meta-data of all the knowledge graphs in the platform. The Viewer can explore the knowledge graph models, and see the properties and relationships of each concept, but he cannot edit or query anything, and he doesn’t have any access to the data.
Default Datasource Roles - When a user creates a new datasource in Timbr, the following three default roles are automatically created:
- Analyst - Users given the Analyst role will be able to query the specific datasources assigned by the admin.
- Editor - Users given the Editor role will be able to edit and query the specific datasources assigned by the admin.
- Viewer - Users given the Viewer role will strictly have the ability to view the specific datasources assigned by the admin, without the ability to edit or query them.
Default Knowledge Graph Roles - When a user creates a new knowledge graph in Timbr, the following three default roles are automatically created:
- Analyst - Users given the Analyst role will be able to query the specific knowledge graphs assigned by the admin.
- Editor - Users given the Editor role will be able to edit and query the specific knowledge graphs assigned by the admin.
- Viewer - Users given the Viewer role will strictly have the ability to view the specific knowledge graphs assigned by the admin, without the ability to edit or query them.
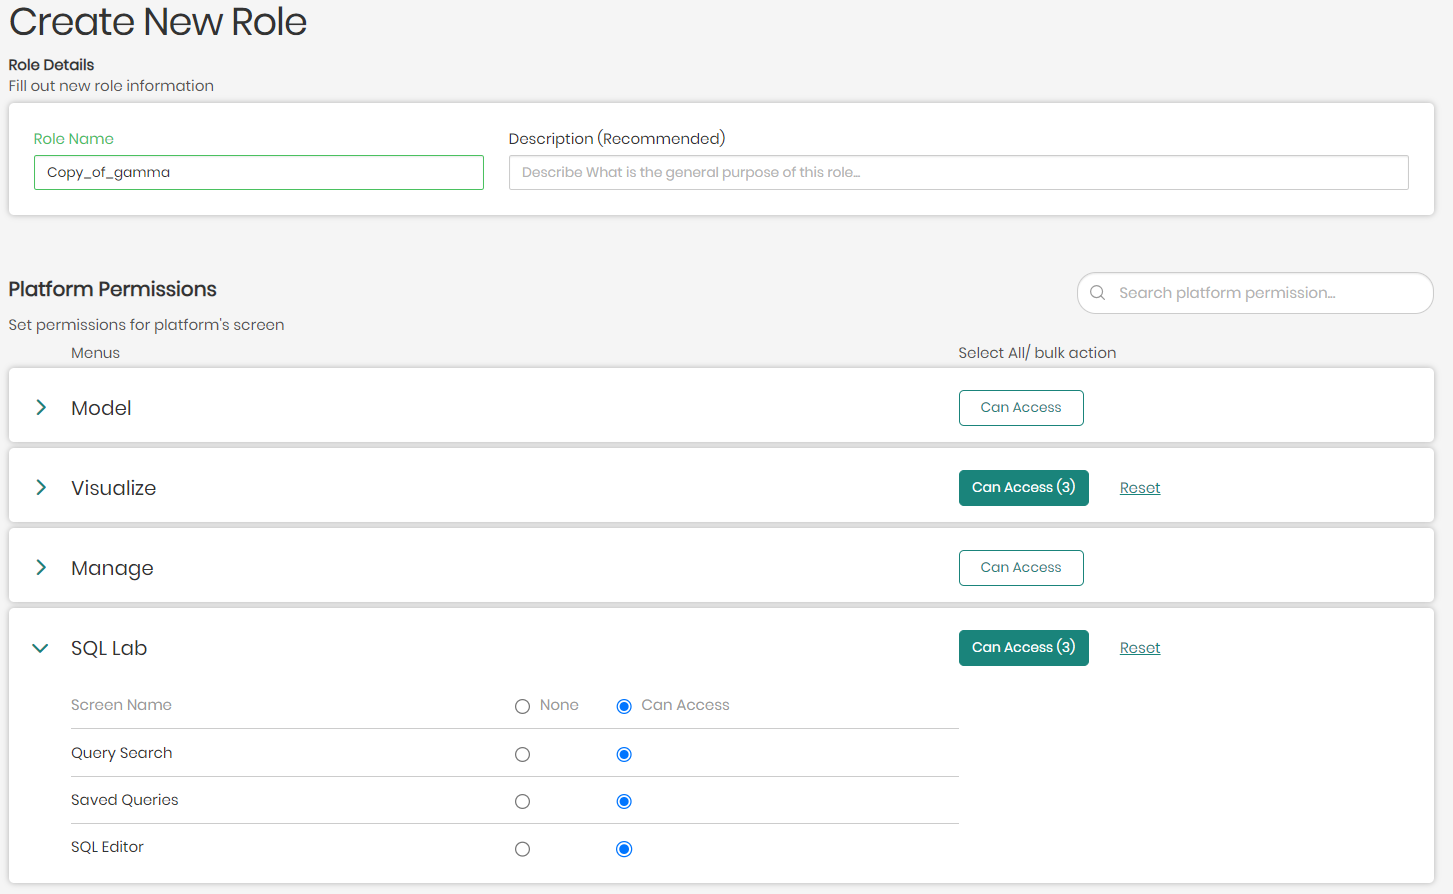
- To create a new custom role click on + Create New Role located on the top right above all the category lists.

- Once clicked, you will be asked to enter a Name for the role as well as an optional yet recommended description, describing the purpose of the created role.

Beneath the name and description are the platform permissions which decide What a user can do in the platform when he is assigned this role. Here there is the option to pinpoint the exact possibilities the users will have when maneuvering through the platform with the given role.
Every possibility in the platform is located in the different platform screen menus seen below, which include: Model, Visualize, Manage, and SQL Lab.
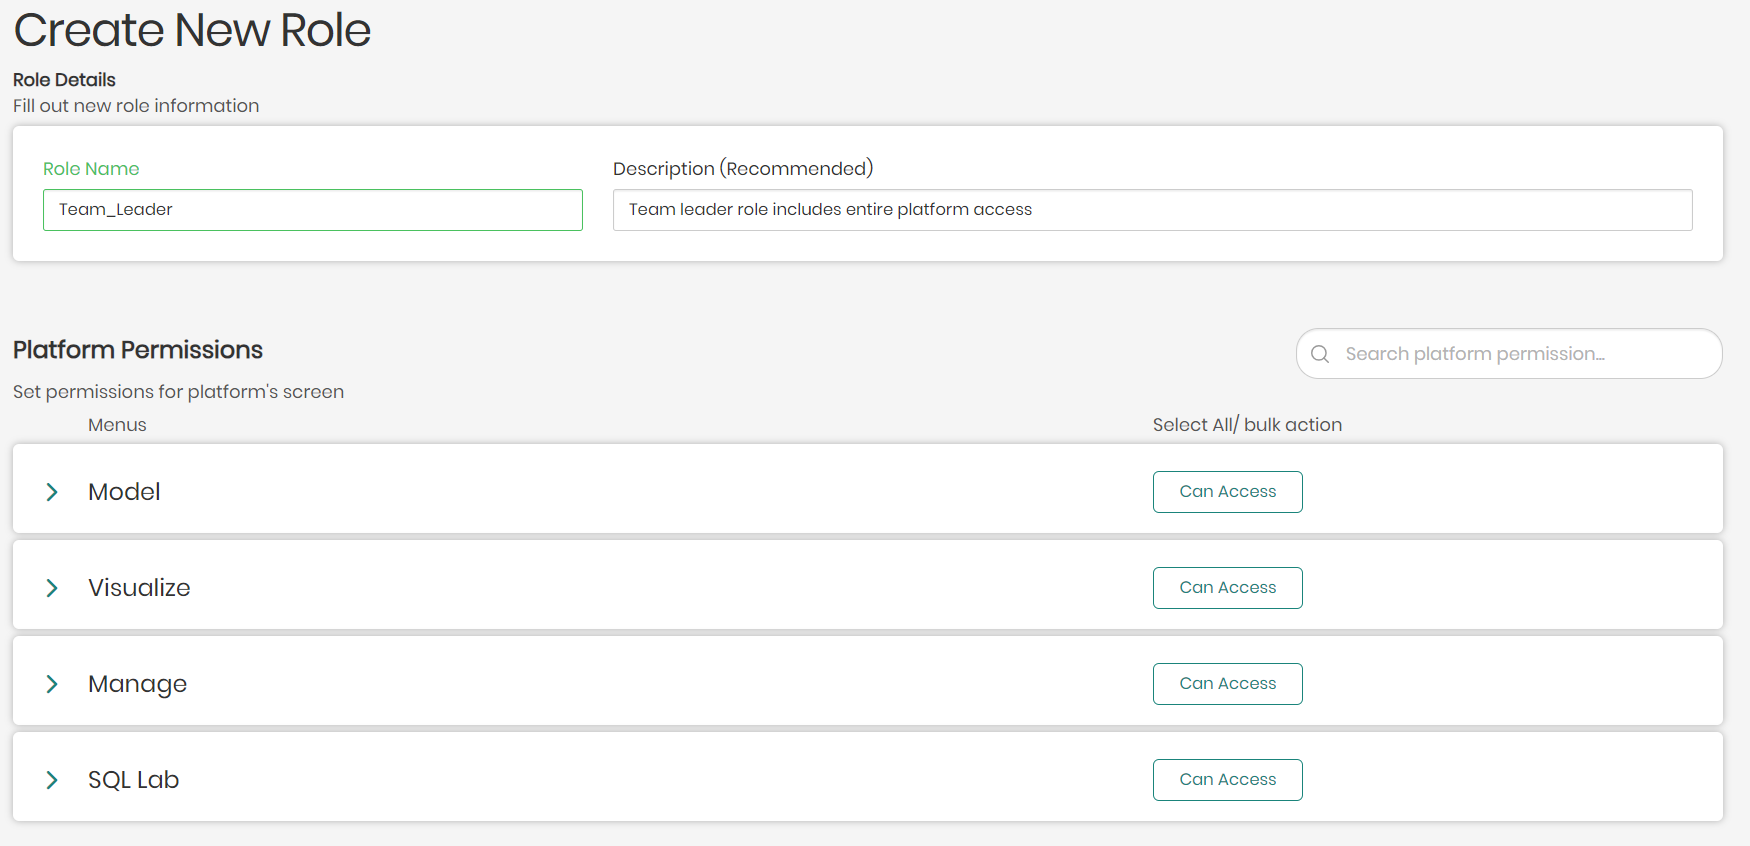
Each platform menu can be clicked on and opened in order to select which aspects of the chosen platform menu the user will have access to when assigned this role.
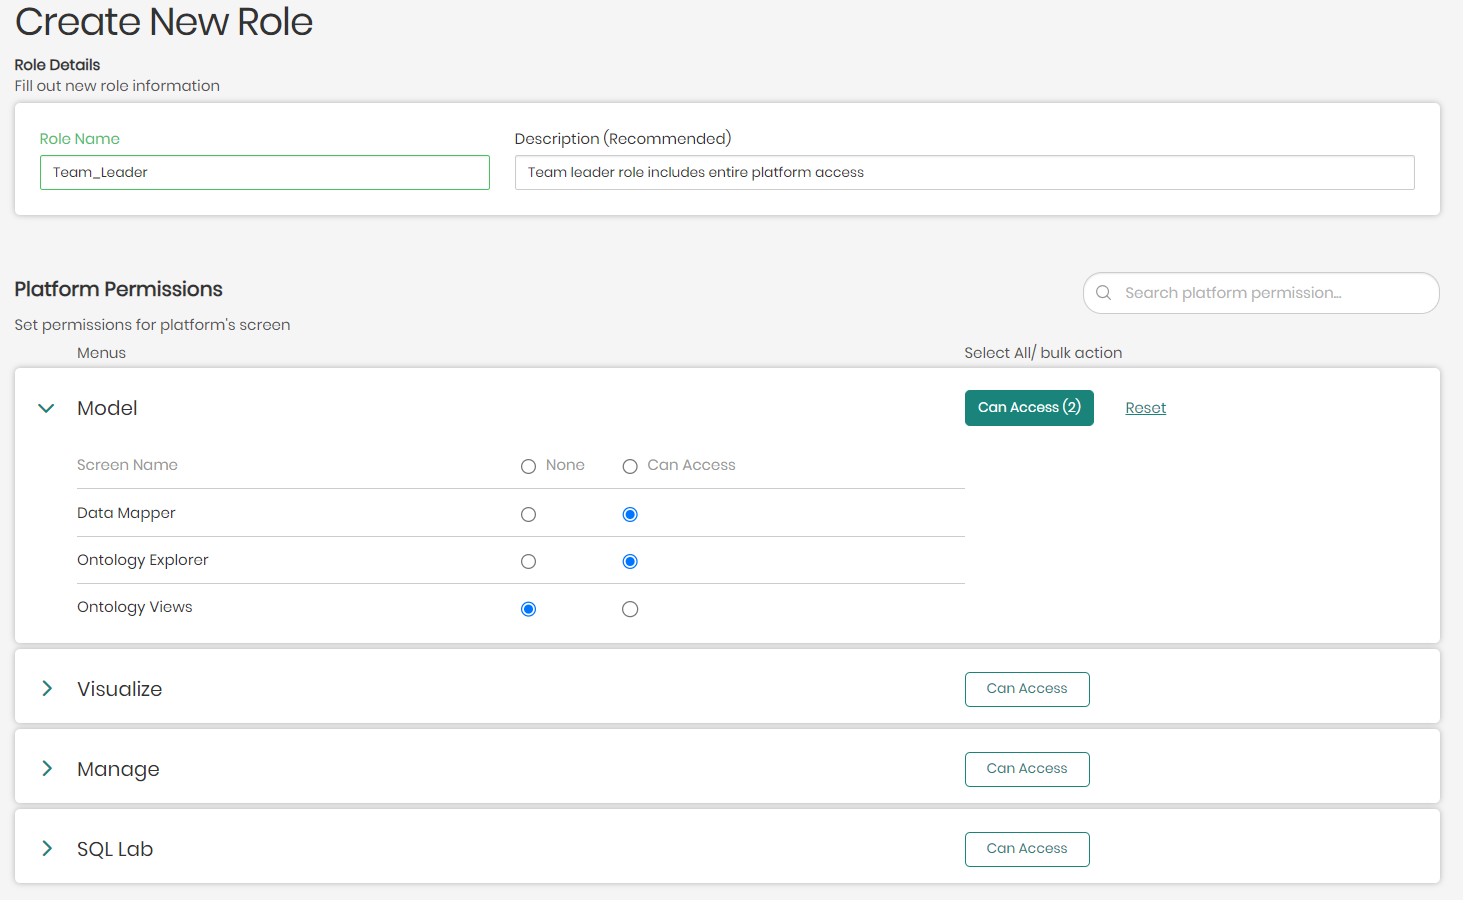
In cases where there are many options and you'd like to give access to all, you can use the bulk options on the right of each platform menu to select and give access to all by clicking on Can Access, or on the other hand, clicking on Reset to remove access to all.
- Once the new role information and permissions are in place, the role can now be added by clicking on Add New Role on the bottom right of the screen.
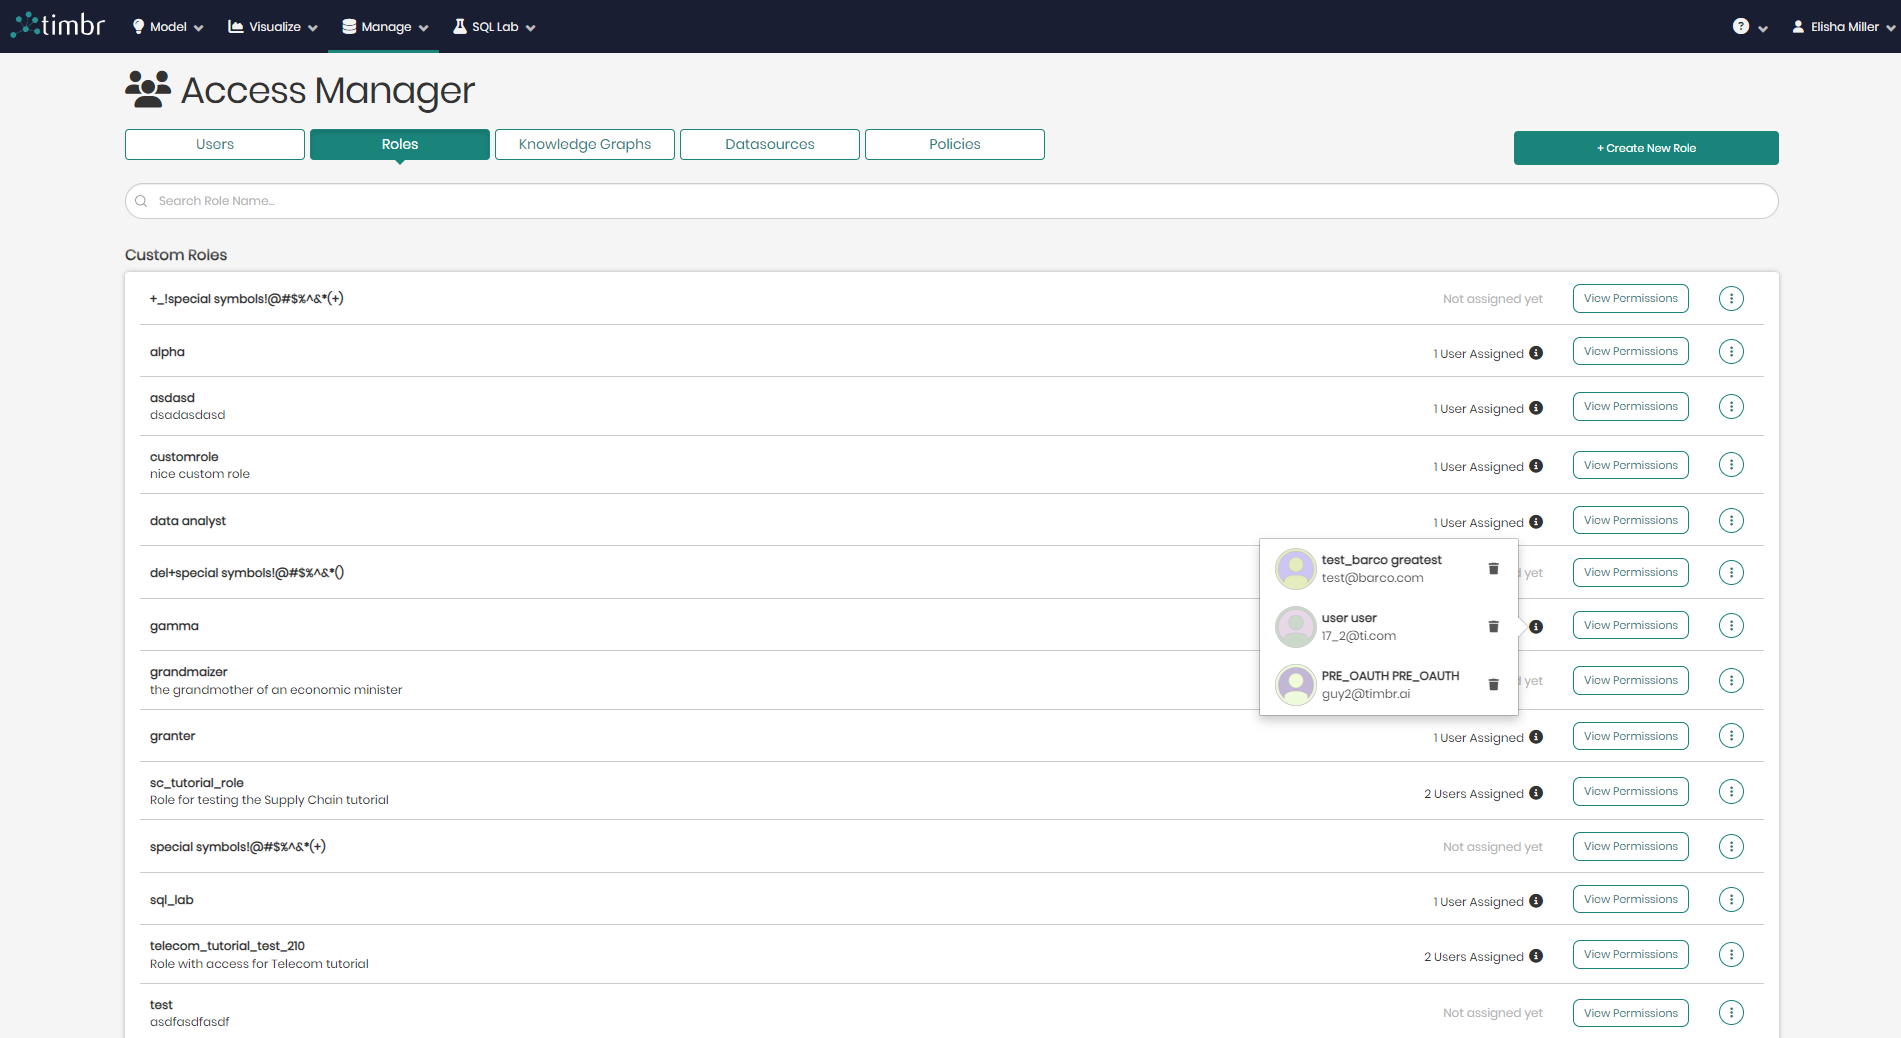
When returning to the main Access Manager page in the roles tab, to the right of each role on the list there are 3 options.

These 3 options are:
Assigned Vs. Not Assigned - This shows which roles are assigned to which users, as well as which roles have no users assigned to them.
View Permissions - This button will open a window with a detailed view of what platform permissions are attached to the selected role, as well as which users are assigned this role. Here you will be able to add permissions and edit the role.

Additional Options - This button will open a small pop-up with additional options that can be performed on each role.
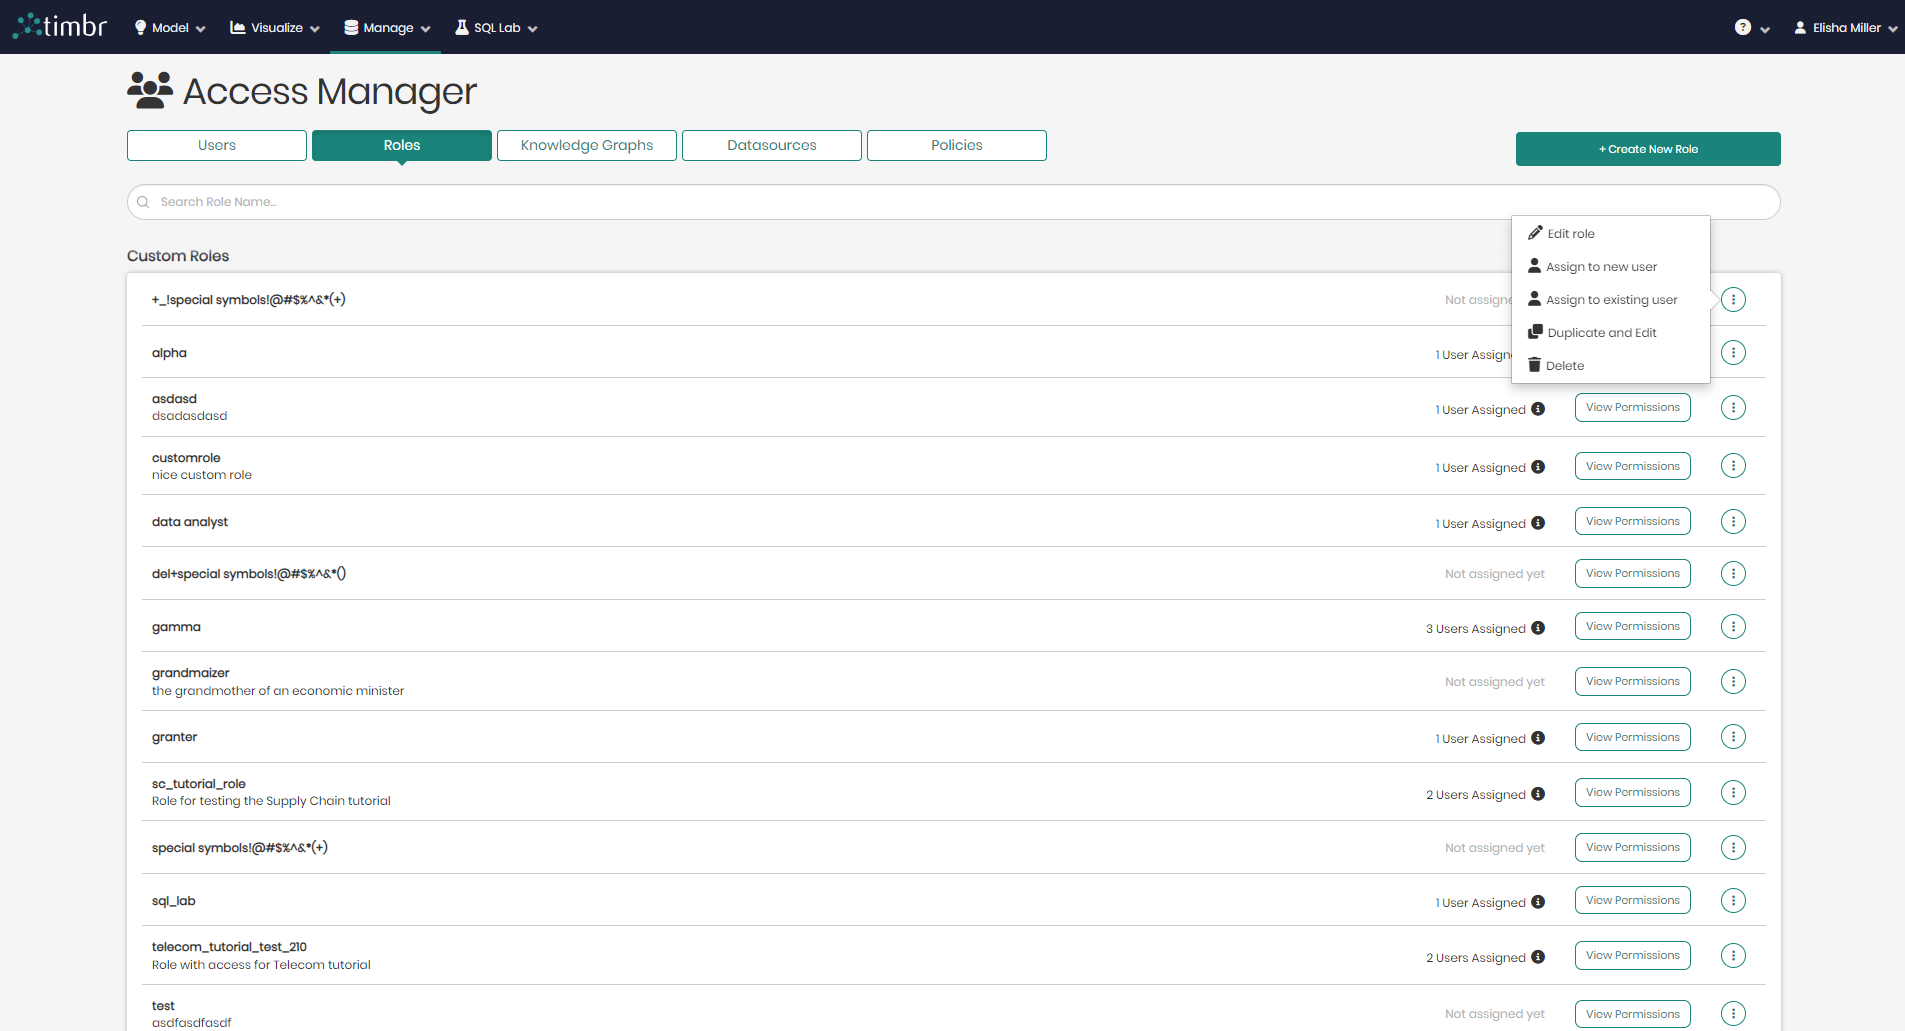
The following options that appear include:
Edit role - When clicked on, a window will appear allowing users to edit the selected role by adding or editing existing permissions to the role.
Assign to new user - When clicked on a Create New User window will appear with the selected role highlighted beneath. All that would be needed is to fill in the new user's information and click on Add New User on the bottom right.
Assign to existing user - When clicked on, an Assign user window will appear with the option to assign the selected role to any of the users on the list.
Duplicate and Edit - Duplicates the selected role enabling users to edit a copy of the role as well as edit its permissions.
Delete - Deletes the selected role from the list of roles in the Access Manager.
The features and options above can be performed on all categories as well, which include Custom Roles, Default Roles, Default Datasource Roles and Default Knowledge Graph Roles.
Adding and Editing Knowledge Graph Access Permissions
- In the main Access Manager page switch from the default Users tab to the Knowledge Graphs tab.

You will now see all the different Knowledge Graphs that exist including their: Name, Last updated time, date of creation, user who created the Knowledge Graph, number of concepts in the knowledge graph and the Knowledge graphs active datasource.
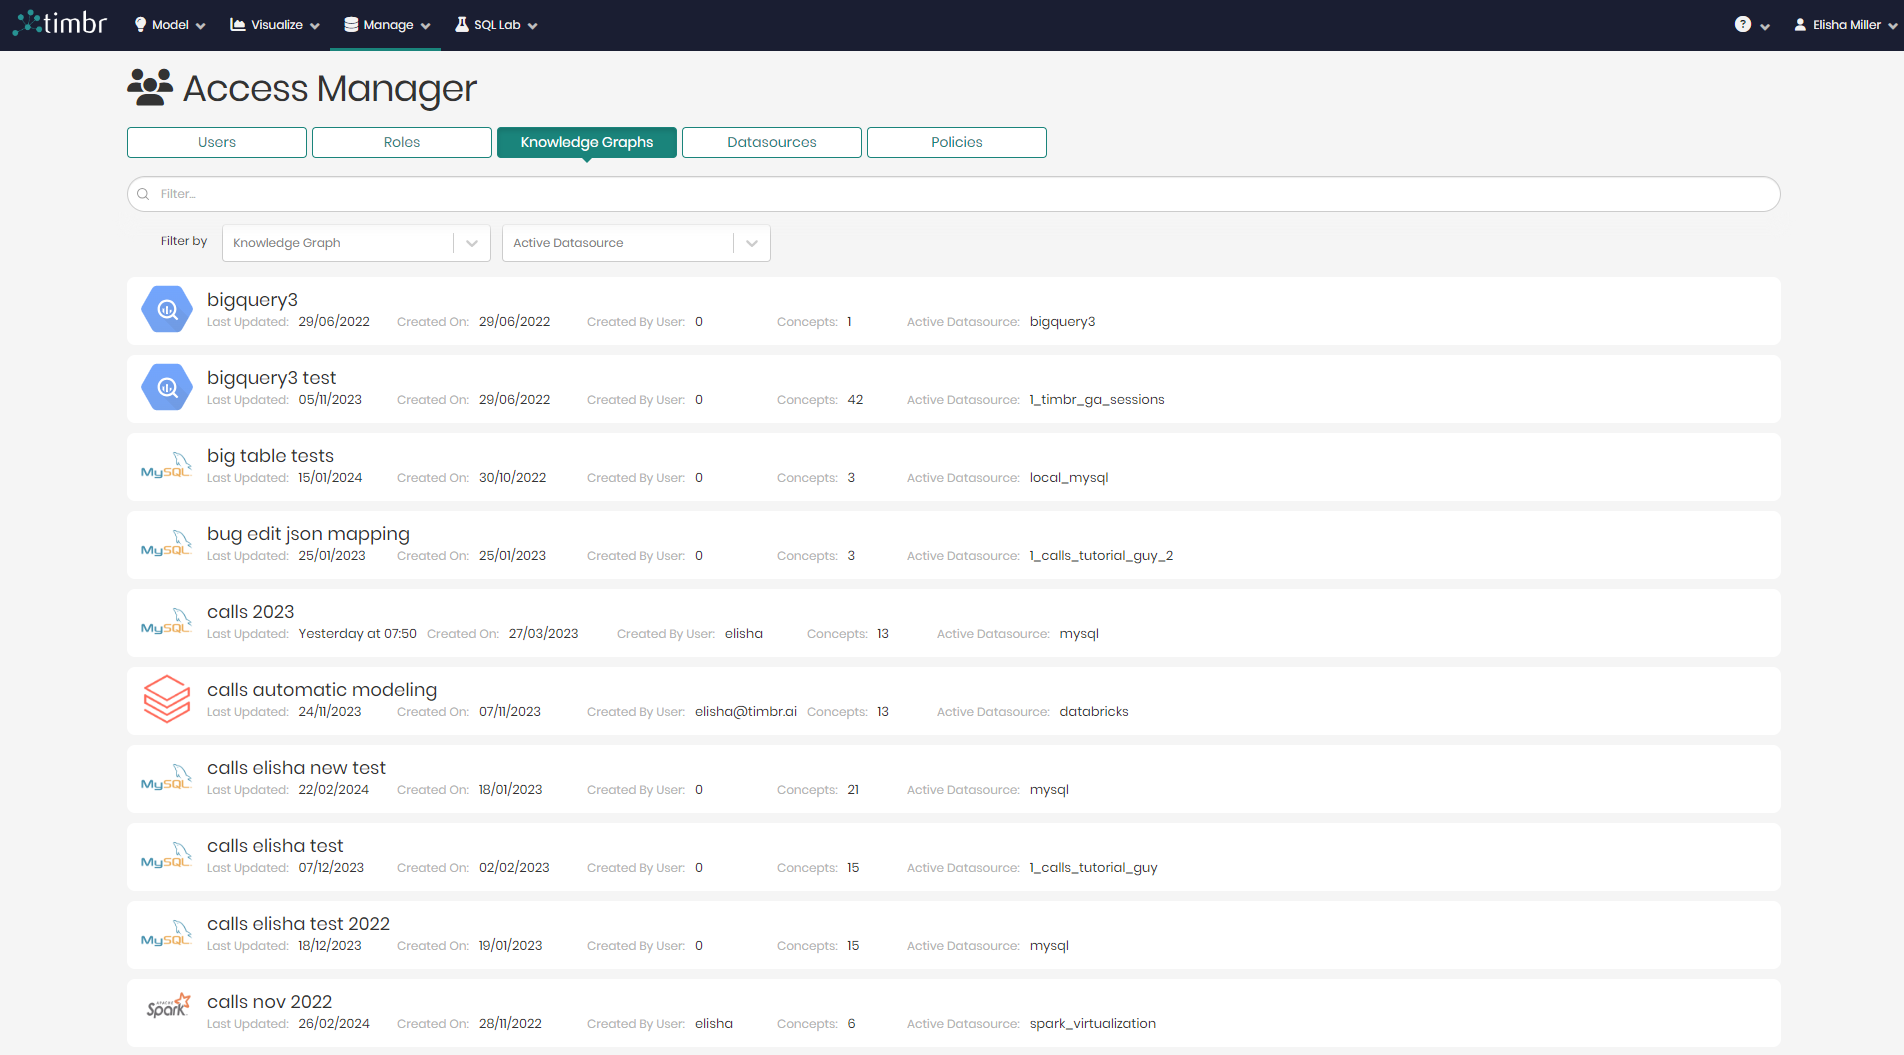
- To add or edit a knowledge graphs access permissions, simply click on the relevant knowledge graph.
Once clicked a window will slide in with all the existing user permissions for the selected knowledge graph in one tab, and all the existing role permissions for the selected knowledge graph in the other tab.

In the users tab, right beneath the tab itself, users can hover over the number of users and see the full list of users.
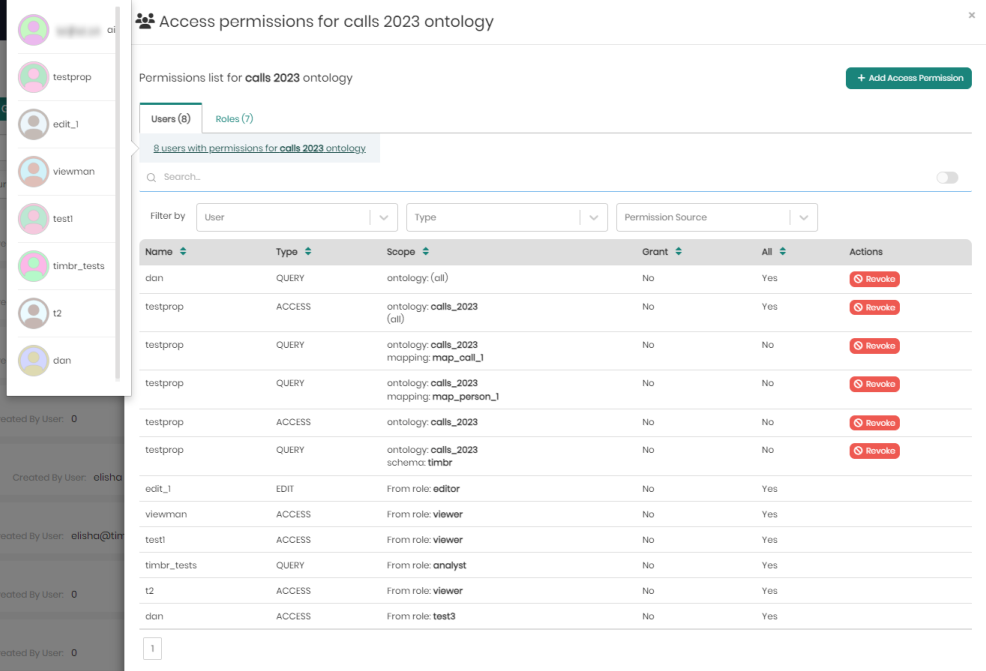
Beneath that, users can search for specific permissions in the search bar, as well as in the filters which include filter by: User, Type, and Permission Source.
Under the search and filters is the list of user permissions for the selected knowledge graph with the following fields:
Name - The name of the user.
Type - The type of permission. Either Access, Query, or Edit.
Scope - The scope of the user permission for the selected knowledge graph.
Grant - Indicates whether or not the permission contains granting permissions.
All - Indicates whether the permission applies to the entire ontology ("Yes") or is limited to a specific scope ("No"), such as a particular mapping, schema, or subset of data, as defined in the "Scope" column.
Actions - Provides the "Revoke" button, which allows administrators to remove the associated permission from the user, instantly revoking the specified access rights for the defined scope.
In the roles tab, right beneath the tab itself, users can hover over the number of roles and see the full list of roles.
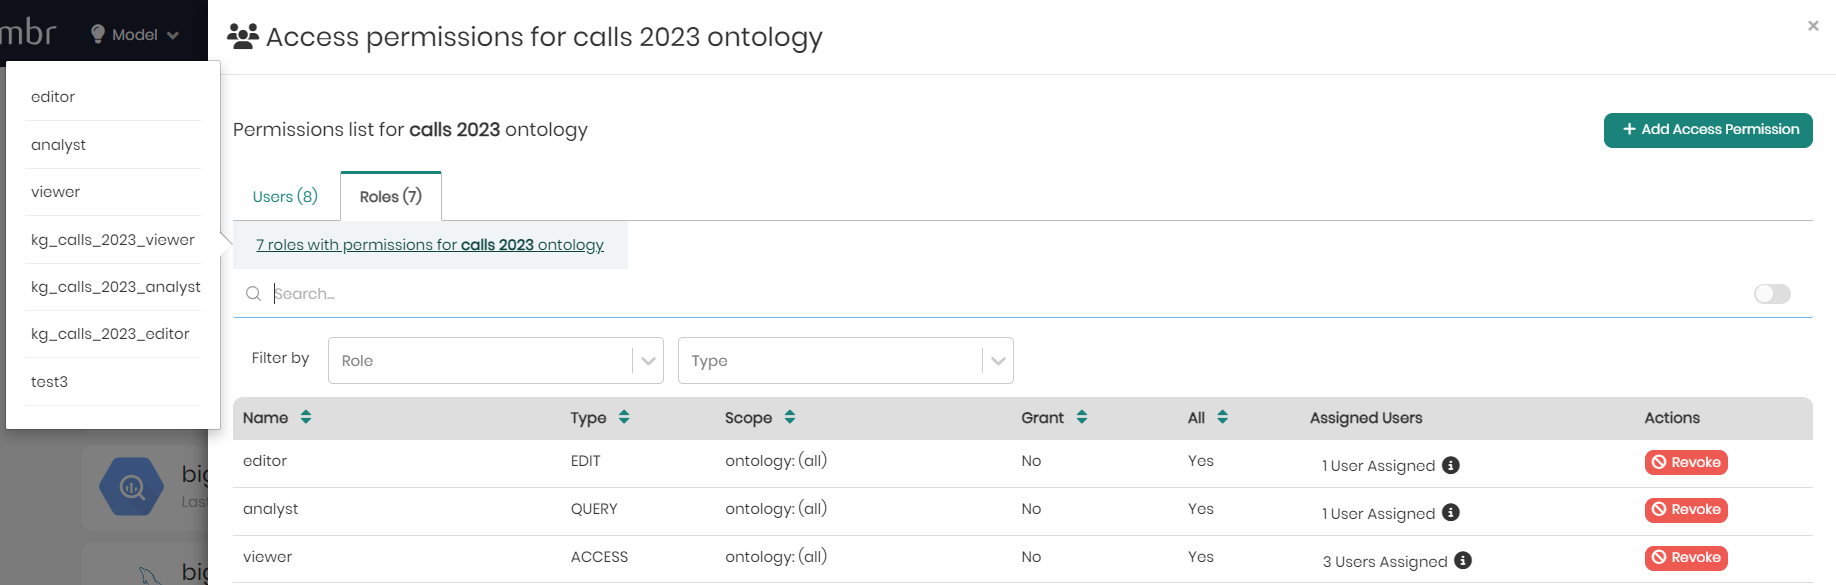
Beneath that, users can search for specific permissions in the search bar, as well as in the filters which include filter by: Role and Type.
Under the search and filters is the list of role permissions for the selected knowledge graph with the following fields:
Name - The name of the role.
Type - The type of permission. Either Access, Query, or Edit.
Scope - The scope of the role permission for the selected knowledge graph.
Grant - Indicates whether or not the permission contains granting permissions.
All - Indicates whether the permission applies to the entire ontology ("Yes") or is limited to a specific scope ("No"), such as a particular mapping, schema, or subset of data, as defined in the "Scope" column.
Assigned Users - Shows the number of users assigned to each role. When hovering over the assigned users in each row, the list of users will appear.
Actions - Provides the "Revoke" button, which allows administrators to remove the associated permission from a role, instantly revoking the specified access rights for the defined scope.
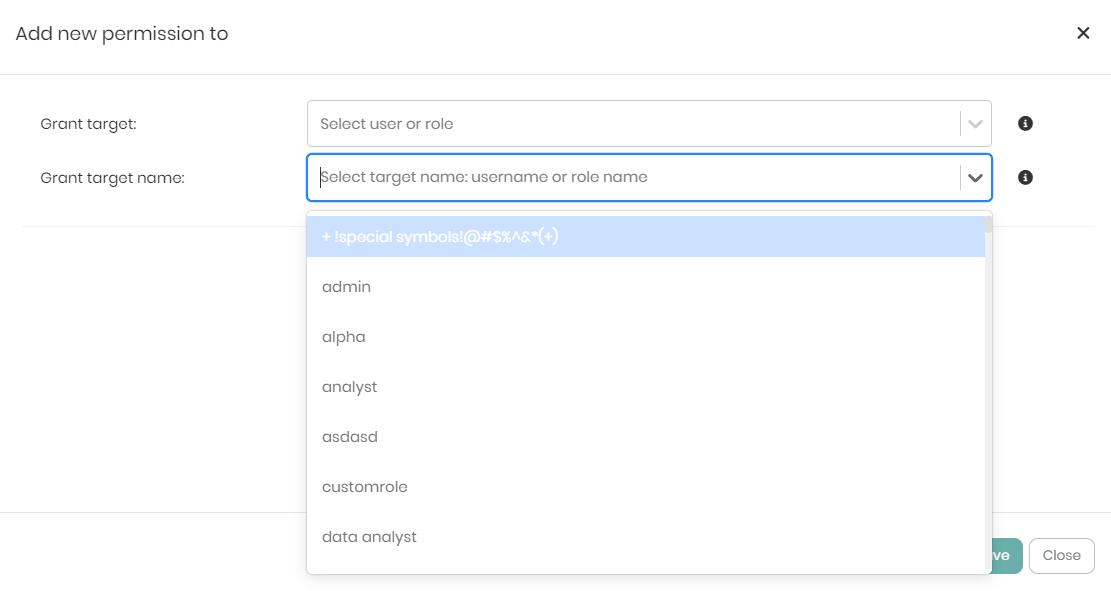
- To add Access permissions to either a user or a role, on the top right click on Add Access Permission.

In the new window that appears, there are the initial 2 dropdowns that include Grant target and Grant target name.
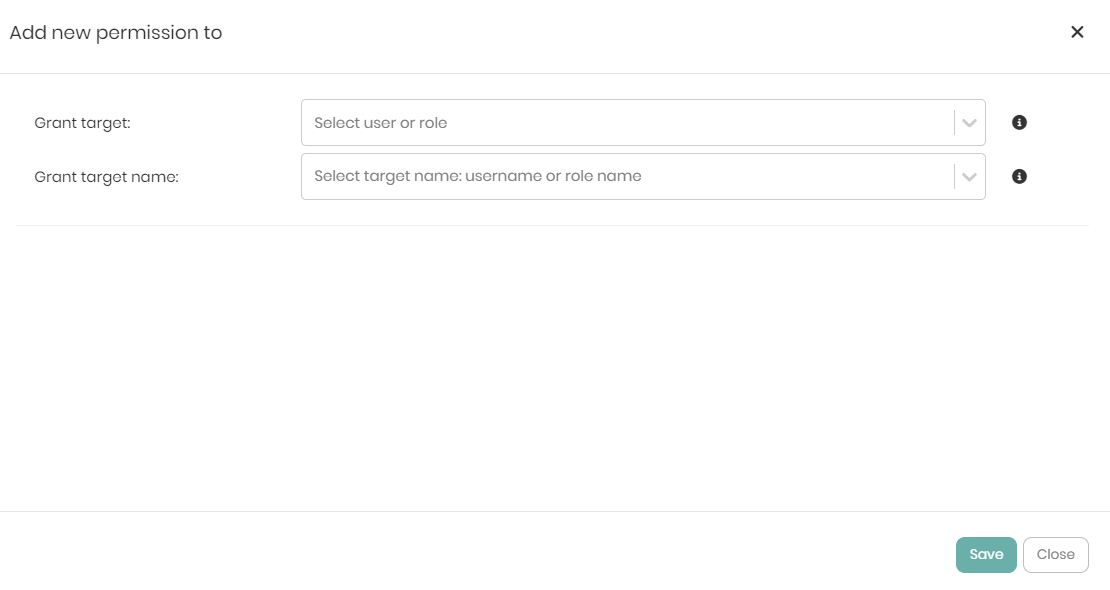
The Grant target dropdown contains 2 options which are:
- User - Whether the permission should be granted to a user.
- Role - Whether the permission should be granted to a role.
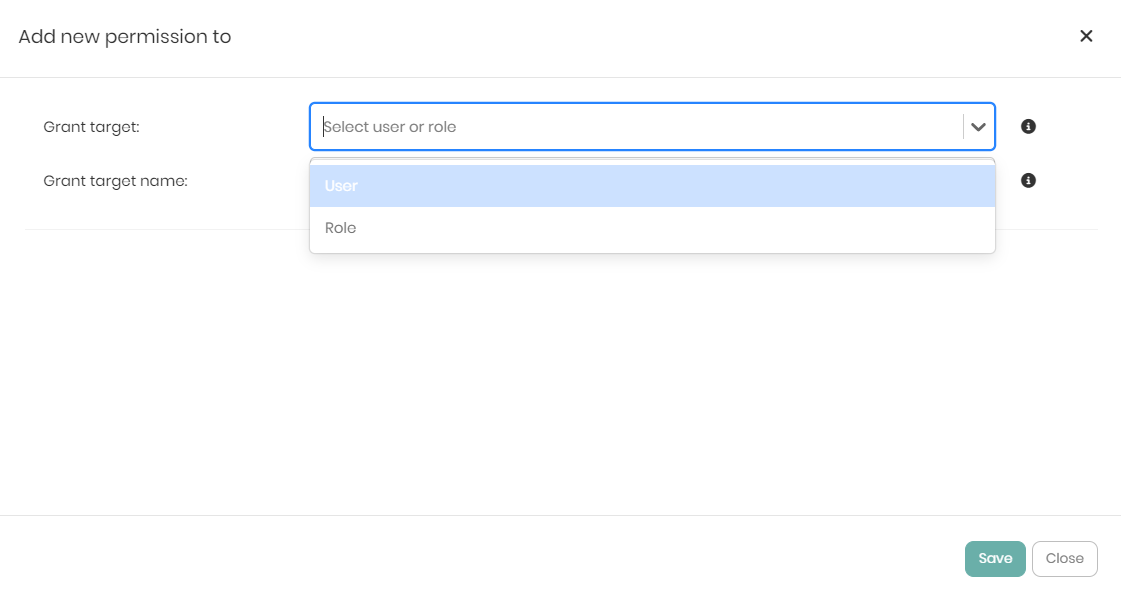
The Grant target name dropdown contains a list of all the usernames and role names in order to choose one to grant the permission to.
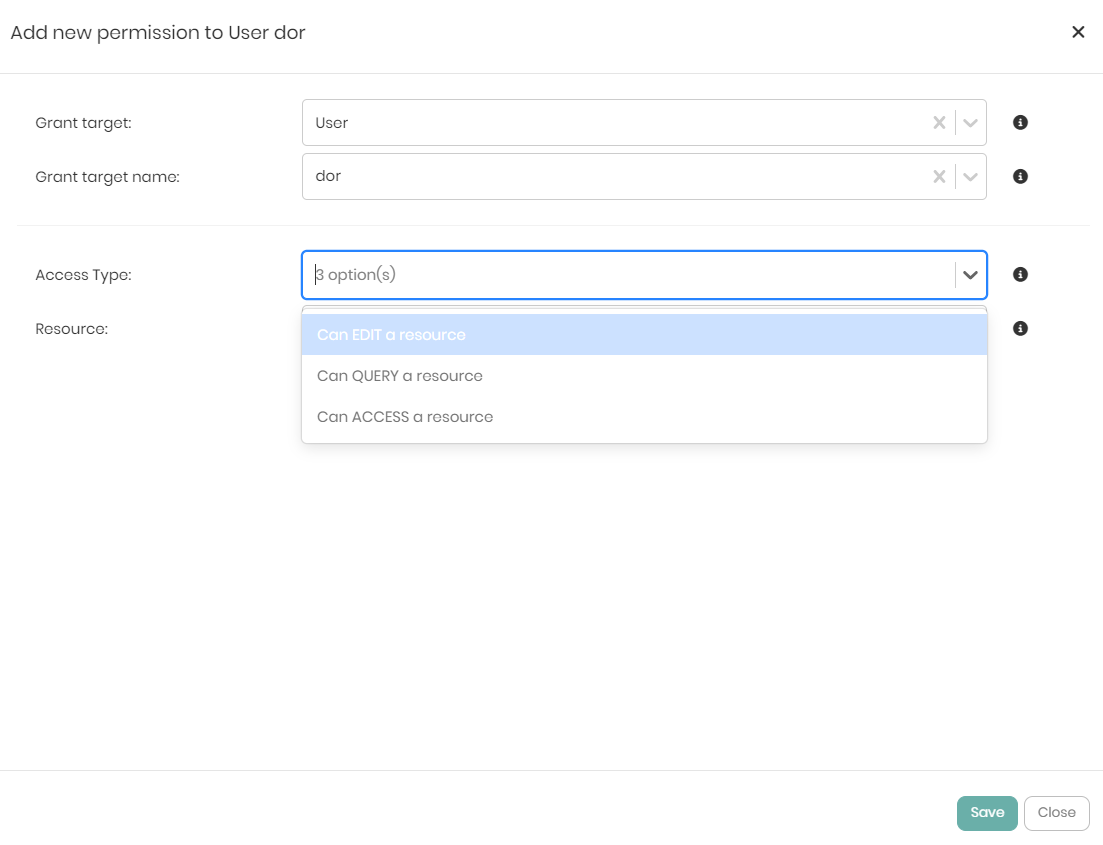
Once the Grant target and Grant target name are chosen, two additional dropdowns will appear, which are: Access Type and Resource
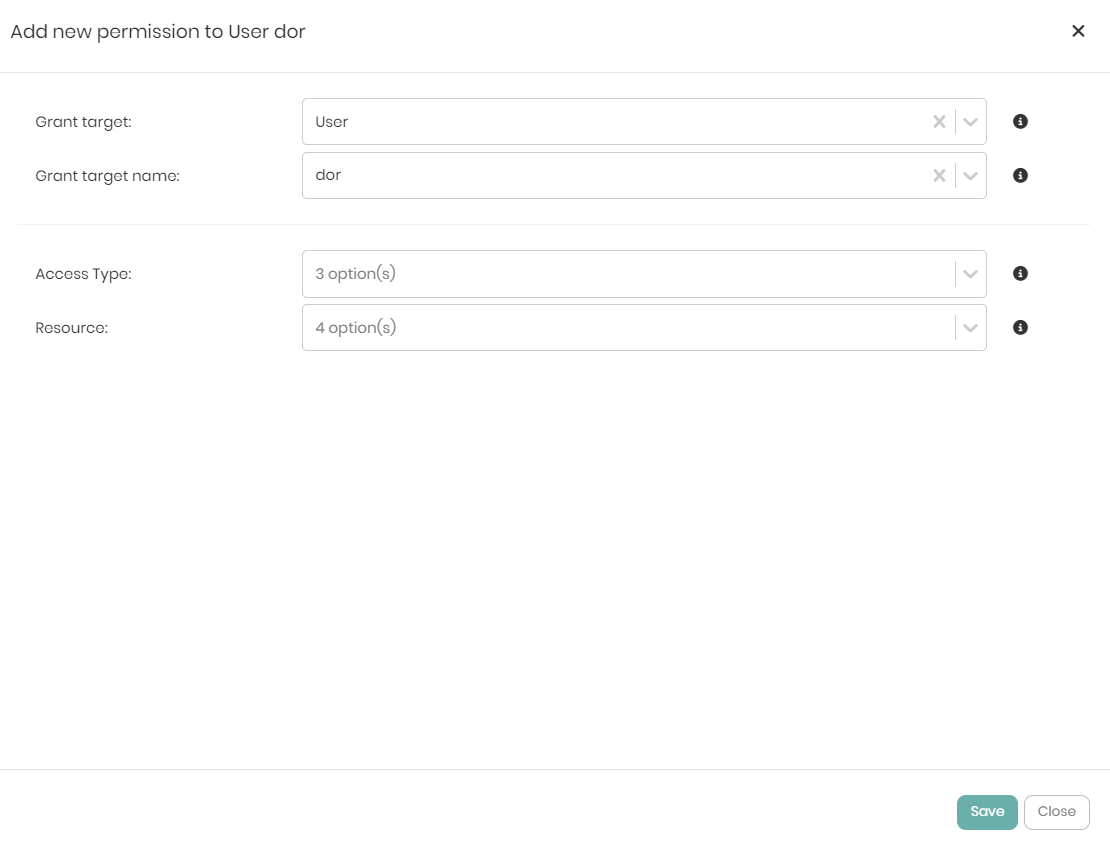
The Access Type dropdown contains 3 options which are:
- Access - Users or roles given the Access permission can only view the metadata of a chosen resource.
- Query - Users or roles given the Query permission can view the metadata and query the chosen resource.
- Edit - Users or roles given the Edit permission can create, edit or remove the chosen resource.
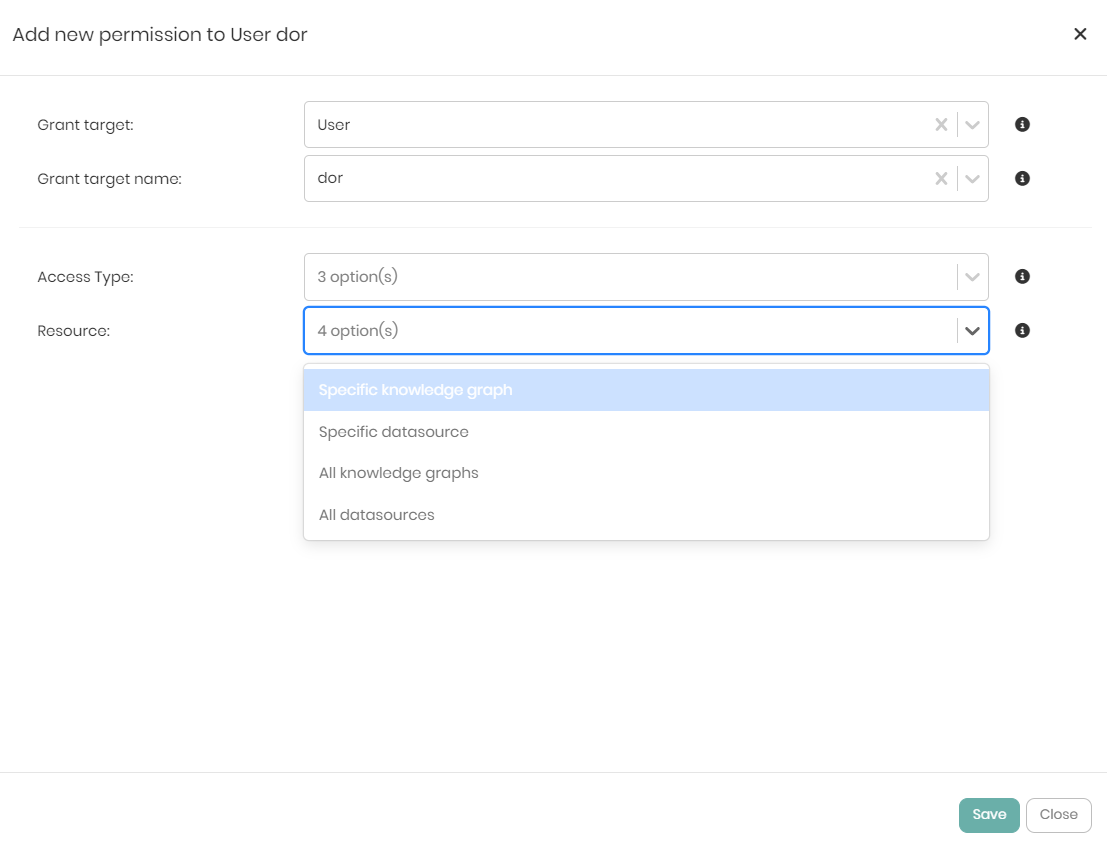
The Resource dropdown initially contains 4 options but the options change based on the first selection in the following way:
If the Access permission is given to the user or role, which is the most basic permission, then the Resource dropdown will show the following 4 options:
- Specific knowledge graph - Giving the user or role permission to view a specific knowledge graph.
- Specific datasource - Giving the user or role permission to view a specific datasource.
- All knowledge graphs - Giving the user or role permission to view all the knowledge graphs in the platform.
- All datasources - Giving the user or role permission to view all the datasources connected to the platform.
If the Query permission is given to the user or role then the Resource dropdown will show the following 6 options:
- Specific knowledge graph - Giving the user or role permission to view and query a specific knowledge graph.
- Specific datasource - Giving the user or role permission to view and query a specific datasource.
- All knowledge graphs - Giving the user or role permission to view and query all the knowledge graphs in the platform.
- All datasources - Giving the user or role permission to view and query all the datasources connected to the platform.
- View all users - Giving the user or role permission to view all users in the platform.
- View all roles - Giving the user or role permission to view all roles in the platform.
If the Edit permission is given to the user or role which includes the most advanced permissions then the Resource dropdown will show the following 12 options:
- Specific knowledge graph - Giving the user or role permission to view, edit or remove a specific knowledge graph.
- Specific datasource - Giving the user or role permission to view, edit or remove a specific datasource.
- All knowledge graphs - Giving the user or role permission to view, edit or remove all the knowledge graphs in the platform.
- Create knowledge graphs - Giving the user or role permission to create new knowledge graphs in the platform.
- All datasources - Giving the user or role permission to view, edit or remove all the datasources connected to the platform.
- Create datasources - Giving the user or role permission to create and add new datasources to the platform.
- Create new users - Giving the user or role permission to create new users in the platform.
- Edit all users - Giving the user or role permission to edit the details of all the users in the platform.
- Edit a specific user - Giving the user or role permission to edit a specific user in the platform.
- Create new roles - Giving the user or role permission to create new roles in the platform.
- Edit all roles - Giving the user or role permission to edit all roles in the platform.
- Edit a specific role - Giving the user or role permission to edit a specific role in the platform.
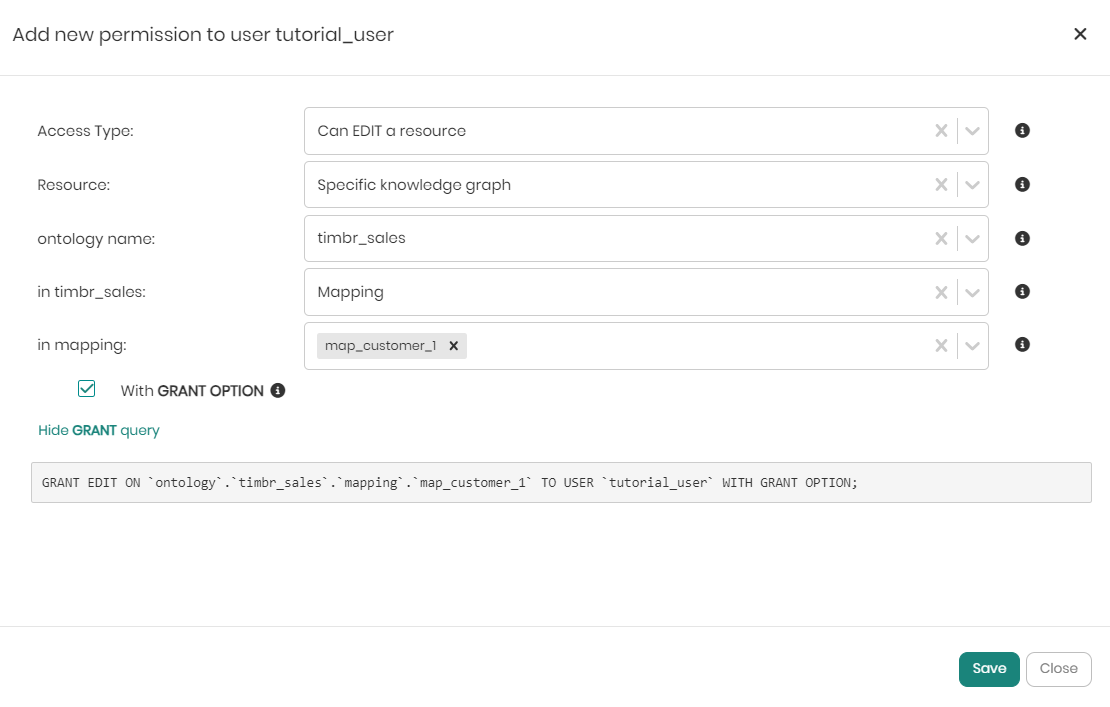
Notice that for the Edit permission only, there is a checkbox called with Grant Option that hands the specific user or role the ability to grant and revoke permissions from other users or roles in the scope of the permission.
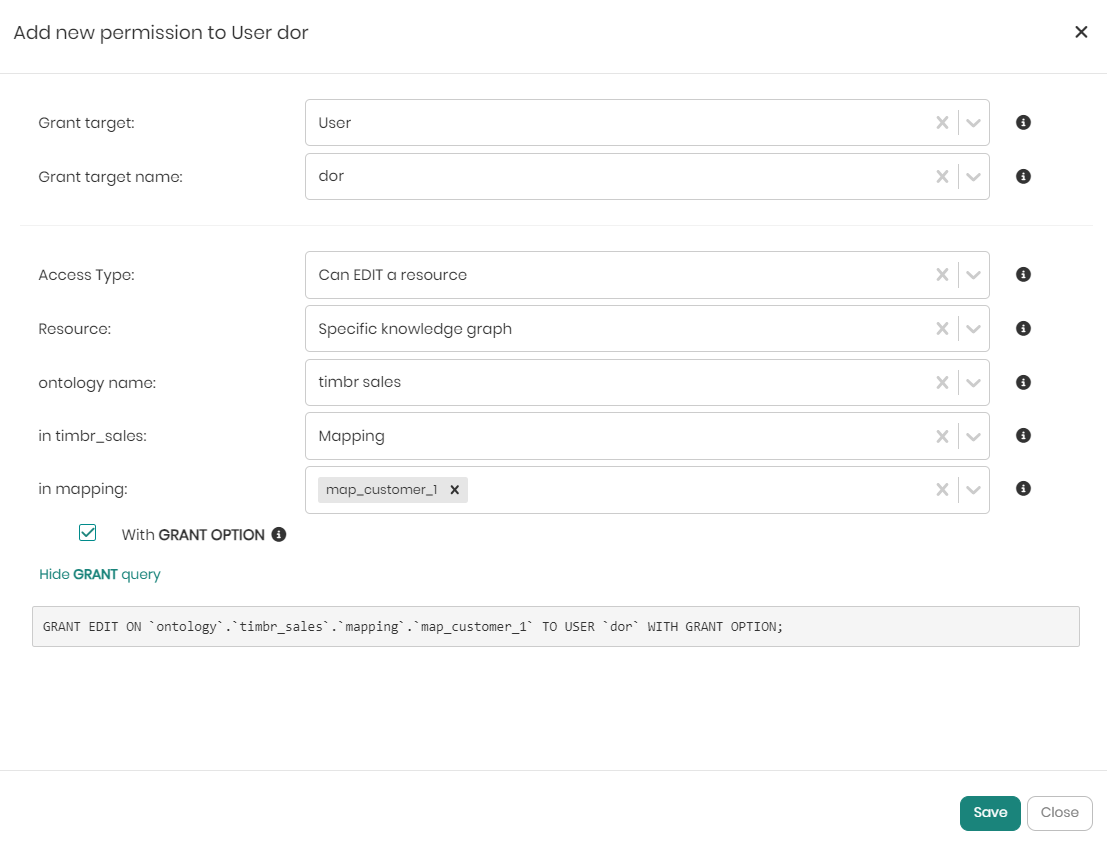
When the Access Type and Resource dropdowns are chosen, depending on the choices different dropdowns will appear to drill down to the intended selection. Once the dropdowns are chosen all that's left is to click on Save at the bottom right of the window. If before saving you would like to see the SQL syntax behind the grant query defining the permission, you can click on Show GRANT query beneath the with GRANT Option checkbox.
All the access permissions for both users and roles can also be granted or revoked using SQL.
Adding and Editing Datasource Access Permissions
Similar to adding and editing knowledge graph access permissions in the previous section, datasource access permissions follow the same flow.
- In the main Access Manager page switch from the default Users tab to the Datasources tab.

You will now see all the different datasources that exist including their: Name, date of creation, user who created the datasource, and the datasource type.
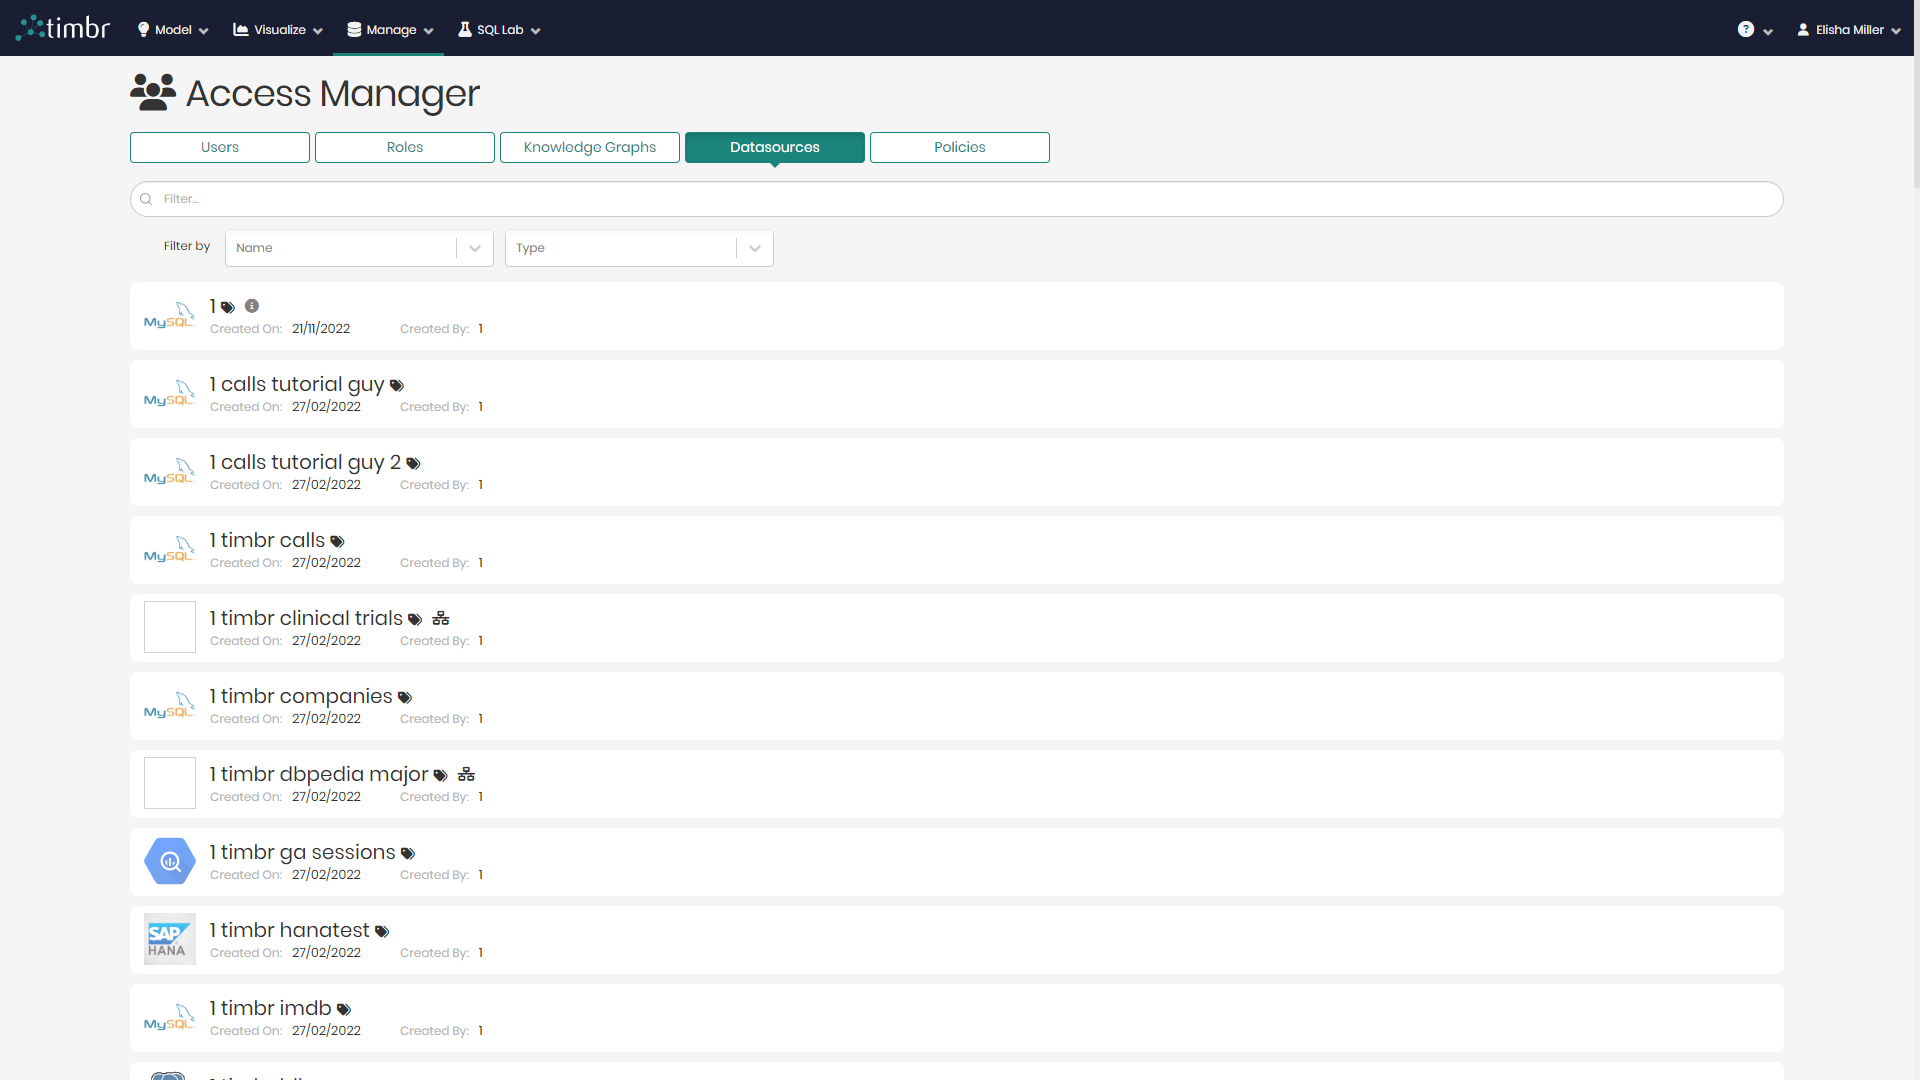
- To add or edit a datasources access permissions, simply click on the relevant datasource.
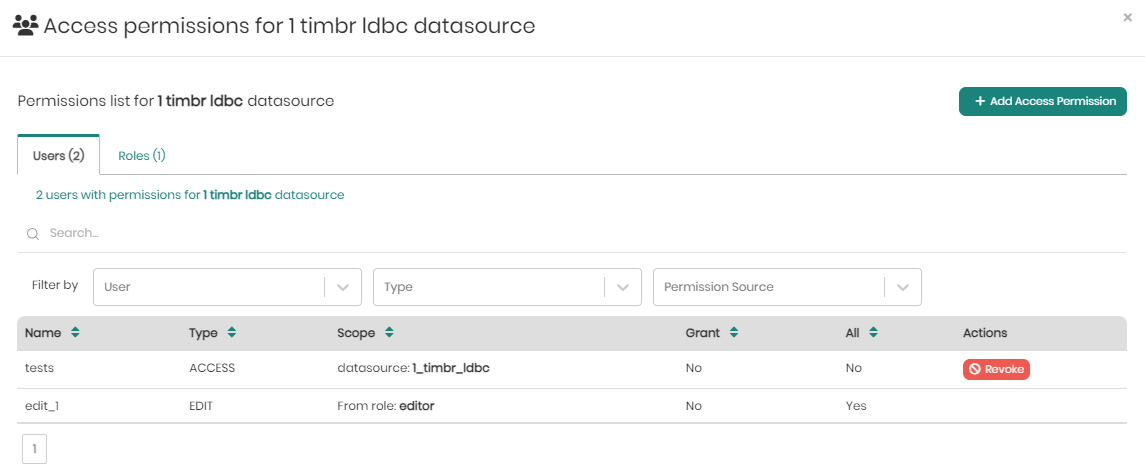
Once clicked a window will slide in with all the existing user permissions for the selected datasource in one tab, and all the existing role permissions for the selected datasource in the other tab.
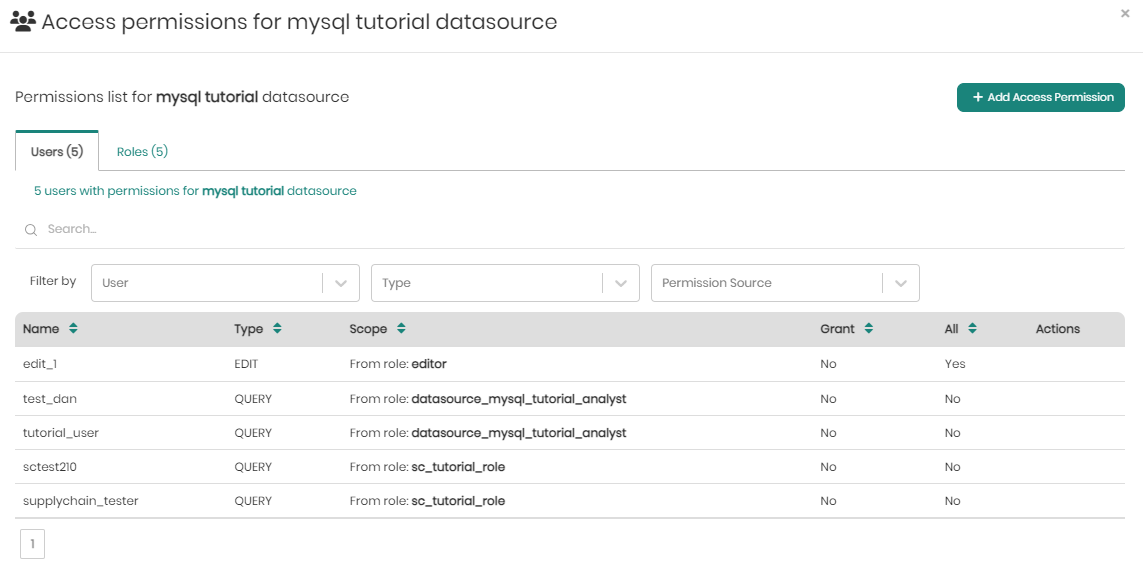
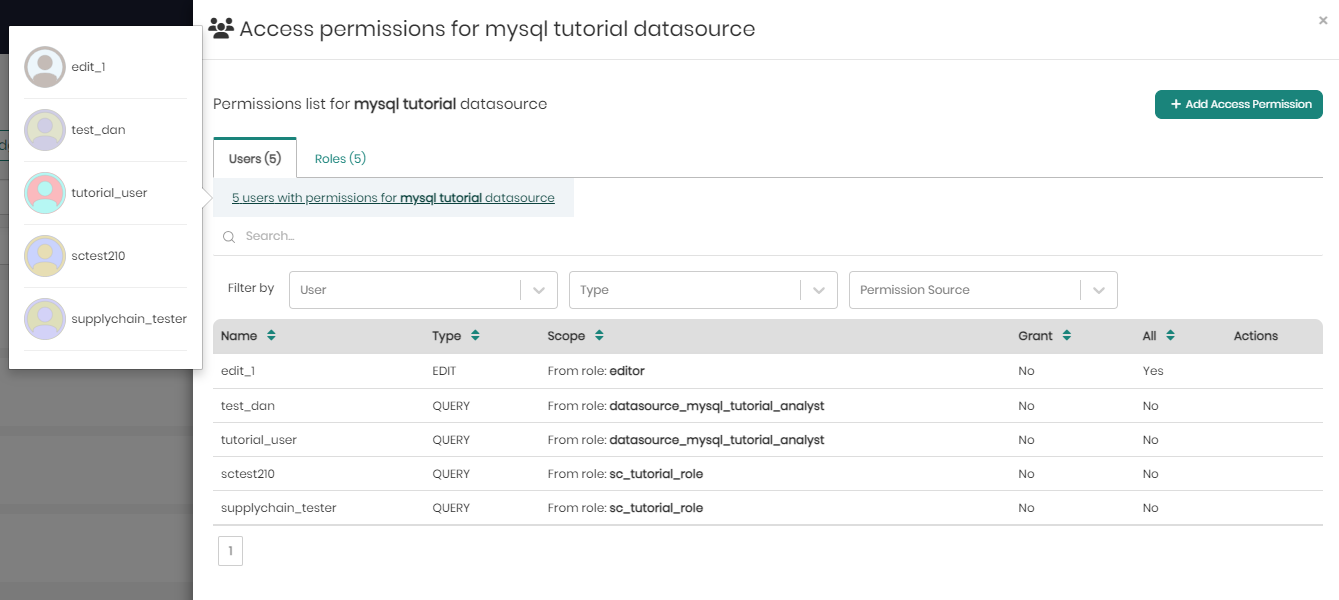
In the users tab, right beneath the tab itself, users can hover over the number of users and see the full list of users.
Beneath that, users can search for specific permissions in the search bar, as well as in the filters which include filter by: User, Type, and Permission Source.
Under the search and filters is the list of user permissions for the selected datasource with the following fields:
Name - The name of the user.
Type - The type of permission. Either Access, Query, or Edit.
Scope - The scope of the user permission for the selected datasource.
Grant - Indicates whether or not the permission conatins granting permissions.
All - Indicates whether the permission applies to all datasets or tables within the datasource ("Yes") or is limited to a specific dataset or table ("No"), as defined in the "Scope" column.
Actions - Provides the "Revoke" button, which allows administrators to remove the associated permission from the user, instantly revoking the specified access rights for the defined scope.
In the roles tab, right beneath the tab itself, users can hover over the number of roles and see the full list of roles.

Beneath that, users can search for specific permissions in the search bar, as well as in the filters which include filter by: Role and Type.
Under the search and filters is the list of role permissions for the selected datasource with the following fields:
Name - The name of the role.
Type - The type of permission. Either Access, Query, or Edit.
Scope - The scope of the role permission for the selected datasource.
Grant - Indicates whether or not the permission conatins granting permissions.
All - Indicates whether the permission applies to all datasets or tables within the datasource ("Yes") or is limited to a specific dataset or table ("No"), as defined in the "Scope" column.
Assigned Users - Shows the number of users assigned to each role. When hovering over the assigned users in each row, the list of users will appear.
Actions - Provides the "Revoke" button, which allows administrators to remove the associated permission from a role, instantly revoking the specified access rights for the defined scope.
- To add Access permissions to either a user or a role, on the top right click on Add Access Permission.
In the new window that appears, there are the initial 2 dropdowns that include Grant target and Grant target name.
The Grant target dropdown contains 2 options which are:
- User - Whether the permission should be granted to a user.
- Role - Whether the permission should be granted to a role.
The Grant target name dropdown contains a list of all the usernames and role names in order to choose one to grant the permission to.
Once the Grant target and Grant target name are chosen, two additional dropdowns will appear, which are: Access Type and Resource
The Access Type dropdown contains 3 options which are:
- Access - Users or roles given the Access permission can only view the metadata of a chosen resource.
- Query - Users or roles given the Query permission can view the metadata and query the chosen resource.
- Edit - Users or roles given the Edit permission can create, edit or remove the chosen resource.
The Resource dropdown initially contains 4 options but the options change based on the first selection in the following way:
If the Access permission is given to the user or role, which is the most basic permission, then the Resource dropdown will show the following 4 options:
- Specific knowledge graph - Giving the user or role permission to view a specific knowledge graph.
- Specific datasource - Giving the user or role permission to view a specific datasource.
- All knowledge graphs - Giving the user or role permission to view all the knowledge graphs in the platform.
- All datasources - Giving the user or role permission to view all the datasources connected to the platform.
If the Query permission is given to the user or role then the Resource dropdown will show the following 6 options:
- Specific knowledge graph - Giving the user or role permission to view and query a specific knowledge graph.
- Specific datasource - Giving the user or role permission to view and query a specific datasource.
- All knowledge graphs - Giving the user or role permission to view and query all the knowledge graphs in the platform.
- All datasources - Giving the user or role permission to view and query all the datasources connected to the platform.
- View all users - Giving the user or role permission to view all users in the platform.
- View all roles - Giving the user or role permission to view all roles in the platform.
If the Edit permission is given to the user or role which includes the most advanced permissions then the Resource dropdown will show the following 12 options:
- Specific knowledge graph - Giving the user or role permission to view, edit or remove a specific knowledge graph.
- Specific datasource - Giving the user or role permission to view, edit or remove a specific datasource.
- All knowledge graphs - Giving the user or role permission to view, edit or remove all the knowledge graphs in the platform.
- Create knowledge graphs - Giving the user or role permission to create new knowledge graphs in the platform.
- All datasources - Giving the user or role permission to view, edit or remove all the datasources connected to the platform.
- Create datasources - Giving the user or role permission to create and add new datasources to the platform.
- Create new users - Giving the user or role permission to create new users in the platform.
- Edit all users - Giving the user or role permission to edit the details of all the users in the platform.
- Edit a specific user - Giving the user or role permission to edit a specific user in the platform.
- Create new roles - Giving the user or role permission to create new roles in the platform.
- Edit all roles - Giving the user or role permission to edit all roles in the platform.
- Edit a specific role - Giving the user or role permission to edit a specific role in the platform.
Notice that for the Edit permission only, there is a checkbox called with Grant Option that hands the specific user or role the ability to grant and revoke permissions from other users or roles in the scope of the permission.
When the Access Type and Resource dropdowns are chosen, depending on the choices different dropdowns will appear to drill down to the intended selection. Once the dropdowns are chosen all that's left is to click on Save at the bottom right of the window. If before saving you would like to see the SQL syntax behind the grant query defining the permission, you can click on Show GRANT query beneath the with GRANT Option checkbox.
All the access permissions for both users and roles can also be granted or revoked using SQL.
Creating User Policies
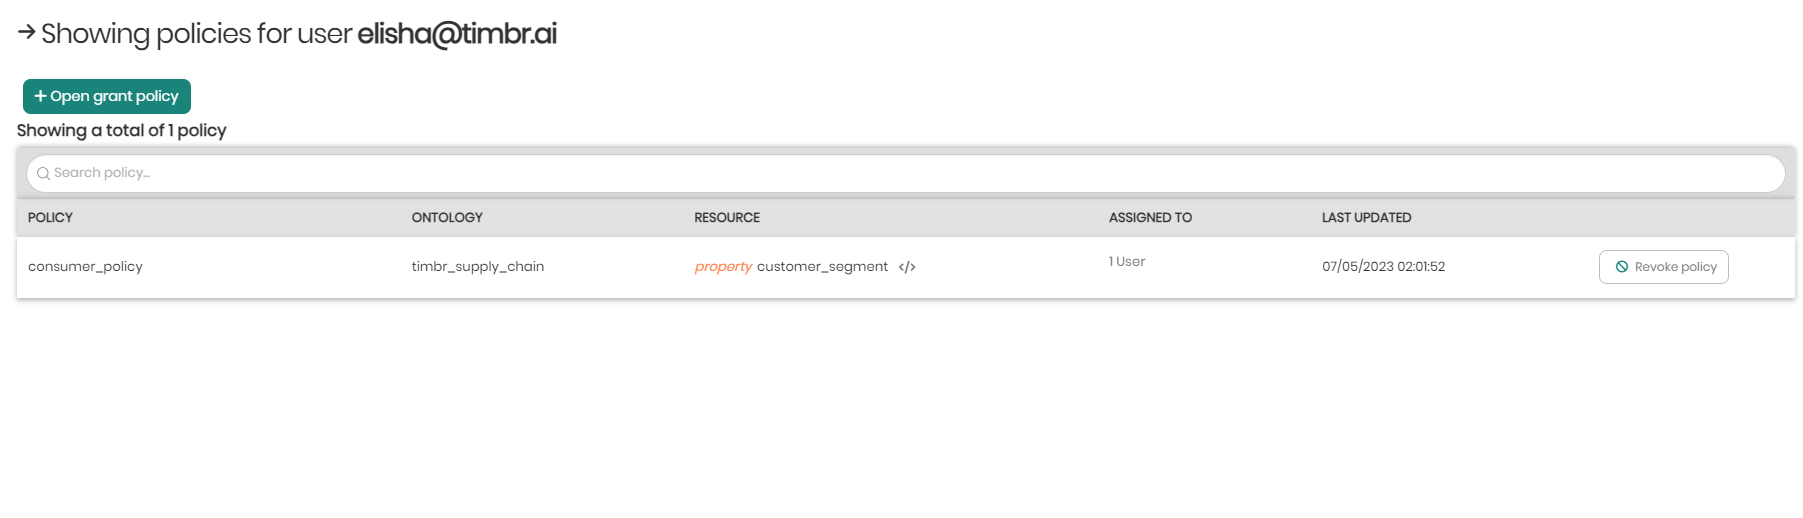
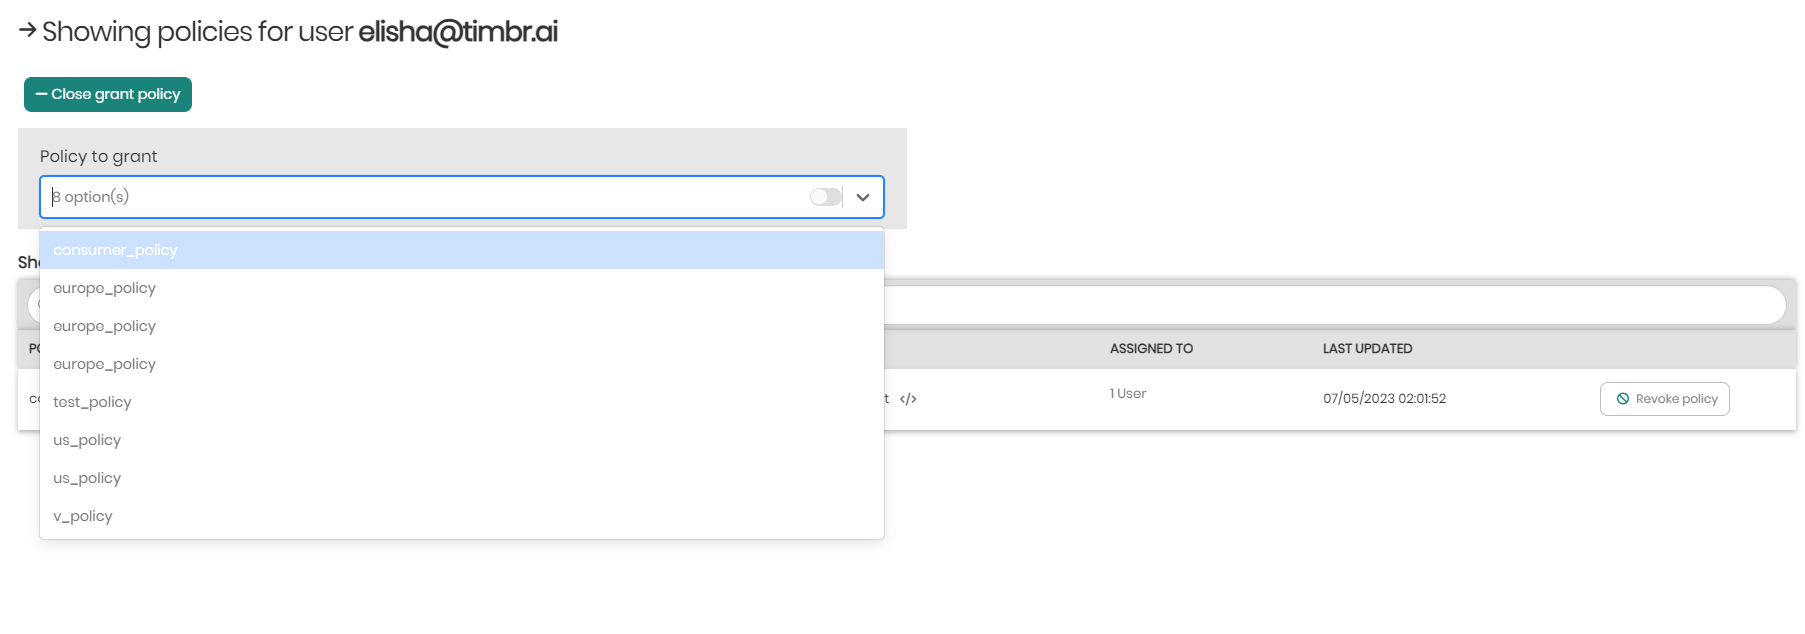
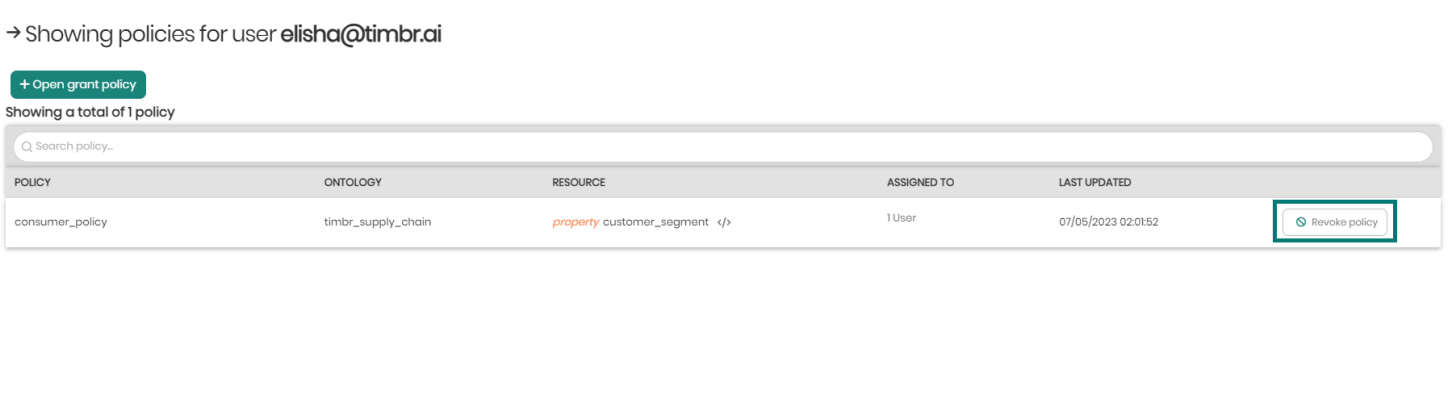
- In the main Access Manager page switch from the default Users tab to the Policies tab.

You will now see all the different policies that exist including their: Name, Ontology, Resource, Assigned Users, and Last Activity.
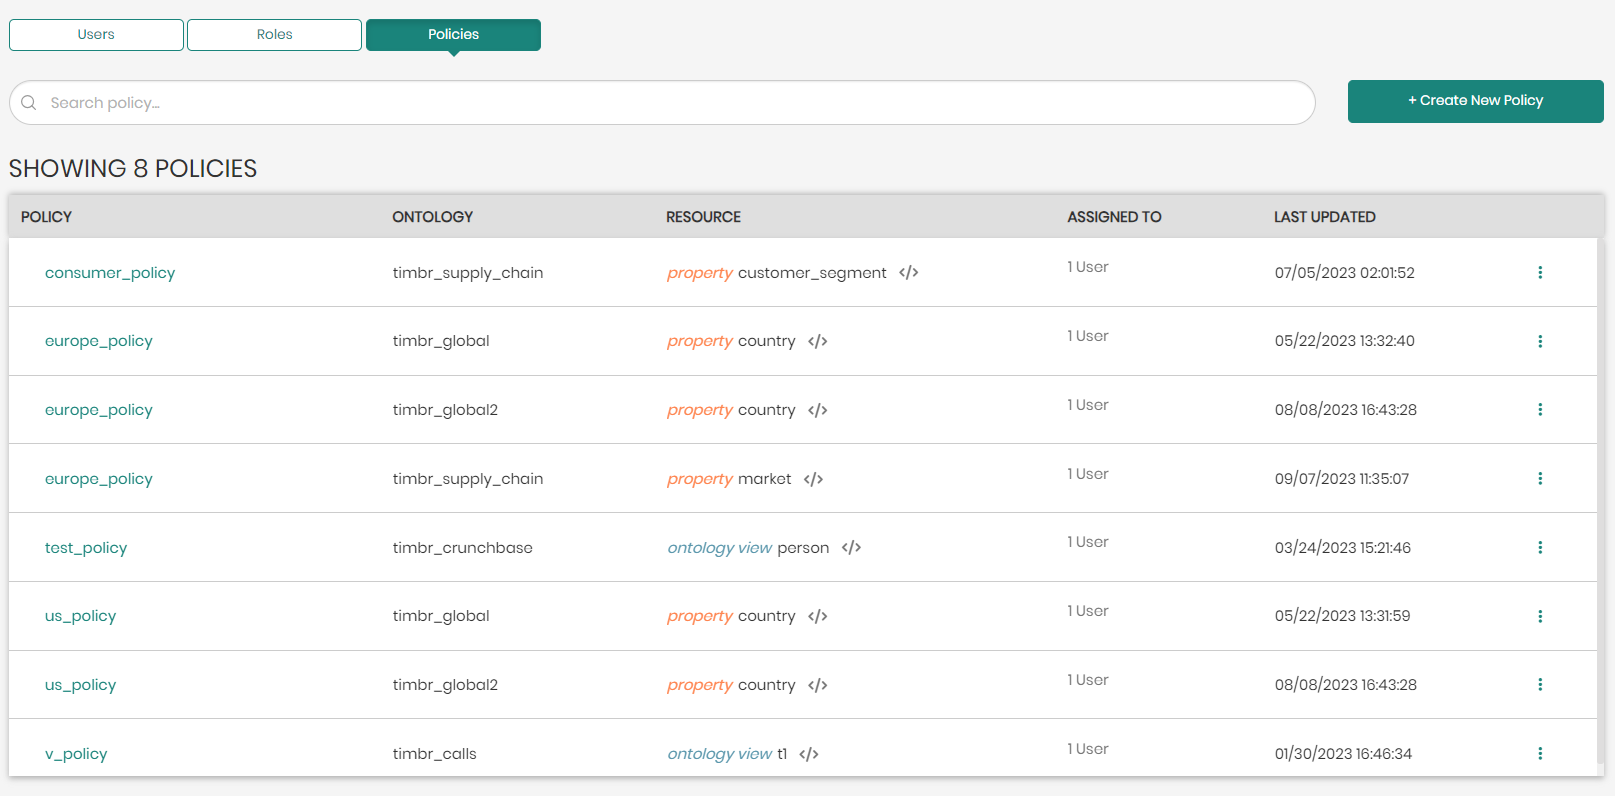
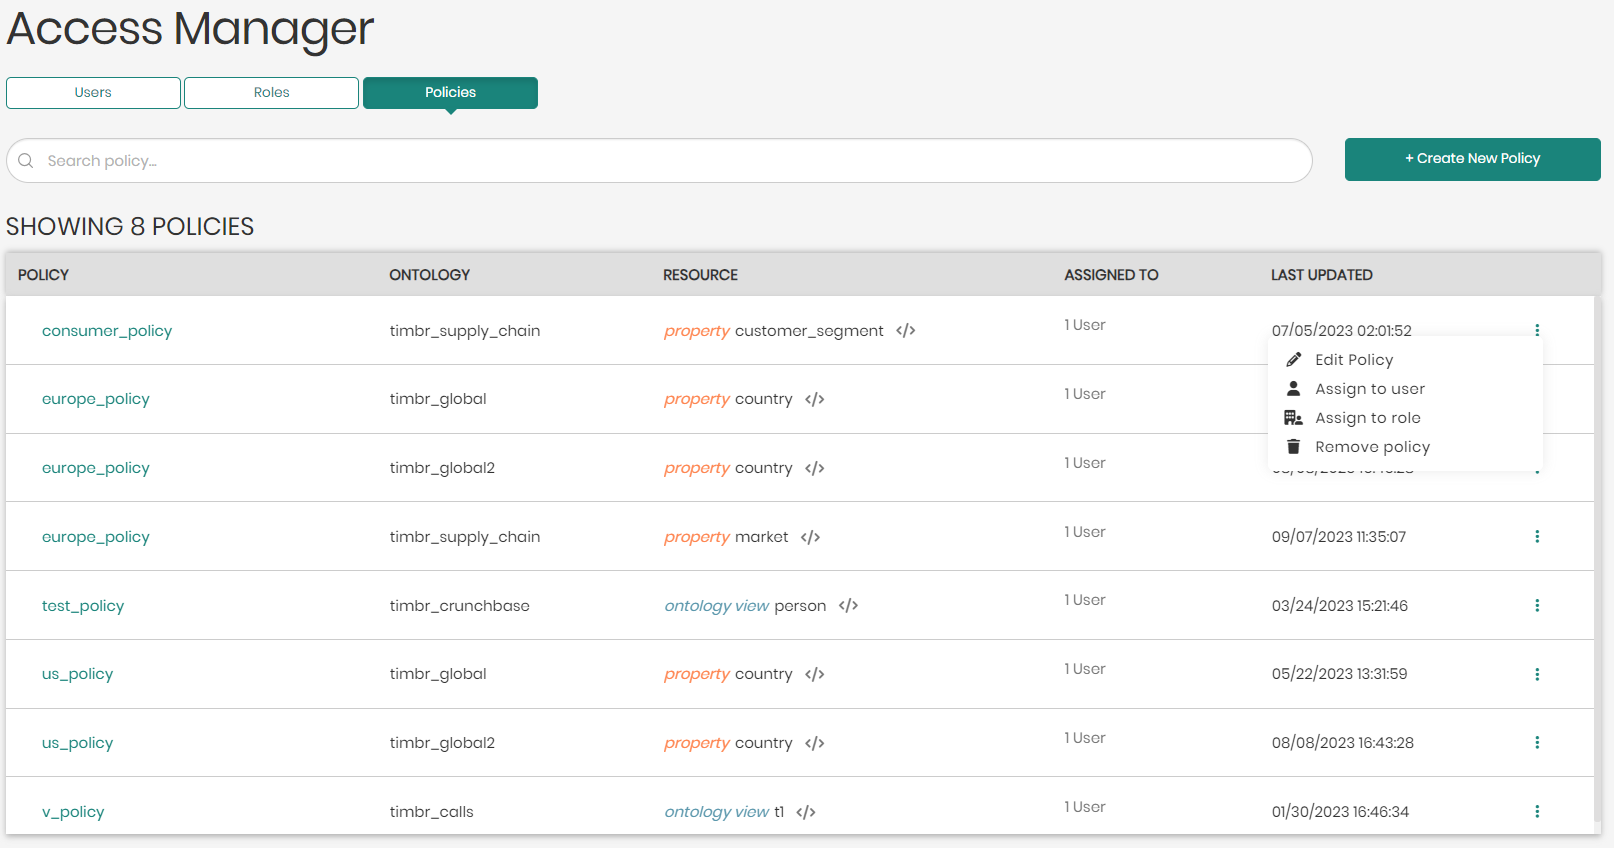
To the right of each policy is a button with 3 dots that opens a menu with the following options:
Edit Policy - Enables users to edit the selected policy.
Assign to user - Enables admins to assign the selected policy to a user of their choice.
Assign to role - Enables admins to assign the selected policy to a role of their choice.
Remove Policy - Removes and deletes the selected policy.
- Above the list of policies on the top right click on Create New Policy.

- Once clicked, you will be asked to fill out the following policy information:
Policy Name - A name for the policy.
Knowledge Graph - The knowledge graph we want the policy to take effect on.
Resource Type - The resource type of the policy, being either a concept, mapping, property, or view.
Resource Name - The resource name based on the resource type that was chosen.
Security policy rule - An SQL statement representing the policy.
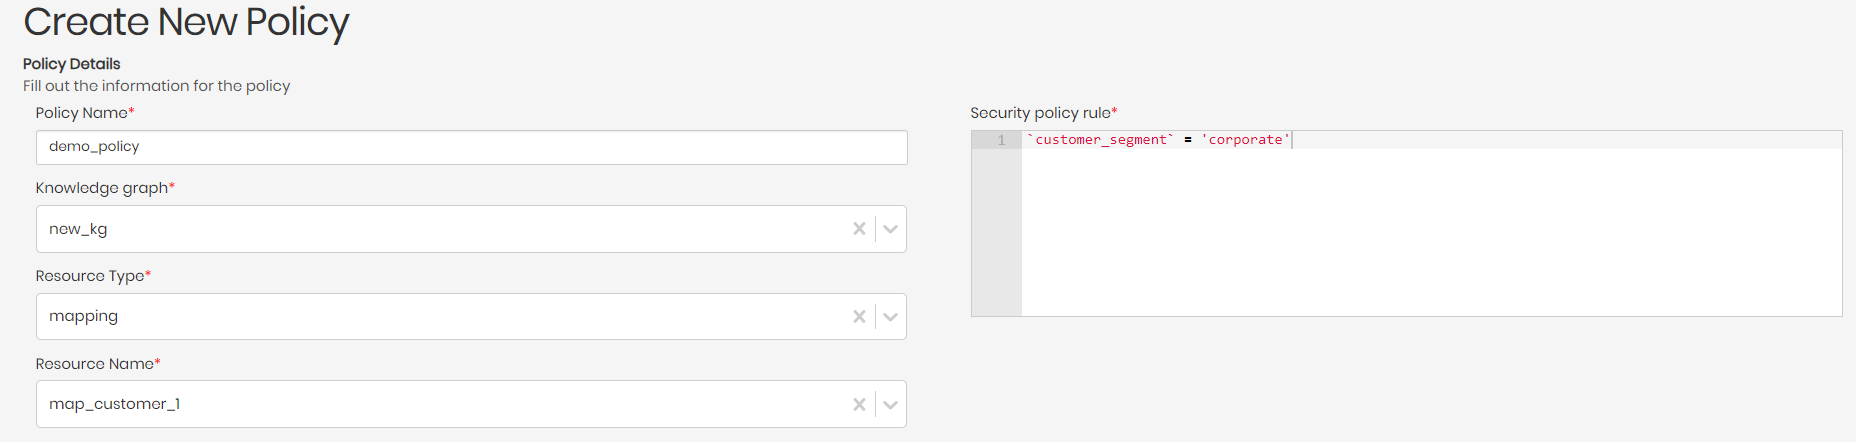
Once the new policy information is inserted, the policy can now be added by clicking on Add New Policy on the bottom right of the screen.

Adding and Editing User Access Permissions
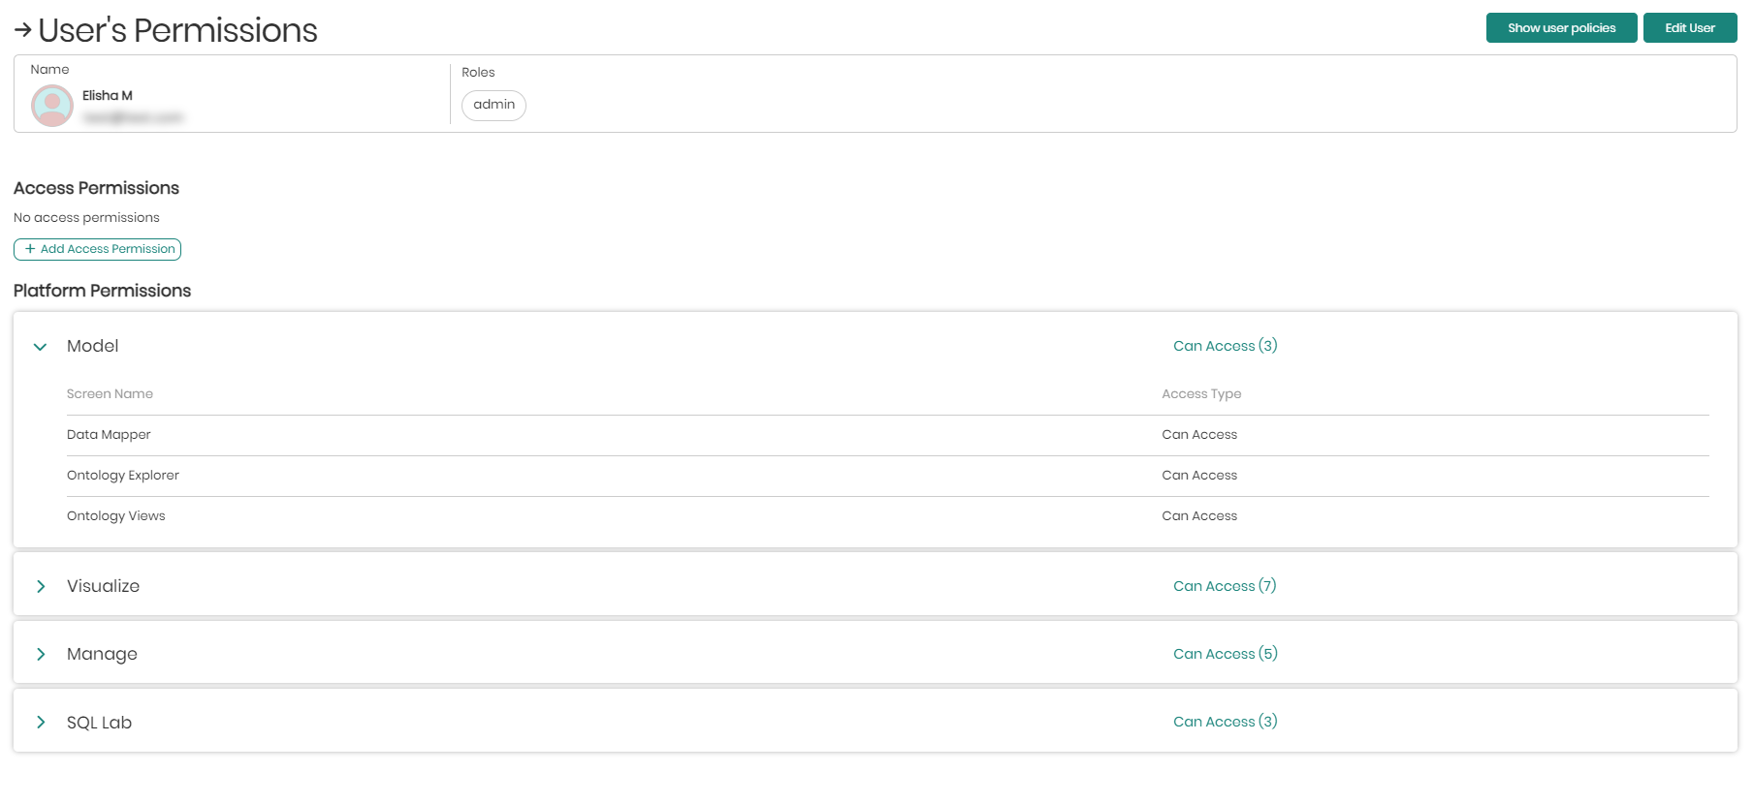
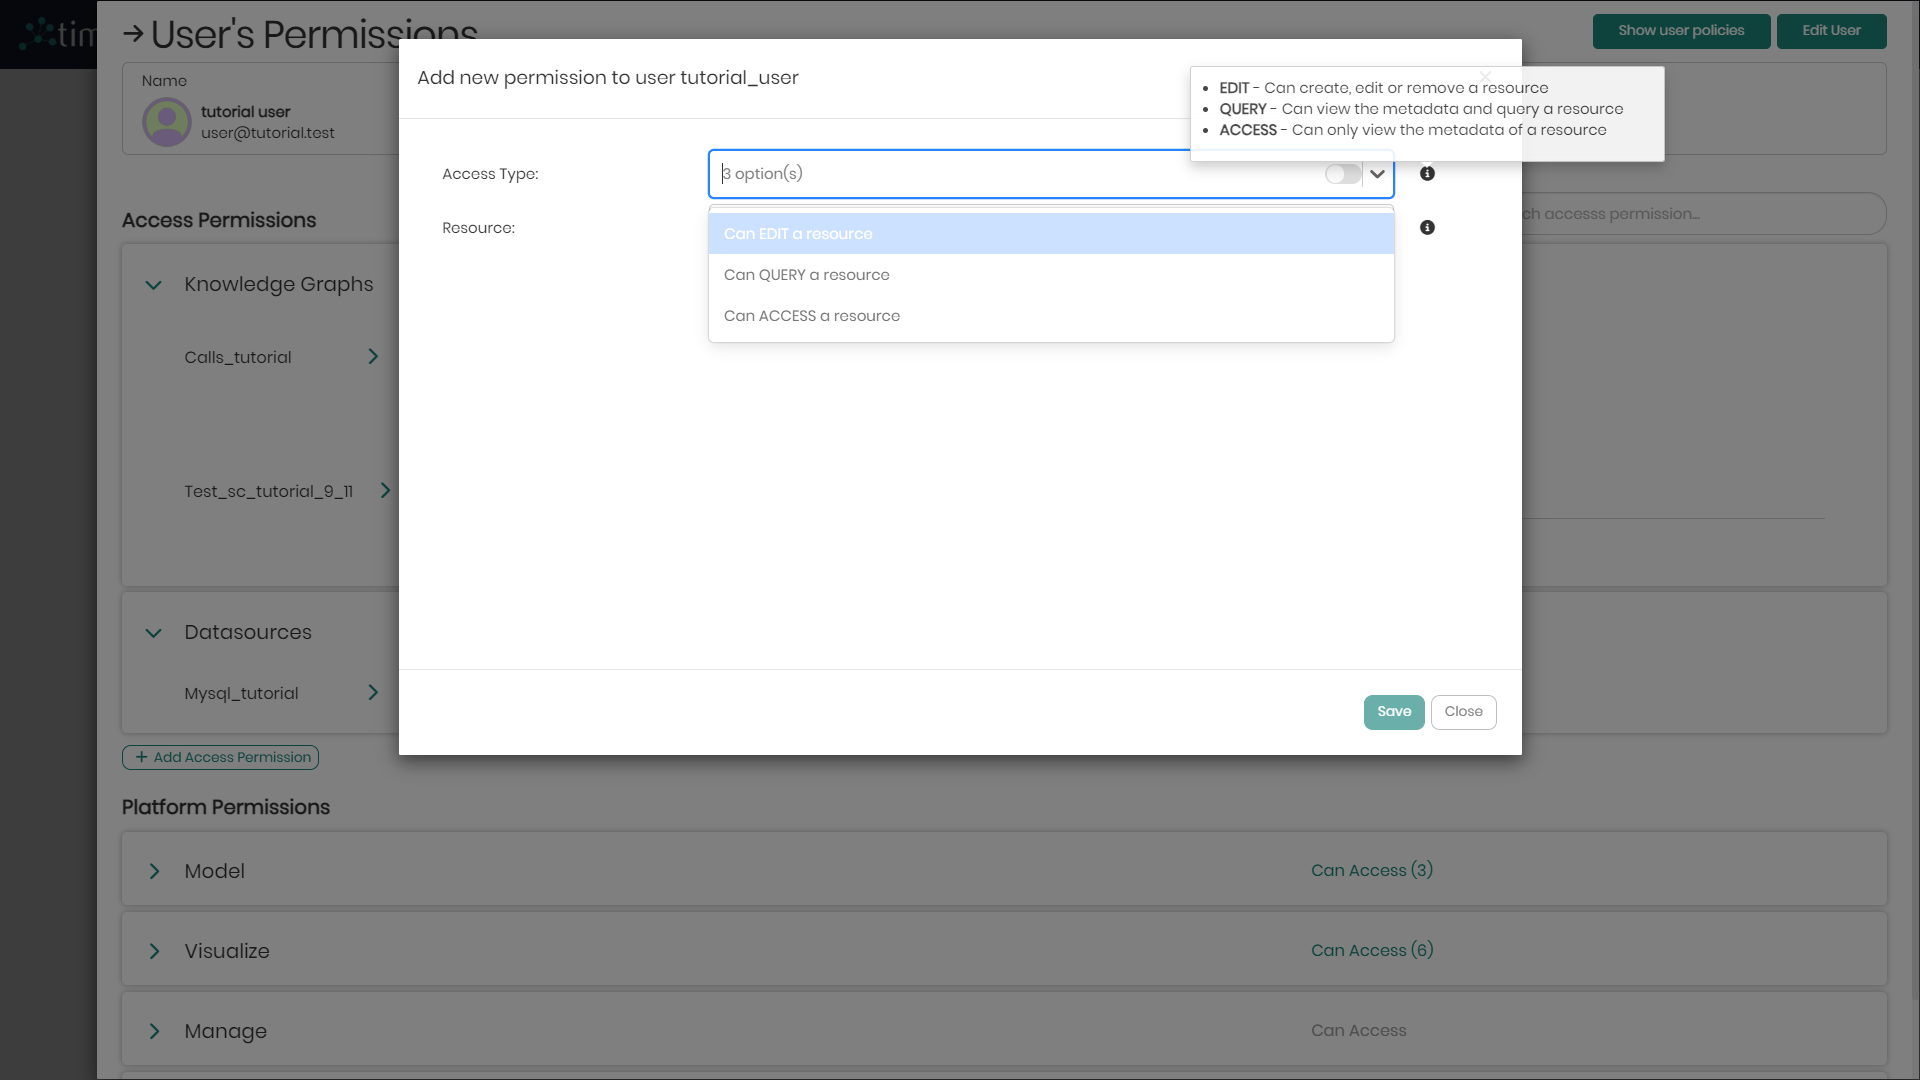
As mentioned above, a user's access permissions can be accessed and viewed in the Users tab to the right of each user by clicking on View Permissions.

In the window that appears, on top will be the user's name and roles. Each user role can be accessed and edited by clicking on the role name.

Please notice that when editing a role, it won't only affect the specific user you are trying to edit the role for, but will affect all users who were assigned that role.
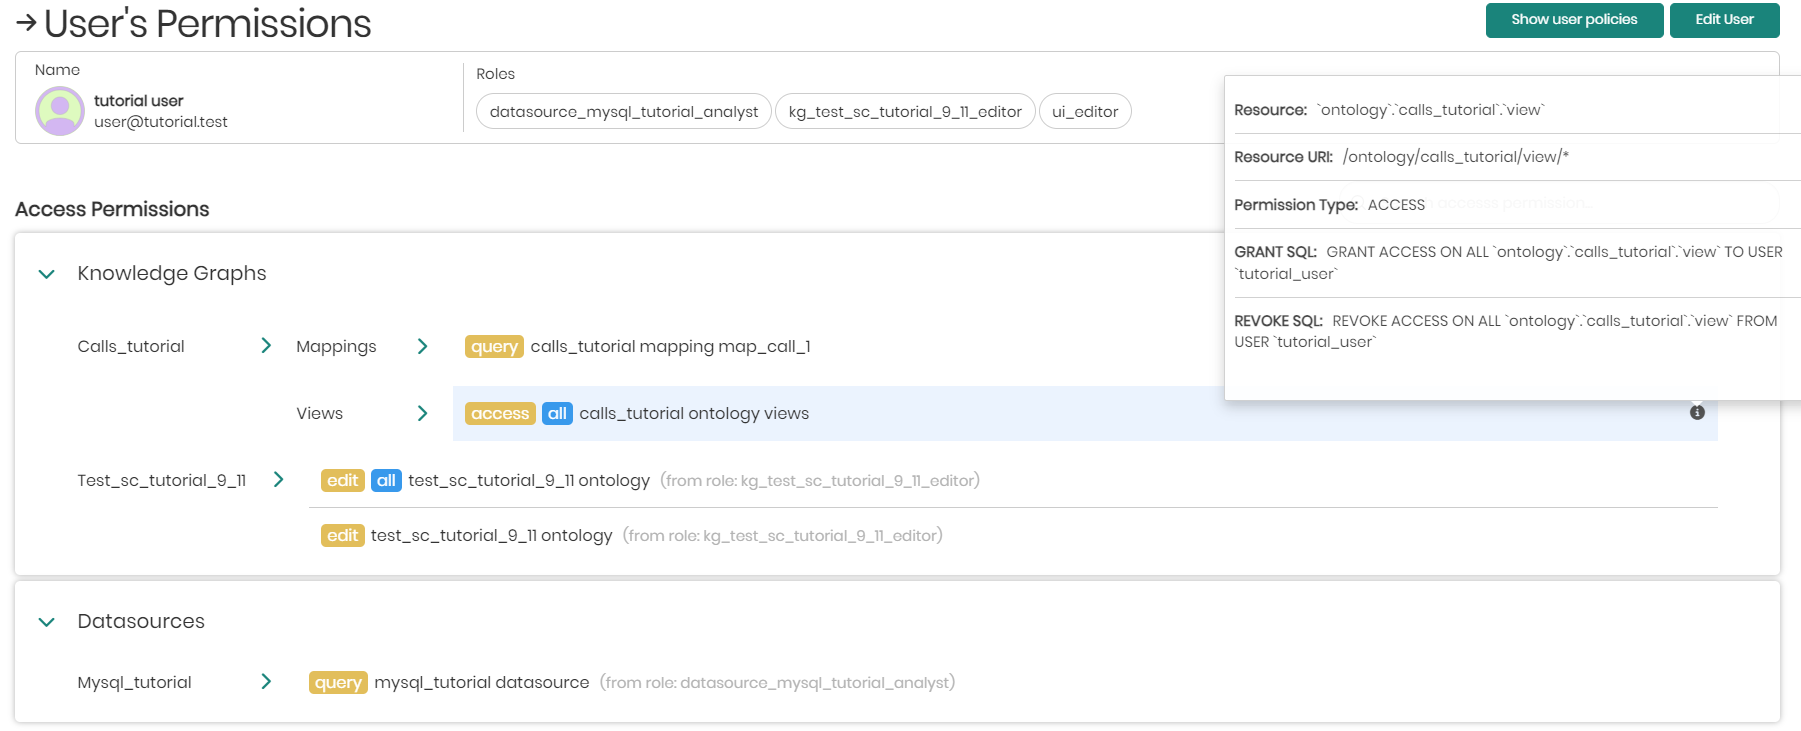
Under the selected user's name and roles, will be the user's access permissions which define what a user can see in the platform. Existing permissions given to a specific user will have 3 options when hovering over the permission, which include: Revoke, Copy Grant Query, and Information.
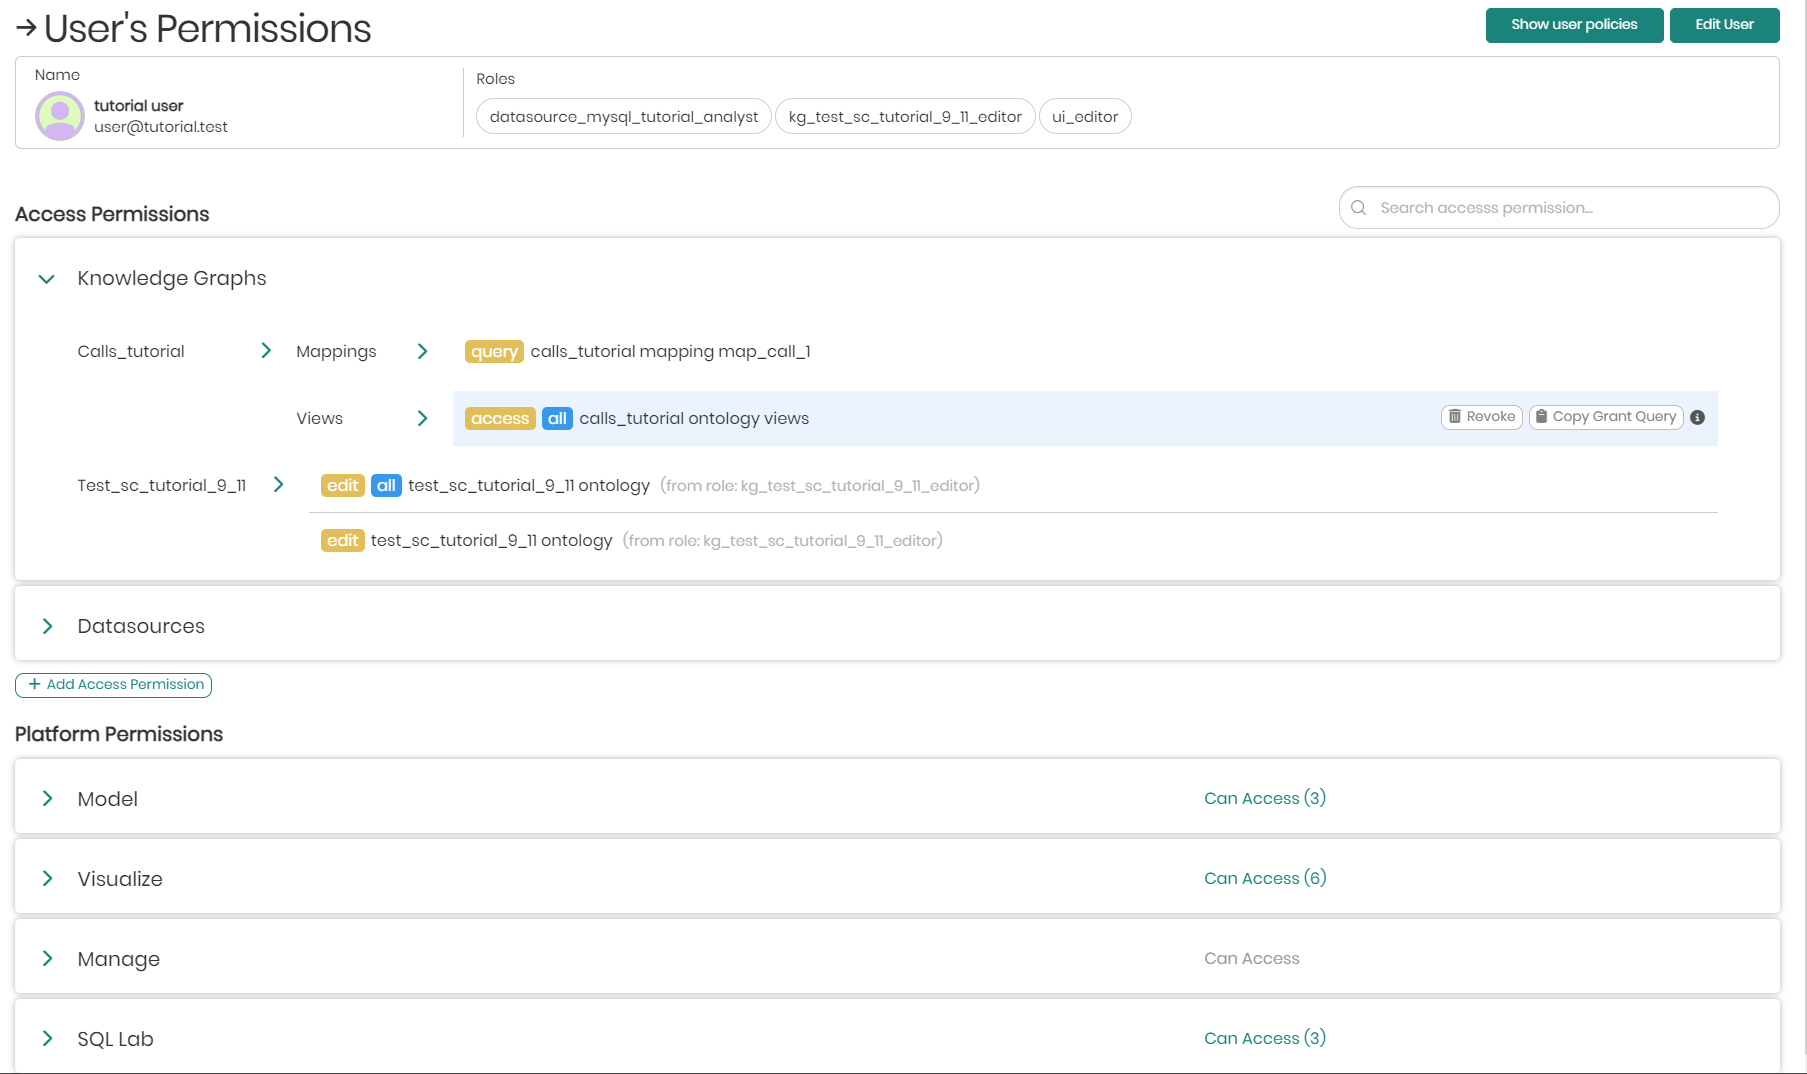
Revoke - Revokes the specific access given to the user.
Please notice that only permissions that were assigned to the specific user can be revoked from here. When a user is added to a role, revoking the permission is done by removing the user from the role he was assigned to through the roles tab.
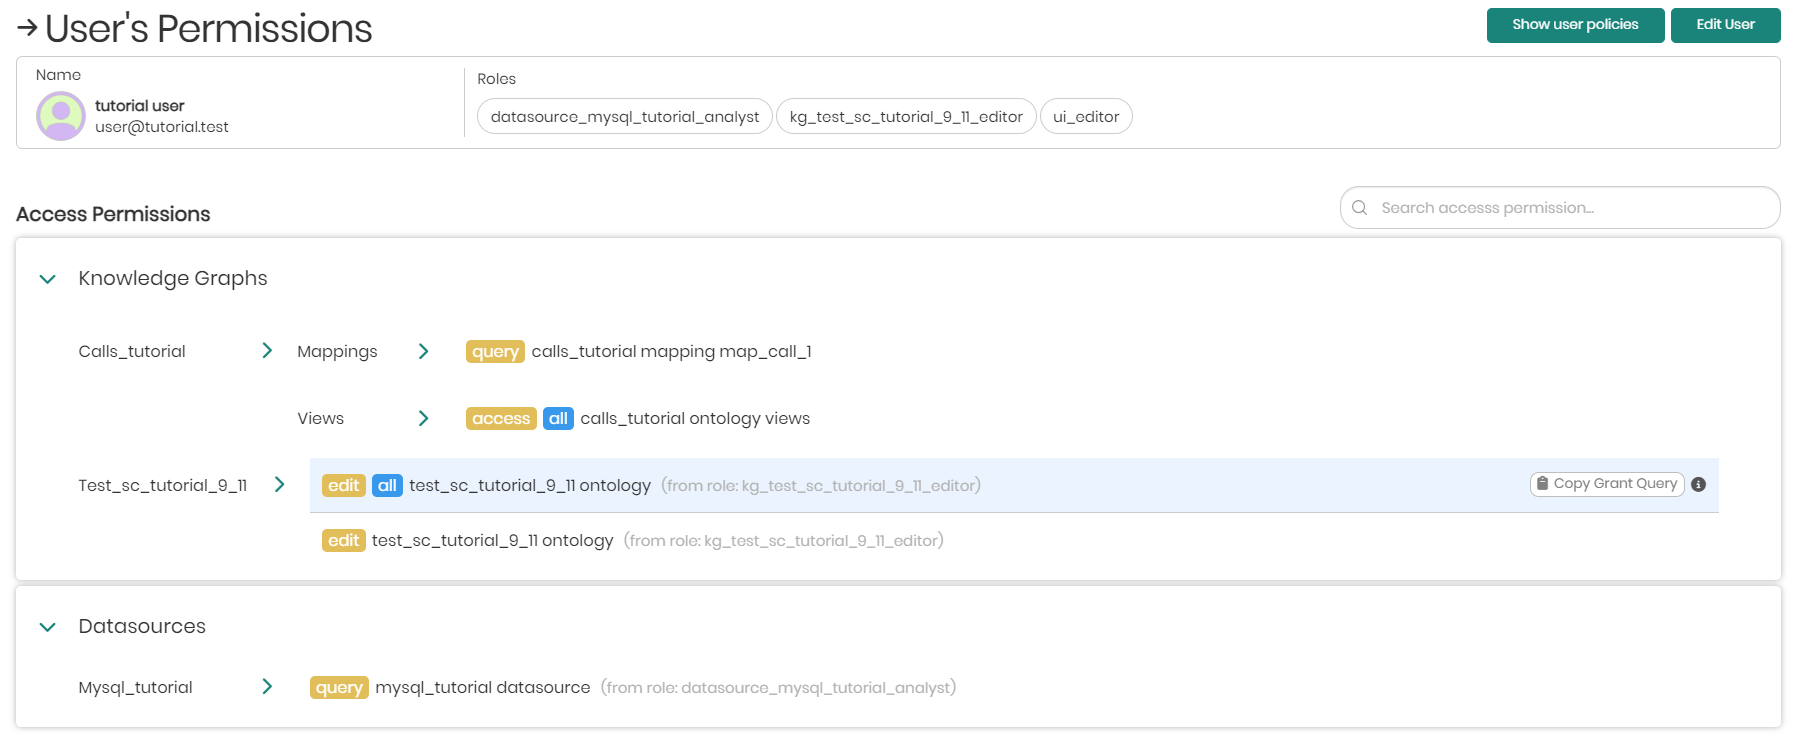
Copy Grant Query - Copies the permissions SQL Grant query to the clipboard.
Information - When Information is hovered over, it will show all the information of the specific permission.
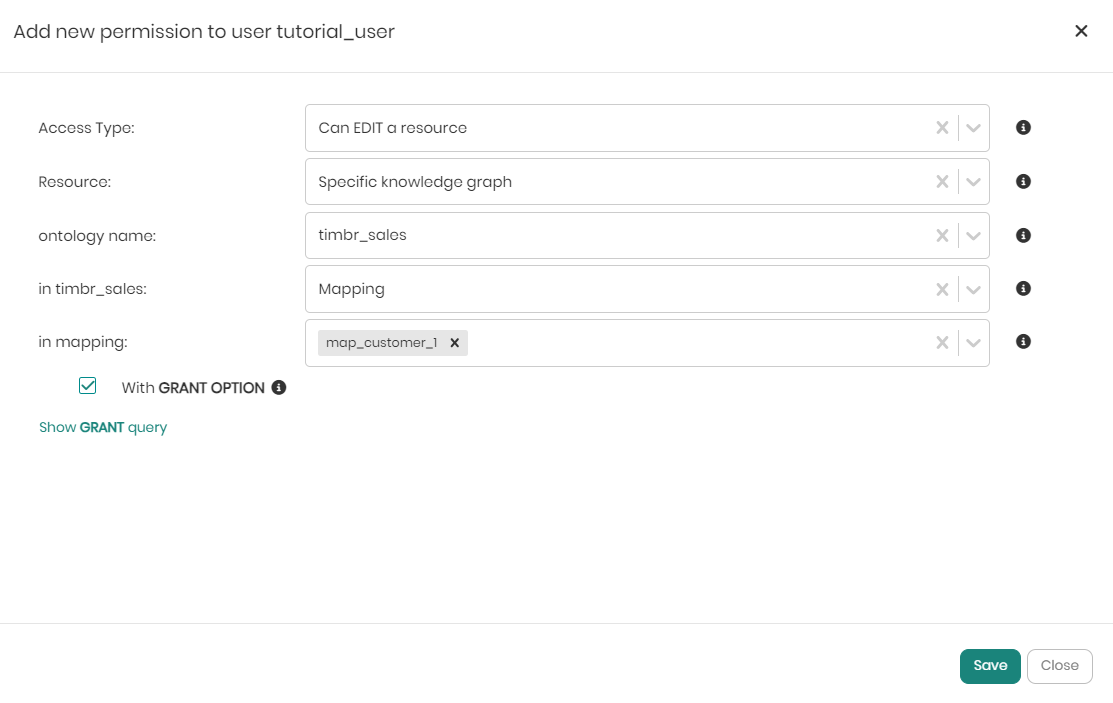
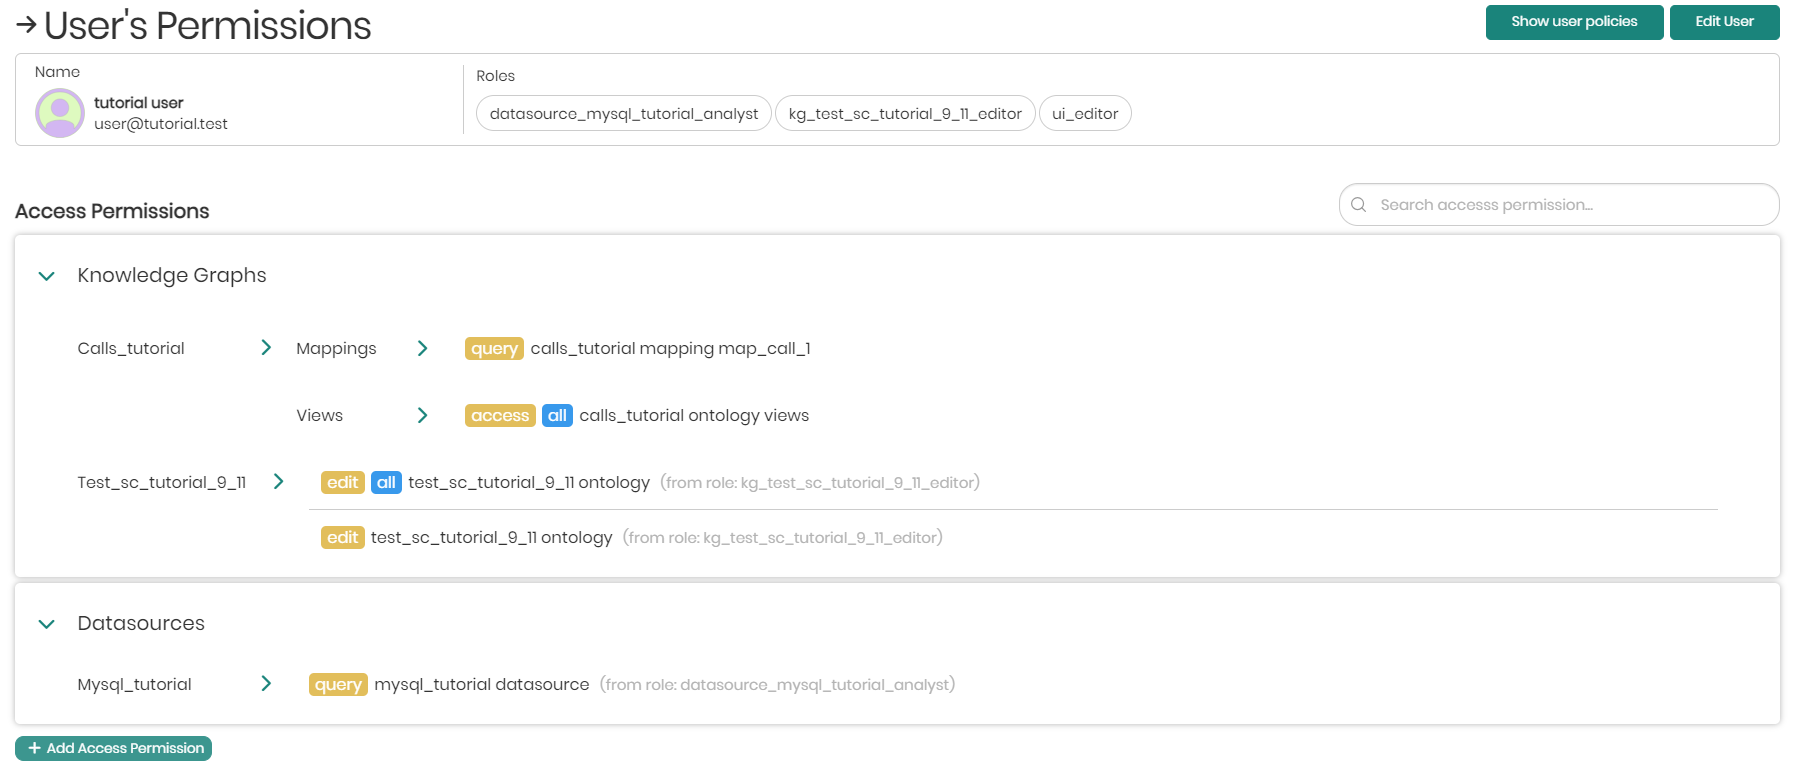
To add new access permissions to the user click on + Add Access Permissions below the list of existing permissions.
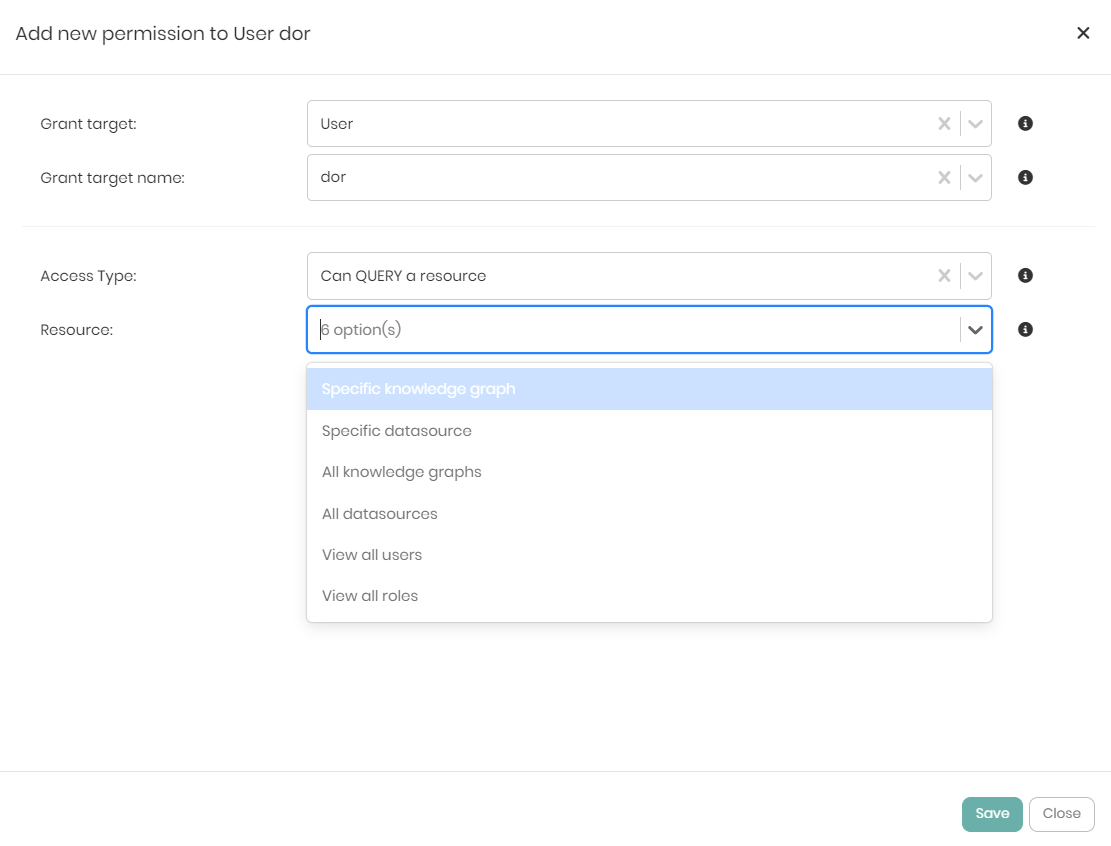
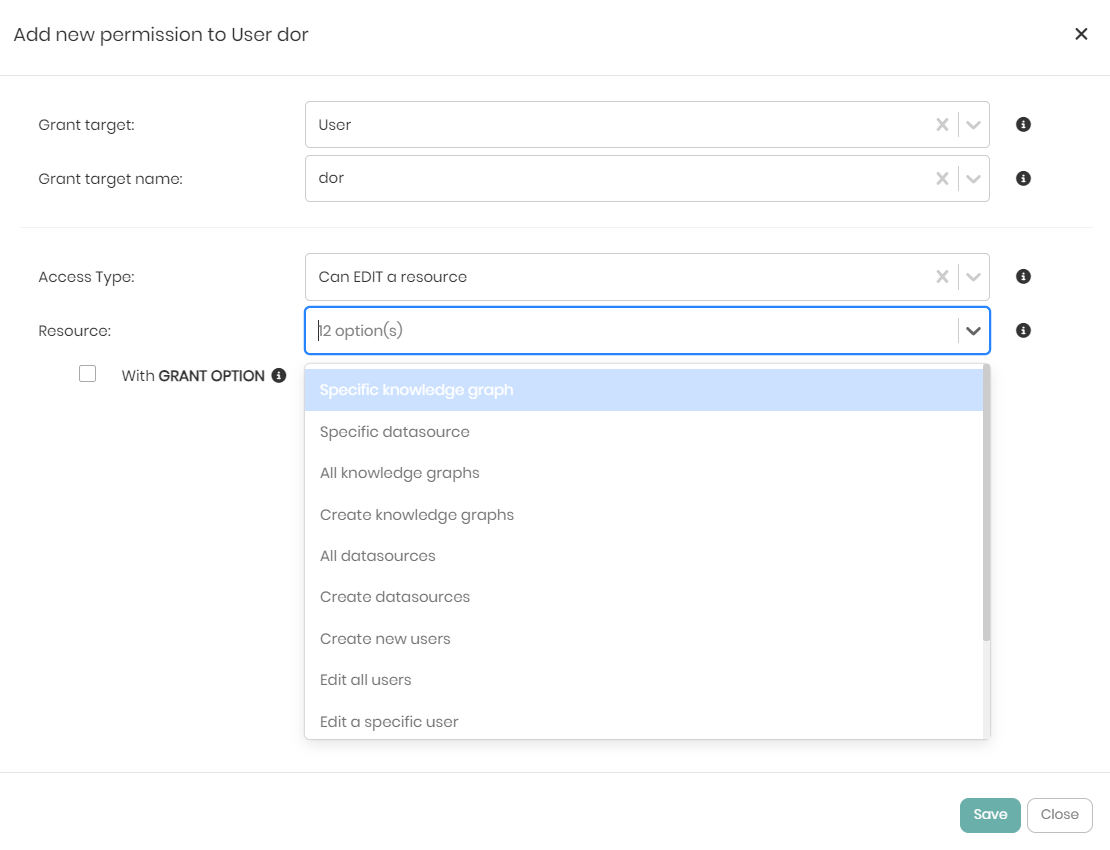
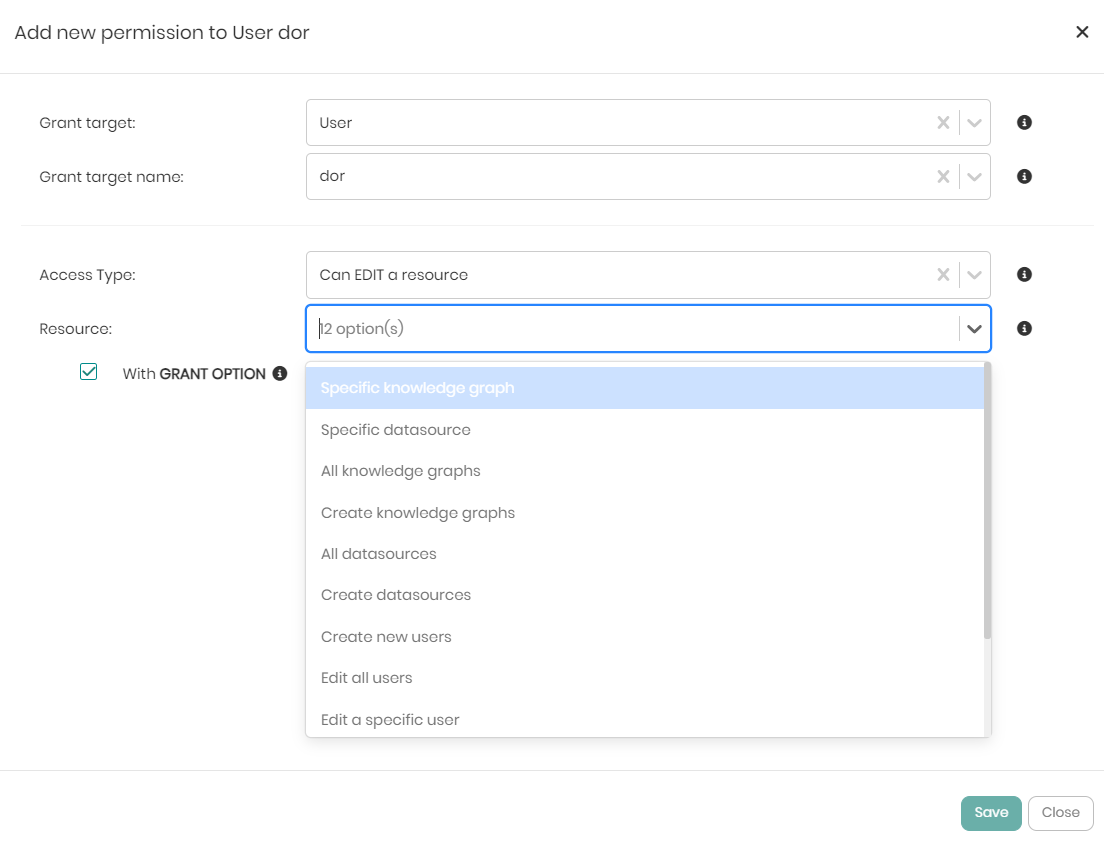
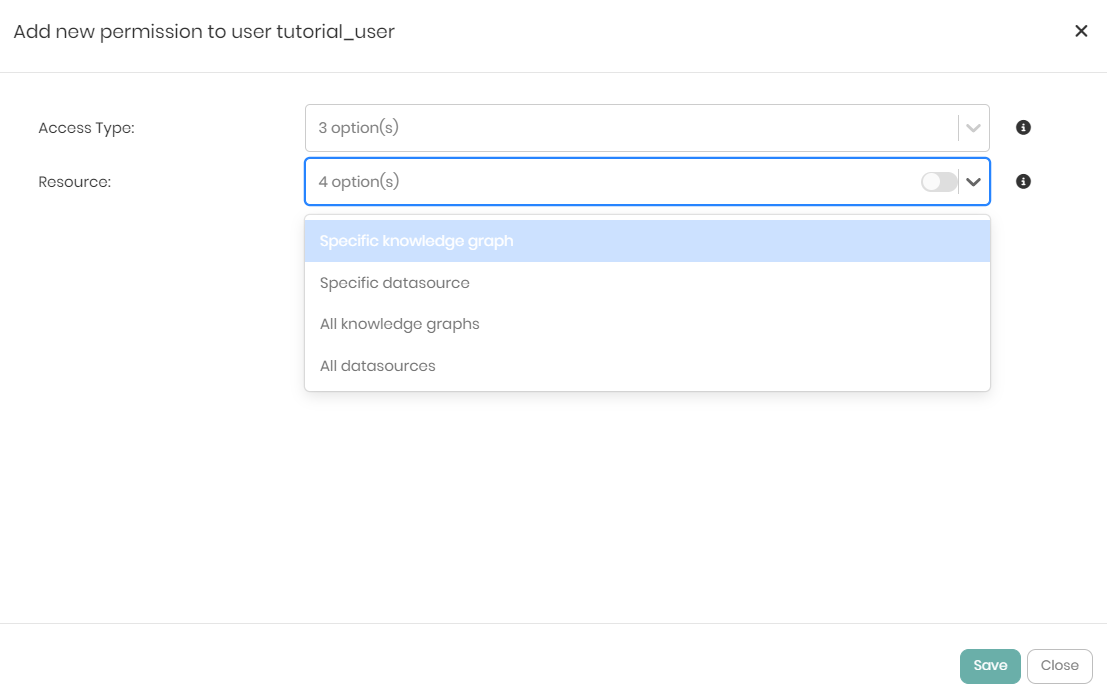
In the new window that appears, there are the initial 2 dropdowns that include Access Type and Resource.
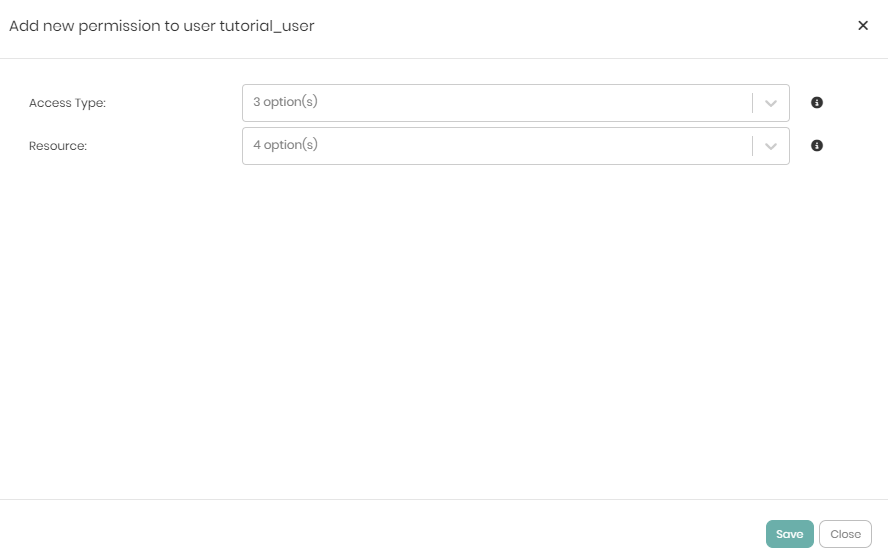
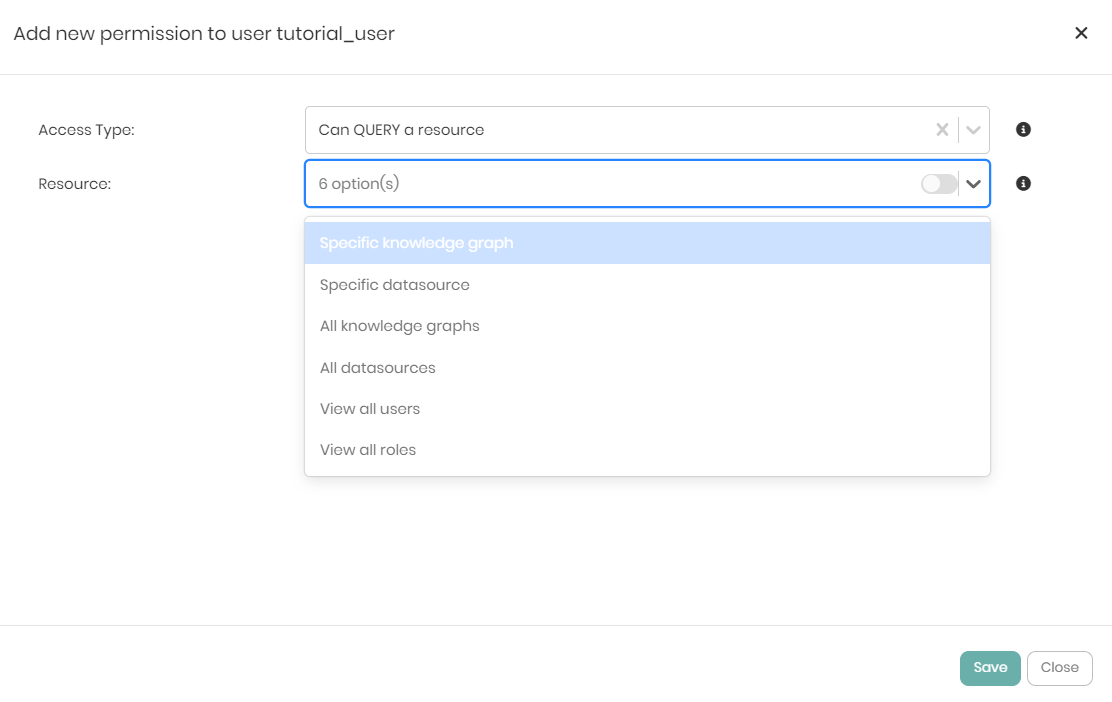
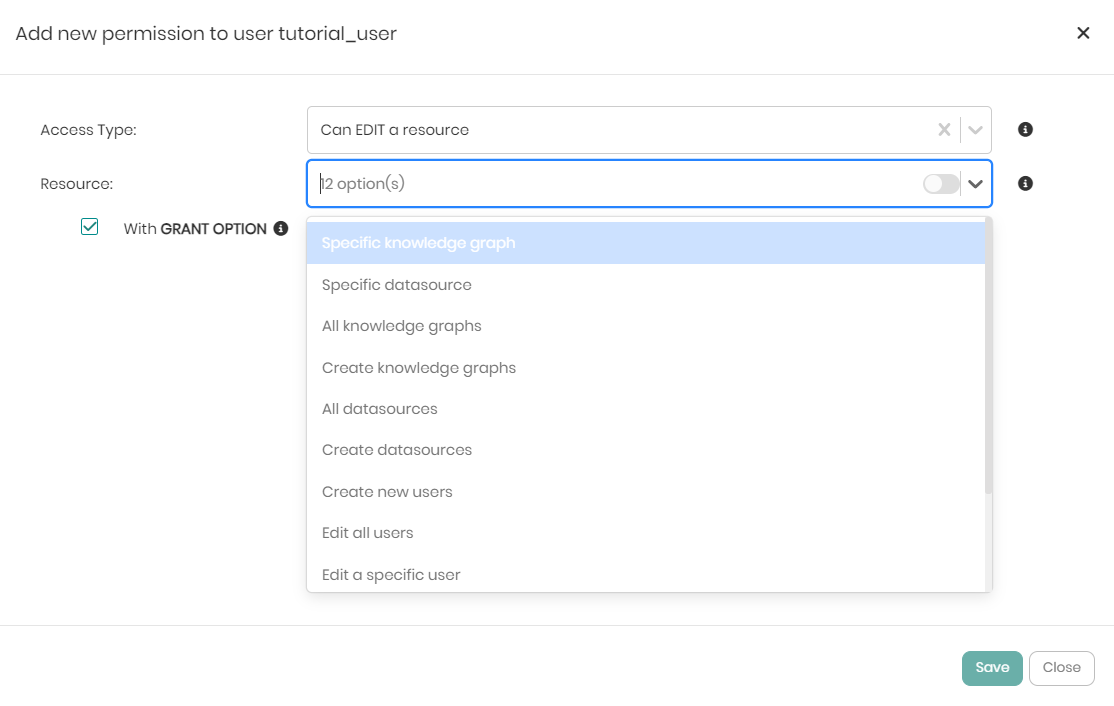
The Access Type dropdown contains 3 options which are:
- Access - Users given the Access permission can only view the metadata of a chosen resource.
- Query - Users given the Query permission can view the metadata and query the chosen resource.
- Edit - Users given the Edit permission can create, edit or remove the chosen resource.
The Resource dropdown initially contains 4 options but the options change based on the first selection in the following way:
If the Access permission is given to the user which is the most basic permission then the Resource dropdown will show the following 4 options:
- Specific knowledge graph - Giving the user permission to view a specific knowledge graph.
- Specific datasource - Giving the user permission to view a specific datasource.
- All knowledge graphs - Giving the user permission to view all the knowledge graphs in the platform.
- All datasources - Giving the user permission to view all the datasources connected to the platform.
If the Query permission is given to the user then the Resource dropdown will show the following 6 options:
- Specific knowledge graph - Giving the user permission to view and query a specific knowledge graph.
- Specific datasource - Giving the user permission to view and query a specific datasource.
- All knowledge graphs - Giving the user permission to view and query all the knowledge graphs in the platform.
- All datasources - Giving the user permission to view and query all the datasources connected to the platform.
- View all users - Giving the user permission to view all users in the platform.
- View all roles - Giving the user permission to view all roles in the platform.
If the Edit permission is given to the user which includes the most advanced permissions then the Resource dropdown will show the following 12 options:
- Specific knowledge graph - Giving the user permission to view, edit or remove a specific knowledge graph.
- Specific datasource - Giving the user permission to view, edit or remove a specific datasource.
- All knowledge graphs - Giving the user permission to view, edit or remove all the knowledge graphs in the platform.
- Create knowledge graphs - Giving the user permission to create new knowledge graphs in the platform.
- All datasources - Giving the user permission to view, edit or remove all the datasources connected to the platform.
- Create datasources - Giving the user permission to create and add new datasources to the platform.
- Create new users - Giving the user permission to create new users in the platform.
- Edit all users - Giving the user permission to edit the details of all the users in the platform.
- Edit a specific user - Giving the user permission to edit a specific user in the platform.
- Create new roles - Giving the user permission to create new roles in the platform.
- Edit all roles - Giving the user permission to edit all roles in the platform.
- Edit a specific role - Giving the user permission to edit a specific role in the platform.
Notice that for the Edit permission only, there is a checkbox called with Grant Option below Resource that hands the specific user the ability to grant and revoke permissions from other users in the scope of the permission.
When the Access Type and Resource dropdowns are chosen, depending on the choices different dropdowns will appear to drill down to the intended selection. Once the dropdowns are chosen all that's left is to click on Save at the bottom right of the window. If before saving you would like to see the SQL syntax behind the grant query defining the permission, you can click on Show GRANT query beneath the with GRANT Option checkbox.