Azure Integration
![]()
This page provides a comprehensive guide for integrating Microsoft Azure services with Timbr’s ontology-based semantic layer.
Timbr operates as a virtual knowledge graph over existing data sources, enabling the semantic layer to securely expose business entities, relationships, and logic across Azure services, BI tools, and AI systems.
This includes configuring Azure AD Single Sign-On (SSO), syncing Azure AD groups with Timbr roles, enabling Databricks passthrough authentication, configuring Azure Key Vault for datasource credentials, and setting up JWT token authentication for the Timbr API service.
Table of Contents
- Azure AD Single Sign-On (SSO)
- Sync Azure AD Groups with Timbr Roles
- SSO for Databricks Datasources (Passthrough)
- Azure KeyVault for Datasource Credentials
- JWT Token Authentication (Azure)
Azure AD Single Sign-On (SSO)
Configure Azure Active Directory as a Single Sign-On (SSO) provider for the Timbr platform using OAuth 2.0 and OpenID Connect.
Prerequisites
Before you begin, ensure you have:
- Administrative access to your Azure Active Directory tenant
- Administrative access to the Timbr platform server to configure environment variables
- Your Timbr domain URL (e.g.,
https://timbr.example.com) - An HTTPS endpoint (Azure AD doesn't allow configuring HTTP servers)
- An existing SSL certificate configured for the Timbr Platform service
Step 1: Create an Azure App Registration
- Log in to the Azure Portal at https://portal.azure.com.
- Navigate to Azure Active Directory.
- In the left sidebar, click App registrations.
- Click New registration.
- Configure the following settings:
- Name:
Timbr Platform(or any name you prefer) - Supported account types: Select the appropriate option (e.g., Accounts in this organizational directory only)
- Redirect URI: Select Web and enter:
https://<timbr-public-url>/oauth-authorized/azure- Replace
<timbr-public-url>with your actual Timbr domain
- Replace
- Name:
- Click Register.

Step 2: Configure API Permissions
After creating the App Registration, configure the required permissions:
- In your App Registration, click API permissions in the left sidebar.
- Click Add a permission.
- Select Microsoft Graph.
- Select Delegated permissions.
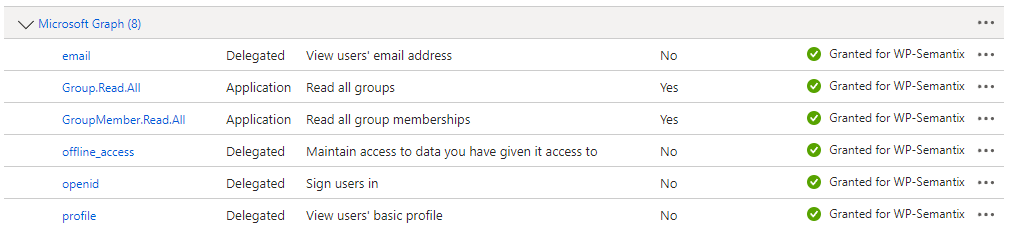
- Add the following permissions:
| Permission | Type | Description |
|---|---|---|
| Delegated | View users' email address | |
| openid | Delegated | Sign users in |
| profile | Delegated | View users' basic profile |
| User.Read | Delegated | Sign in and read user profile |
- Click Add permissions.
- Click Grant admin consent for your tenant (if you have admin privileges).
Step 3: Create a Client Secret
- In your App Registration, click Certificates & secrets in the left sidebar.
- Under Client secrets, click New client secret.
- Enter a description (e.g.,
Timbr Platform Secret) and select an expiration period. - Click Add.
- Important: Copy the Value of the secret immediately. This will be your
OAUTH_SECRET. You won't be able to see it again.
Step 4: Collect Required Information
From your App Registration, collect the following information:
- Application (client) ID: This will be your
OAUTH_CLIENT_ID- Found on the Overview page
- Directory (tenant) ID: This will be used in
OAUTH_BASE_URL- Found on the Overview page
- Client Secret: Collected in Step 3 (use as
OAUTH_SECRET)
Step 5: Configure Timbr Environment Variables
Add the Azure OAuth environment variables to your timbr-platform service configuration.
Required Environment Variables
# Provider identifier
OAUTH_PROVIDER=azure

# Application (client) ID from Azure App Registration
OAUTH_CLIENT_ID=<AZURE_APPLICATION_ID>

# Client secret from Azure App Registration
OAUTH_SECRET=<AZURE_SECRET>

# Azure tenant-specific OAuth endpoint
OAUTH_BASE_URL=https://login.microsoftonline.com/<AZURE_TENANT_ID>/oauth2

# User identification method (False = email, True = UserPrincipalName)
OAUTH_AZURE_WITH_UPN_FIRST=False
- Set
OAUTH_AZURE_WITH_UPN_FIRST=Falseif users will login using their email address - Set
OAUTH_AZURE_WITH_UPN_FIRST=Trueif users will login using their Azure UserPrincipalName (UPN)
Deployment Options
Docker Compose
Add the OAuth environment variables to your timbr-platform service in docker-compose.yml:
services:
  timbr-platform:
    # ...
    environment:
      - OAUTH_PROVIDER=azure
      - OAUTH_CLIENT_ID=<AZURE_APPLICATION_ID>
      - OAUTH_SECRET=<AZURE_SECRET>
      - OAUTH_BASE_URL=https://login.microsoftonline.com/<AZURE_TENANT_ID>/oauth2
      - OAUTH_AZURE_WITH_UPN_FIRST=False
After updating your docker-compose.yml, restart the timbr-platform service:
sudo docker-compose up -d timbr-platform
Kubernetes
Add the OAuth environment variables to your timbr-platform Deployment manifest:
apiVersion: apps/v1
kind: Deployment
metadata:
  name: timbr-platform
  namespace: default
spec:
  template:
    spec:
      containers:
        - name: timbr-platform
          # ...
          env:
            # ...
            - name: OAUTH_PROVIDER
              value: azure
            - name: OAUTH_CLIENT_ID
              value: <AZURE_APPLICATION_ID>
            - name: OAUTH_SECRET
              value: <AZURE_SECRET>
            - name: OAUTH_BASE_URL
              value: https://login.microsoftonline.com/<AZURE_TENANT_ID>/oauth2
            - name: OAUTH_AZURE_WITH_UPN_FIRST
              value: "False"
Apply the updated manifest:
kubectl apply -f timbr-platform.yaml
For better security in Kubernetes, store sensitive values like OAUTH_CLIENT_ID and OAUTH_SECRET in Kubernetes Secrets instead of plain text in the manifest.
Optional Environment Variables
# Enable user self-registration on first OAuth login (default: false)
AUTH_USER_REGISTRATION=true

# Default role for self-registered users (default: viewer)
AUTH_USER_REGISTRATION_ROLE=viewer

# Allow or disable username/password login alongside OAuth (default: true)
AUTH_WITH_USERPASS=true
Step 6: Test the Integration
- Navigate to your Timbr platform URL.
- You should see an option to Sign in with Azure (or similar).
- Click the sign-in button and authenticate using your Azure AD credentials.
- After successful authentication, you should be redirected back to the Timbr platform.
Sync Azure AD Groups with Timbr Roles
Automatically synchronize Azure AD group memberships with Timbr roles, allowing centralized user access management through Azure AD.
Prerequisites
- Azure AD SSO must be configured (see section above)
- Administrative access to Azure App Registration
- Administrative access to Timbr server configuration
Step 1: Configure Additional API Permissions
Add additional permissions to your Azure App Registration to enable group synchronization:
- Navigate to your App Registration in Azure Portal.
- Click API permissions in the left sidebar.
- Click Add a permission.
- Select Microsoft Graph.
- Select Application permissions (not Delegated).
- Add the following permissions:
| Permission | Type | Description |
|---|---|---|
| User.Read.All | Application | Read all users' full profiles |
| Group.Read.All | Application | Read all groups |
| GroupMember.Read.All | Application | Read all group memberships |
- Click Add permissions.
- Click Grant admin consent for your tenant (admin privileges required).

Step 2: Configure Timbr Server Environment Variables
Add the Azure AD group sync environment variables to your timbr-server service configuration.
Required Environment Variables
# Application (client) ID from Azure App Registration
AZURE_CLIENT_ID=<AZURE_CLIENT_ID>

# Directory (tenant) ID from Azure
AZURE_TENANT_ID=<AZURE_TENANT_ID>

# Client secret from Azure App Registration
AZURE_CLIENT_SECRET=<AZURE_CLIENT_SECRET>

# Sync interval in seconds (default: 86400 = 24 hours)
SYNC_GROUPS_INTERVAL=86400

# Automatically create users from AD Groups (default: false)
SYNC_GROUPS_AUTO_CREATE_USER=false
Deployment Options
Docker Compose
Add the environment variables to your timbr-server service in docker-compose.yml:
services:
  timbr-server:
    # ...
    environment:
      - AZURE_CLIENT_ID=<AZURE_CLIENT_ID>
      - AZURE_TENANT_ID=<AZURE_TENANT_ID>
      - AZURE_CLIENT_SECRET=<AZURE_CLIENT_SECRET>
      - SYNC_GROUPS_INTERVAL=86400
      - SYNC_GROUPS_AUTO_CREATE_USER=false
After updating your docker-compose.yml, restart the timbr-server service:
sudo docker-compose up -d timbr-server
Kubernetes
Add the environment variables to your timbr-server Deployment manifest:
apiVersion: apps/v1
kind: Deployment
metadata:
  name: timbr-server
  namespace: default
spec:
  template:
    spec:
      containers:
        - name: timbr-server
          # ...
          env:
            # ...
            - name: AZURE_CLIENT_ID
              value: <AZURE_CLIENT_ID>
            - name: AZURE_TENANT_ID
              value: <AZURE_TENANT_ID>
            - name: AZURE_CLIENT_SECRET
              value: <AZURE_CLIENT_SECRET>
            - name: SYNC_GROUPS_INTERVAL
              value: "86400"
            - name: SYNC_GROUPS_AUTO_CREATE_USER
              value: "false"
Apply the updated manifest:
kubectl apply -f timbr-server.yaml
Step 3: Configure Role-to-Group Mappings
After configuring the environment variables, map Timbr roles to Azure AD groups using SQL statements in the Timbr Platform.
- Navigate to the SQL Lab page in the Timbr Platform.
- Run one of the following SQL statements to configure group synchronization:
Using Group Name
ALTER ROLE `role_name` SYNC name = 'group_name';
Example:
ALTER ROLE `admin` SYNC name = 'Timbr Administrators';
ALTER ROLE `editor` SYNC name = 'Timbr Editors';
ALTER ROLE `viewer` SYNC name = 'Timbr Viewers';
Using Group ID
ALTER ROLE `role_name` SYNC id = 'group_id';
Example:
ALTER ROLE `admin` SYNC id = '12345678-1234-1234-1234-123456789abc';
Using Group Email
ALTER ROLE `role_name` SYNC email = '[email protected]';
Example:
ALTER ROLE `admin` SYNC email = '[email protected]';
Step 4: Manual Synchronization (Optional)
If you need to manually trigger a synchronization before the scheduled interval:
SYNC ROLE `role_name`;
Example:
SYNC ROLE `admin`;
Configuration Options
Automatic User Creation
To automatically create Timbr user accounts when new users are added to synced Azure AD groups:
SYNC_GROUPS_AUTO_CREATE_USER=true
Add this to your timbr-server environment variables in your deployment configuration.
Custom Sync Interval
To change the synchronization interval (default is 24 hours):
# Sync every 12 hours (43200 seconds)
SYNC_GROUPS_INTERVAL=43200

# Sync every hour (3600 seconds)
SYNC_GROUPS_INTERVAL=3600
- Use descriptive group names in Azure AD for easy identification
- Regularly review group memberships to ensure proper access control
- Consider enabling
SYNC_GROUPS_AUTO_CREATE_USERto streamline user onboarding - Monitor sync logs to ensure groups are synchronizing successfully
SSO for Databricks Datasources (Passthrough)
Enable Single Sign-On passthrough authentication for Databricks datasources in Azure, allowing users to query Databricks using their Azure AD credentials.
Prerequisites
- Azure AD SSO must be configured for Timbr (see first section)
- HTTPS endpoint configured for Timbr Platform
- Administrative access to Azure App Registration
- Access to Azure Databricks workspace
- Administrative access to both timbr-platform and timbr-server configuration
Step 1: Configure Azure App Registration Permissions
Add the required permissions for Databricks passthrough authentication:
- Navigate to your App Registration in Azure Portal.
- Click API permissions in the left sidebar.
- Click Add a permission.
Add Databricks User Impersonation Permission
- In the Request API permissions panel, select the APIs my organization uses tab.
- Search for AzureDatabricks or 2ff814a6-3304-4ab8-85cb-cd0e6f879c1d.
- Select Delegated permissions.
- Check user_impersonation.
- Click Add permissions.

Add Microsoft Graph Offline Access Permission
- Click Add a permission again.
- Select Microsoft Graph.
- Select Delegated permissions.
- Search for and check offline_access.
- Click Add permissions.
- Click Grant admin consent for your tenant.
Both user_impersonation for AzureDatabricks and offline_access for Microsoft Graph are required for passthrough authentication to work correctly.
Step 2: Configure Timbr Platform Environment Variables
Add the Databricks-specific OAuth environment variables to your timbr-platform service:
# Enable offline access scope for refresh tokens
OAUTH_OFFLINE_ACCESS_SCOPE=true

# Databricks user impersonation scope (AzureDatabricks App ID)
OAUTH_SCOPES=2ff814a6-3304-4ab8-85cb-cd0e6f879c1d/user_impersonation
Deployment Options
Docker Compose
Add to your timbr-platform service in docker-compose.yml:
services:
  timbr-platform:
    # ...
    environment:
      # ... (existing Azure SSO configuration)
      - OAUTH_OFFLINE_ACCESS_SCOPE=true
      - OAUTH_SCOPES=2ff814a6-3304-4ab8-85cb-cd0e6f879c1d/user_impersonation
Restart the service:
sudo docker-compose up -d timbr-platform
Kubernetes
Add to your timbr-platform Deployment manifest:
apiVersion: apps/v1
kind: Deployment
metadata:
  name: timbr-platform
spec:
  template:
    spec:
      containers:
        - name: timbr-platform
          # ...
          env:
            # ... (existing Azure SSO configuration)
            - name: OAUTH_OFFLINE_ACCESS_SCOPE
              value: "true"
            - name: OAUTH_SCOPES
              value: 2ff814a6-3304-4ab8-85cb-cd0e6f879c1d/user_impersonation
Apply the manifest:
kubectl apply -f timbr-platform.yaml
Step 3: Configure Timbr Server Environment Variables
Add the token refresh configuration to your timbr-server service:
# Enable offline access scope for refresh tokens
OAUTH_OFFLINE_ACCESS_SCOPE=true

# Token expiration in minutes (default: 10)
OAUTH_REFRESH_TOKEN_EXPIRATION=10

# Token validation interval in minutes (default: 1)
OAUTH_REFRESH_TOKEN_VALIDATION=1
Deployment Options
Docker Compose
Add to your timbr-server service in docker-compose.yml:
services:
  timbr-server:
    # ...
    environment:
      # ... (existing configuration)
      - OAUTH_OFFLINE_ACCESS_SCOPE=true
      - OAUTH_REFRESH_TOKEN_EXPIRATION=10
      - OAUTH_REFRESH_TOKEN_VALIDATION=1
Restart the service:
sudo docker-compose up -d timbr-server
Kubernetes
Add to your timbr-server Deployment manifest:
apiVersion: apps/v1
kind: Deployment
metadata:
  name: timbr-server
spec:
  template:
    spec:
      containers:
        - name: timbr-server
          # ...
          env:
            # ... (existing configuration)
            - name: OAUTH_OFFLINE_ACCESS_SCOPE
              value: "true"
            - name: OAUTH_REFRESH_TOKEN_EXPIRATION
              value: "10"
            - name: OAUTH_REFRESH_TOKEN_VALIDATION
              value: "1"
Apply the manifest:
kubectl apply -f timbr-server.yaml
Step 4: Configure Databricks Datasource in Timbr
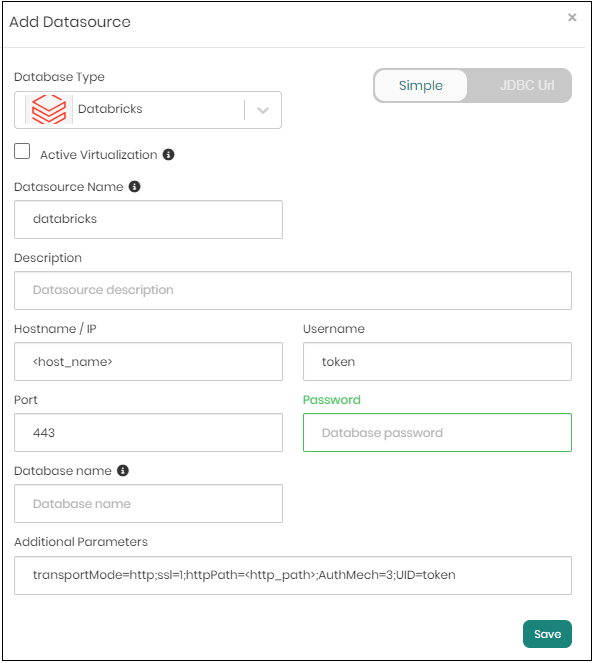
Add a new Databricks datasource in the Timbr web platform:
Navigate to Datasources in the Timbr Platform.
Click Add New Datasource.
Configure with the following settings:
- Datasource Type:
Databricks - Datasource Name:
databricks(or your preferred name) - Hostname/IP:
<your-databricks-workspace-url>(e.g.,adb-123456789.azuredatabricks.net) - Port:
443 - User:
token - Password:
<sso token value>(the SSO token will be automatically managed)
- Datasource Type:
In the Additional Parameters field, configure the authentication mechanism:
AuthMech=11;Auth_Flow=0
Make sure to set AuthMech=11 and Auth_Flow=0 in the Additional Parameters. These settings enable the OAuth passthrough authentication flow.
- Click Test Connection to verify the configuration.
- Click Save to create the datasource.
How It Works
- User authenticates to Timbr using Azure AD SSO.
- Timbr obtains an OAuth token with Databricks user impersonation scope.
- When querying Databricks, Timbr uses the user's token to authenticate.
- Databricks executes the query with the user's permissions.
- Token is automatically refreshed based on the configured expiration and validation intervals.
- Centralized access control: Manage Databricks permissions through Azure AD
- Audit trail: Track which users executed which queries
- No shared credentials: Each user queries with their own permissions
- Automatic token management: Timbr handles token refresh automatically
Azure KeyVault for Datasource Credentials
Configure Timbr to encrypt and store datasource credentials in Azure Key Vault instead of the Timbr database, providing enhanced security for sensitive connection information.
Prerequisites
- Azure Key Vault instance created and accessible
- Azure Service Principal with permissions to access the Key Vault
- Administrative access to Timbr server configuration
Overview
By default, Timbr encrypts and stores datasource credentials in its internal database. With Azure Key Vault integration:
- All datasource passwords are stored in Azure Key Vault
- Credentials are encrypted using Azure's encryption mechanisms
- Centralized management of secrets across your organization
- Integration with Azure's security and compliance features
When Key Vault is enabled, ALL datasource passwords will be stored in Azure Key Vault instead of Timbr's database. This is a platform-wide setting.
Step 1: Create Azure Service Principal
If you don't already have a Service Principal with Key Vault access:
- In Azure Portal, navigate to Azure Active Directory.
- Click App registrations > New registration.
- Provide a name (e.g.,
Timbr-KeyVault-Access) and click Register. - Note the Application (client) ID and Directory (tenant) ID.
- Click Certificates & secrets > New client secret.
- Create a secret and copy the Value (this is your client secret).
Step 2: Grant Key Vault Permissions
- Navigate to your Key Vault in Azure Portal.
- Click Access policies in the left sidebar.
- Click Add Access Policy.
- Configure the following permissions:
- Secret permissions: Get, List, Set, Delete
- Click Select principal and search for your Service Principal.
- Click Add and then Save.
Alternatively, if using Azure RBAC:
- Navigate to your Key Vault > Access control (IAM).
- Click Add role assignment.
- Select Key Vault Secrets Officer role.
- Assign to your Service Principal.
Step 3: Configure Timbr Server Environment Variables
Add the Azure Key Vault configuration to your timbr-server service:
Required Environment Variables
# Key Vault type
KV_VAULT_TYPE=azure

# Authentication method
KV_VAULT_AUTH_TYPE=password

# Azure Key Vault URL
KV_VAULT=<KEY_VAULT_URL>

# Azure Service Principal credentials
AZURE_CLIENT_ID=<AZURE_CLIENT_ID>
AZURE_TENANT_ID=<AZURE_TENANT_ID>
AZURE_CLIENT_SECRET=<AZURE_CLIENT_SECRET>
The Key Vault URL should be in the format: https://<your-keyvault-name>.vault.azure.net/
Deployment Options
Docker Compose
Add to your timbr-server service in docker-compose.yml:
services:
  timbr-server:
    # ...
    environment:
      - KV_VAULT_TYPE=azure
      - KV_VAULT_AUTH_TYPE=password
      - KV_VAULT=https://<your-keyvault-name>.vault.azure.net/
      - AZURE_CLIENT_ID=<AZURE_CLIENT_ID>
      - AZURE_TENANT_ID=<AZURE_TENANT_ID>
      - AZURE_CLIENT_SECRET=<AZURE_CLIENT_SECRET>
Restart the service:
sudo docker-compose up -d timbr-server
Kubernetes
Add to your timbr-server Deployment manifest:
apiVersion: apps/v1
kind: Deployment
metadata:
  name: timbr-server
spec:
  template:
    spec:
      containers:
        - name: timbr-server
          # ...
          env:
            # ...
            - name: KV_VAULT_TYPE
              value: azure
            - name: KV_VAULT_AUTH_TYPE
              value: password
            - name: KV_VAULT
              value: https://<your-keyvault-name>.vault.azure.net/
            - name: AZURE_CLIENT_ID
              value: <AZURE_CLIENT_ID>
            - name: AZURE_TENANT_ID
              value: <AZURE_TENANT_ID>
            - name: AZURE_CLIENT_SECRET
              value: <AZURE_CLIENT_SECRET>
Apply the manifest:
kubectl apply -f timbr-server.yaml
Store sensitive values in Kubernetes Secrets:
- name: AZURE_CLIENT_SECRET
  valueFrom:
    secretKeyRef:
      name: azure-keyvault-secret
      key: client-secret
Step 4: Verify Configuration
After restarting the Timbr server:
- Navigate to Datasources in the Timbr Platform.
- Create a new datasource or edit an existing one.
- Enter the datasource password.
- Save the datasource.
- Verify in Azure Key Vault that a new secret was created for the datasource.
How It Works
- When you create or update a datasource in Timbr, the password is sent to Azure Key Vault.
- Azure Key Vault encrypts and stores the password.
- Timbr stores only a reference to the Key Vault secret.
- When connecting to the datasource, Timbr retrieves the password from Azure Key Vault.
- The password is decrypted by Azure Key Vault and used for the connection.
References
JWT Token Authentication (Azure)
Configure the Timbr REST API Service to support offline authentication using JWT tokens from Azure AD, Microsoft Identity Platform, and OAuth 2.0 OpenID Connect (OIDC), including multi-tenant environments.
Prerequisites
- Azure AD configuration completed
- Administrative access to Timbr API service configuration
- Understanding of JWT token structure and OAuth 2.0 flows
Overview
JWT token authentication allows:
- Offline authentication without direct user interaction
- API access using Azure AD access tokens
- Support for multi-tenant environments
- Integration with Azure AD application tokens
Step 1: Configure Timbr API Environment Variables
Add the JWT authentication configuration to your timbr-api service:
Required Environment Variables
# Enable JWT token authentication
ENABLE_TOKEN=true

# JWT provider type (must be 'azure' for Azure AD)
JWT_TYPE=azure
Deployment Options
Docker Compose
Add to your timbr-api service in docker-compose.yml:
services:
  timbr-api:
    # ...
    environment:
      - ENABLE_TOKEN=true
      - JWT_TYPE=azure
Restart the service:
sudo docker-compose up -d timbr-api
Kubernetes
Add to your timbr-api Deployment manifest:
apiVersion: apps/v1
kind: Deployment
metadata:
  name: timbr-api
spec:
  template:
    spec:
      containers:
        - name: timbr-api
          # ...
          env:
            # ...
            - name: ENABLE_TOKEN
              value: "true"
            - name: JWT_TYPE
              value: azure
Apply the manifest:
kubectl apply -f timbr-api.yaml
Step 2: Optional Environment Variables
Configure additional JWT settings based on your requirements:
# Algorithm for JWT decryption (default: RS246)
JWT_DEFAULT_ALGORITHM=RS256

# JWT audience (commonly the Client ID)
JWT_DEFAULT_AUDIENCE=<AZURE_CLIENT_ID>

# User identification field in JWT token (default: upn)
JWT_USE_EMAIL_OR_USER=upn

# JWT issuer URL
JWT_ISSUER=https://login.microsoftonline.com/<AZURE_TENANT_ID>/v2.0
Azure JWT Environment Variables Reference
All JWT environment variables must be in UPPERCASE.
| Environment Variable | Required | Default Value | Possible Values | Description |
|---|---|---|---|---|
ENABLE_TOKEN | ✔️ | false | false, true | Must be set to true to enable JWT authentication |
JWT_TYPE | ✔️ | custom | custom, azure | Must be set to azure for Azure AD JWT authentication |
JWT_DEFAULT_ALGORITHM | ✖️ | RS246 | HS256, RSA-OAEP, RS256, AES | Encryption algorithm. Use RS256 or RSA-OAEP with Public Key, HS256 or AES with Secret Password. Multiple algorithms can be specified with commas (e.g., RS246,RSA-OAEP) |
JWT_DEFAULT_AUDIENCE | ✖️ | None | string | The audience is commonly the Client ID. If not set, JWT will be decrypted without audience validation. Can also be set via x-jwt-client-id header |
JWT_USE_EMAIL_OR_USER | ✖️ | upn | string | The key in the JWT token containing the username or email for authentication in Timbr |
JWT_ISSUER | ✖️ | None | string | The issuer of the JWT token. Must be a case-sensitive HTTPS URL with scheme, host, and optionally port/path (no query or fragment) |
Azure JWT Request Headers
Use these HTTP headers when making API requests with JWT authentication:
All request headers must be in lowercase.
| Header Key | Required | Description |
|---|---|---|
x-jwt-token | ✔️ | The JWT access token from Azure AD |
x-jwt-tenant-id | ✖️ | Tenant ID for multi-tenant environments (used with JWT_<TENANT_ID>_* variables) |
x-jwt-issuer | ✖️ | Issuer identifier for the JWT token (case-sensitive HTTPS URL) |
x-jwt-client-id | ✖️ | The audience for the JWT (commonly the OAuth 2.0 client_id) |
x-jwt-nonce | ✖️ | Nonce value if present in the JWT (must match the nonce sent in the auth request) |
Multi-Tenant Configuration
For multi-tenant environments, configure tenant-specific settings by replacing <TENANT_ID> with an alphanumeric identifier:
# Tenant-specific algorithm
JWT_<TENANT_ID>_ALGORITHM=RS256

# Tenant-specific audience
JWT_<TENANT_ID>_AUDIENCE=<CLIENT_ID_FOR_TENANT>

# Prefix username with tenant ID (default: False)
JWT_USE_TENANT_USER=False
Example for tenant "contoso":
JWT_CONTOSO_ALGORITHM=RS256
JWT_CONTOSO_AUDIENCE=a1b2c3d4-e5f6-g7h8-i9j0-k1l2m3n4o5p6
JWT_USE_TENANT_USER=True
Multi-Tenant Environment Variables
| Environment Variable | Required | Default Value | Description |
|---|---|---|---|
JWT_<TENANT_ID>_ALGORITHM | ✖️ | RS246 | Algorithm for tenant-specific JWT decryption |
JWT_<TENANT_ID>_AUDIENCE | ✖️ | None | Audience (Client ID) for tenant-specific validation |
JWT_USE_TENANT_USER | ✖️ | False | When True, prefixes username with tenant ID (format: <tenant-id>/<username>) |
Example: Using JWT Authentication
Obtain Azure AD Access Token
# Using Azure CLI
az account get-access-token --resource <AZURE_CLIENT_ID>
Make API Request with JWT Token
curl -X GET https://timbr-api.example.com/api/v1/ontologies \
  -H "x-jwt-token: eyJ0eXAiOiJKV1QiLCJhbGciOiJSUzI1NiIsIng1dCI6..." \
  -H "x-jwt-client-id: a1b2c3d4-e5f6-g7h8-i9j0-k1l2m3n4o5p6"
Multi-Tenant Example
When JWT_USE_TENANT_USER=True with a tenant ID of "contoso":
Incoming request:
- Header:
x-jwt-tenant-id: contoso - JWT token contains:
"upn": "[email protected]"
Timbr authenticates as: contoso/[email protected]
This allows different tenants to have users with the same username without conflicts.
Security Best Practices
- Use HTTPS: Always use HTTPS for API endpoints handling JWT tokens
- Validate Audience: Set
JWT_DEFAULT_AUDIENCEto validate tokens are intended for your application - Validate Issuer: Set
JWT_ISSUERto ensure tokens come from Azure AD - Token Expiration: Respect token expiration times (
expclaim) - Secure Storage: Store JWT tokens securely (never in client-side code or version control)
- Rotate Secrets: Regularly rotate client secrets in Azure AD
- Monitor Access: Enable logging and monitoring for API access
Troubleshooting
Token validation fails:
- Verify the token hasn't expired
- Check that
JWT_TYPE=azureis set correctly - Ensure the audience matches your application's client ID
- Verify the issuer URL matches your Azure AD tenant
User not found:
- Check
JWT_USE_EMAIL_OR_USERpoints to the correct claim in the token - Verify the user exists in Timbr with the same username/email
- For multi-tenant setups, ensure
JWT_USE_TENANT_USERis configured correctly
Algorithm mismatch:
- Verify
JWT_DEFAULT_ALGORITHMmatches the algorithm used by Azure AD (typicallyRS256) - Azure AD uses RS256 for signing tokens by default
References
- Microsoft Identity Platform
- Azure AD OAuth 2.0
- JWT.io - Token decoder and validator
Additional Resources
- Azure Active Directory Documentation
- Azure Databricks Authentication
- Azure Key Vault Best Practices
- OAuth 2.0 and OpenID Connect
Support
For additional assistance with Azure integration, please contact Timbr support or refer to the main Timbr documentation.