IBM Verify using OIDC

This tutorial provides step-by-step instructions for configuring Single Sign-On (SSO) between IBM Security Verify and Timbr’s ontology-based semantic layer using the OpenID Connect (OIDC) protocol.
Timbr operates as a virtual knowledge graph over existing data sources, enabling the semantic layer to securely expose business entities, relationships, and logic across identity systems, BI tools, and AI applications.
Table of Contents
- Introduction
- Prerequisites
- Part 1: Configure IBM Security Verify
- Part 2: Configure Timbr Platform
- Part 3: Test the Connection
- Part 4: Configure Role Mapping
- Advanced Configuration
- Troubleshooting
Introduction
About IBM Security Verify
IBM Security Verify is IBM's cloud-native Identity-as-a-Service (IDaaS) platform that provides:
- Single Sign-On (SSO) across applications
- Multi-factor authentication (MFA)
- Adaptive access policies
- User lifecycle management
- OIDC/OAuth 2.0 and SAML support
What You'll Achieve
After completing this tutorial:
- Users can log into Timbr Platform using their IBM Verify credentials
- User accounts are automatically created on first login
- Roles are automatically assigned based on IBM Verify groups
- Single logout works across both platforms (optional)
Time Required
30-45 minutes for complete setup including role mapping.
Prerequisites
IBM Security Verify Requirements
- IBM Security Verify tenant (SaaS or on-premises)
- Administrator access to IBM Verify Admin Console
- License that supports OIDC applications
Timbr Platform Requirements
- Admin access to Timbr Platform server
- HTTPS enabled on Timbr Platform (required for production)
- Timbr Platform URL (e.g.,
https://timbr.yourcompany.com) - Ability to set environment variables
Information to Gather
Before starting, collect:
| Item | Example | Where to Find |
|---|---|---|
| Timbr Platform URL | https://timbr.company.com | Your deployment |
| IBM Verify Tenant URL | https://company.verify.ibm.com | IBM Verify Admin Console |
Part 1: Configure IBM Security Verify
Step 1.1: Access IBM Verify Admin Console
- Open your browser and navigate to your IBM Security Verify Admin Console
- URL format:
https://<your-tenant>.verify.ibm.com/ui/admin - Log in with your administrator credentials
Step 1.2: Create a New Application
- In the Admin Console, navigate to Applications in the left menu
- Click Add application button
- Select Custom Application
- Click Add application to continue
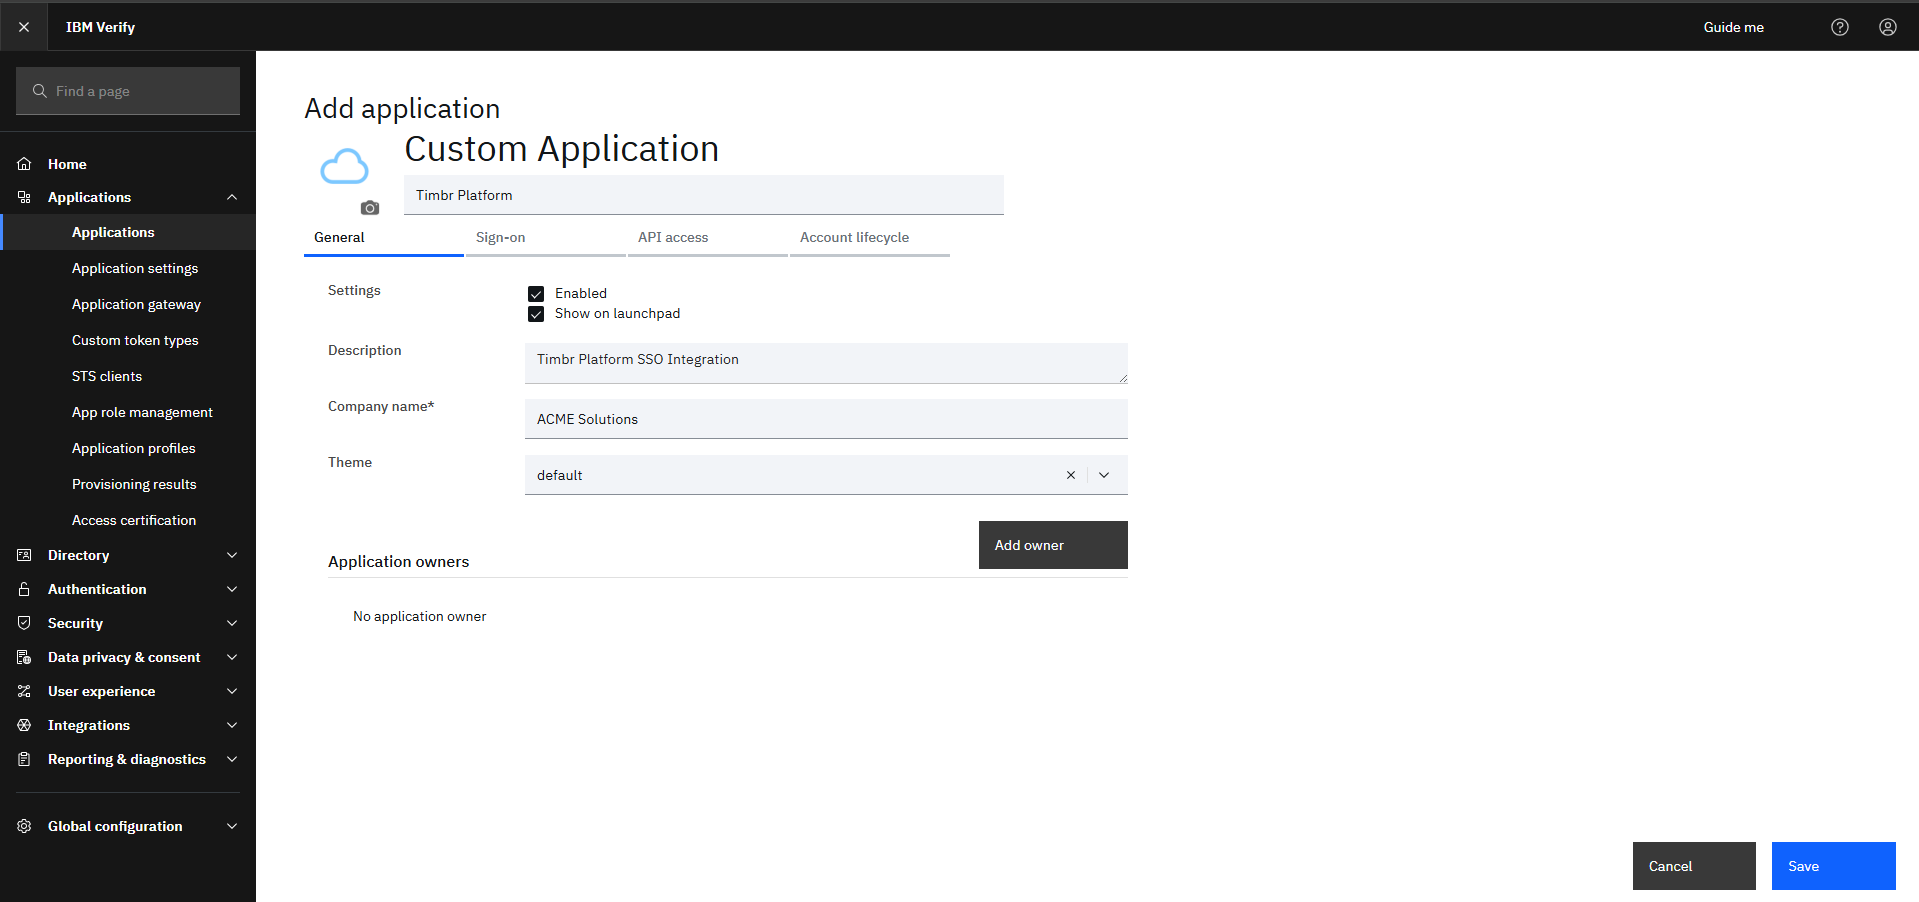
Step 1.3: Configure Application Basics
General Settings:
Field Value Application name Timbr PlatformDescription Timbr Platform SSO IntegrationCompany name Your company name
Step 1.4: Configure Sign-On Settings
Navigate to the Sign-on tab
Configure the following:
Field Value Sign-on method Open ID Connect 1.0 Application URL https://your-timbr-domain.comGrant types Authorization code Send all known user attributes Enabled (optional)
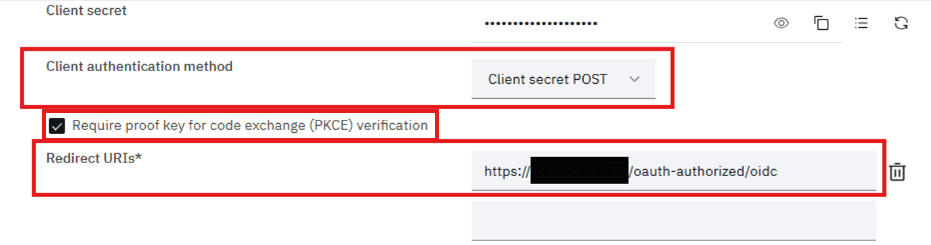
Step 1.5: Configure Redirect URIs
Still in the Sign-on tab, find Redirect URIs section
Click Add URI
Enter your Timbr redirect URI:
https://your-timbr-domain.com/oauth-authorized/oidcExamples:
- Production:
https://timbr.company.com/oauth-authorized/oidc - Development:
http://localhost:8088/oauth-authorized/oidc
- Production:
If using single logout, also add Sign-out redirect URIs:
https://your-timbr-domain.com/login/Click Save
Step 1.6: Configure Client Authentication
In the Sign-on tab, find Client authentication section
Enable Require PKCE verification
Set Token endpoint authentication method:
- Recommended:
Client secret post - Alternative:
Client secret basic
- Recommended:
Note this choice - you'll need it for Timbr configuration
Click Save
Step 1.7: Collect Client Credentials
In the Sign-on tab, locate the Client ID and Client secret
Copy and securely store both values:
Credential Example Value Client ID a1b2c3d4-e5f6-7890-abcd-ef1234567890Client secret aBcDeFgHiJkLmNoPqRsTuVwXyZ123456
Store the client secret securely. You won't be able to view it again after leaving this page.
Step 1.8: Find Your Tenant's OIDC Endpoints
Your IBM Verify OIDC Discovery URL follows this pattern:
https://<your-tenant>.verify.ibm.com/v1.0/endpoint/default/.well-known/openid-configurationTest this URL in your browser to verify it returns the OIDC configuration
Note the Issuer URL from the discovery document:
https://<your-tenant>.verify.ibm.com/v1.0/endpoint/default
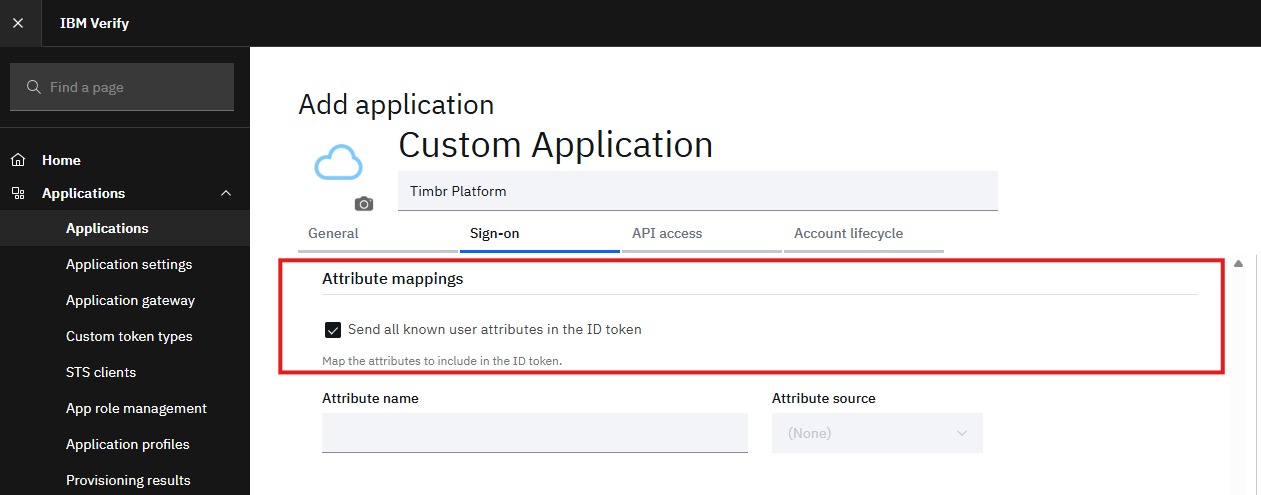
Step 1.9: Configure Token Claims (Optional but Recommended)
To include user groups in the tokens for role mapping:
Navigate to Sign-on → Attribute mappings
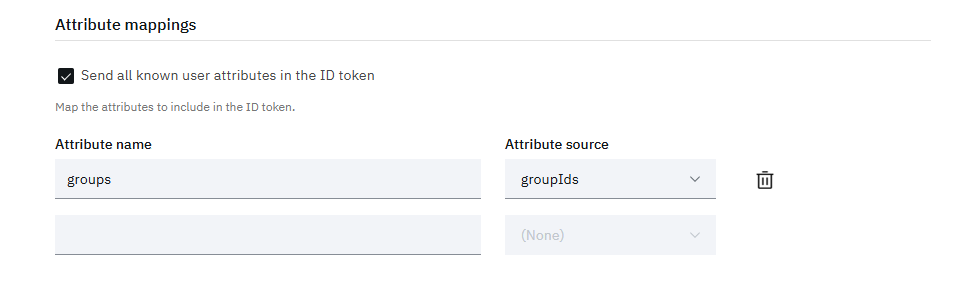
Under Attribute name
Add the following:
Field Value Attribute name groupsAttribute source groupIdsorgroups(depending on your setup)Click Save
Step 1.11: Configure Entitlements (User Assignment)
Navigate to the Entitlements tab
Choose how users can access this application:
Option A: All users (simplest)
- Select Automatic access for all users
Option B: Specific users/groups
- Select Select users and groups
- Click Add and select the users or groups that should have access
Click Save
Step 1.12: Verify Application Status
- Ensure the application status is Enabled
- If disabled, toggle it to Enabled
- Click Save to apply all changes
Part 2: Configure Timbr Platform
Step 2.1: Stop Timbr Platform
# If using systemd
sudo systemctl stop timbr-platform

# If using Docker
docker-compose down
Step 2.2: Set Required Environment Variables
Add the following environment variables to your Timbr Platform configuration:
# Enable Generic OIDC Provider
OAUTH_PROVIDER=oidc

# IBM Verify Client Credentials (from Step 1.8)
OAUTH_CLIENT_ID=a1b2c3d4-e5f6-7890-abcd-ef1234567890
OAUTH_SECRET=aBcDeFgHiJkLmNoPqRsTuVwXyZ123456

# IBM Verify Issuer URL (from Step 1.9)
OAUTH_OIDC_ISSUER=https://your-tenant.verify.ibm.com/v1.0/endpoint/default

# Enable user auto-registration
AUTH_USER_REGISTRATION=true
AUTH_USER_REGISTRATION_ROLE=editor

# Enable PKCE (must match IBM Verify configuration)
OAUTH_USE_PKCE=true

# Match the token endpoint auth method from Step 1.6
OAUTH_OIDC_AUTH_METHOD=client_secret_post
Step 2.3: Optional Environment Variables
# Allow username/password login as backup
AUTH_WITH_USERPASS=true

# Enable single logout
OAUTH_FRONT_CHANNEL_SINGLE_LOGOUT=true

# Enable JWT signature verification
OAUTH_OIDC_VERIFY_SIGNATURE=true

# HTTPS scheme (use 'http' only for development)
OAUTH_DEFAULT_SCHEME=https
Step 2.4: Complete Configuration Example
Here's a complete configuration for IBM Verify:
# ============================================
# Timbr Platform - IBM Security Verify OIDC
# ============================================

# Provider Configuration
OAUTH_PROVIDER=oidc

# IBM Verify Credentials
OAUTH_CLIENT_ID=a1b2c3d4-e5f6-7890-abcd-ef1234567890
OAUTH_SECRET=aBcDeFgHiJkLmNoPqRsTuVwXyZ123456

# IBM Verify OIDC Issuer
OAUTH_OIDC_ISSUER=https://company.verify.ibm.com/v1.0/endpoint/default

# Security Settings
OAUTH_USE_PKCE=true
OAUTH_OIDC_AUTH_METHOD=client_secret_post
OAUTH_OIDC_VERIFY_SIGNATURE=true
OAUTH_DEFAULT_SCHEME=https

# User Registration
AUTH_USER_REGISTRATION=true
AUTH_USER_REGISTRATION_ROLE=editor
AUTH_WITH_USERPASS=true

# Single Logout (optional)
OAUTH_FRONT_CHANNEL_SINGLE_LOGOUT=true
Step 2.5: Configure Environment Variables Location
Docker Compose (docker-compose.yml):
services:
  timbr-platform:
    environment:
      - OAUTH_PROVIDER=oidc
      - OAUTH_CLIENT_ID=a1b2c3d4-e5f6-7890-abcd-ef1234567890
      - OAUTH_SECRET=${IBM_VERIFY_CLIENT_SECRET}
      - OAUTH_OIDC_ISSUER=https://company.verify.ibm.com/v1.0/endpoint/default
      - AUTH_USER_REGISTRATION=true
      - AUTH_USER_REGISTRATION_ROLE=editor
      - OAUTH_USE_PKCE=true
      - OAUTH_OIDC_AUTH_METHOD=client_secret_post
Systemd Service (/etc/systemd/system/timbr-platform.service):
[Service]
Environment="OAUTH_PROVIDER=oidc"
Environment="OAUTH_CLIENT_ID=a1b2c3d4-e5f6-7890-abcd-ef1234567890"
Environment="OAUTH_SECRET=aBcDeFgHiJkLmNoPqRsTuVwXyZ123456"
Environment="OAUTH_OIDC_ISSUER=https://company.verify.ibm.com/v1.0/endpoint/default"
Environment="AUTH_USER_REGISTRATION=true"
Environment="AUTH_USER_REGISTRATION_ROLE=editor"
Environment="OAUTH_USE_PKCE=true"
Environment="OAUTH_OIDC_AUTH_METHOD=client_secret_post"
Step 2.6: Start Timbr Platform
# If using systemd
sudo systemctl daemon-reload
sudo systemctl start timbr-platform

# If using Docker
docker-compose up -d
Step 2.7: Verify Configuration Loaded
Check the logs to confirm OIDC configuration was loaded:
# Systemd
sudo journalctl -u timbr-platform -f | grep -i oidc

# Docker
docker-compose logs -f timbr-platform | grep -i oidc
Look for messages like:
INFO - OIDC Discovery successful from https://company.verify.ibm.com/v1.0/endpoint/default/.well-known/openid-configuration
Part 3: Test the Connection
Step 3.1: Access Timbr Login Page
- Open your browser
- Navigate to your Timbr Platform URL (e.g.,
https://timbr.company.com) - You should see the login page with a "Login with OIDC" button
Step 3.2: Initiate OIDC Login
- Click "Login with OIDC"
- You will be redirected to IBM Security Verify login page
Step 3.3: Authenticate with IBM Verify
- Enter your IBM Verify username (usually email)
- Enter your password
- Complete any MFA challenges if configured
- Click Sign In
Step 3.4: Authorize Application (First Time Only)
If this is your first login:
- IBM Verify may show a consent screen
- Review the requested permissions
- Click Allow or Authorize
Step 3.5: Verify Successful Login
- You should be redirected back to Timbr Platform
- You should now be logged in
- Your username should appear in the top-right corner
Step 3.6: Verify User Creation
- If you have admin access, go to Manage → Access Manager
- Find your user account
- Verify:
- Correct email address
- Correct first and last name
- Role is
viewer(default)
Step 3.7: Test Logout
- Click your username → Logout
- You should be logged out of Timbr
- If single logout is enabled, you'll also be logged out of IBM Verify
Part 4: Configure Role Mapping
Role mapping automatically assigns Timbr roles based on IBM Verify groups.
Step 4.1: Create Groups in IBM Verify
In IBM Verify Admin Console, go to Directory → Groups
Click Add group
Create groups that will map to Timbr roles:
IBM Verify Group Description timbr-adminsUsers with admin access timbr-editorsUsers who can edit content timbr-analystsUsers who can run analytics timbr-viewersRead-only users Click Save for each group
Step 4.2: Assign Users to Groups
- Go to Directory → Users
- Select a user
- Go to the Groups tab
- Click Add to group
- Select the appropriate Timbr group(s)
- Click Add
Step 4.3: Verify Groups in Tokens
Ensure the application is configured to include groups in tokens:
- Go to Applications → Timbr Platform
- Navigate to Sign-on → Token settings
- Verify the
groupsclaim is added (from Step 1.10)
Step 4.4: Configure Role Mapping in Timbr
Add these environment variables:
# Enable role mapping
OAUTH_ROLE_MAPPING_ENABLED=true

# Map IBM Verify groups to Timbr roles
OAUTH_ROLE_MAPPING={"timbr-admins": "admin", "timbr-editors": "editor", "timbr-analysts": "analyst", "timbr-viewers": "viewer"}

# Default role if no group matches
OAUTH_ROLE_MAPPING_DEFAULT=viewer

# Strategy: assign highest priority role when multiple match
OAUTH_ROLE_MAPPING_STRATEGY=highest

# Role priority (highest first)
OAUTH_ROLE_PRIORITY=admin,editor,analyst,viewer

# Claim path where groups are found
OAUTH_OIDC_ROLE_CLAIM_PATHS=groups,groupIds
Step 4.5: Alternative: Using IBM Verify Group IDs
If IBM Verify returns group IDs instead of names:
Find the group IDs in IBM Verify Admin Console:
- Go to Directory → Groups
- Select a group
- Copy the Group ID from the URL or details
Update the role mapping to use IDs:
OAUTH_ROLE_MAPPING={"00000000-0000-0000-0000-000000000001": "admin", "00000000-0000-0000-0000-000000000002": "editor", "00000000-0000-0000-0000-000000000003": "analyst", "00000000-0000-0000-0000-000000000004": "viewer"}
Step 4.6: Test Role Mapping
- Restart Timbr Platform to apply changes
- Log out and log back in
- Check your assigned role:
- Go to Manage → Access Manager
- Find your user
- Verify the correct role was assigned
Advanced Configuration
Custom OIDC Endpoints
If auto-discovery fails or you need custom endpoints:
# IBM Verify standard endpoint patterns
OAUTH_OIDC_AUTHORIZATION_ENDPOINT=https://your-tenant.verify.ibm.com/v1.0/endpoint/default/authorize
OAUTH_OIDC_TOKEN_ENDPOINT=https://your-tenant.verify.ibm.com/v1.0/endpoint/default/token
OAUTH_OIDC_USERINFO_ENDPOINT=https://your-tenant.verify.ibm.com/v1.0/endpoint/default/userinfo
OAUTH_OIDC_JWKS_URI=https://your-tenant.verify.ibm.com/v1.0/endpoint/default/jwks
OAUTH_OIDC_END_SESSION_ENDPOINT=https://your-tenant.verify.ibm.com/v1.0/endpoint/default/logout
IBM Verify On-Premises
For IBM Verify Access (on-premises):
# On-premises endpoints may differ
OAUTH_OIDC_ISSUER=https://isva.company.com/mga/sps/oauth/oauth20

# You may need to set custom discovery URL
OAUTH_OIDC_DISCOVERY_URL=https://isva.company.com/mga/sps/oauth/oauth20/.well-known/openid-configuration
Additional Scopes
Request additional information from IBM Verify:
# Default scopes: openid email profile
# Add additional scopes as needed
OAUTH_SCOPES=groups
Troubleshooting
Issue: "redirect_uri_mismatch" Error
Cause: The redirect URI configured in IBM Verify doesn't match what Timbr sends.
Solution:
- In IBM Verify Admin Console, go to your application
- Check Sign-on → Redirect URIs
- Ensure URI matches exactly:
- Correct scheme (https)
- Correct domain
- Path is
/oauth-authorized/oidc - No trailing slash
# If using HTTP for development
OAUTH_DEFAULT_SCHEME=http
Issue: "invalid_client" Error
Cause: Client credentials are incorrect or client secret authentication method mismatch.
Solution:
- Verify
OAUTH_CLIENT_IDis correct - Verify
OAUTH_SECRETis correct (regenerate if needed) - Match the authentication method:
# If IBM Verify uses Basic authentication
OAUTH_OIDC_AUTH_METHOD=client_secret_basic

# If IBM Verify uses POST (default)
OAUTH_OIDC_AUTH_METHOD=client_secret_post
Issue: Discovery Failed
Cause: Cannot reach IBM Verify discovery endpoint.
Solution:
Test discovery URL manually:
curl https://your-tenant.verify.ibm.com/v1.0/endpoint/default/.well-known/openid-configurationIf it fails, check:
- Network connectivity
- Firewall rules
- DNS resolution
If discovery is at a different path, set custom URL:
OAUTH_OIDC_DISCOVERY_URL=https://your-tenant.verify.ibm.com/custom/path/.well-known/openid-configuration
Issue: User Not Created
Cause: User registration is disabled.
Solution:
AUTH_USER_REGISTRATION=true
AUTH_USER_REGISTRATION_ROLE=editor
Issue: PKCE Error
Cause: PKCE configuration mismatch between IBM Verify and Timbr.
Solution:
Check IBM Verify PKCE settings:
- Go to application Sign-on tab
- Note if PKCE is required
Match in Timbr:
# If PKCE is enabled in IBM Verify
OAUTH_USE_PKCE=true

# If PKCE is not supported
OAUTH_USE_PKCE=false
Issue: SSL Certificate Error
Cause: Self-signed or untrusted SSL certificate on IBM Verify.
Solution (Production):
- Use a valid, trusted SSL certificate
Security Best Practices
Recommended Settings
# Always use HTTPS in production
OAUTH_DEFAULT_SCHEME=https

# Enable PKCE for enhanced security
OAUTH_USE_PKCE=true

# Verify token signatures
OAUTH_OIDC_VERIFY_SIGNATURE=true

# Enable single logout for security
OAUTH_FRONT_CHANNEL_SINGLE_LOGOUT=true
IBM Verify Best Practices
- Enable MFA in IBM Verify for all users
- Configure adaptive access policies for risk-based authentication
- Set session timeouts appropriately
- Enable audit logging in IBM Verify
- Restrict application access to authorized users/groups only
- Rotate client secrets periodically
Avoid These
- Using HTTP in production
- Disabling PKCE without a valid reason
- Disabling token signature verification
- Storing client secrets in version control
- Overly permissive application access
Quick Reference
IBM Verify URLs
| Resource | URL Pattern |
|---|---|
| Admin Console | https://<tenant>.verify.ibm.com/ui/admin |
| Discovery | https://<tenant>.verify.ibm.com/v1.0/endpoint/default/.well-known/openid-configuration |
| Authorization | https://<tenant>.verify.ibm.com/v1.0/endpoint/default/authorize |
| Token | https://<tenant>.verify.ibm.com/v1.0/endpoint/default/token |
| UserInfo | https://<tenant>.verify.ibm.com/v1.0/endpoint/default/userinfo |
| JWKS | https://<tenant>.verify.ibm.com/v1.0/endpoint/default/jwks |
| Logout | https://<tenant>.verify.ibm.com/v1.0/endpoint/default/logout |
Environment Variables Summary
| Variable | Required | Default | Description |
|---|---|---|---|
OAUTH_PROVIDER | Yes | - | Set to oidc |
OAUTH_CLIENT_ID | Yes | - | IBM Verify Client ID |
OAUTH_SECRET | Yes | - | IBM Verify Client Secret |
OAUTH_OIDC_ISSUER | Yes | - | IBM Verify Issuer URL |
AUTH_USER_REGISTRATION | No | true | Enable auto user creation |
AUTH_USER_REGISTRATION_ROLE | No | viewer | Default role for new users |
OAUTH_USE_PKCE | No | true | Enable PKCE |
OAUTH_OIDC_AUTH_METHOD | No | client_secret_post | Token auth method |
OAUTH_ROLE_MAPPING_ENABLED | No | false | Enable group-to-role mapping |
OAUTH_ROLE_MAPPING | No | {} | JSON group-to-role mapping |
OAUTH_OIDC_ROLE_CLAIM_PATHS | No | groups,roles | Token claim paths for groups |
Additional Resources
- IBM Security Verify Documentation
- IBM Verify OIDC Configuration Guide
- OIDC Integration in Timbr
- OpenID Connect Specification
Congratulations! 🎉 You have successfully configured Timbr Platform to use IBM Security Verify for Single Sign-On.
Last updated: January 2026