Okta Integration
![]()
This page provides a step-by-step guide for integrating Okta as a Single Sign-On (SSO) provider with Timbr’s ontology-based semantic layer.
Timbr operates as a virtual knowledge graph over existing data sources, enabling the semantic layer to securely expose business entities, relationships, and logic across identity systems, BI tools, and AI applications.
By following this tutorial, you will configure OpenID Connect (OIDC) authentication with secure PKCE (Proof Key for Code Exchange), enable optional multi-factor authentication (MFA), and allow automatic user registration on first login.
Prerequisites
Before you begin, ensure you have:
- Administrative access to your Okta organization
- Administrative access to the Timbr platform server to configure environment variables
- Your Timbr domain URL (e.g.,
https://timbr.example.com)
Step 1: Create an Okta OIDC Application
Create App Integration
- Log in to the Okta Admin Console.
- Navigate to Applications > Applications.
- Click Create App Integration.
- In the dialog that appears:
- Select OIDC - OpenID Connect as the Sign-in method.
- Select Web Application as the Application type.
- Click Next.

Configure General Settings
On the New Web App Integration page, configure the following settings:
- App integration name:
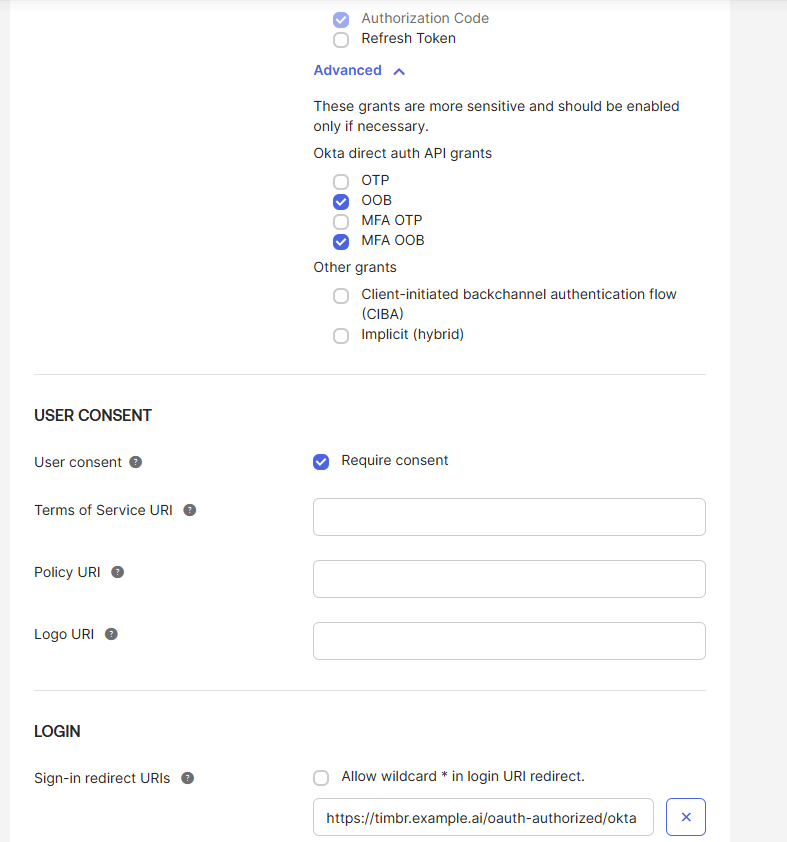
Timbr Platform(or any name you prefer) - Grant type:
- ✅ Check Authorization Code
- ✅ Check Refresh Token (optional, for offline access)
- Sign-in redirect URIs:
https://<your-timbr-domain>/oauth-authorized/okta- Replace
<your-timbr-domain>with your actual Timbr domain (e.g.,https://timbr.example.com/oauth-authorized/okta)
- Replace
- Sign-out redirect URIs:
https://<your-timbr-domain>/login/- The redirect URI after a successful logout. - Controlled access: Select how to assign users or groups (e.g., Allow everyone in your organization to access)
Configure Security Settings
Scroll to the Client authentication section:
- Client authentication: Select Client secret (recommended for web applications)
- Proof Key for Code Exchange (PKCE): Select Require PKCE as additional verification
Enabling PKCE provides an additional layer of security for the OAuth flow, protecting against authorization code interception attacks.
Click Save to create the application.
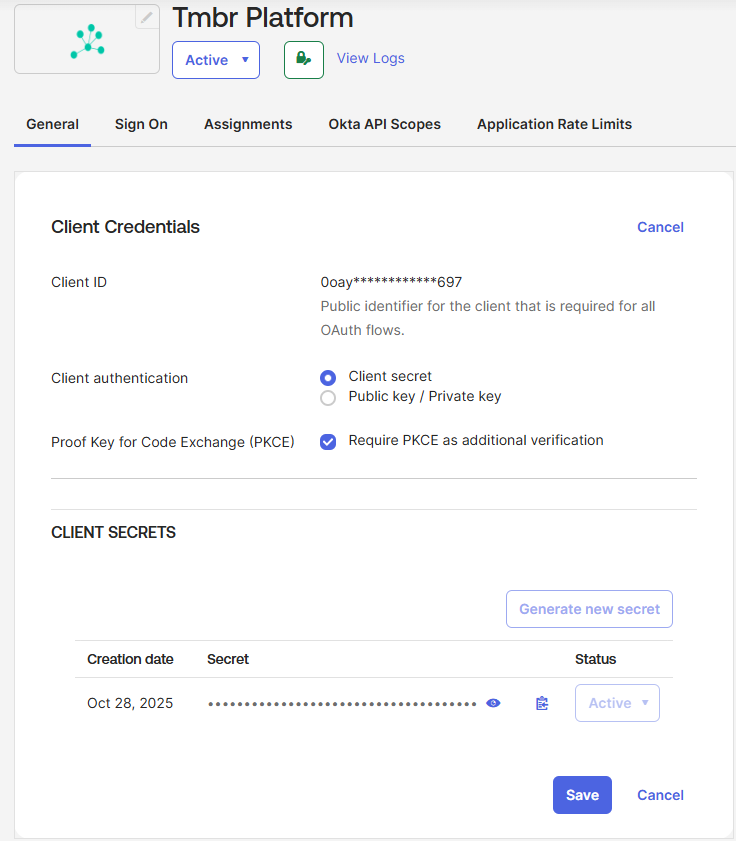
Collect Client Credentials
After saving, you'll be taken to the application's General tab:
- Locate the Client Credentials section.
- Copy the Client ID – you'll use this as
OAUTH_CLIENT_ID. - Copy the Client secret – you'll use this as
OAUTH_SECRET. - Note your Okta domain from the browser URL (e.g.,
https://your-org.okta.com) – you'll use this asOAUTH_BASE_URL.
Store your client secret securely. Never commit it to version control or share it publicly.
Step 2: Configure Timbr Environment Variables
Add the OAuth environment variables to your timbr-platform service configuration. The configuration method depends on your deployment type:
- Docker Compose: Add environment variables to the
timbr-platformservice in yourdocker-compose.ymlfile. See the Docker Compose deployment guide for the base configuration. - Kubernetes: Add environment variables to the
timbr-platformDeployment manifest. See the Kubernetes deployment guide for the base configuration.
2.1. Required Environment Variables
# Provider identifier
OAUTH_PROVIDER=okta

# Client credentials from Okta Admin Console
OAUTH_CLIENT_ID=<your-okta-client-id>
OAUTH_SECRET=<your-okta-client-secret>

# Okta domain URL (without /oauth2 suffix - paths are appended automatically)
OAUTH_BASE_URL=https://<your-okta-domain>
Set OAUTH_BASE_URL to your Okta domain (e.g., https://your-org.okta.com).
The OAuth2 paths (/oauth2/v1/token, /oauth2/v1/authorize, etc.) are appended automatically.
For Custom Authorization Servers, include the auth server ID in the path.
Do NOT enable DPoP (Demonstrating Proof of Possession) in your Okta application.
This implementation uses PKCE only. If DPoP is enabled, you will see an error:
invalid_dpop_proof: The DPoP proof JWT header is missing
2.2 Deployment-Specific Configuration
Docker Compose
Add the OAuth environment variables to your timbr-platform service in docker-compose.yml:
services:
  timbr-platform:
    image: timbr.azurecr.io/timbr-platform-stable:latest
    container_name: timbr-platform
    environment:
      # Existing environment variables...
      - DB_CONNECTION=mysql
      - DB_HOST=timbr-db
      - DB_PORT=3306
      - DB_DATABASE=timbr_platform
      - DB_USERNAME=db_user
      - DB_PASSWORD=db_pass
      # OAuth/Okta configuration
      - OAUTH_PROVIDER=okta
      - OAUTH_CLIENT_ID=<your-okta-client-id>
      - OAUTH_SECRET=<your-okta-client-secret>
      - OAUTH_BASE_URL=https://<your-okta-domain>
      - AUTH_USER_REGISTRATION=true
      - AUTH_USER_REGISTRATION_ROLE=viewer
      - OAUTH_USE_PKCE=true
    # ... rest of configuration
After updating your docker-compose.yml, restart the timbr-platform service:
sudo docker-compose up -d timbr-platform
Kubernetes
Add the OAuth environment variables to your timbr-platform Deployment manifest:
apiVersion: apps/v1
kind: Deployment
metadata:
  name: timbr-platform
  namespace: default
spec:
  template:
    spec:
      containers:
        - name: timbr-platform
          image: timbr.azurecr.io/timbr-platform-stable:latest
          env:
            # Existing environment variables...
            - name: DB_CONNECTION
              value: mysql
            - name: DB_HOST
              value: timbr-mysql
            # OAuth/Okta configuration
            - name: OAUTH_PROVIDER
              value: okta
            - name: OAUTH_CLIENT_ID
              value: <your-okta-client-id>
            - name: OAUTH_SECRET
              value: <your-okta-client-secret>
            - name: OAUTH_BASE_URL
              value: https://<your-okta-domain>
            - name: AUTH_USER_REGISTRATION
              value: "true"
            - name: AUTH_USER_REGISTRATION_ROLE
              value: viewer
            - name: OAUTH_USE_PKCE
              value: "true"
Apply the updated manifest:
kubectl apply -f timbr-platform.yaml
For better security in Kubernetes, store sensitive values like OAUTH_CLIENT_ID and OAUTH_SECRET in Kubernetes Secrets instead of plain text in the manifest.
2.3 Optional Environment Variables
# Default scheme for OAuth redirects (default: https)
OAUTH_DEFAULT_SCHEME=https

# Enable user self-registration on first OAuth login
AUTH_USER_REGISTRATION=true

# Default role for self-registered users (default: viewer)
AUTH_USER_REGISTRATION_ROLE=viewer

# Allow or disable username/password login alongside OAuth
AUTH_WITH_USERPASS=true

# Custom scopes (space-separated)
OAUTH_SCOPES=

# Enable PKCE (default: true)
OAUTH_USE_PKCE=true

# Enable Okta groups to Timbr roles mapping (default: false)
OAUTH_ROLE_MAPPING_ENABLED=false

# JSON mapping of Okta groups to Timbr roles
OAUTH_ROLE_MAPPING={"everyone": "viewer", "timbr_editor": "editor", "timbr_viewer": "viewer", "timbr_analyst": "analyst", "timbr_admin": "admin"}

# Fallback role if no group matches (defaults to AUTH_USER_REGISTRATION_ROLE)
OAUTH_ROLE_MAPPING_DEFAULT=viewer

# Role assignment strategy: 'highest', 'all', or 'first' (default: highest)
OAUTH_ROLE_MAPPING_STRATEGY=highest

# Role priority for 'highest' strategy (comma-separated, highest first)
OAUTH_ROLE_PRIORITY=admin,editor,analyst,viewer

# Enable front-channel single logout endpoint SAML and OIDC single logout requests will trigger subsequent logout requests to all other participating apps with active sessions
OAUTH_FRONT_CHANNEL_SINGLE_LOGOUT=false
To enable front-channel single logout, configure the following settings in your Okta Admin Console:
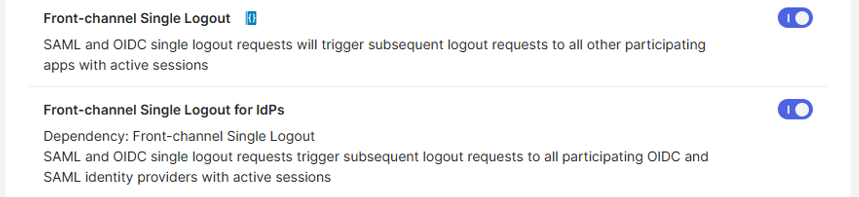
Enable Front-Channel Single Logout Features:
- In the Okta Admin Console, click Settings in the left sidebar
- Select Features from the menu
- Enable both:
- Front-channel Single Logout
- Front-channel Single Logout for IdPs
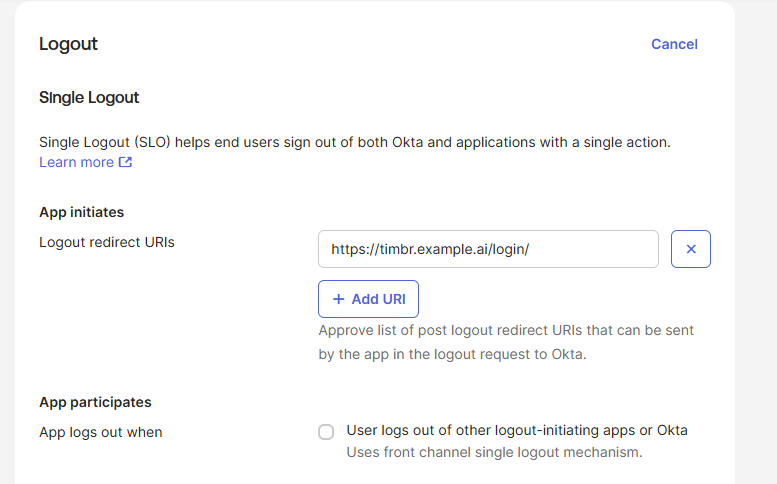
Configure Application Logout Settings:
- Navigate to Applications > Your Timbr App
- Go to the General tab
- Scroll to the General Settings section and click Edit
- In the Logout section, add:
- Logout redirect URIs:
https://<your-timbr-domain>/login/ - Replace
<your-timbr-domain>with your actual Timbr domain
- Click Save
This configuration ensures users are properly redirected to the Timbr login page after logout and enables single logout across all active sessions.
2.4 Example Configuration (Org Authorization Server)
OAUTH_PROVIDER=okta
OAUTH_CLIENT_ID=0oay231hfa32..
OAUTH_SECRET=JeyZS2q8Jok1He9Af8qWE...f-aOxSwZyM
OAUTH_BASE_URL=https://your-org.okta.com
AUTH_USER_REGISTRATION=true
AUTH_USER_REGISTRATION_ROLE=viewer
OAUTH_USE_PKCE=true
2.5 Configure Okta Groups for Role Mapping (Optional)
If you want to automatically assign Timbr roles based on Okta group membership, you'll need to create groups in Okta and configure the groups claim.
Step 1: Create Groups in Okta
- In the Okta Admin Console, navigate to Directory > Groups.
- Click Add Group.
- Enter the group details:
- Name: Use a descriptive name (e.g.,
timbr_admin,timbr_analyst,timbr_viewer) - Description: Optional description of the group's purpose
- Name: Use a descriptive name (e.g.,
- Click Save.
- Repeat for each role you want to map (recommended groups:
timbr_admin,timbr_editor,timbr_analyst,timbr_viewer).
Use a consistent naming convention like timbr_<role> to make group-to-role mapping easier. The group names you create here will be used in the OAUTH_ROLE_MAPPING environment variable.
Step 2: Assign Users to Groups
- In Directory > Groups, click on the group you created.
- Click the Assign people button.
- Search for users and click + next to each user you want to add.
- Click Done when finished.
- Repeat for other groups as needed.
Alternative method - Assign groups from the user profile:
- Navigate to Directory > People.
- Click on a user.
- Go to the Groups tab.
- Click Assign Groups.
- Select the appropriate groups and click Done.
Step 3: Configure Groups Claim in Okta Application
To include group information in the authentication token, configure the groups claim:
For Org Authorization Server (Default):
- Go to Applications > Your Timbr App > Sign On.
- Scroll to the OpenID Connect ID Token section.
- Click Edit.
- Configure the Groups claim:
- Groups claim type: Select
Filter - Groups claim filter:
- Claim name:
groups - Filter: Select
Matches regex - Pattern: Enter
timbr_.*(to include only Timbr-related groups) or.*(to include all groups)
- Claim name:
- Groups claim type: Select
- Click Save.
For Custom Authorization Server:
- Navigate to Security > API > Authorization Servers.
- Select your authorization server (or default if using the default server).
- Go to the Claims tab.
- Click Add Claim and configure:
- Name:
groups - Include in token type: Select
ID Token(or bothID TokenandAccess Token) - Value type: Select
Groups - Filter: Select
Matches regex - Pattern: Enter
timbr_.*or.* - Include in: Select
Any scope
- Name:
- Click Create.
After configuring the groups claim, you can test it by:
- Using Okta's Token Preview feature in the Authorization Server settings
- Checking the ID token after logging in (look for the
groupsarray in the token)
Step 4: Map Okta Groups to Timbr Roles
Now that your groups are configured, you'll map them to Timbr roles using environment variables (see next section).
Example mapping strategy:
| Okta Group | Timbr Role | Purpose |
|---|---|---|
timbr_admin | admin | Full system access |
timbr_editor | editor | Can edit ontologies and models |
timbr_analyst | analyst | Can query and analyze data |
timbr_viewer | viewer | Read-only access |
everyone | viewer | Default role for all authenticated users |
2.6 Environment Variables for Role Mapping
# Enable Okta groups to Timbr roles mapping (default: false)
OAUTH_ROLE_MAPPING_ENABLED=true

# JSON mapping of Okta groups to Timbr roles (case-insensitive matching)
# Format: {"okta_group_name": "timbr_role_name", ...}
# Default mapping provided:
OAUTH_ROLE_MAPPING={"everyone": "viewer", "timbr_editor": "editor", "timbr_viewer": "viewer", "timbr_analyst": "analyst", "timbr_admin": "admin"}

# Fallback role if no group matches (defaults to AUTH_USER_REGISTRATION_ROLE)
OAUTH_ROLE_MAPPING_DEFAULT=viewer

# How to handle multiple matching groups: "first", "highest", "all"
# - first: Use the first matching role found
# - highest: Use the role with highest privileges (based on OAUTH_ROLE_PRIORITY)
# - all: Assign all matching roles to the user (additive)
OAUTH_ROLE_MAPPING_STRATEGY=highest

# Role priority for "highest" strategy (comma-separated, highest first)
OAUTH_ROLE_PRIORITY=admin,editor,analyst,viewer
Note: When
OAUTH_ROLE_MAPPING_ENABLED=true, thegroupsscope is automatically added to the OAuth request. Group names are matched case-insensitively (converted to lowercase).
Note 2: Groups are extracted from the userinfo endpoint first. If not present, they are decoded from the ID token. Group names are converted to lowercase in
auth_user_oauthfor case-insensitive matching against the role mapping configuration.
2.7 Example Configurations
Example 1: Using the Groups Created in Section 2.5
If you created groups named timbr_admin, timbr_editor, timbr_analyst, and timbr_viewer in Okta:
OAUTH_ROLE_MAPPING_ENABLED=true
OAUTH_ROLE_MAPPING={"timbr_admin": "admin", "timbr_editor": "editor", "timbr_analyst": "analyst", "timbr_viewer": "viewer", "everyone": "viewer"}
OAUTH_ROLE_MAPPING_STRATEGY=highest
OAUTH_ROLE_PRIORITY=admin,editor,analyst,viewer
OAUTH_ROLE_MAPPING_DEFAULT=viewer
With this configuration:
- Users in
timbr_admingroup → Getadminrole - Users in
timbr_editorgroup → Geteditorrole - Users in
timbr_analystgroup → Getanalystrole - Users in
timbr_viewergroup → Getviewerrole - Users in multiple groups → Get the highest priority role
- Users with no matching groups → Get default
viewerrole
Example 2: Simple Department-Based Mapping
If your organization uses department groups:
OAUTH_ROLE_MAPPING_ENABLED=true
OAUTH_ROLE_MAPPING={"IT-Department": "admin", "Data-Analytics": "analyst", "Business-Users": "viewer"}
OAUTH_ROLE_MAPPING_DEFAULT=viewer
Example 3: Project-Based Access with Multiple Groups
For organizations with project-specific access:
OAUTH_ROLE_MAPPING_ENABLED=true
OAUTH_ROLE_MAPPING={"Project-Leads": "admin", "Data-Engineers": "editor", "Data-Scientists": "analyst", "Stakeholders": "viewer"}
OAUTH_ROLE_MAPPING_STRATEGY=highest
OAUTH_ROLE_PRIORITY=admin,editor,analyst,viewer
Test Your Role Mapping
After configuring the groups claim and environment variables, test with different users to verify the mapping works correctly:
Testing Steps:
- Log out of Timbr if currently logged in
- Click "Sign in with Okta"
- Log in with a test user who belongs to specific groups
- After successful login, check the user's role in Timbr
- Verify the role matches your mapping configuration
Test Scenarios:
| Test Scenario | User's Okta Groups | Expected Timbr Role | Notes |
|---|---|---|---|
| Admin user | ["timbr_admin"] | admin | User should have full system access |
| Editor user | ["timbr_editor"] | editor | Can modify ontologies and models |
| Analyst user | ["timbr_analyst"] | analyst | Can query and analyze data |
| Viewer user | ["timbr_viewer"] | viewer | Read-only access |
| Multi-group user (highest) | ["timbr_analyst", "timbr_viewer"] | analyst | Gets higher priority role when strategy is "highest" |
| Multi-group user (all) | ["timbr_editor", "timbr_analyst"] | editor, analyst | Gets both roles when strategy is "all" |
| User with unmapped groups | ["HR-Department"] | viewer | Falls back to default role |
| User with no groups | [] | viewer | Falls back to default role |
If roles are not being assigned correctly:
- Verify the groups claim is included in the ID token (check Okta token preview)
- Ensure group names in
OAUTH_ROLE_MAPPINGexactly match Okta group names (case-insensitive) - Check the Timbr platform logs for role assignment messages
- Verify users are actually members of the expected groups in Okta
- Confirm
OAUTH_ROLE_MAPPING_ENABLED=trueis set