Supply Chain Use Case Tutorial

Overview of the Supply Chain Use Case Tutorial
This tutorial demonstrates how to build an ontology-based semantic layer using Timbr in a Supply Chain context.
You will create a virtual knowledge graph over relational data using SQL-native ontologies, defining business entities such as products, orders, customers, and shipments, along with their relationships and business logic.
This approach reflects how a semantic context layer is implemented in practice, enabling consistent business definitions, simplified querying, and reusable logic across SQL queries, BI tools, and AI systems.
What is covered in this guided tutorial:
- Creating a virtual Knowledge Graph with hierarchies and business logic
- Mapping data from a sample database to the virtual Knowledge Graph
- Defining logical relationships between the business concepts
- Using SQL statements to create the graph instantly
- Querying the Knowledge Graph using standard SQL to easily get those insights
- Exploring and discovering hidden relationships in the data using a graph explorer
- Creating a dashboard to represent the data by using different visualizations
- Creating Semantic Views with aggregations from the Knowledge Graph
Creating the Knowledge Graph Model
- To begin click on the Model tab on the top menu bar and then click on Ontology Explorer.
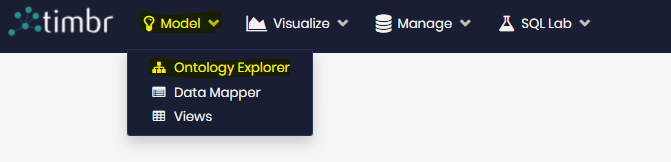
- Select the Knowledge Graph that was assigned to you:
tutorial_<yourname>.
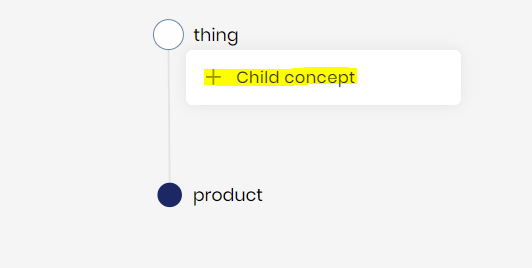
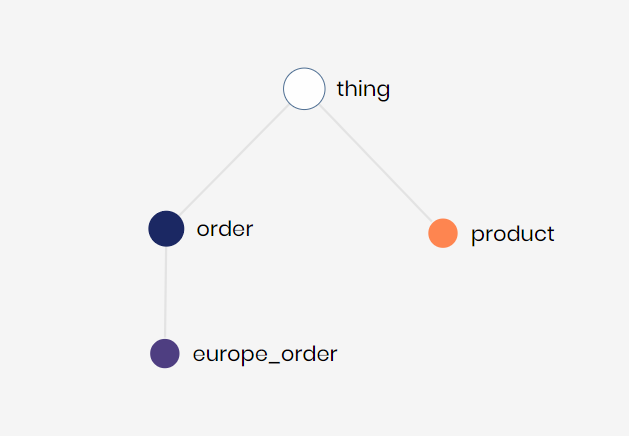
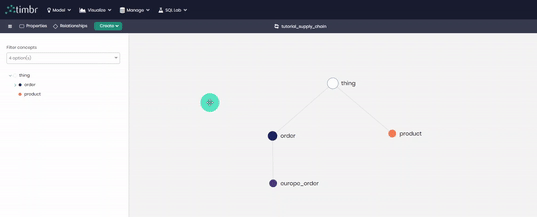
Once in the Ontology Explorer, you can see a brand new knowledge graph with the core concept called thing (the model of our Knowledge Graph is an "Ontology", where everything is a thing, in an hierarchical structure).

Creating our first concepts in the Knowledge Graph
We will model our knowledge graph by creating concepts that best represent our data according to the business point of view and terminology.
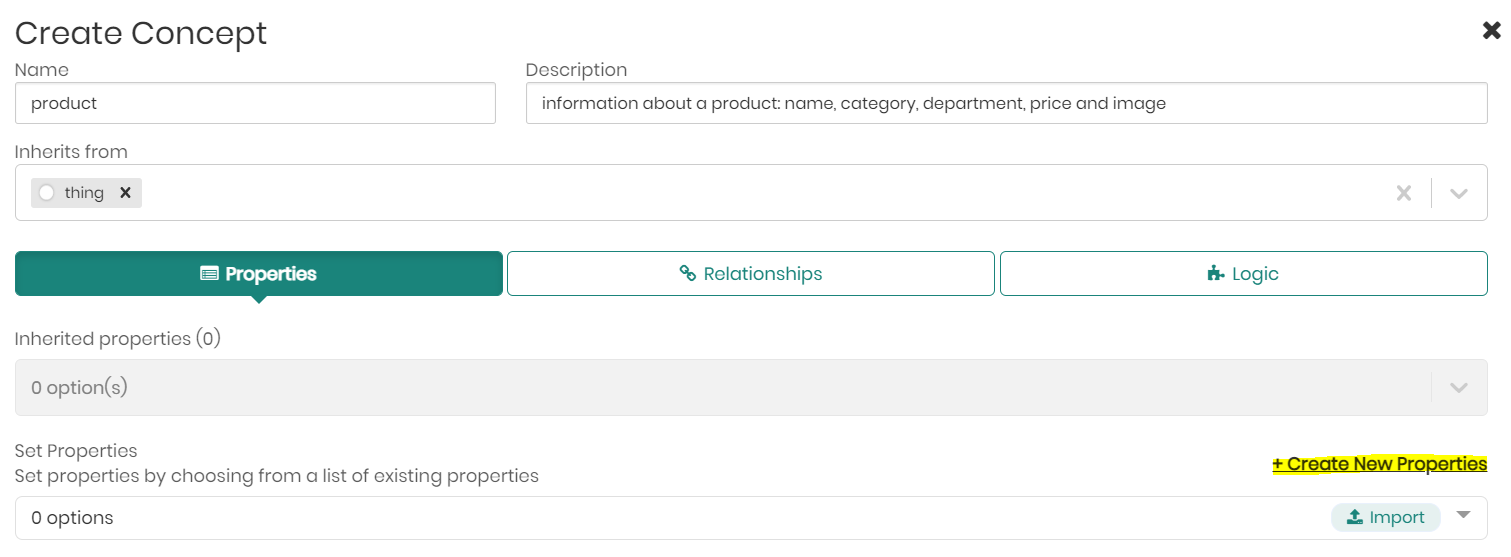
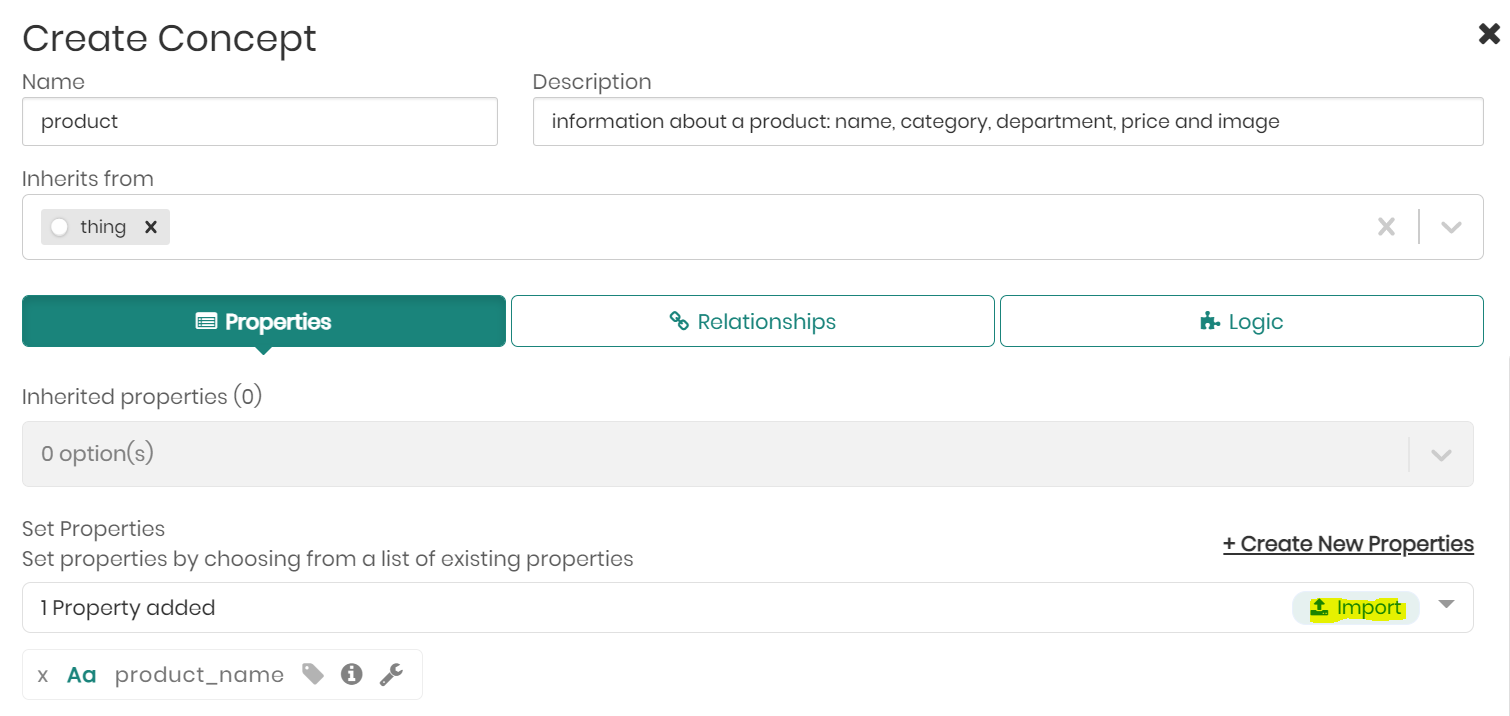
Creating "product" concept
- Right-click on the concept thing and then click on + Child concept.

- Start by writing the name of the concept, in this case "product". We can also give the concept a description to explain what type of data the concept will represent.

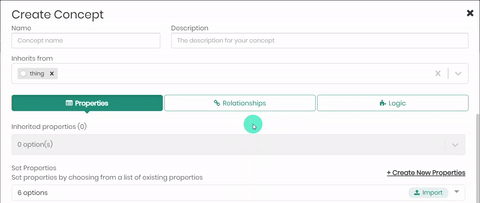
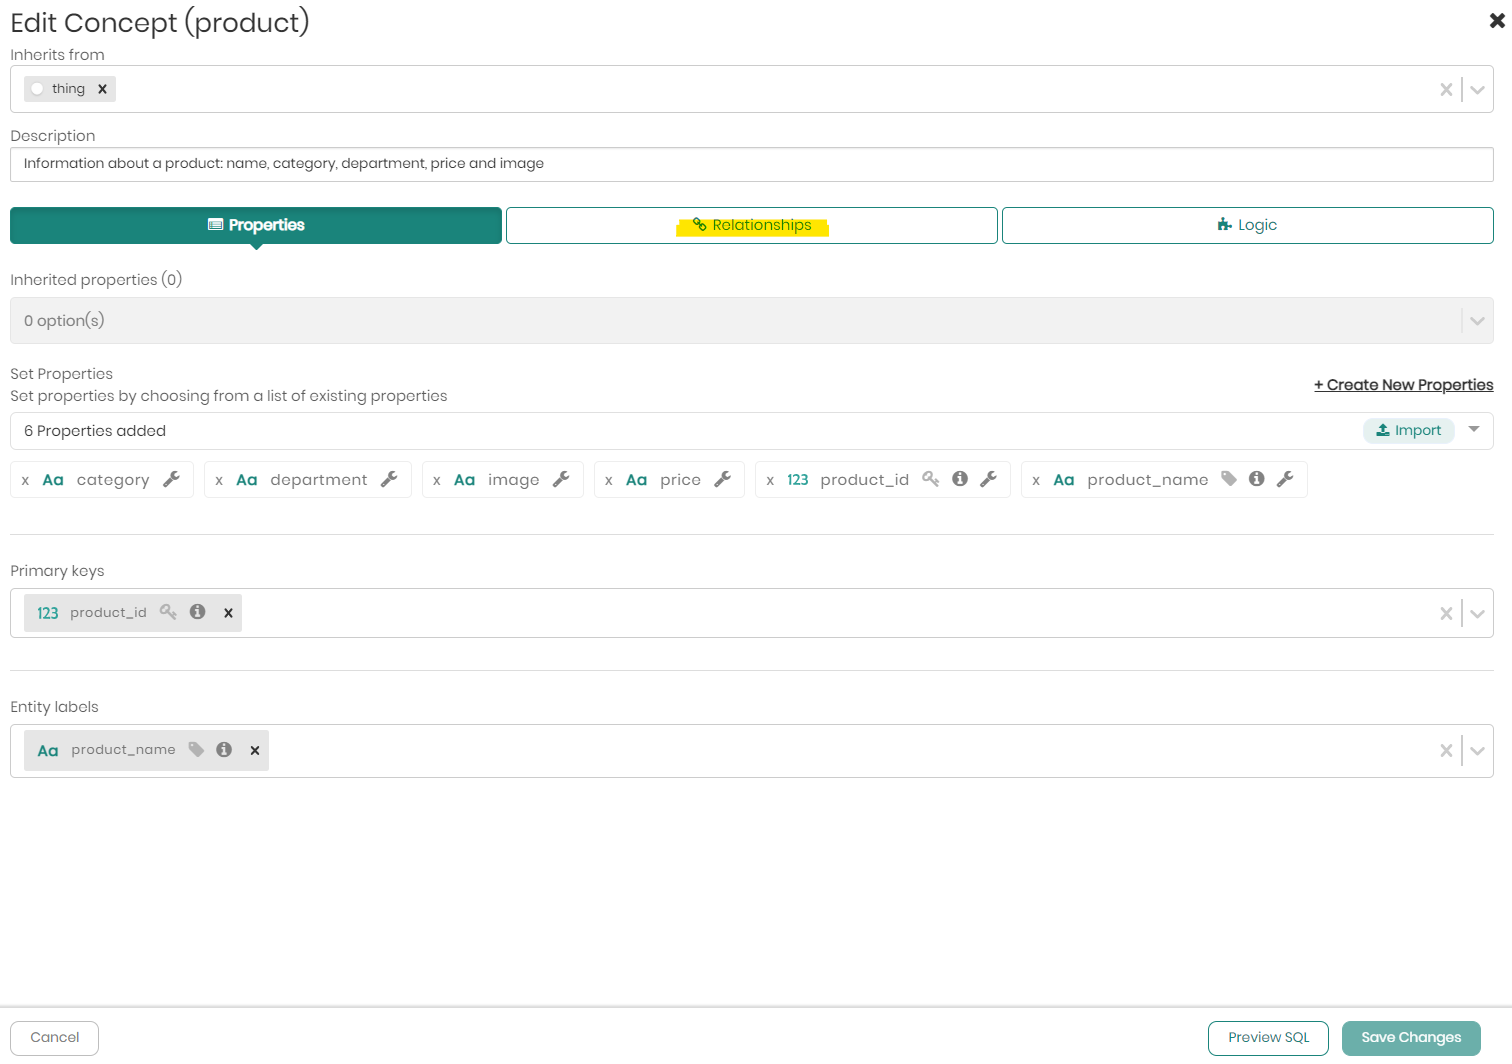
- Now it's time to add properties to our concept. One option we can use is to manually create new properties by clicking on + Create New Properties.
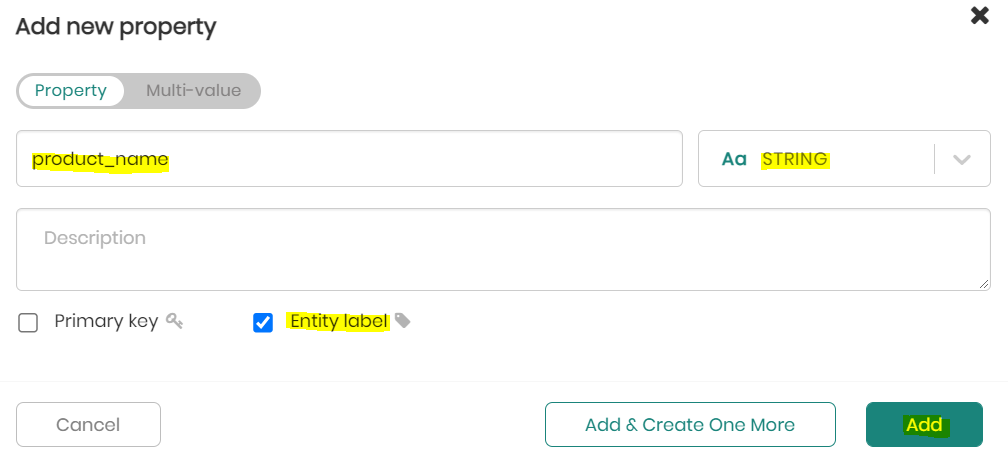
- A small popup will appear, give the property a name (product_name) and choose the type (STRING). You can also add a description to the property, as well as decide if the property being created should be our concept's Primary Key or Entity Label. For this concept tick only the Entity Label checkbox. Once ready click on Add.
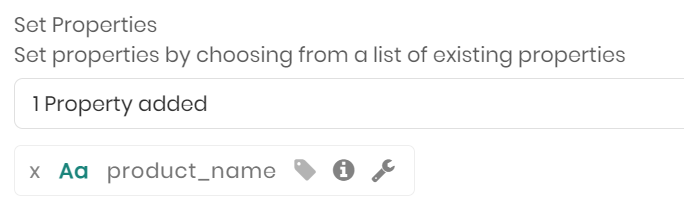
After clicking on the Add button we will see that our property has been added to the concept successfully (see below).
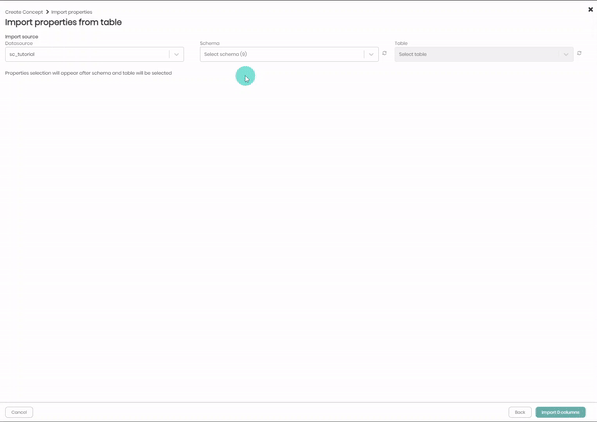
- The second option we have for adding properties to the concept, is by importing them directly from a table. Click on Import and let's see how easy it is to do.
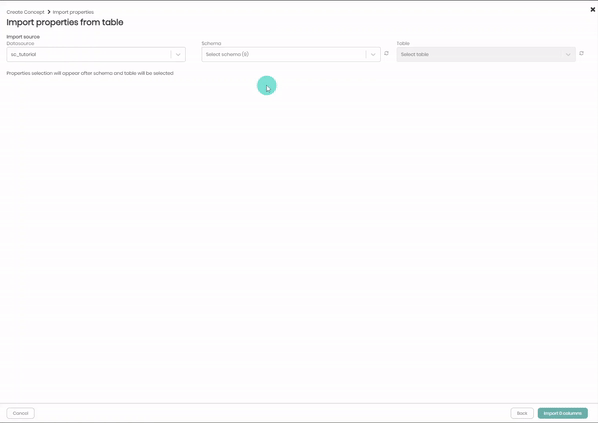
Once the import window appears, we need to choose our datasource, schema and table from which we will import the properties to our product concept. In this step choose the schema "supply_chain_demo" and the table "product".
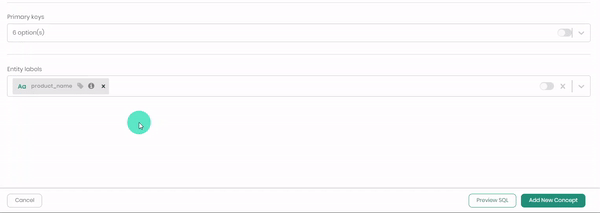
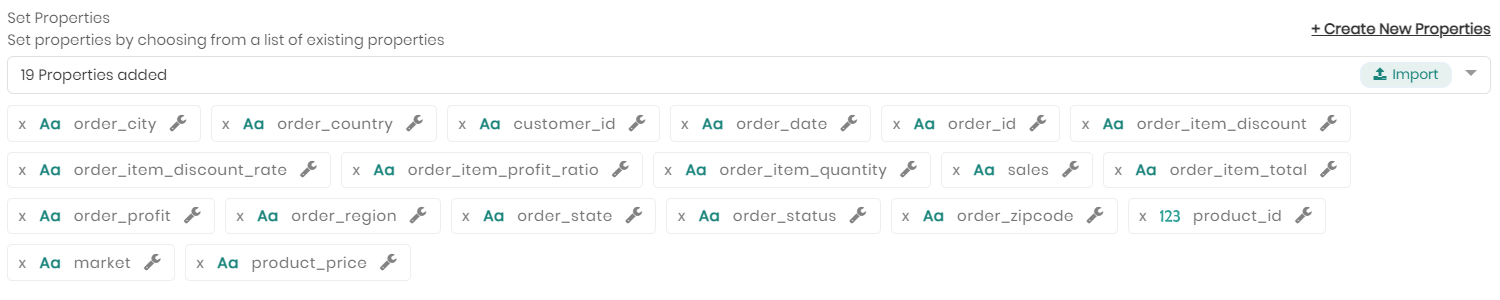
- Timbr will now present the column names and types automatically from the table. Once the properties have loaded, change the type of product_id to INTEGER, and click on Import columns.
We can now see the properties have been imported and added successfully to our concept!

Finally, let's choose the Primary Key (product_id) for our concept. Notice that it is mandatory to choose a Primary Key for a concept as without it, we won't be able to map data to our concept. Open the dropdown menu of Primary Key and add product_id.
Once the Primary Key and Entity label are chosen for the concept, click on Add New Concept and add our first concept.
We now see our first concept product representing information about products.

Let's proceed by similarly creating our second concept named order.
Creating "order" concept
- Right click on the concept thing and click on + Child concept.
- Fill in the concept name (order) and add a description (Information about orders), then click on import to import properties from our datasource.
Choose the schema "scdata", and table "datacosupplychaindataset_order", to import the columns from the table.
Once the properties load, scroll down and allocate product_id. You will notice a wand symbol next to the property type, this means the same property name already exists in the Knowledge Graph with a different property type. Click on the wand (use ontology default value) in order to change product_id to an INTEGER as defined previously in the product concept.
Once changed, click on import columns to add them as properties of our concept.
Our properties have been imported and added successfully to our concept.
- Add the Primary key "order_id" and Entity label "order_id" for the concept, then click on Add New Concept to add our second concept to the knowledge graph.
We have successfully created our second concept named order that represents information about orders.

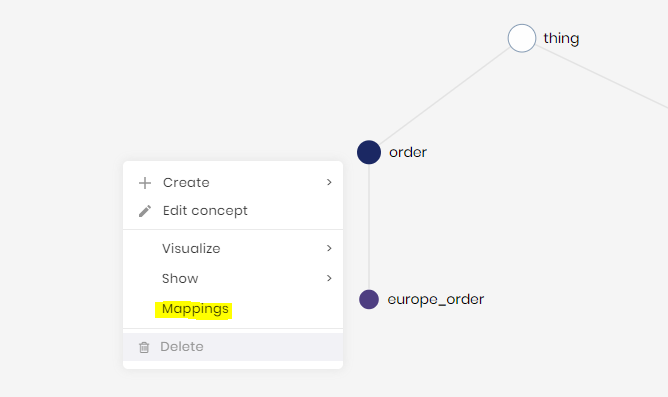
Let's proceed and create our final manual concept which in this case won't inherit from thing, but instead, will be a sub-concept inheriting from the concept order. Our third concept will be called europe_order and will represent only orders from Europe.
Creating "europe_order" concept using business logic
- Right click on the concept order, hover over + Create, then click on + Child concept.
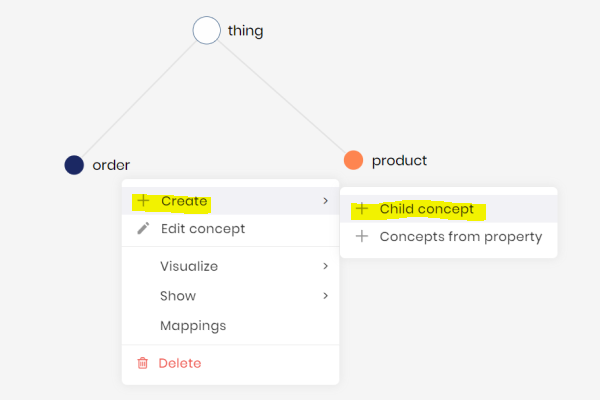
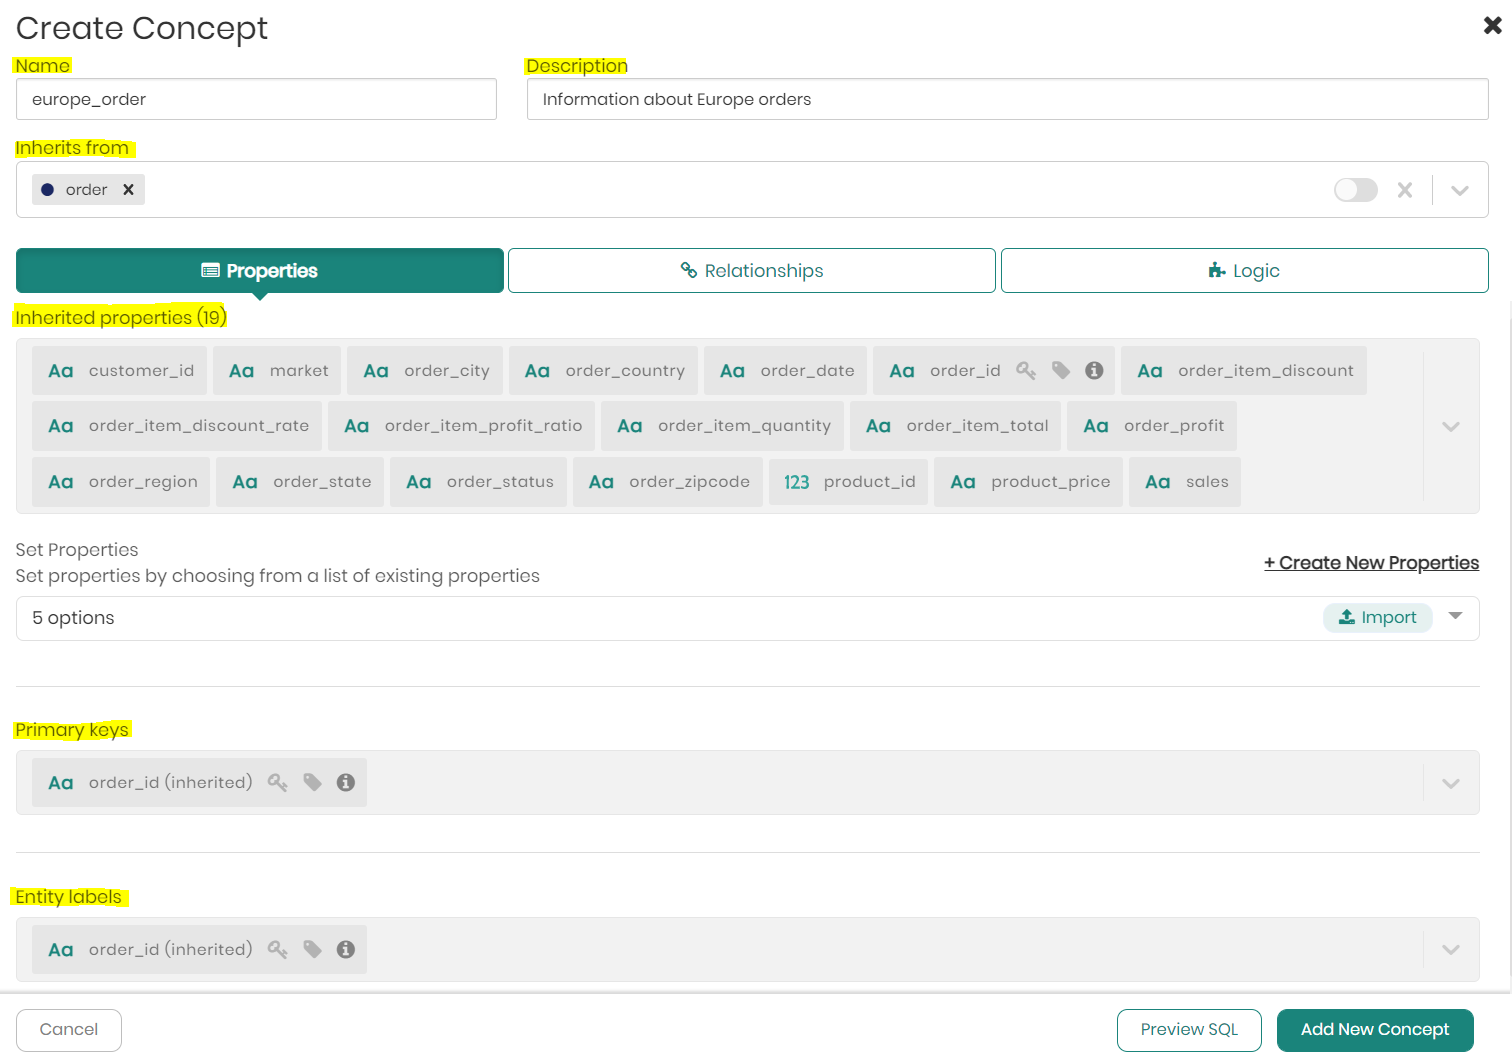
- Fill in the concept name (europe_order) and add a description (Information about orders from Europe).
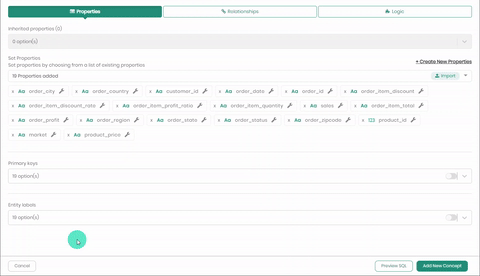
Notice how our europe_order concept automatically inherits from the concept order. In the first two concepts we've created, we imported properties from a datasource, in this case, we can see that the concept europe_order inherited properties automatically from its parent concept order.
FYI: You can always add unique properties, though in this example we can continue with the 19 inherited properties. This applies also for relationships (inherited and unique).
Choosing a Primary Key and Entity Labels won't be necessary here as well, as they are also inherited from the upper-level concept.
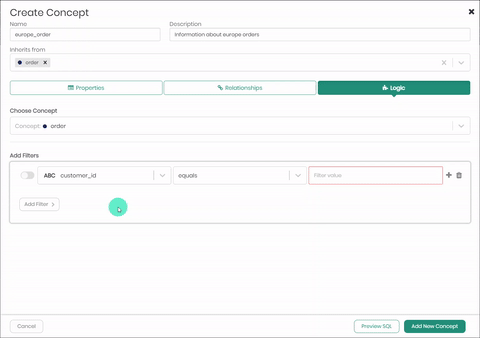
Normally at this point we would click on Add New Concept and create our concept, but to distinguish between the europe_order concept and order concept, we will add the business logic that represents orders from europe.
- Click on the Logic tab, then Choose the order concept as the concept to apply our logic on. Next, click on the Add Filter button to define the logic.
- In the Filter window, choose the property ‘Market' which we will use to apply our business logic, choose ‘equals' in the middle drop-down menu, and write ‘Europe' in the free text box on the right and click Enter or Create from the list below. This means that the concept europe_order will only inherit data from its parent concept order when the orders are from market = Europe. Once you have defined the logic, click on Add New Concept to apply the logic and create our europe_order concept.
You have successfully created our third and final manual concept named europe_order using business logic, representing orders from europe.
Mapping Data to the Knowledge Graph Concepts
After creating the concepts and their properties, it's time to map data to the concepts from our datasource, so we can query and use them in the Knowledge Graph. We'll start by mapping the relevant data to the concept product which we have created earlier.
Mapping data to product concept
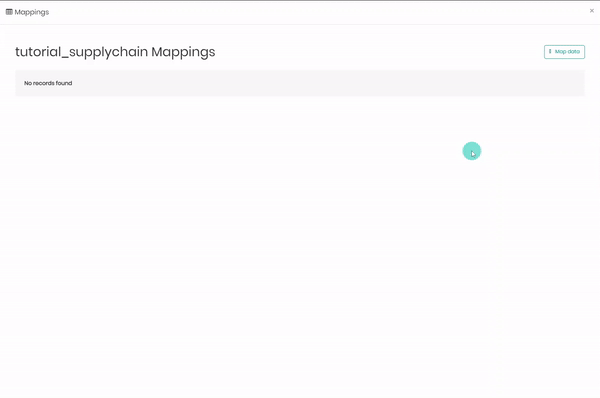
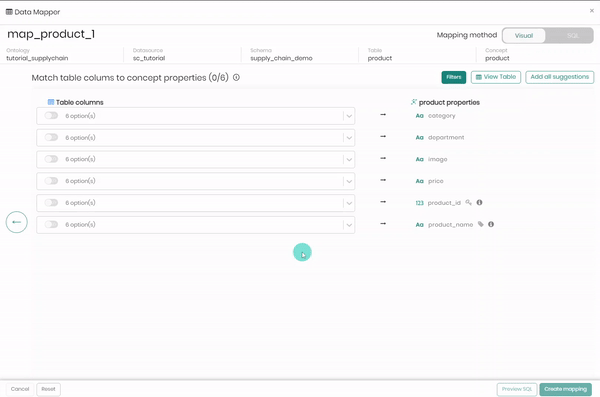
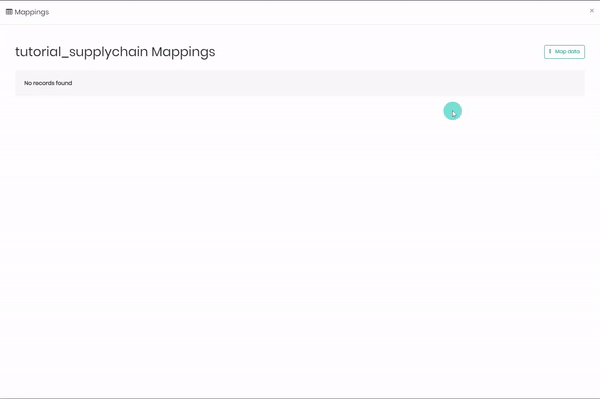
- Right click on the concept product and then click on Mappings.
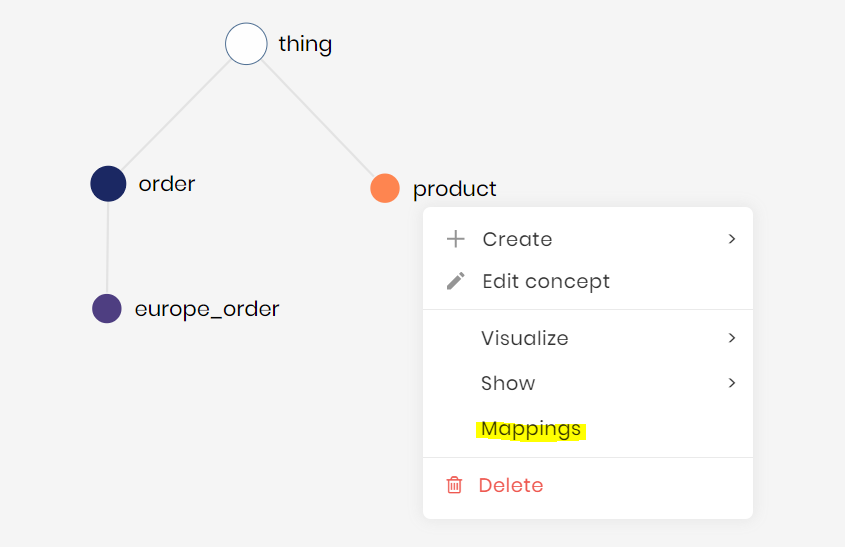
A new window will open, this is the Data Mapper. Here we can map data to a concept visually or using SQL statements in a few simple steps.
Step 1: Click on Map Data, then click on Concept Mapping.
Step 2: Choose the relevant datasource & schema to map the data from, in this case choose the supply_chain_demo schema (our graph is only connected to 1 datasource so no need to select that). Once we choose the schema, Timbr will load the tables within that schema. In our case, select the product table.
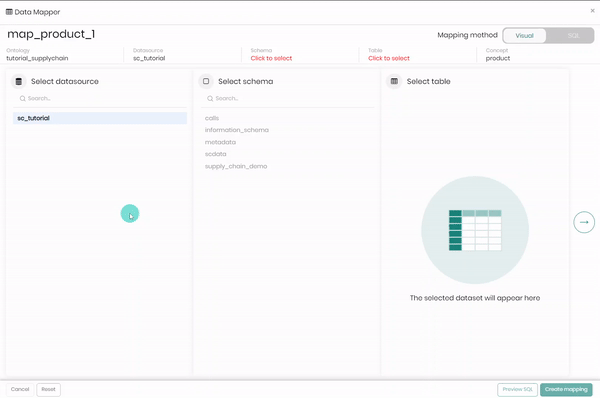
Step 3: Here we will match the column names from the datasource to the concept properties by clicking on Add all suggestions on the top right. Timbr will try to automatically match them (we always recommend to verify that Timbr managed to match a column to each property - in some cases, Timbr wont be able to identify and manuall selection will be required).
Click on Add all suggestions, once the table columns are matched, click on Create mapping.
At this step you can perform any SQL operation or function on the table columns (CAST, TRIM, CONCAT, etc.). You can also filter the data by clicking on Filter.
Our concept product now contains the relevant data.
We can now proceed by similarly mapping data to our second concept named order.
Mapping data to order concept
- Right click on the concept order and then click on Mappings.
Once again follow the simple steps in the Data Mapper.
Step 1: Click on Map Data, then click on Concept Mapping.
Step 2: Choose the relevant schema to map the data from, in our case scdata. Next, choose the table datacosupplychaindataset_order.
Step 3: Click on Add all suggestions to match the columns to the properties. Once the table columns are matched, click on Create mapping.
Our order concept now contains the relevant data!
Defining Relationships in the Knowledge Graph
Relationships in the knowledge graph represent the semantic relation between two concepts and allow us to join data intuitively from them. Let's begin and see how we can apply it in the graph.
We'll start by choosing one of the two concepts that we would like to connect, in our case, a relationship between concept product and concept order.
- Right click on the concept product and then click on Edit concept.
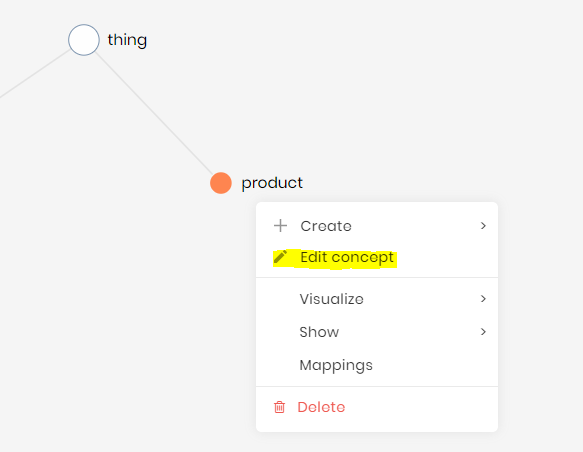
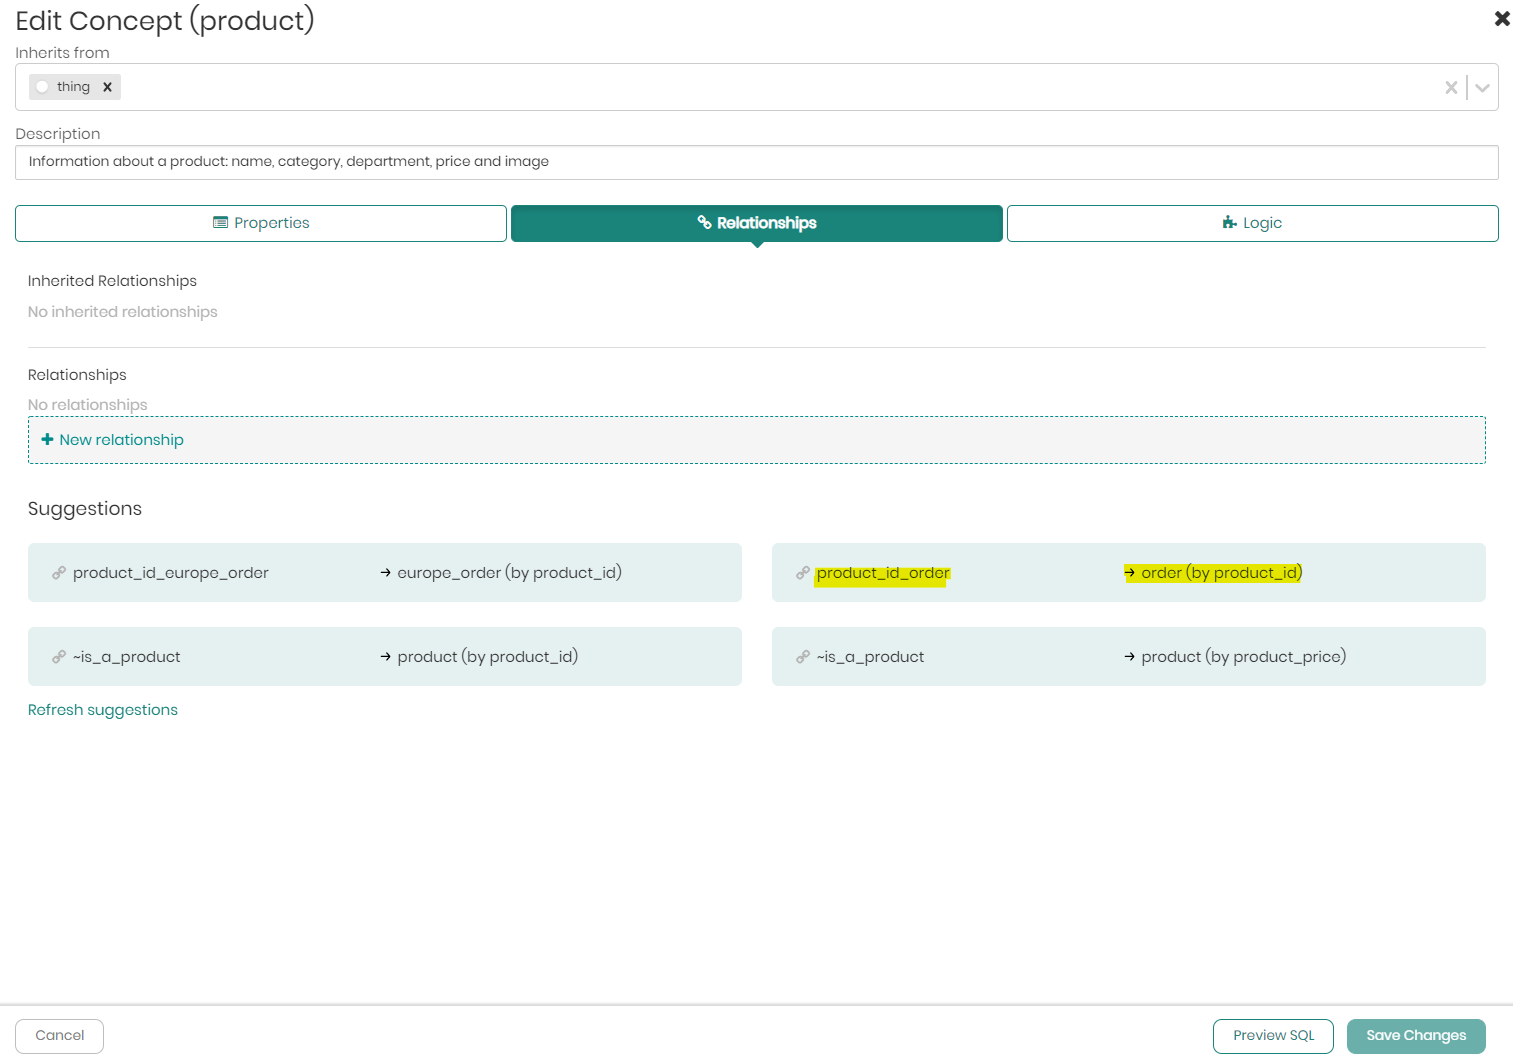
- Click on the Relationships tab.
- This is where we can add or modify relationships. In this section, Timbr adds automated suggestions of relationships between the chosen concept and other concepts in the same knowledge graph.
In our case, allocate and click on the suggestion "product_id_order" (relationship to the "order" concept based on the product_id property).
If the suggestion "product_id_order" doesn't appear at first, click on Refresh suggestions below the current suggestions and choose "product_id_order" when it appears.
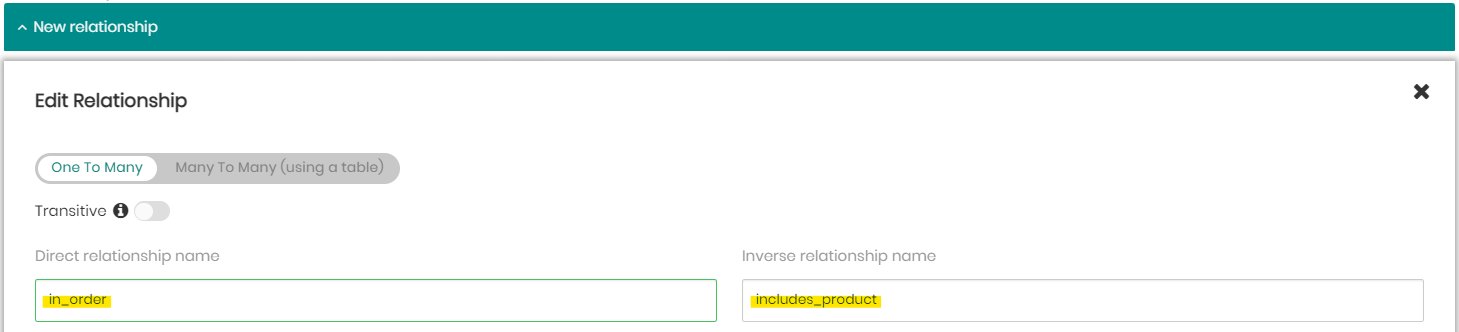
Once the relationship window opens, change the direct relationship name to - "in_order" (when describing the relationship of a specific product to a specific order), and add the inverse relationship name - "includes_product" (describing the relationship from order to product).
Next, we can see that the target concept "Order" was already chosen for us.
The last step to create the relationship is to choose a property from our base concept product that matches with a property from our target concept order, in our case "product_id" for product, and "product_id" for order. Timbr automatically suggested the shared property. To complete the relationship click Save.
Click on Save Changes to add our relationship to the concept.
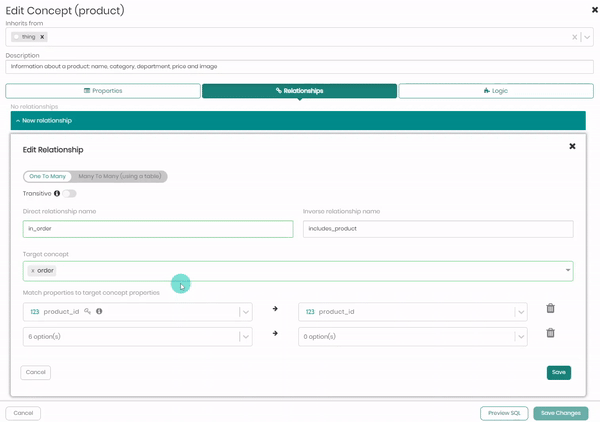
The relationship has been added successfully! Moving forward we will learn how to use these relationships to perform Graph Traversals in SQL, or in simpler words, how to shorten our queries by up to 90% using relationships!
Completing the Knowledge Graph with SQL Statements
Some users prefer to add concepts manually as done until now, other users prefer using SQL statements to create, map, and define relationships in the graph. At this stage we will learn how to use the SQL statements to create the remaining concepts of our knowledge graph.
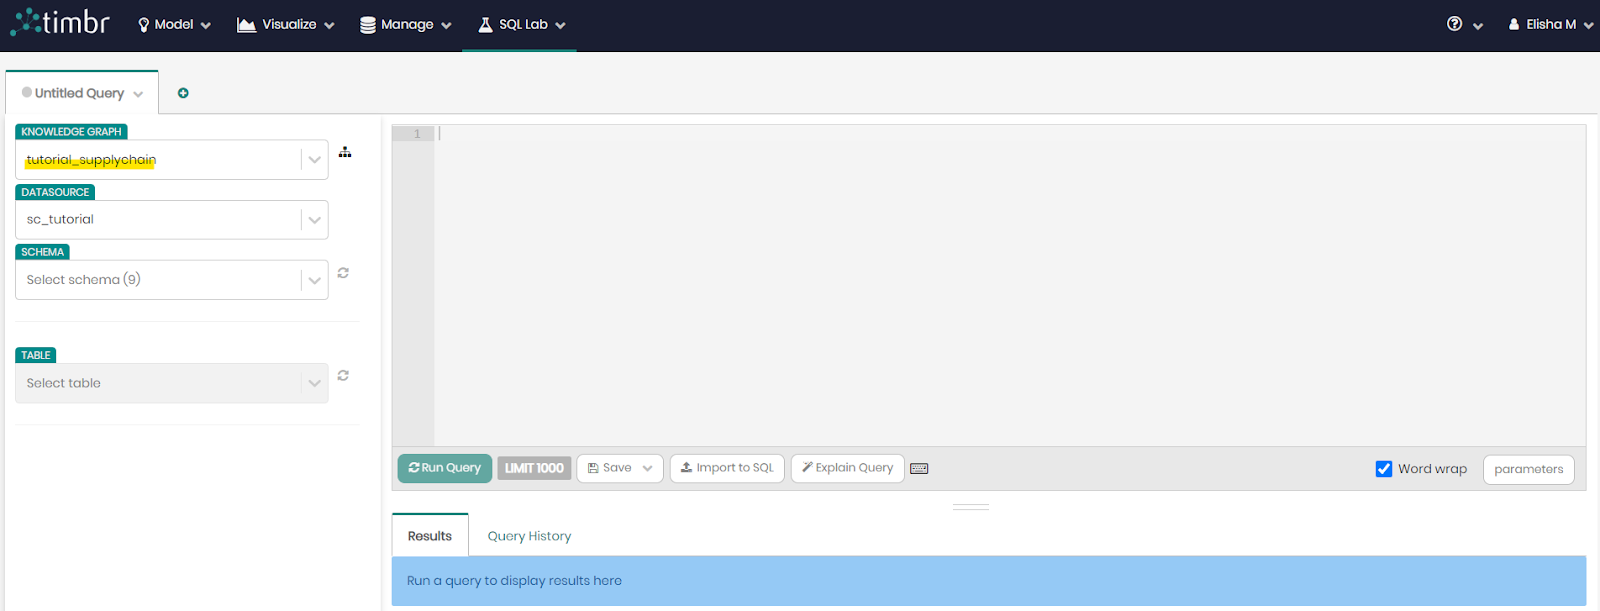
- Click on the SQL Lab tab on the top menu bar and then click on SQL Editor.
- Choose the knowledge graph assigned to you, it should be
tutorial_<yourname>.
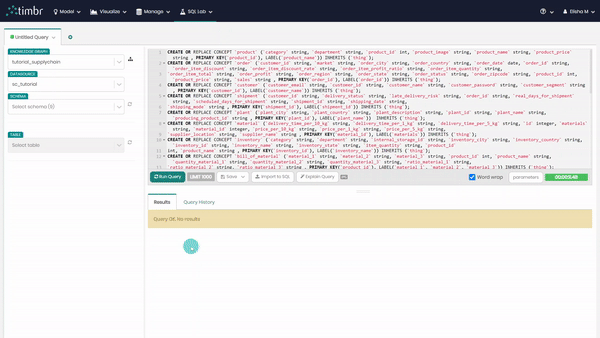
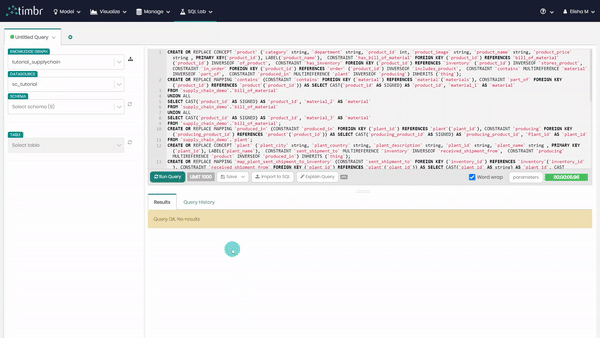
- Copy the first SQL statement below into the query box and click on Run Query.
SQL Statement #1 (creating all concepts):
CREATE OR REPLACE CONCEPT `product` (`category` string, `department` string, `product_id` int, `product_image` string, `product_name` string, `product_price` string , PRIMARY KEY(`product_id`), LABEL(`product_name`)) INHERITS (`thing`);
CREATE OR REPLACE CONCEPT `order` (`customer_id` string, `market` string, `order_city` string, `order_country` string, `order_date` date, `order_id` string, `order_item_discount` string, `order_item_discount_rate` string, `order_item_profit_ratio` string, `order_item_quantity` string,
`order_item_total` string, `order_profit` string, `order_region` string, `order_state` string, `order_status` string, `order_zipcode` string, `product_id` int, `product_price` string, `sales` string , PRIMARY KEY(`order_id`), LABEL(`order_id`)) INHERITS (`thing`);
CREATE OR REPLACE CONCEPT `customer` (`customer_email` string, `customer_id` string, `customer_name` string, `customer_password` string, `customer_segment` string , PRIMARY KEY(`customer_id`), LABEL(`customer_name`)) INHERITS (`thing`);
CREATE OR REPLACE CONCEPT `shipment` (`customer_id` string, `delivery_status` string, `late_delivery_risk` string, `order_id` string, `real_days_for_shipment` string, `scheduled_days_for_shipment` string, `shipment_id` string, `shipping_date` string,
`shipping_mode` string , PRIMARY KEY(`shipment_id`), LABEL(`shipment_id`)) INHERITS (`thing`);
CREATE OR REPLACE CONCEPT `plant` (`plant_city` string, `plant_country` string, `plant_description` string, `plant_id` string, `plant_name` string, PRIMARY KEY(`plant_id`), LABEL(`plant_name`))  INHERITS (`thing`);
CREATE OR REPLACE CONCEPT `material` (`delivery_time_per_10_kg` string, `delivery_time_per_1_kg` string, `delivery_time_per_5_kg` string, `id` integer, `materials` string, `material_id` integer, `price_per_10_kg` string, `price_per_1_kg` string, `price_per_5_kg` string,
`supplier_location` string, `supplier_name` string , PRIMARY KEY(`material_id`), LABEL(`materials`)) INHERITS (`thing`);
CREATE OR REPLACE CONCEPT `inventory` (`category` string, `department` string, `internal_storage_id` string, `inventory_city` string, `inventory_country` string, `inventory_id` string, `inventory_name` string, `inventory_state` string, `item_quantity` string, `product_id`
int, `product_name` string , PRIMARY KEY(`inventory_id`), LABEL(`inventory_name`)) INHERITS (`thing`);
CREATE OR REPLACE CONCEPT `bill_of_material` (`material_1` string, `material_2` string, `material_3` string, `product_id` int, `product_name` string, `quantity_material_1` string, `quantity_material_2` string, `quantity_material_3` string, `ratio_material_1` string,
`ratio_material_2` string, `ratio_material_3` string , PRIMARY KEY(`product_id`), LABEL(`material_1`, `material_2`, `material_3`)) INHERITS (`thing`);
CREATE OR REPLACE CONCEPT `fitness_product`  INHERITS (`product`)
FROM `timbr`.`product` WHERE `department` = 'Fitness';
CREATE OR REPLACE CONCEPT `outdoors_product`  INHERITS (`product`)
FROM `timbr`.`product` WHERE `department` = 'Outdoors';
CREATE OR REPLACE CONCEPT `fan_shop_product`  INHERITS (`product`)
FROM `timbr`.`product` WHERE `department` = 'Fan Shop';
CREATE OR REPLACE CONCEPT `apparel_product`  INHERITS (`product`)
FROM `timbr`.`product` WHERE `department` = 'Apparel';
CREATE OR REPLACE CONCEPT `golf_product`  INHERITS (`product`)
FROM `timbr`.`product` WHERE `department` = 'Golf';
CREATE OR REPLACE CONCEPT `footwear_product`  INHERITS (`product`)
FROM `timbr`.`product` WHERE `department` = 'Footwear';
CREATE OR REPLACE CONCEPT `latin_america_order`  INHERITS (`order`)
FROM `timbr`.`order` WHERE `market` = 'LATAM';
CREATE OR REPLACE CONCEPT `europe_order`  INHERITS (`order`)
FROM `timbr`.`order` WHERE `market` = 'Europe';
CREATE OR REPLACE CONCEPT `asia_order`  INHERITS (`order`)
FROM `timbr`.`order` WHERE `market` = 'Pacific Asia';
CREATE OR REPLACE CONCEPT `africa_order`  INHERITS (`order`)
FROM `timbr`.`order` WHERE `market` = 'Africa';
CREATE OR REPLACE CONCEPT `us_canada_order`  INHERITS (`order`)
FROM `timbr`.`order` WHERE `market` = 'USCA';
CREATE OR REPLACE CONCEPT `home_office_customer`  INHERITS (`customer`)
FROM `timbr`.`customer` WHERE `customer_segment` = 'Home Office';
CREATE OR REPLACE CONCEPT `corporate_customer`  INHERITS (`customer`)
FROM `timbr`.`customer` WHERE `customer_segment` = 'Corporate';
CREATE OR REPLACE CONCEPT `consumer_customer`  INHERITS (`customer`)
FROM `timbr`.`customer` WHERE `customer_segment` = 'Consumer';
CREATE OR REPLACE CONCEPT `first_class_shipment`  INHERITS (`shipment`)
FROM `timbr`.`shipment` WHERE `shipping_mode` = 'First Class';
CREATE OR REPLACE CONCEPT `standard_class_shipment`  INHERITS (`shipment`)
FROM `timbr`.`shipment` WHERE `shipping_mode` = 'Standard Class';
CREATE OR REPLACE CONCEPT `second_class_shipment`  INHERITS (`shipment`)
FROM `timbr`.`shipment` WHERE `shipping_mode` = 'Second Class';
CREATE OR REPLACE CONCEPT `same_day_shipment`  INHERITS (`shipment`)
FROM `timbr`.`shipment` WHERE `shipping_mode` = 'Same Day';
Once the query has finished running, we should get the result: "Query OK. No results". This means you have successfully created all the knowledge graph concepts as well as added business logic to them.
- Remove the first query and copy the second query below into the query box and click on Run Query.
SQL Statement #2 (adding relationships to all concepts):
CREATE OR REPLACE CONCEPT `product` (`category` string, `department` string, `product_id` int, `product_image` string, `product_name` string, `product_price` string , PRIMARY KEY(`product_id`), LABEL(`product_name`),  CONSTRAINT `has_bill_of_material` FOREIGN KEY (`product_id`) REFERENCES `bill_of_material` (`product_id`) INVERSEOF `of_product`,  CONSTRAINT `has_inventory` FOREIGN KEY (`product_id`) REFERENCES `inventory` (`product_id`) INVERSEOF `stores_product`,  CONSTRAINT `in_order` FOREIGN KEY (`product_id`) REFERENCES `order` (`product_id`) INVERSEOF `includes_product`,  CONSTRAINT `contains` MULTIREFERENCE `material` INVERSEOF `part_of`,  CONSTRAINT `produced_in` MULTIREFERENCE `plant` INVERSEOF `producing`) INHERITS (`thing`);
CREATE OR REPLACE MAPPING `contains` (CONSTRAINT `contains` FOREIGN KEY (`material`) REFERENCES `material`(`materials`), CONSTRAINT `part_of` FOREIGN KEY (`product_id`) REFERENCES `product`(`product_id`)) AS SELECT CAST(`product_id` AS SIGNED) AS `product_id`, `material_1` AS `material`
FROM `supply_chain_demo`.`bill_of_material`
UNION ALL
SELECT CAST(`product_id` AS SIGNED) AS `product_id`, `material_2` AS `material`
FROM `supply_chain_demo`.`bill_of_material`
UNION ALL
SELECT CAST(`product_id` AS SIGNED) AS `product_id`, `material_3` AS `material`
FROM `supply_chain_demo`.`bill_of_material`;
CREATE OR REPLACE MAPPING `produced_in` (CONSTRAINT `produced_in` FOREIGN KEY (`plant_id`) REFERENCES `plant`(`plant_id`), CONSTRAINT `producing` FOREIGN KEY (`producing_product_id`) REFERENCES `product`(`product_id`)) AS SELECT CAST(`producing_product_id` AS SIGNED) AS `producing_product_id`, `Plant_id` AS `plant_id`
FROM `supply_chain_demo`.`plant`;
CREATE OR REPLACE CONCEPT `plant` (`plant_city` string, `plant_country` string, `plant_description` string, `plant_id` string, `plant_name` string , PRIMARY KEY(`plant_id`), LABEL(`plant_name`),  CONSTRAINT `sent_shipment_to` MULTIREFERENCE `inventory` INVERSEOF `received_shipment_from`,  CONSTRAINT `producing` MULTIREFERENCE `product` INVERSEOF `produced_in`) INHERITS (`thing`);
CREATE OR REPLACE MAPPING `map_plant_sent_shipment_to_inventory` (CONSTRAINT `sent_shipment_to` FOREIGN KEY (`inventory_id`) REFERENCES `inventory`(`inventory_id`), CONSTRAINT `received_shipment_from` FOREIGN KEY (`plant_id`) REFERENCES `plant`(`plant_id`)) AS SELECT CAST(`plant_id` AS string) AS `plant_id`, CAST(`inventory_id` AS string) AS `inventory_id` FROM `supply_chain_demo`.`plan_inventory`;
CREATE OR REPLACE CONCEPT `material` (`delivery_time_per_10_kg` string, `delivery_time_per_1_kg` string, `delivery_time_per_5_kg` string, `id` integer, `materials` string, `material_id` integer, `price_per_10_kg` string, `price_per_1_kg` string, `price_per_5_kg` string, `supplier_location` string, `supplier_name` string , PRIMARY KEY(`material_id`), LABEL(`materials`),  CONSTRAINT `part_of_1` FOREIGN KEY (`materials`) REFERENCES `bill_of_material` (`material_1`) INVERSEOF `contains_1`,  CONSTRAINT `part_of_2` FOREIGN KEY (`materials`) REFERENCES `bill_of_material` (`material_2`) INVERSEOF `contains_2`,  CONSTRAINT `part_of_3` FOREIGN KEY (`materials`) REFERENCES `bill_of_material` (`material_3`) INVERSEOF `contains_3`,  CONSTRAINT `part_of` MULTIREFERENCE `product` INVERSEOF `contains`) INHERITS (`thing`);
CREATE OR REPLACE CONCEPT `shipment` (`customer_id` string, `delivery_status` string, `late_delivery_risk` string, `order_id` string, `real_days_for_shipment` string, `scheduled_days_for_shipment` string, `shipment_id` string, `shipping_date` string, `shipping_mode` string , PRIMARY KEY(`shipment_id`), LABEL(`shipment_id`),  CONSTRAINT `for_customer` FOREIGN KEY (`customer_id`) REFERENCES `customer` (`customer_id`) INVERSEOF `has_shipment`) INHERITS (`thing`);
CREATE OR REPLACE CONCEPT `order` (`customer_id` string, `market` string, `order_city` string, `order_country` string, `order_date` date, `order_id` string, `order_item_discount` string, `order_item_discount_rate` string, `order_item_profit_ratio` string, `order_item_quantity` string, `order_item_total` string, `order_profit` string, `order_region` string, `order_state` string, `order_status` string, `order_zipcode` string, `product_id` int, `product_price` string, `sales` string , PRIMARY KEY(`order_id`), LABEL(`order_id`),  CONSTRAINT `ordered_by` FOREIGN KEY (`customer_id`) REFERENCES `customer` (`customer_id`) INVERSEOF `has_ordered`,  CONSTRAINT `in_shipment` FOREIGN KEY (`order_id`) REFERENCES `shipment` (`order_id`) INVERSEOF `has_order`) INHERITS (`thing`);
Once again if the query result states: "Query OK. No results", then you have successfully created and defined the relationships in our knowledge graph, connecting the underlying data together.
- Remove the second query and copy the third and final query below into the query box and click on Run Query.
SQL Statement #3 (creating mappings to all concepts):
CREATE OR REPLACE MAPPING `map_product_1` INTO `product` AS SELECT DISTINCT `Category` AS `category`, `Department` AS `department`, `Image` AS `product_image`, `Price` AS `product_price`, CAST(`product_id` AS SIGNED) AS `product_id`, `Product_name` AS `product_name`
FROM `supply_chain_demo`.`product`;
CREATE OR REPLACE MAPPING `map_shipment_2` INTO `shipment` AS SELECT `customer_id` AS `customer_id`, `delivery_status` AS `delivery_status`, `late_delivery_risk` AS `late_delivery_risk`, `order_id` AS `order_id`, `real_days_for_shipment` AS `real_days_for_shipment`, `scheduled_days_for_shipment` AS `scheduled_days_for_shipment`, `shipment_id` AS `shipment_id`, `shipping_date` AS `shipping_date`, `shipping_mode` AS `shipping_mode` FROM `scdata`.`datacosupplychaindataset_shipment`;
CREATE OR REPLACE MAPPING `map_customer_1` INTO `customer` AS SELECT CONCAT(`customer_first_name`, ' ', `customer_last_name`) AS `customer_name`, `customer_email` AS `customer_email`, `customer_id` AS `customer_id`, `customer_password` AS `customer_password`, `customer_segment` AS `customer_segment`
FROM `scdata`.`datacosupplychaindataset_customer`;
CREATE OR REPLACE MAPPING `map_inventory_1` INTO `inventory` AS SELECT `Category` AS `category`, `Department` AS `department`, `Internal_storage_id` AS `internal_storage_id`, `Inventory_city` AS `inventory_city`, `Inventory_country` AS `inventory_country`, `Inventory_id` AS `inventory_id`, `Inventory_name` AS `inventory_name`, `Inventory_state` AS `inventory_state`, `Item_quantity` AS `item_quantity`, CAST(`Product_id` AS SIGNED) AS `product_id`, `Product_name` AS `product_name` FROM `supply_chain_demo`.`inventory`;
CREATE OR REPLACE MAPPING `map_material_1` INTO `material` AS SELECT `delivery_time_per_10_kg` AS `delivery_time_per_10_kg`, `delivery_time_per_1_kg` AS `delivery_time_per_1_kg`, `delivery_time_per_5_kg` AS `delivery_time_per_5_kg`, `id` AS `id`, `materials` AS `materials`, CAST(`material_id` AS INTEGER) AS `material_id`, `price_per_10_kg` AS `price_per_10_kg`, `price_per_1_kg` AS `price_per_1_kg`, `price_per_5_kg` AS `price_per_5_kg`, `supplier_location` AS `supplier_location`, `supplier_name` AS `supplier_name` FROM `supply_chain_demo`.`material`;
CREATE OR REPLACE MAPPING `map_order_1` INTO `order` AS SELECT `customer_id` AS `customer_id`, `Market` AS `market`, `order_city` AS `order_city`, `order_country` AS `order_country`, CAST(CONCAT(SUBSTRING(`order_date` FROM 7 FOR 4), '-', SUBSTRING(`order_date` FROM 1 FOR 2), '-', SUBSTRING(`order_date` FROM 4 FOR 2)) AS DATE) AS `order_date`, `order_id` AS `order_id`, `order_item_discount` AS `order_item_discount`, `order_item_discount_rate` AS `order_item_discount_rate`, `order_item_profit_ratio` AS `order_item_profit_ratio`, `order_item_quantity` AS `order_item_quantity`, `order_item_total` AS `order_item_total`, `order_profit` AS `order_profit`, `order_region` AS `order_region`, `order_state` AS `order_state`, `order_status` AS `order_status`, `order_zipcode` AS `order_zipcode`, CAST(`product_id` AS SIGNED) AS `product_id`, `product_price` AS `product_price`, `sales` AS `sales` FROM `scdata`.`datacosupplychaindataset_order`;
CREATE OR REPLACE MAPPING `map_plant_1` INTO `plant` AS SELECT DISTINCT `plant_city` AS `plant_city`, `plant_country` AS `plant_country`, `plant_description` AS `plant_description`, `plant_id` AS `plant_id`, `plant_name` AS `plant_name`
FROM `supply_chain_demo`.`plant`;
CREATE OR REPLACE MAPPING `map_bill_of_material_1` INTO `bill_of_material` AS SELECT `material_1` AS `material_1`, `material_2` AS `material_2`, `material_3` AS `material_3`, CAST(`product_id` AS SIGNED) AS `product_id`, `product_name` AS `product_name`, `quantity_material_1` AS `quantity_material_1`, `quantity_material_2` AS `quantity_material_2`, `quantity_material_3` AS `quantity_material_3`, `ratio_material_1` AS `ratio_material_1`, `ratio_material_2` AS `ratio_material_2`, `ratio_material_3` AS `ratio_material_3` FROM `supply_chain_demo`.`bill_of_material`
Finally, once the query has finished running, we should get the result: "Query OK. No results". This means you have successfully created and mapped data to all the knowledge graph concepts.
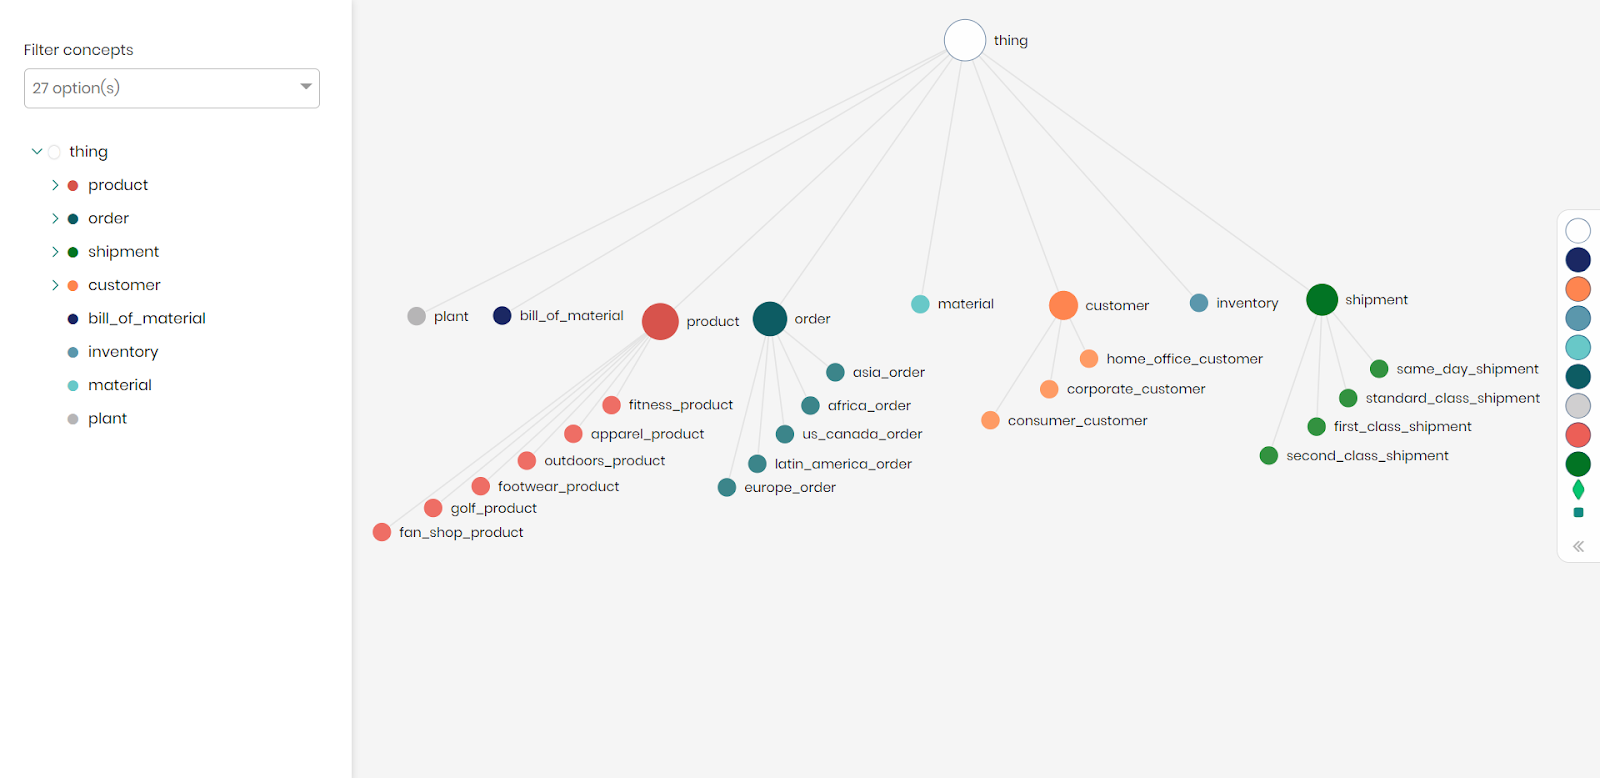
Our knowledge graph is now complete and should include the following 27 concepts:
Now that the Knowledge Graph is ready, we can use and explore it in our next steps! Go ahead and click on the Model tab on the top menu bar and then click on Ontology Explorer. Select your knowledge graph to begin exploring it!

Knowledge Graph Exploration
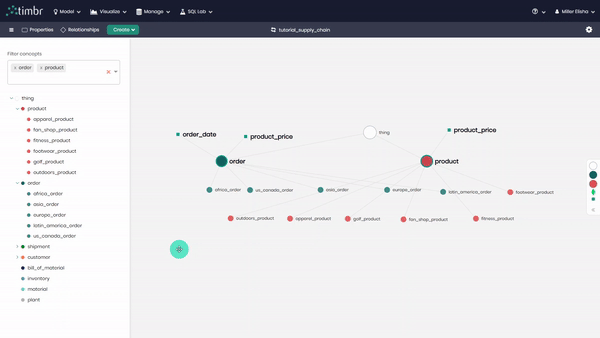
Exploring the Knowledge Graph model is a great way to understand which business entities we have in the data, how they are related to each other, what kind of data points connect entities and what are the hierarchies/classifications in the model.
Viewing a concept
Left click on a concept and the concept menu will slide in with all the information about this concept - description, hierarchy, PK & EL, properties, relationships and logic.
Click on the Properties tab to view the list of all the concept properties divided into inherited properties (from the upper-level concept) and direct properties, if any exist.
Click on the Relationships tab to view the list of all the concept relationships divided into inherited relationships (from the upper-level concept) and direct relationships, if any exist.
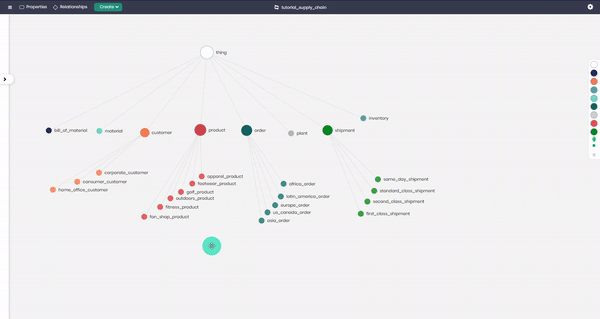
- Click on the Logic tab (of a child concept) to see the SQL logic of the concept, if logic has been defined on the concept.

Viewing properties
On the menu bar above the knowledge graph, click on Properties to open the property filter box.
You can now choose to load all the properties at once or choose specific properties you would like to load on the graph. For example if you would like to know where the properties product_price and order_date belong to, you can select them from the list and click Apply.
Once you click apply, Timbr will filter the graph with concepts that have the chosen properties.
Viewing relationships
Click on the X in the filter box (top-left) to clear the filter and load the full knowledge graph.
On the menu bar above the knowledge graph, click on Relationships to open the relationship filter box.
You can now choose to load all the relationships at once or choose specific relationships you would like to load on the graph. For example if you would like to view the relationships in_order and produced_in, you can add them to the list and then click Apply.
Just like with properties, Timbr will filter the graph according to the chosen relationships and present the concepts that have that relationship.
Running SQL Queries on the Knowledge Graph
In this section, we start using our knowledge graph, query the different concepts and see how to utilize the relationships and logic we've created.
To begin querying the data well go back to the SQL Editor.
Click on the SQL Lab tab on the top menu bar and then click on SQL Editor.
Begin with choosing your knowledge graph and the schema dtimbr as well as the concept you would like to query (in these queries we'll use the dtimbr schema, as this schema allows us to travel through the graph using relationships). Once loading the schema and concept, Timbr will expose the queryable properties of that concept (since we chose dtimbr, we can also access properties of other concepts using the relationships).
- Run the following queries and notice the difference in using different concepts and how their logic and relationships express the knowledge.
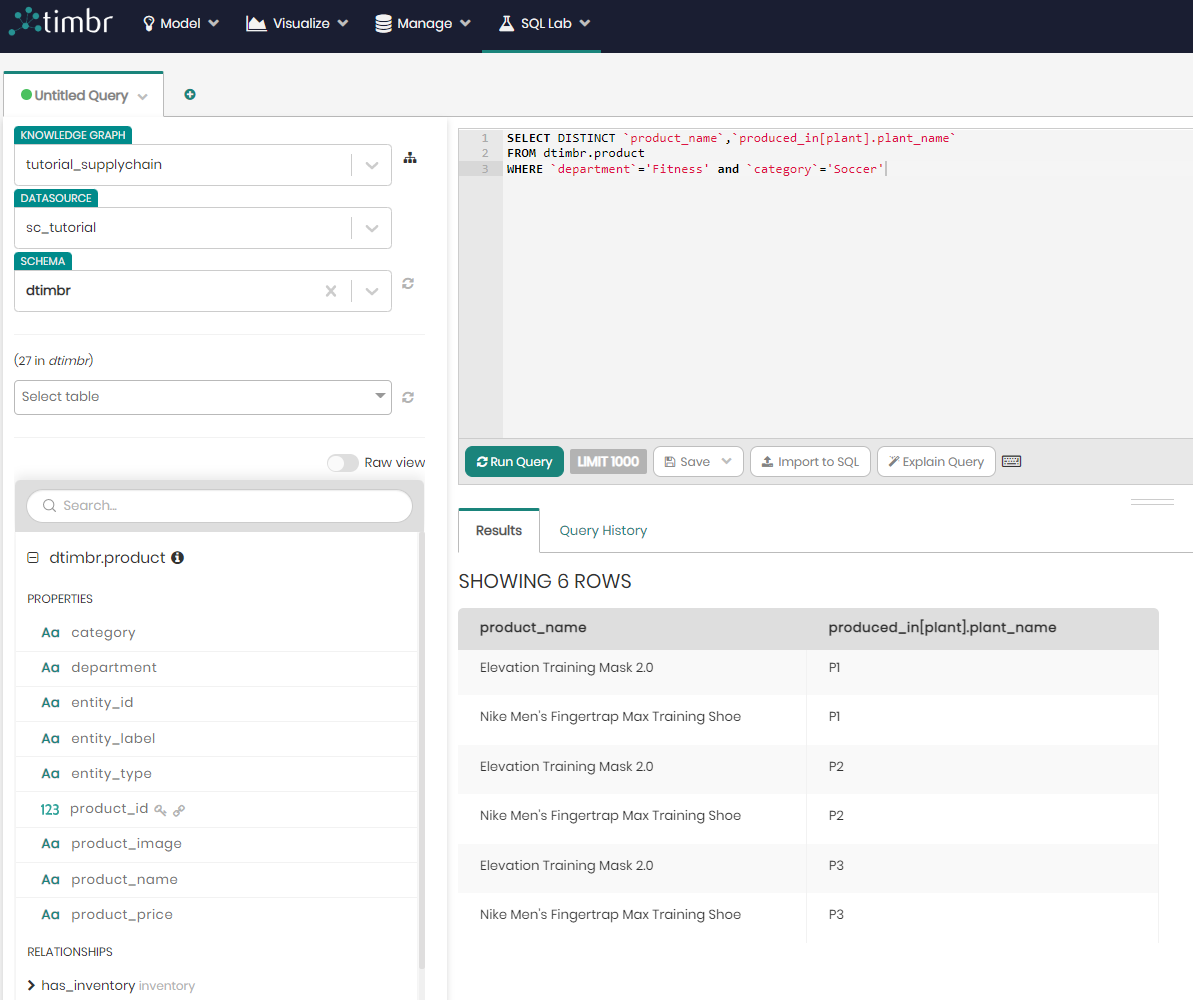
Simple Query #1
Copy the following query into the query-box in the center and click on Run Query:
SELECT DISTINCT `product_name`,`produced_in[plant].plant_name`
FROM dtimbr.product
WHERE `department`='Fitness' and `category`='Soccer'
This query will find the name of any plant that produced fitness products from the soccer category, and the conditions are in the where clause.
Notice that we used the relationship made_in[plant].plant_name from the product concept to connect to the plant concept. As you can see, the relationship is exposed as a virtual column.
Relationship Syntax = relationship[concept].property.
The query and result should look like this:
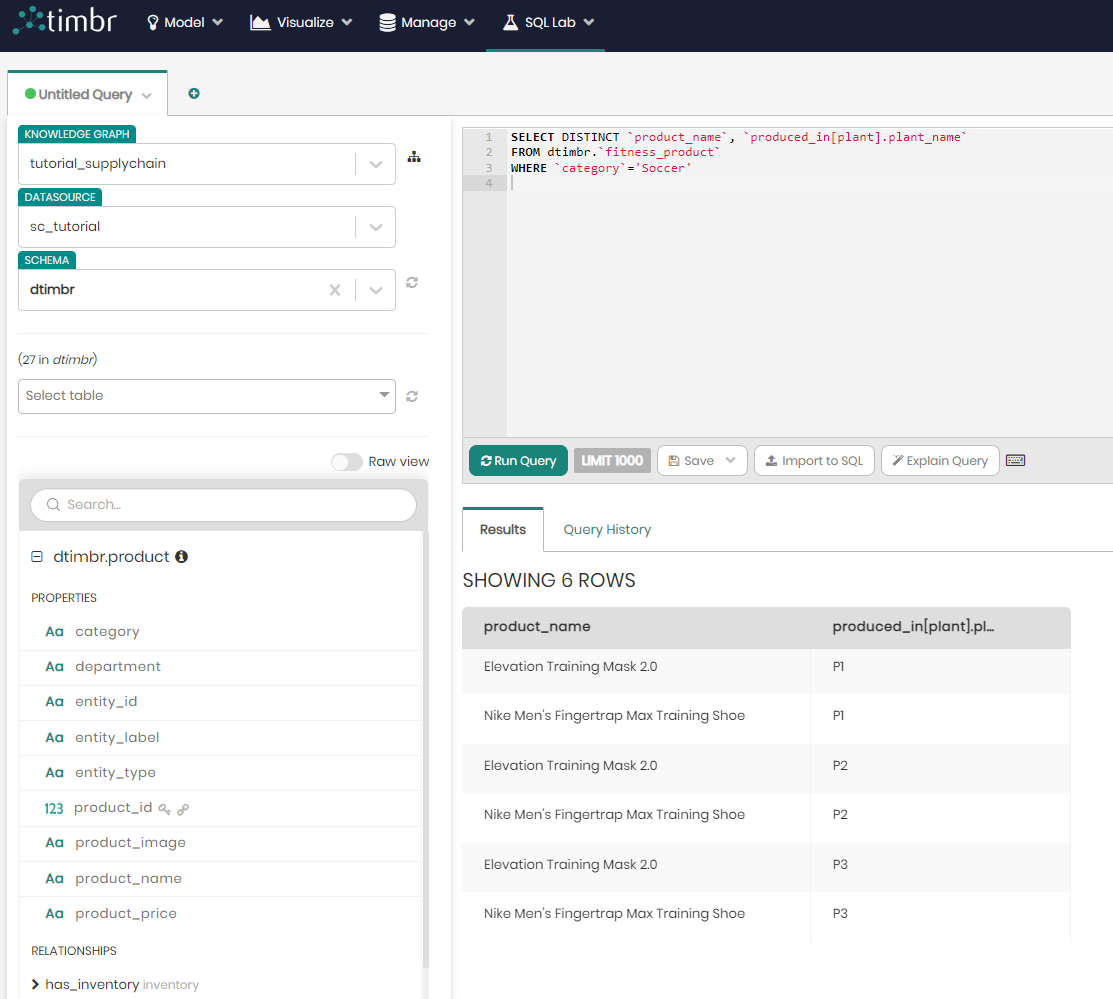
Simple Query #2
Copy the following query into the query-box in the center and click on Run Query:
SELECT DISTINCT `product_name`, `produced_in[plant].plant_name`
FROM dtimbr.`fitness_product`
WHERE `category`='Soccer'
Similarly to the first query, this query will also find the name of any plant that produced fitness products from the soccer category.
The difference in this query is that this time the ontology and it's logic were used so that you didn't need to define any fitness product, just by using the concept fitness_product and it's logic, only fitness products were included.
The query and result should look like this:
Simple Query #3
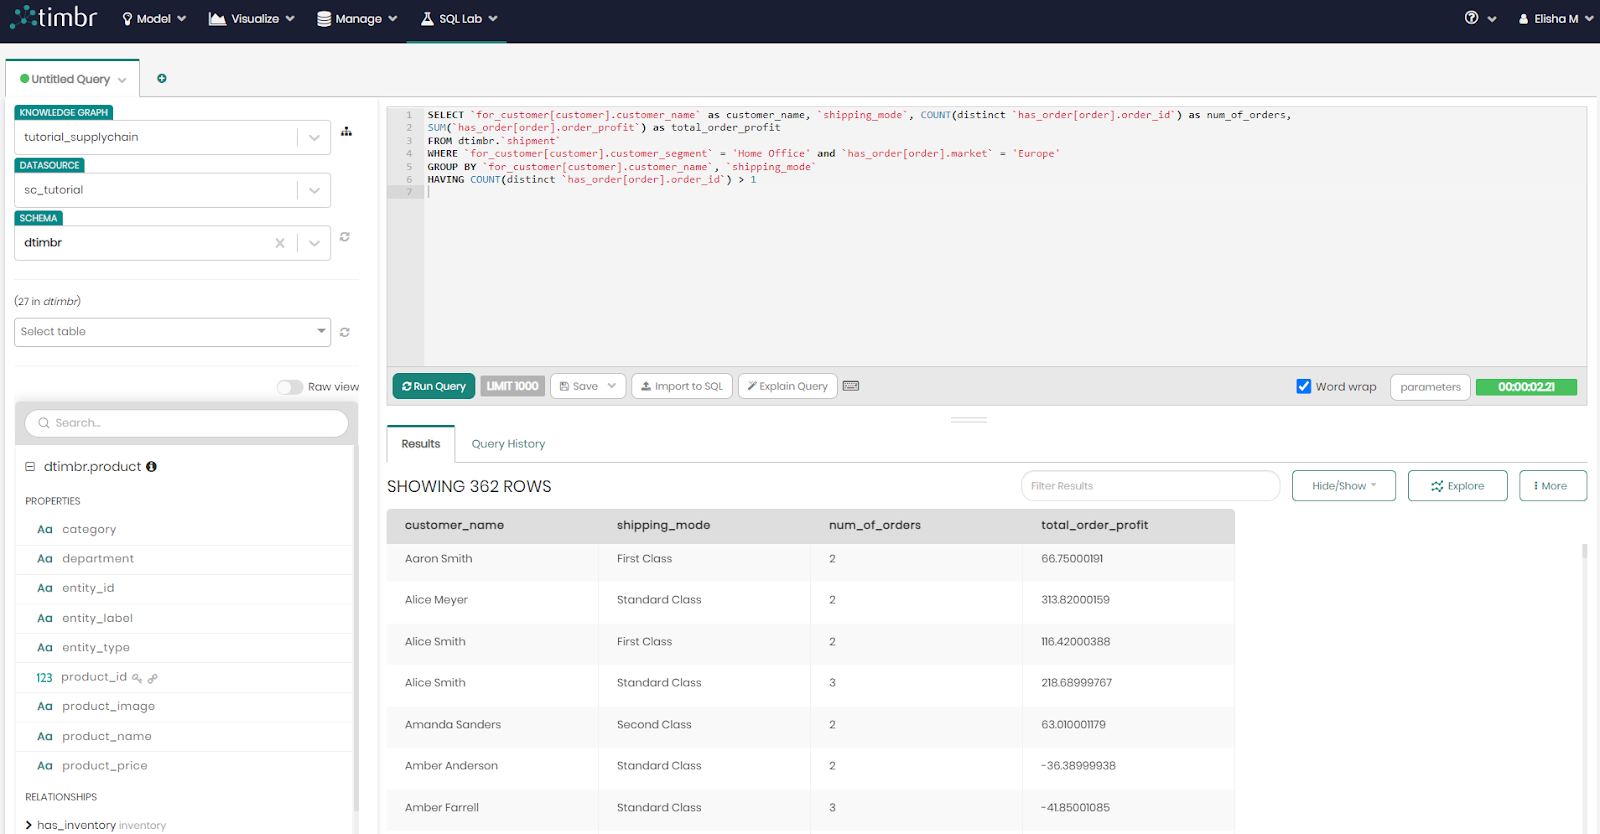
Copy the following query into the query-box in the center and click on Run Query:
SELECT `for_customer[customer].customer_name` as customer_name, `shipping_mode`, COUNT(distinct `has_order[order].order_id`) as num_of_orders, SUM(`has_order[order].order_profit`) as total_order_profit
FROM dtimbr.`shipment`
WHERE `for_customer[customer].customer_segment` = 'Home Office' and `has_order[order].market` = 'Europe'
GROUP BY `for_customer[customer].customer_name`, `shipping_mode`
HAVING COUNT(distinct `has_order[order].order_id`) > 1
This query will find the number of orders per shipping mode for customers in the Home Office segment (We are only looking for customers with more than 1 order), Including their name and sum profit of their total orders. We are using multiple relationships starting from shipment and going to order and customer.
The query and result should look like this:
Graph Exploration
We can also answer the SQL queries in a graph interface called the Graph Explorer, there we can explore the data values and find hidden connections between values in different datasets.
Let's go ahead and see how we can answer the same queries in a graph!
- Click on the Visualize tab on the top menu bar and then click on Graph Explorer.
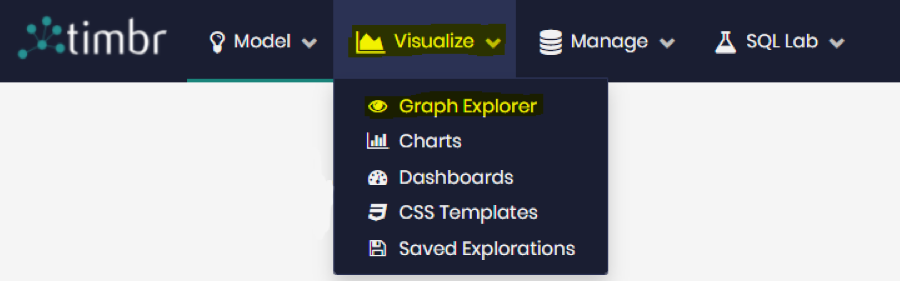
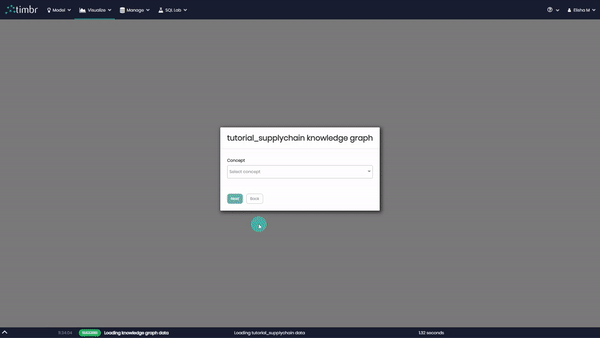
- Select your knowledge graph.
Exploring Query #1
In order to visualize query #1 we will select the concept plant and click Next.
We can now see the plant data points loaded into the graph. Notice you can zoom-in and zoom-out using the scroll/trackpad to focus on specific nodes, or left-click and hold to drag the graph across the screen.
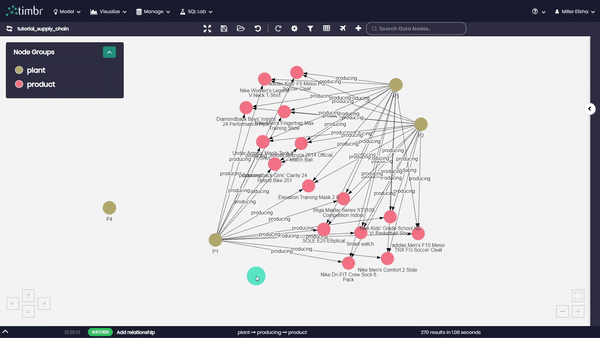
When hovering over plant in the Node Groups widget (top-left), click on the Airplane logo (Find Data Connections) to load properties or travel to other relationships you wish to view. In our case, click on the Relationships tab, choose the relationship called producing and the relevant target concept product.
Next, choose all properties, and add a filter as "department = Fitness". Set a limit of 500 results and click on Find Connections.
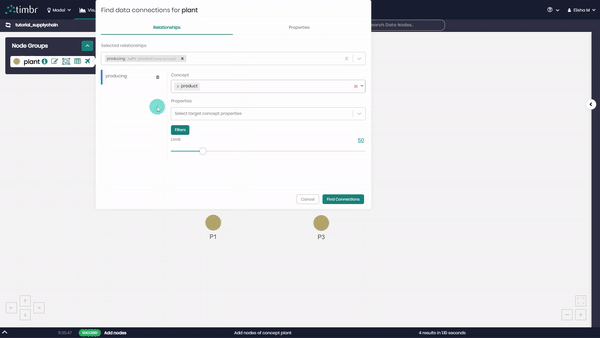
We can now see the connections formed in the graph with the relationship we've defined.
And a new group node concept was added called - product
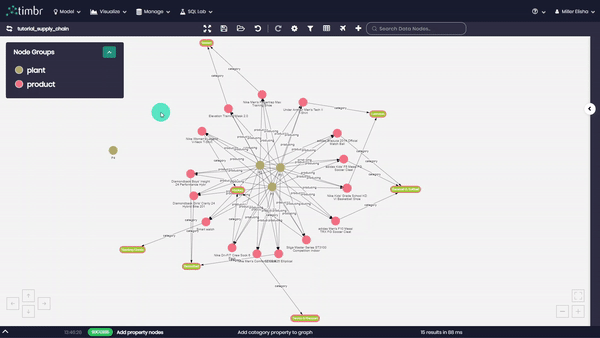
- Click on the Find Data Connection of the node group product, this time to load properties. Click on the Properties tab, select the property category and click on Add Selected Properties.
The category property has been added to the graph as a property of all products.
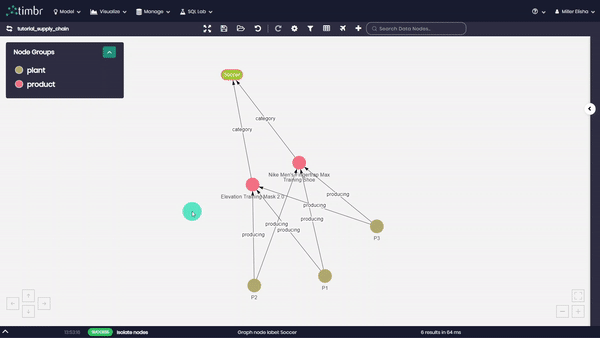
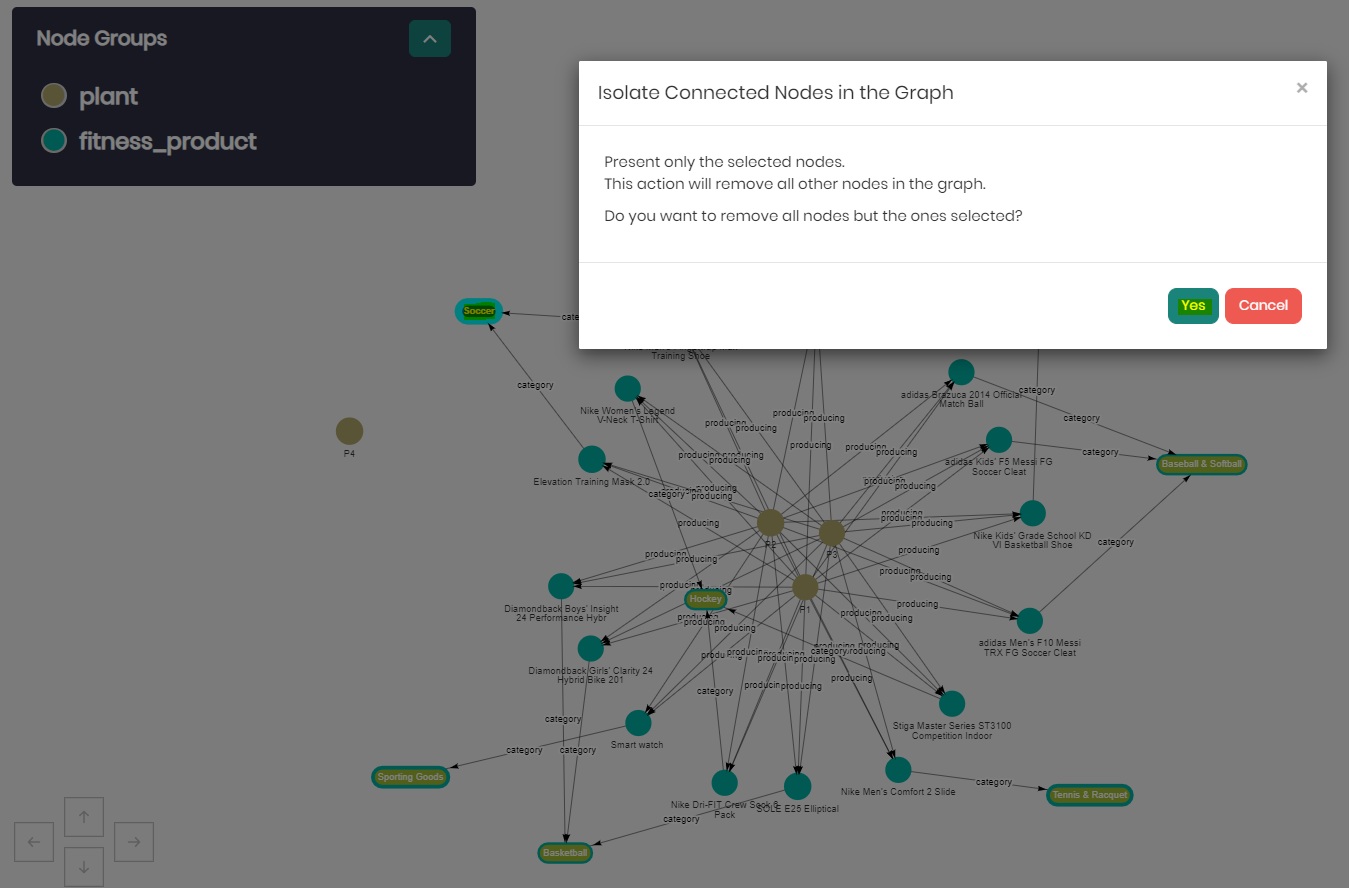
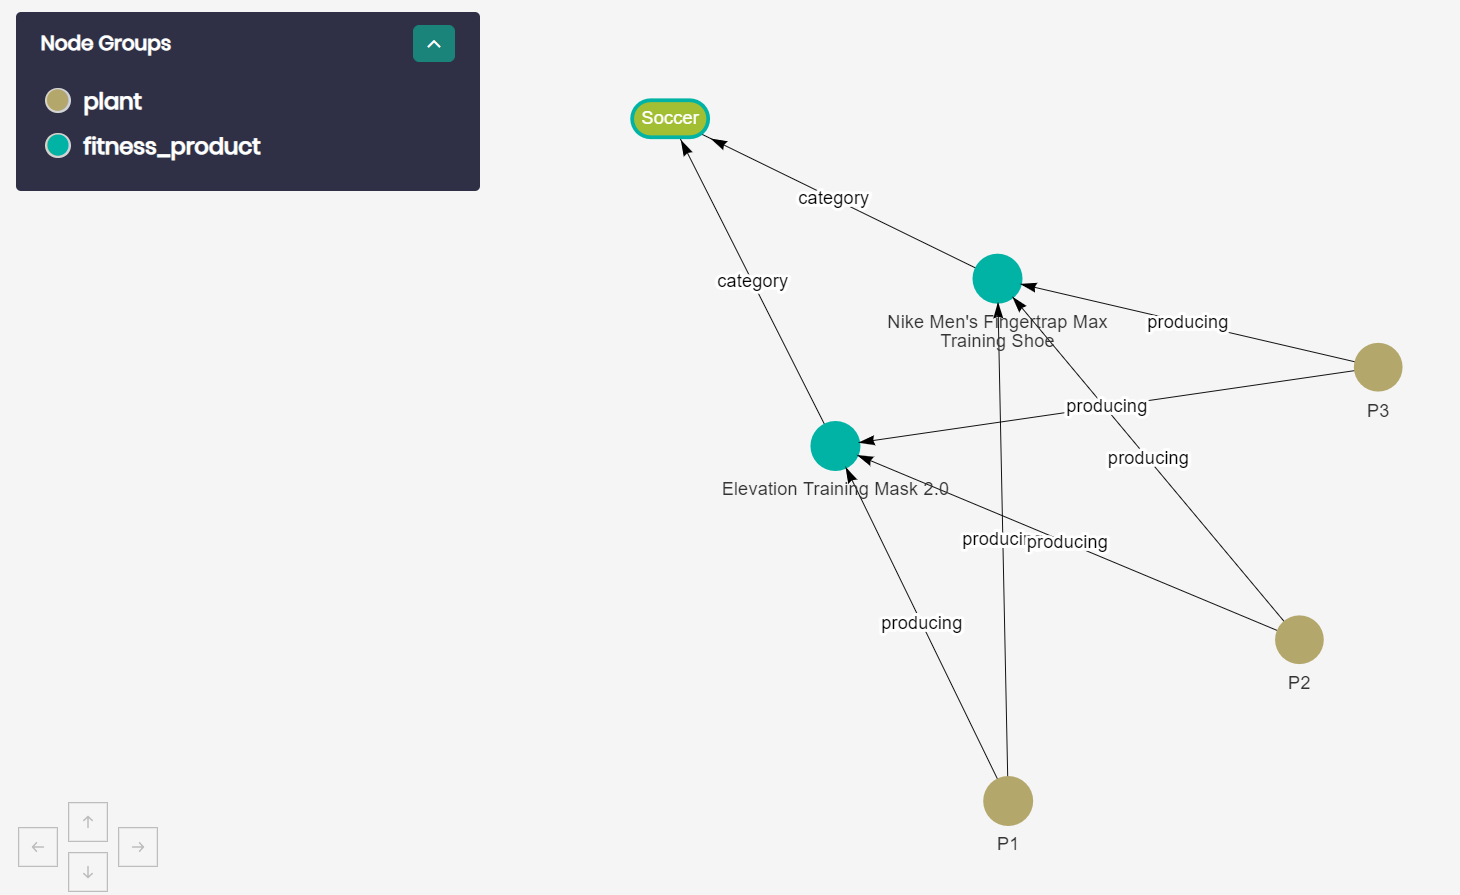
- Locate and right click on the node soccer and click on isolate to isolate the node and all its connected nodes. Click on Yes to confirm the isolation of the nodes.
As you saw in the first query we answered earlier in the SQL Editor, we can now clearly see the plants that produce fitness products of soccer type.
Exploring Query #2
The second query will return the same result as Query #1, but this time, we will use the business logic defined in our knowledge graph, so we don't need to define filters while exploring.
Click on the arrows on the top-left of the window (below the Timbr logo) to begin the second exploration, and reset your knowledge graph. A message will appear asking if you would like to proceed, click Confirm.
Once again, select your knowledge graph.
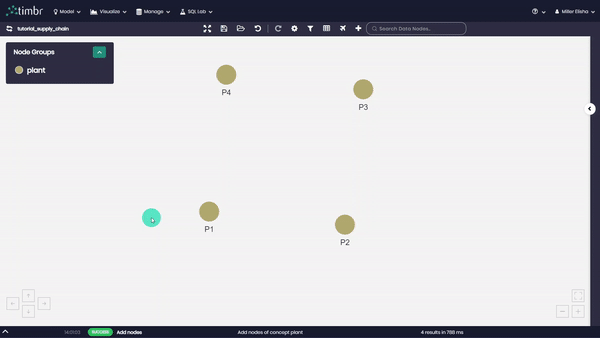
- In order to answer the second query, select the plant concept again and click Next.

We can now see the plant data points loaded into the graph.
- Click on the Find Data Connection of the plant node group to open the menu. Click on the Relationships tab, choose the relationship producing, but in this case, the target concept will be fitness_product. Choose all properties and set the limit to 500, then click on Find Connections.
We can now see the connections formed with the relationship from the knowledge graph.
Notice that we could travel within the product concept hierarchy and choose a lower-lever concept due to the inheritance of properties and relationships in a hierarchy. When choosing the concept fitness_product instead of product we were able to proceed without specifying any filters, as the department condition for fitness is already embedded in the concept.
- Next, click on the Find Data Connection of the fitness_product node group. Click on the Properties tab, choose the property category and add it to the graph by clicking on Add Selected Properties.

The category property was added to the graph as a property of an fitness_product.
- Locate and right click on the node Soccer and click on isolate to isolate the node and all its connected nodes, then click on Yes to confirm the isolation.
We can now see we've received the same result as in our second query, this time using logic.
Data Visualization
Now that we've explored our data as a graph, we can proceed and learn how to visualize our data in Timbr's internal BI tool.
You can connect Timbr to any BI tool and visualize the knowledge graph using the BI tool you're accustomed to.
Creating a visualization straight from the Knowledge Graph
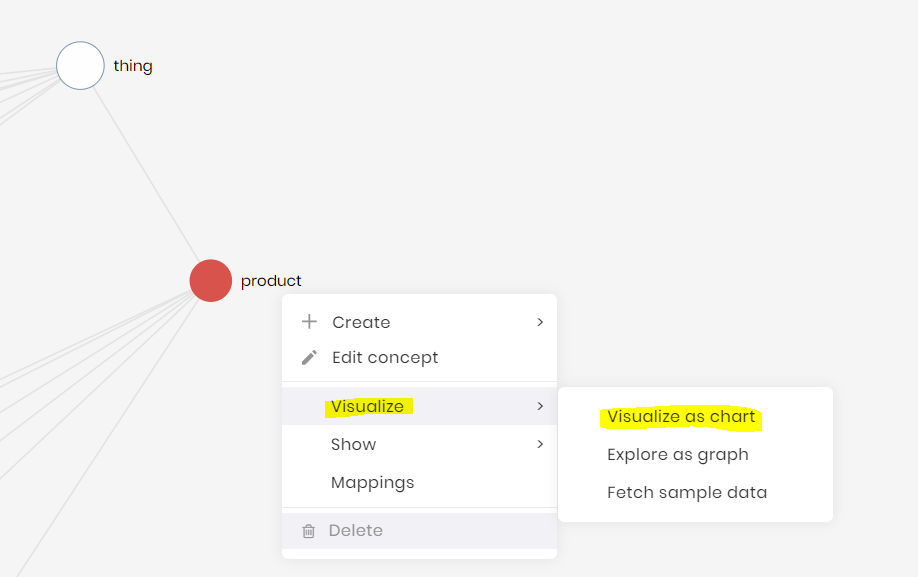
Click on the Model tab on the top menu bar, click on Ontology Explorer, and select your knowledge graph
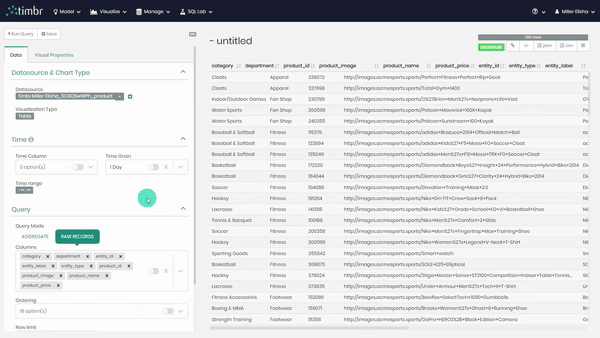
tutorial_<yourname>.Right click on the product concept node, open the Visualize sub-menu, and then click on Visualize as Chart.
Timbr has now opened a new tab with a chart builder, and we can see our data in the default table view.
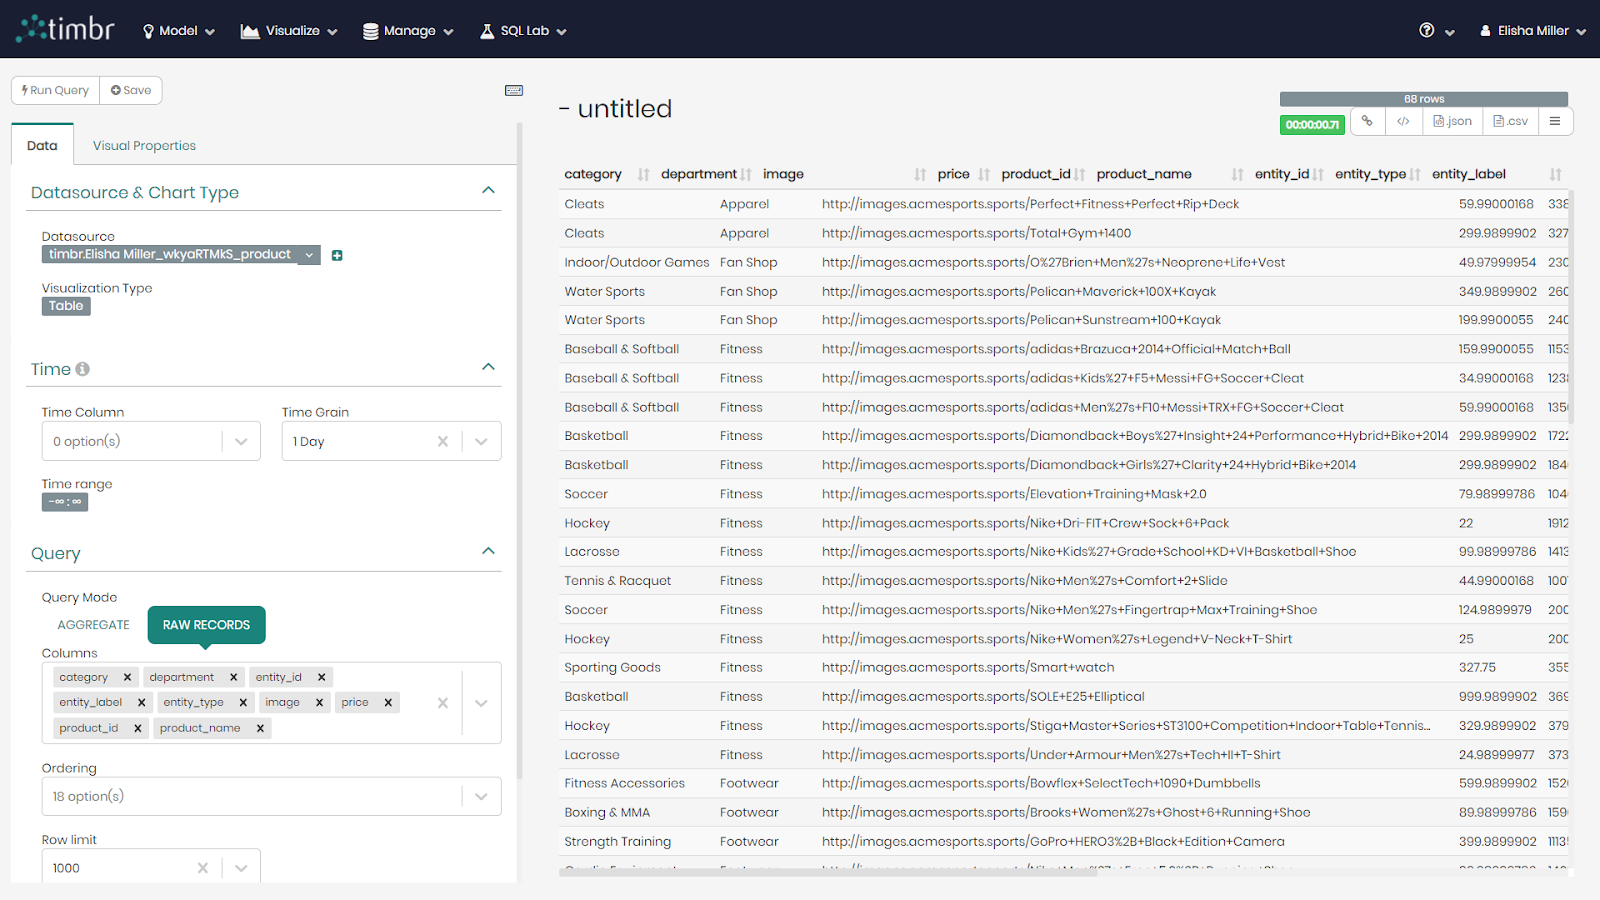
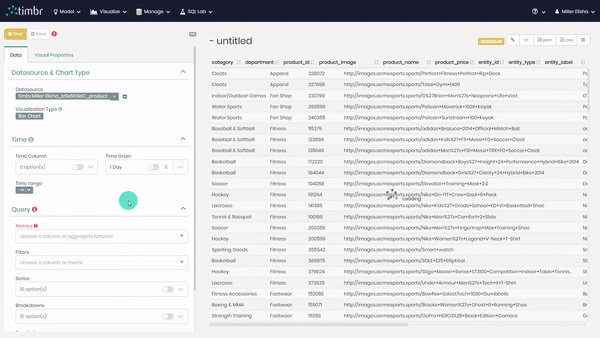
Click on the Table button under the Visualization Type in the Datasource & Chart Type section, to choose the desired visualization.
Once the visualizations window opens, choose the Bar Chart.
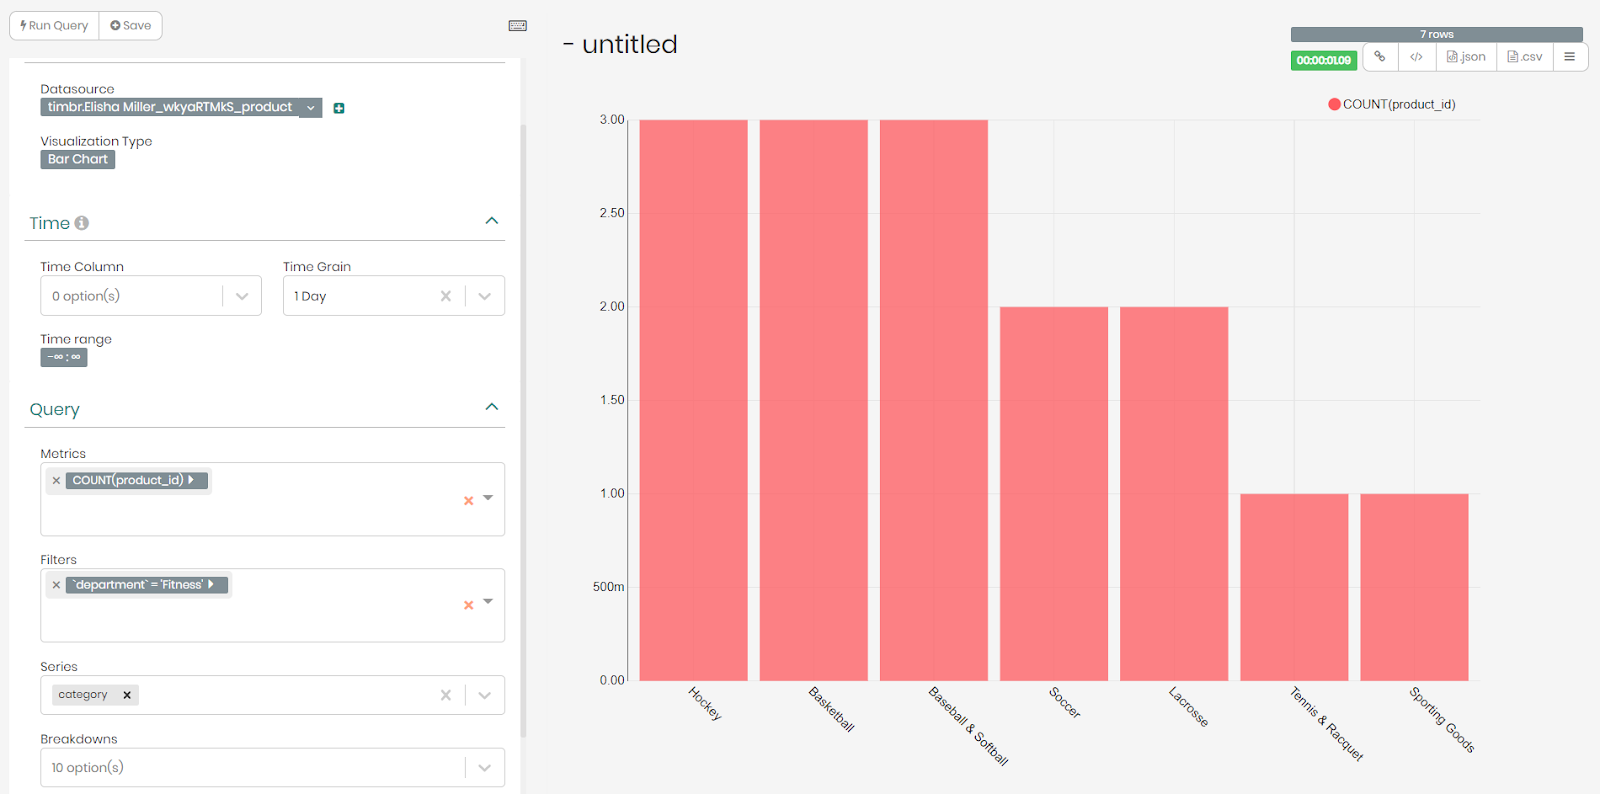
- Select the following:
- Metrics = "COUNT(product_id)"
- Filters = "department = ‘Fitness'"
- Series = "category"
When ready, click on the Run Query button above.
Based on the metrics we selected, we can now see the number of fitness products in each category represented in a bar chart.
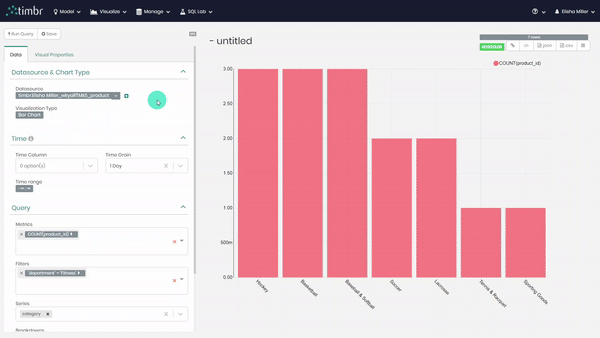
- Click on the Visual Properties tab to edit the chart and add information to it as you please. In this section you can give the chart a name, choose the colors you like, add values to the chart, name the X and Y axis and much more, depending on the chosen visualization.
- You can save the chart by clicking on Save on the top-left side (next to Run Query), and choose if to add the chart to an existing dashboard or create a new one.
Additional Steps: Creating & Querying Semantic Views
Now that we have our Knowledge Graph in place, we can start adding intelligent views that utilise the semantics of our business concepts, relationships, classifications, and business rules, to easily create and manage Views we want to expose to our data consumers. Each view can be associated with unique access permissions and at any time can be analyzed with Data Lineage to understand the building blocks that support the view. Let's jump into the next steps and see for ourselves!
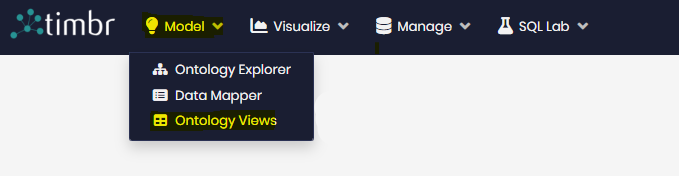
To begin creating views, click on the Model tab on the top menu bar and then click on Ontology Views, and select your knowledge graph tutorial_<yourname>.
Creating View #1
Click on the Add new view button to create a new view. A window will open to create our first view.
Start the creation by writing the name of our view, in this case "order_profit_per_product_and_customer_segment".
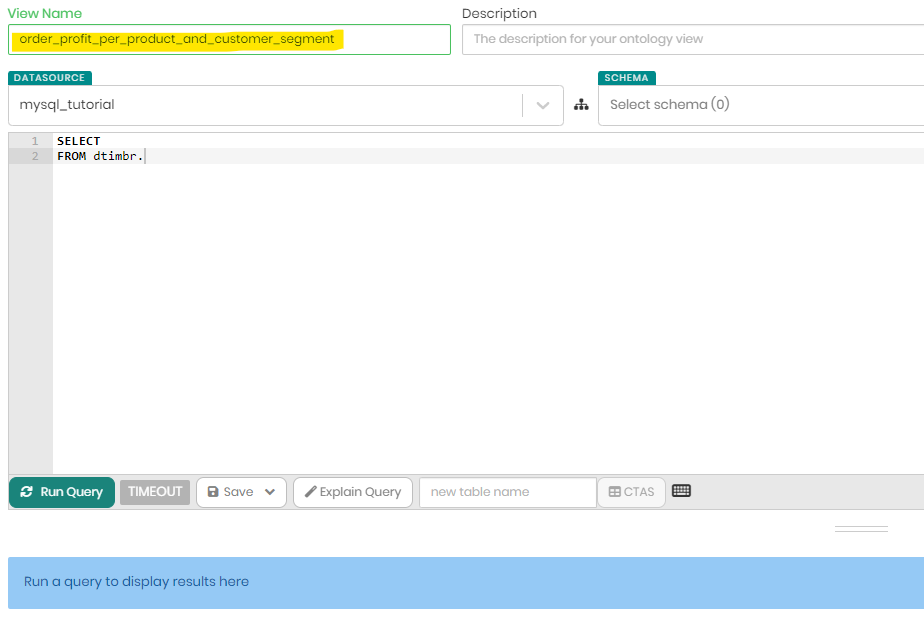
- Copy the SQL statement below into the query box and click on Run Query.
SELECT `customer_segment`, `has_ordered[order].includes_product[product].product_name`, COUNT(DISTINCT `has_ordered[order].order_id`) AS `orders`, SUM(`has_ordered[order].order_profit`) AS `profit`, SUM(`has_ordered[order].order_profit`) / COUNT(DISTINCT `has_ordered[order].order_id`) AS `avg_order_profit`
FROM `dtimbr`.`customer`
GROUP BY `customer_segment`, `has_ordered[order].includes_product[product].product_name`
This query will find the average order profit per product by customer segment. We are using the relationship between order and customer to get the orders that are related to a specific customer , as well as the relationship between order and product to get the ordered product.
- Once the query has finished running and we can see the results, click on Save new view to complete saving our first view.
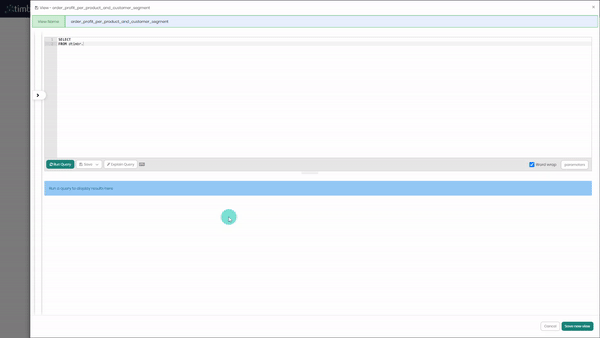
We can now see our first view order_profit_per_product_and_customer_segment.

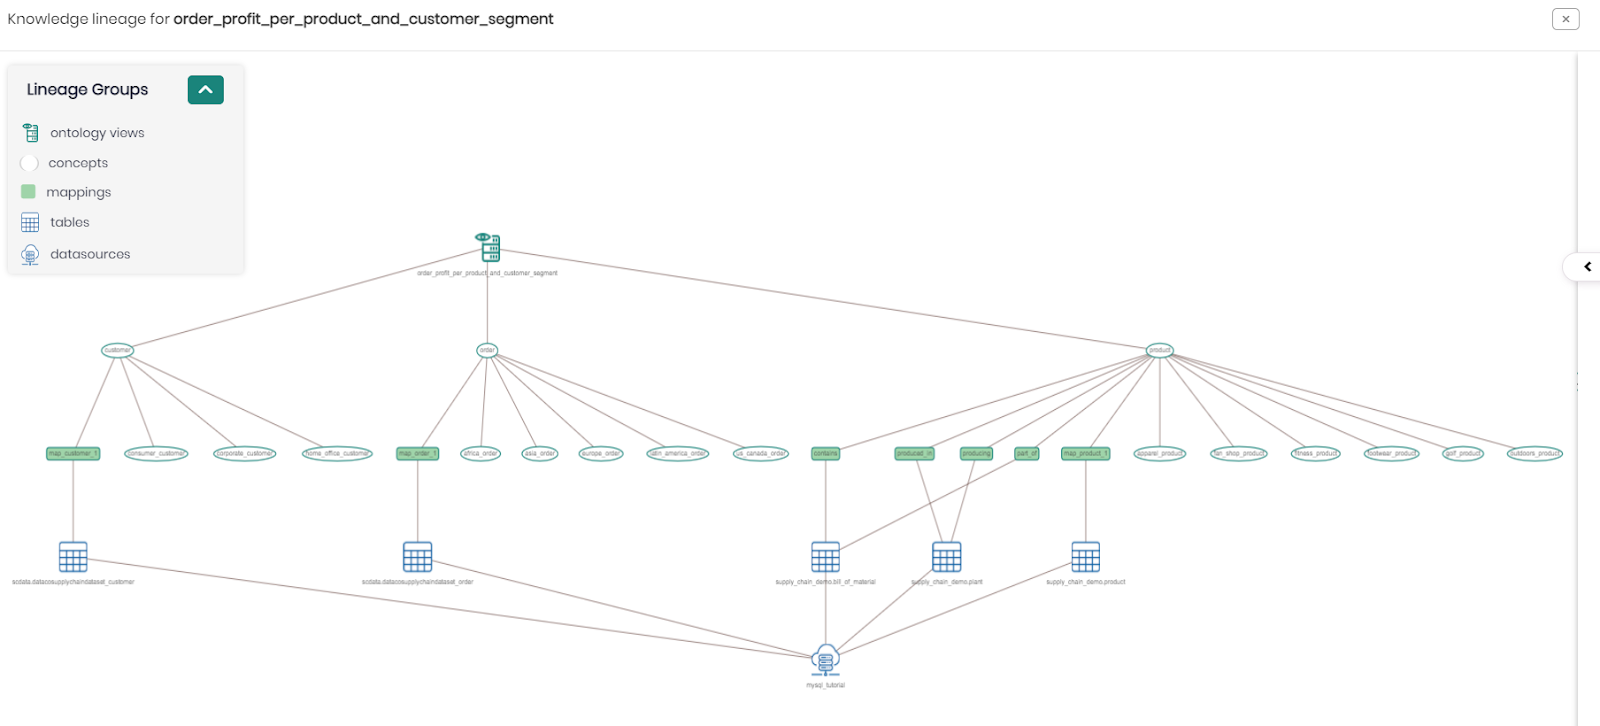
- If you want to see the Data Lineage of the view, including the concepts, mappings, tables, and data sources, you can click on the 3 dots button and select Open Data Lineage.

Now you can see that the data flowing to the view you have created comes from the mysql data source, from the scdata.datacosupplychaindataset_customer table, and is mapped to the customer concept.
Creating View #2
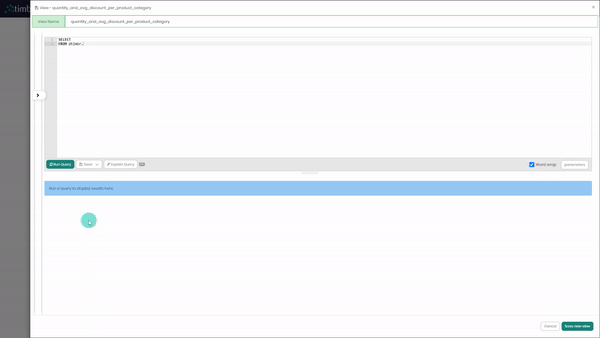
Click again on Add new view and give it the name "quantity_and_avg_discount_per_product_category".
Copy the SQL statement below into the query box and click on Run Query.
SELECT `category` AS `product_category`, COUNT(`in_order[order].order_id`) AS `orders`, SUM(`in_order[order].order_item_quantity`) AS `item_quantity`, AVG(`in_order[order].order_item_discount`) AS `avg_discount`
FROM `dtimbr`.`product`
GROUP BY `category`
This query will find the quantity and the average discount per product category. We are using the relationship between product and order to get the orders that contain a specific customer.
- Once the query has finished running and we can see the results, click on Save new view to complete our second and final view.
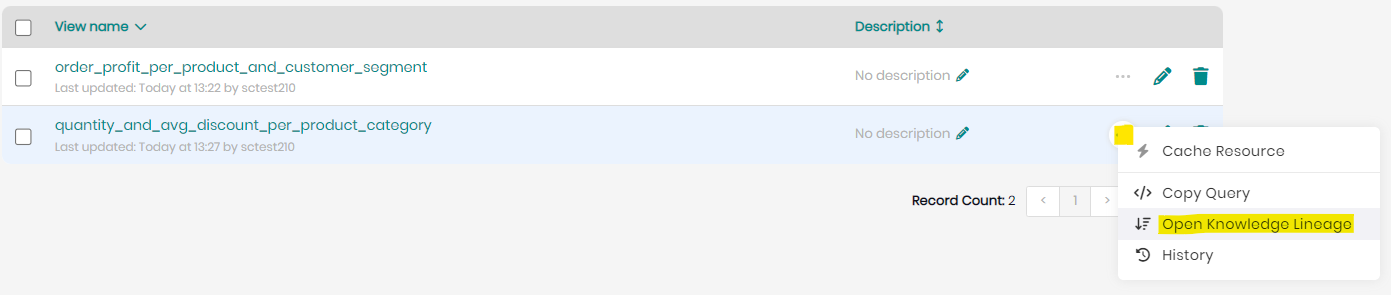
We can now see our second view quantity_and_avg_discount_per_product_category.

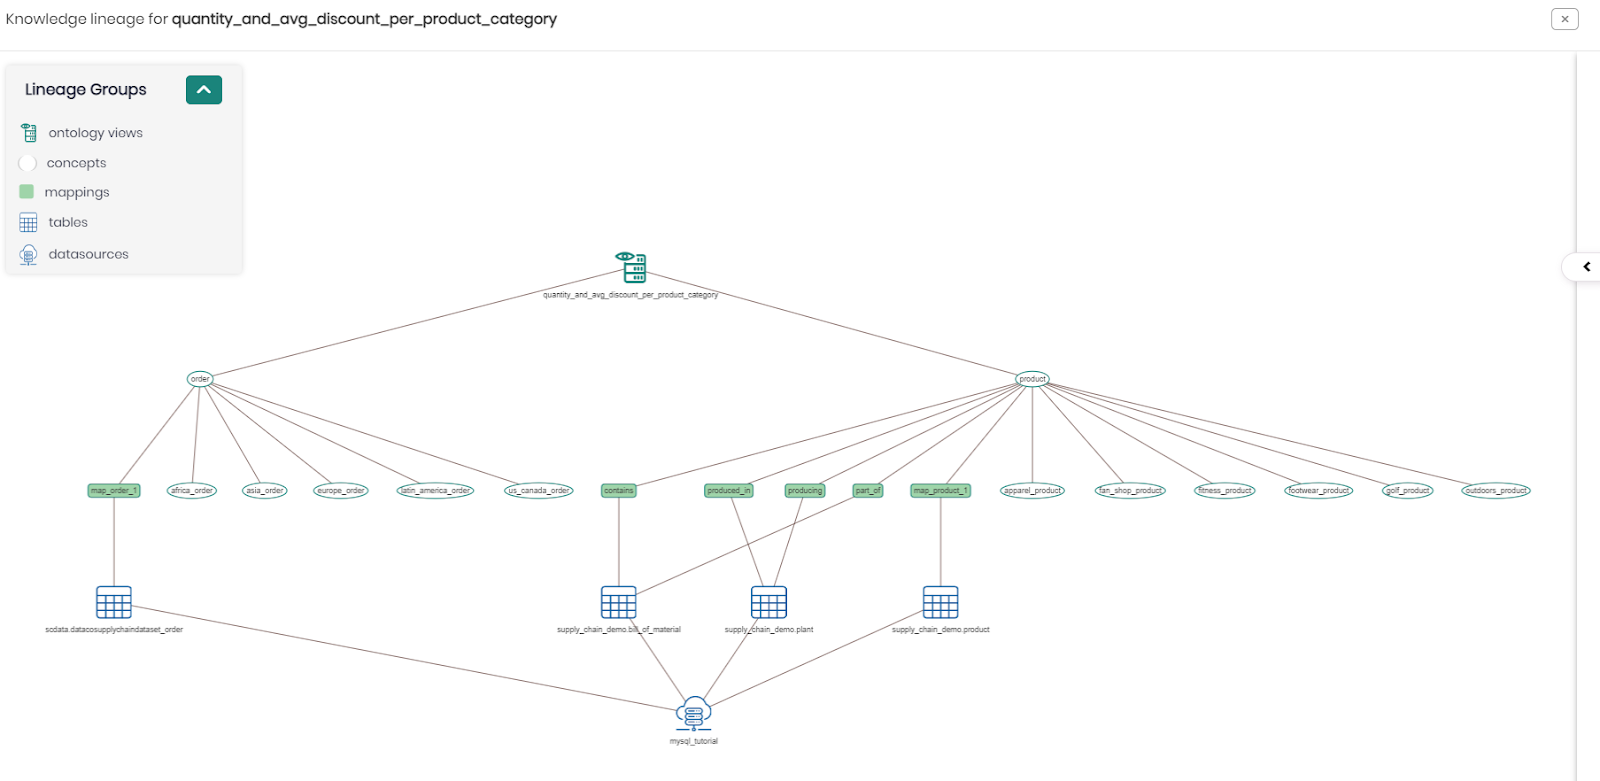
- If you want to see the Data Lineage of the view, including the concepts, mappings, tables, and data sources. You can click on the 3 dots button and select Open Data Lineage.
Now you can see that the data flowing to the new view comes from the product concept that pulls the data from supply_chain_demo.product table. You can also see that the product concept has two other mappings created for relationships. All the data comes from the mysql data source.
Running SQL queries on the new views
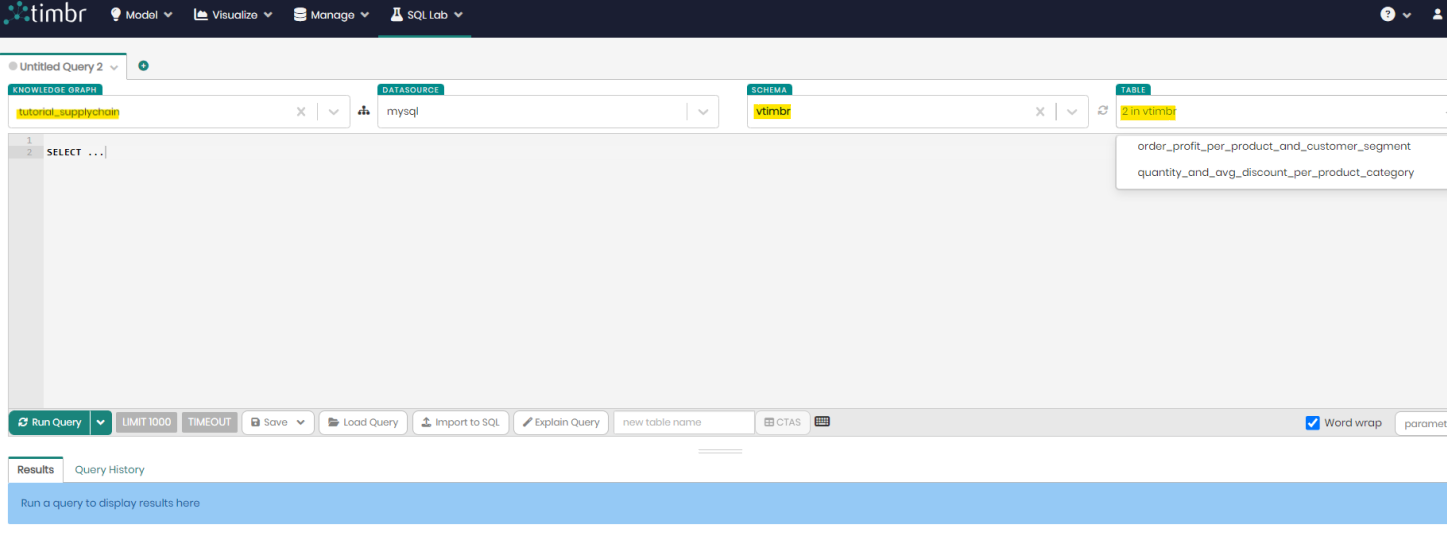
To run the queries we will go over to the SQL Editor.
Click on the SQL Lab tab on the top menu bar and then click on SQL Editor.
Choose your knowledge graph, but this time, choose the schema vtimbr. This schema is used to expose the intelligent views we save above our knowledge graph.
Choose the view you would like to query (the views appear in the ‘'table'' drop-down menu instead of the concepts).
Querying view #1
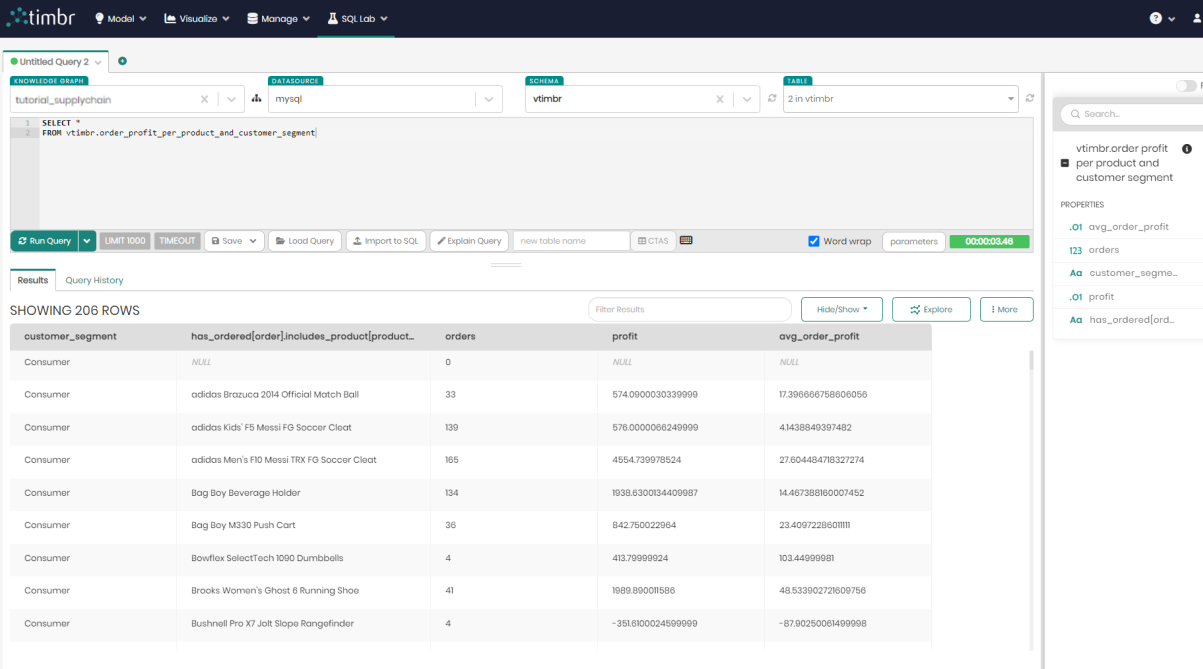
Enter the following query into the main box in the center and click on Run Query:
SELECT *
FROM vtimbr.order_profit_per_product_and_customer_segment
The query and result should look like this:
Querying view #2
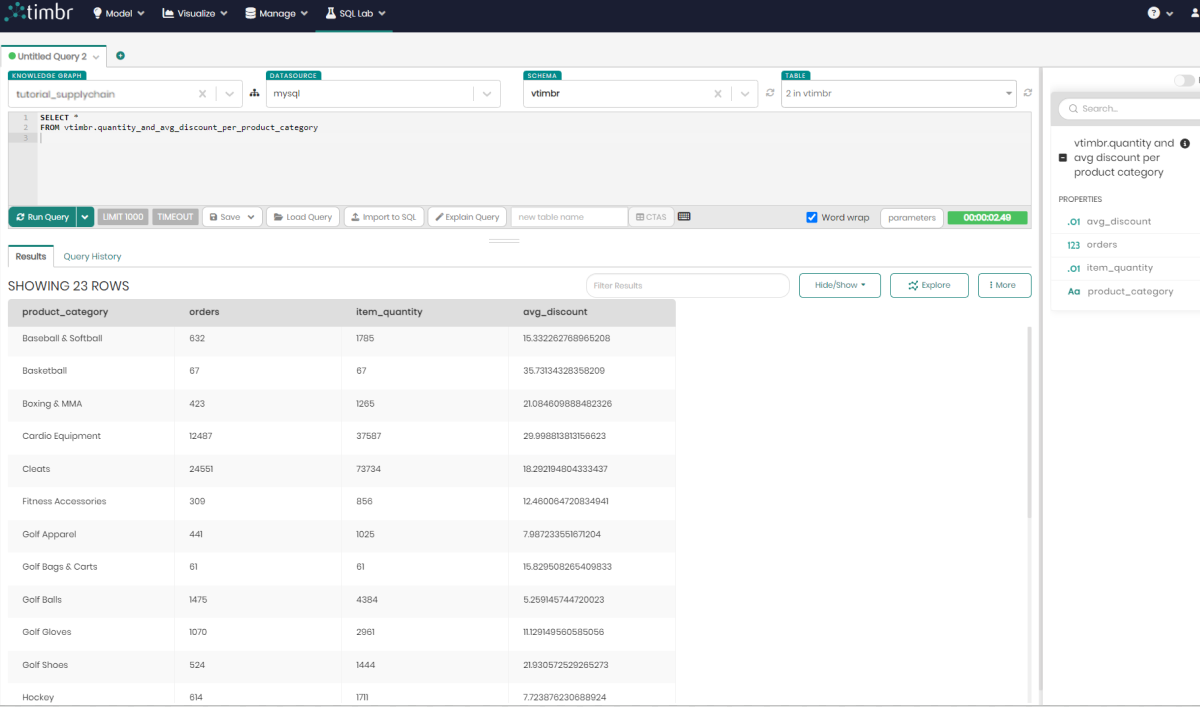
Enter the following query into the main box in the center and click on Run Query:
SELECT *
FROM vtimbr.quantity_and_avg_discount_per_product_category
The query and result should look like this:
Supply Chain Use Case Tutorial Summary
Congratulations!
You've completed our Supply Chain use case and built your own knowledge graph! You are welcome to explore the knowledge graph, play with the data, run semantic queries, visualize charts and build dashboards! Reach out if you want to see additional use cases and real life examples of Knowledge Graphs that drive business data value!
What we've covered
- How to create and model a Knowledge Graph with hard-coded logic
- How to map data to the Knowledge Graph
- How to create relationships connecting data points together
- How to query the data using a variety of SQL queries
- Building and exploring the data as a graph
- Representing the data findings in BI visualizations
- Adding views to the knowledge graph and querying them
Additional information
- Learn more about the Timbr.ai platform
- Check out more details at Timbr.ai