Ontology Modeling in Timbr
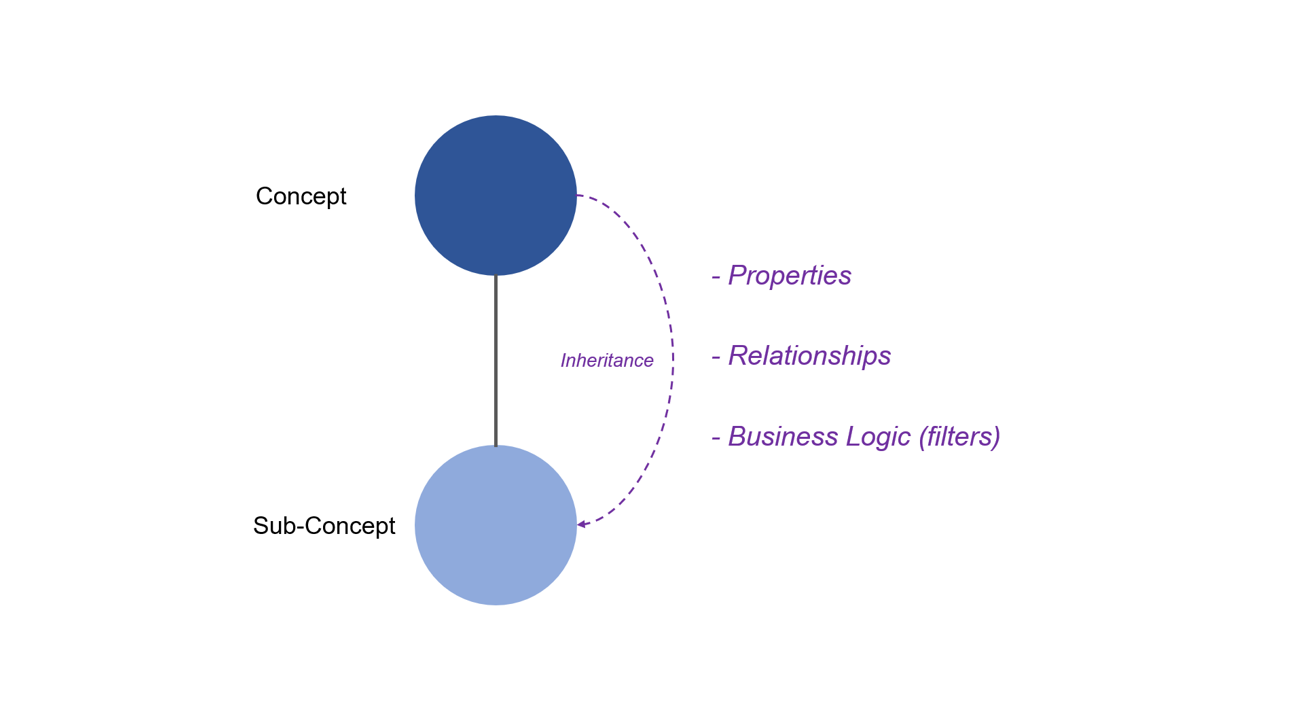
Modeling concepts of an ontology means describing data in a way easily understandable to all users, using a common language to refer to any unit of information. The ontology in Timbr becomes the data model, the concepts act as virtual tables with semantic relationships to automatically JOIN or UNION the data. Concepts also have a motion of inheritence to sub-concepts, forming an hierarchy of abstract and granular business concepts.
Timbr's Ontology Modeler provides a visual interface and a SQL DDL editor to easily model concepts, relationships, and properties that represents a business case.
Datasets to Ontology Modeling
In this example we show how relational tables (ER model) map to an
ontology in Timbr.
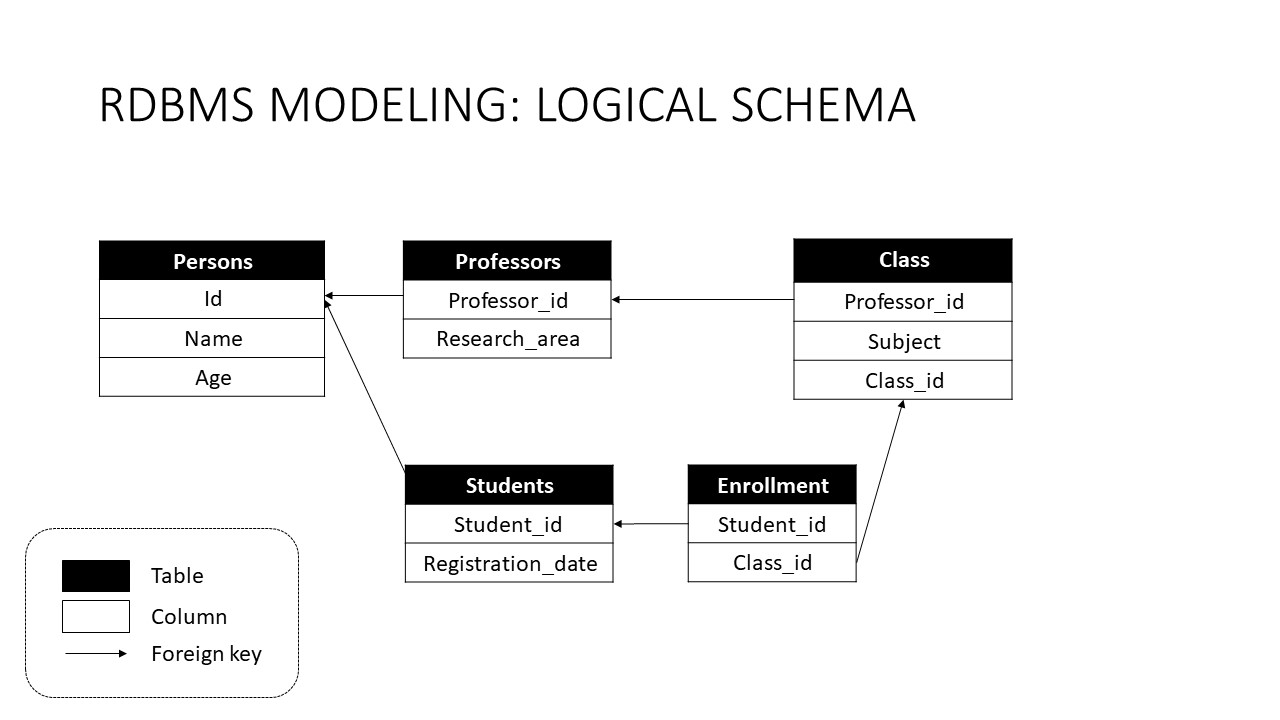
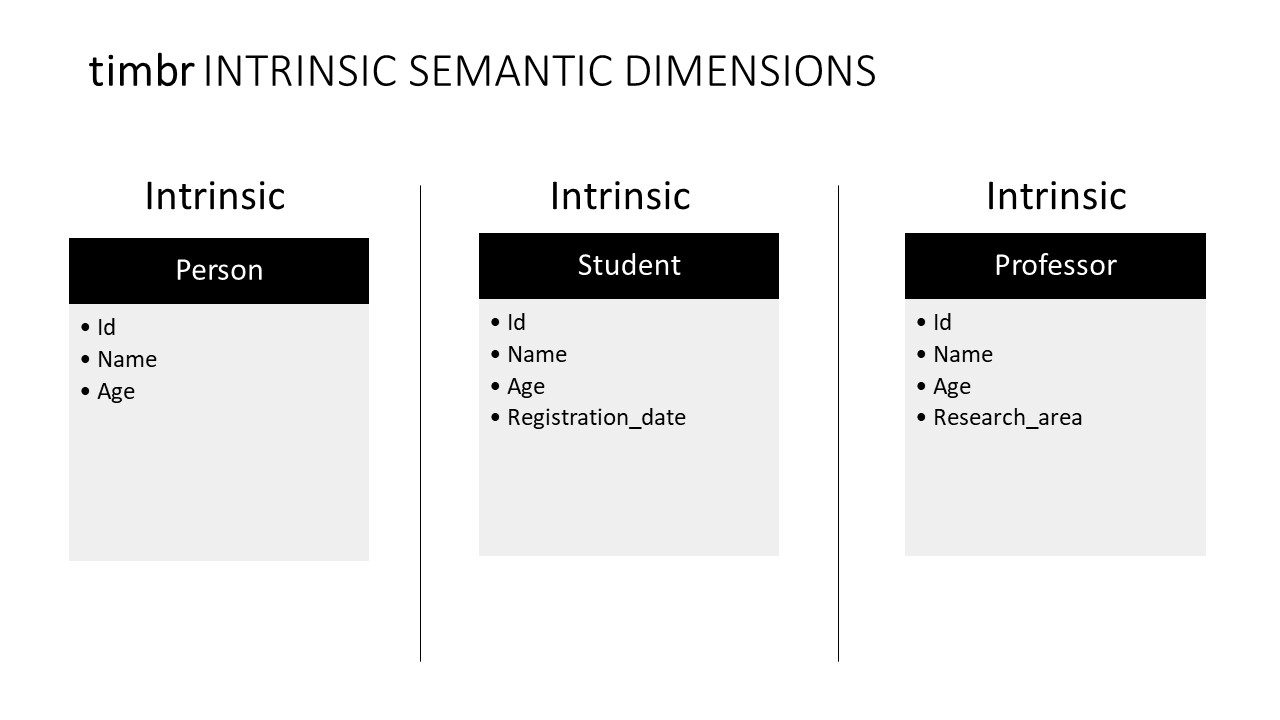
In our example we have 5 tables:
- Persons table with 3 columns: Id (primary key), Name, Age.
- Students table with 2 columns: Student_id (primary key and foreign key to person id), Registration_date
- Professors table with 2 columns: Professor_id (primary key and foreign key to person id), Research_area
- Class table with 3 columns: Professor_id (foreign key to professor id), Subject, Class_id (primary key)
- Enrollment table with 2 columns: Student_id (foreign key to student_id), Class_id (foreign key to class_id)
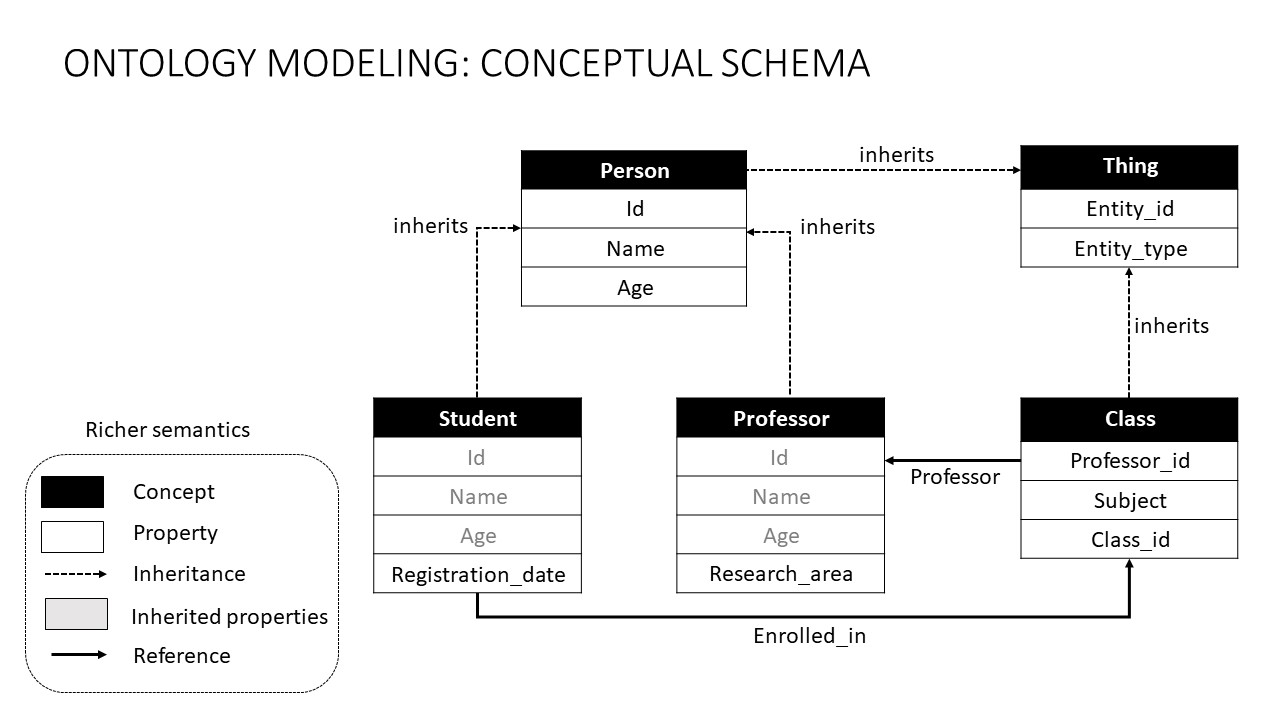
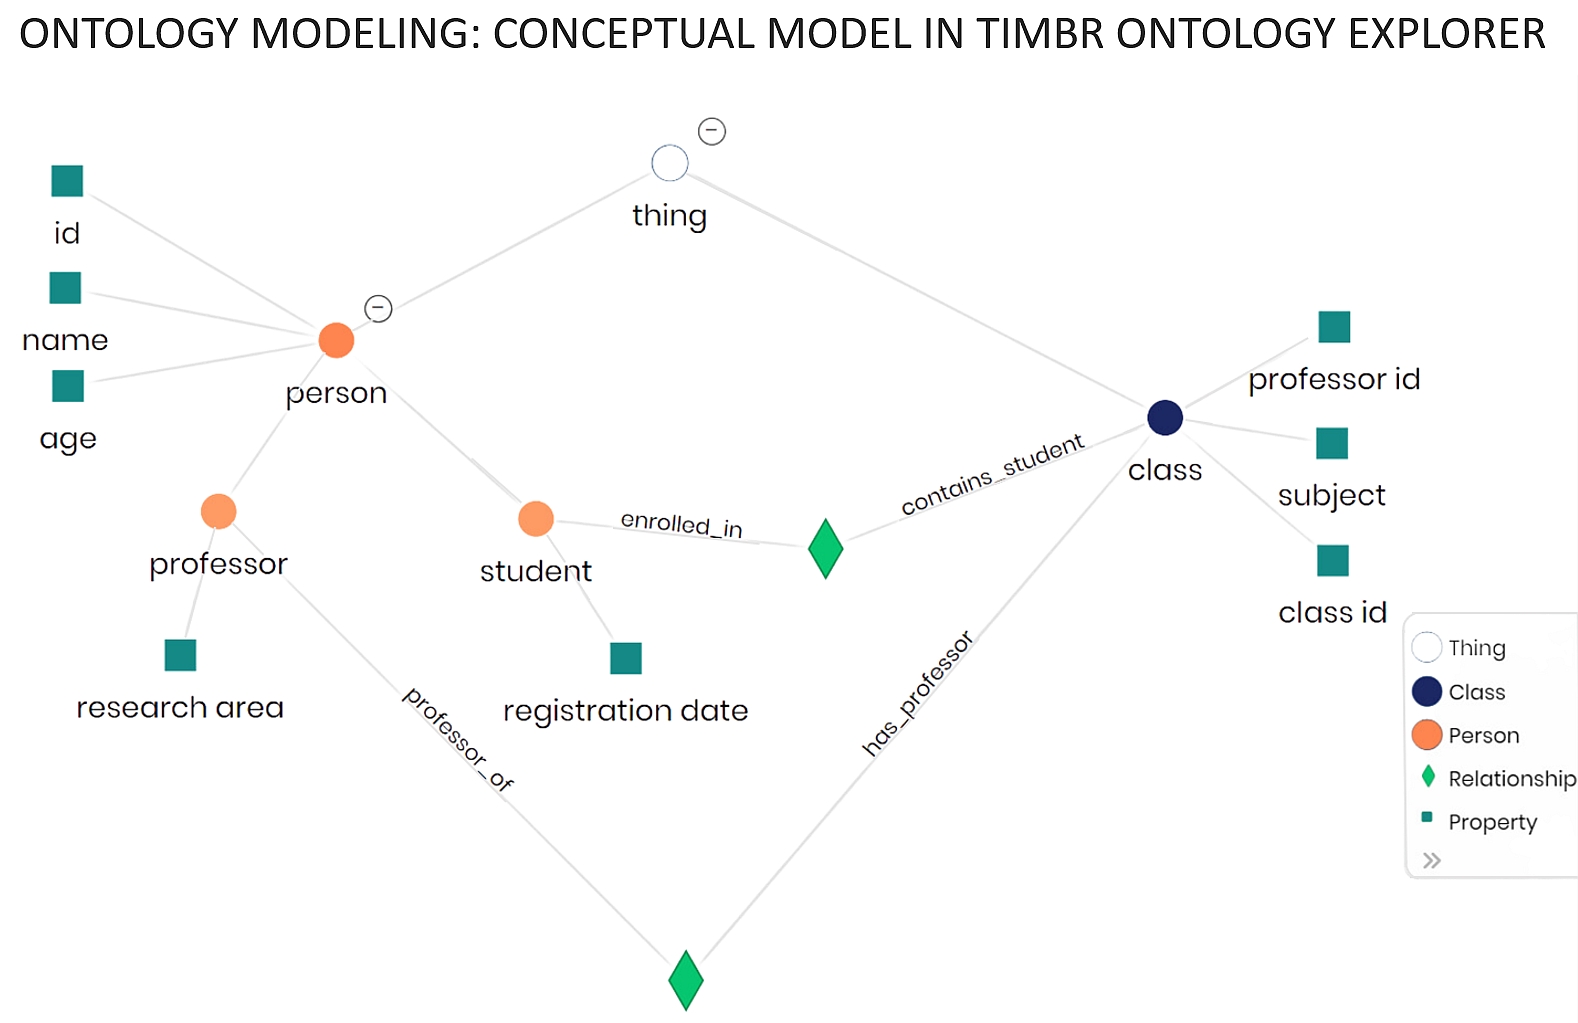
With Timbr we can model an ontology on top of those tables:
- Person concept with 3 properties: Id, Name, Age.
- Student concept inherits from Person with 4 properties: 3 inherited from Person and Registration_date
- Professor concept inherits from Person with 4 properties: 3 inherited from Person and Research_area
- Class concept with 3 properties: Professor_id, Subject, Class_id
We can also define the following relationships:
- Student is Enrolled_in a class (enrollment table is used a reference-table)
- Class has a professor (using professor_id to reference Professor concept)
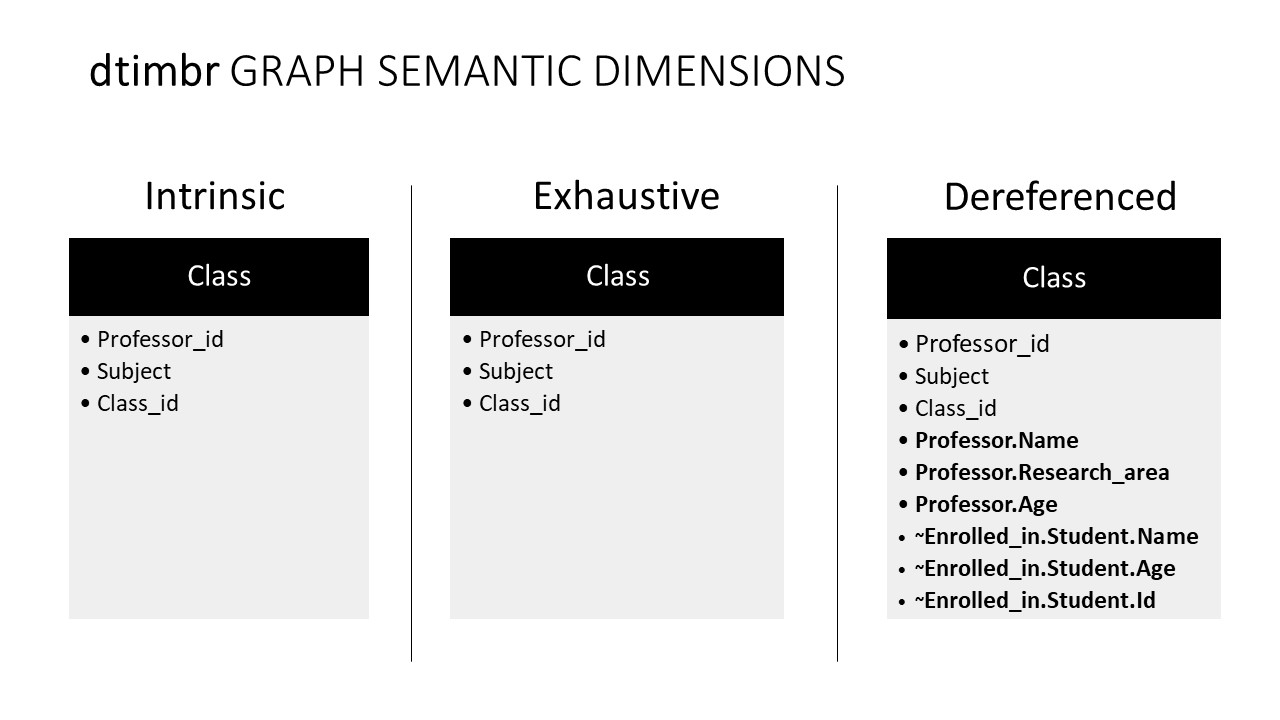
Timbr Ontology Schemas
Timbr creates five virtual schemas to represent the ontology in a relational way:
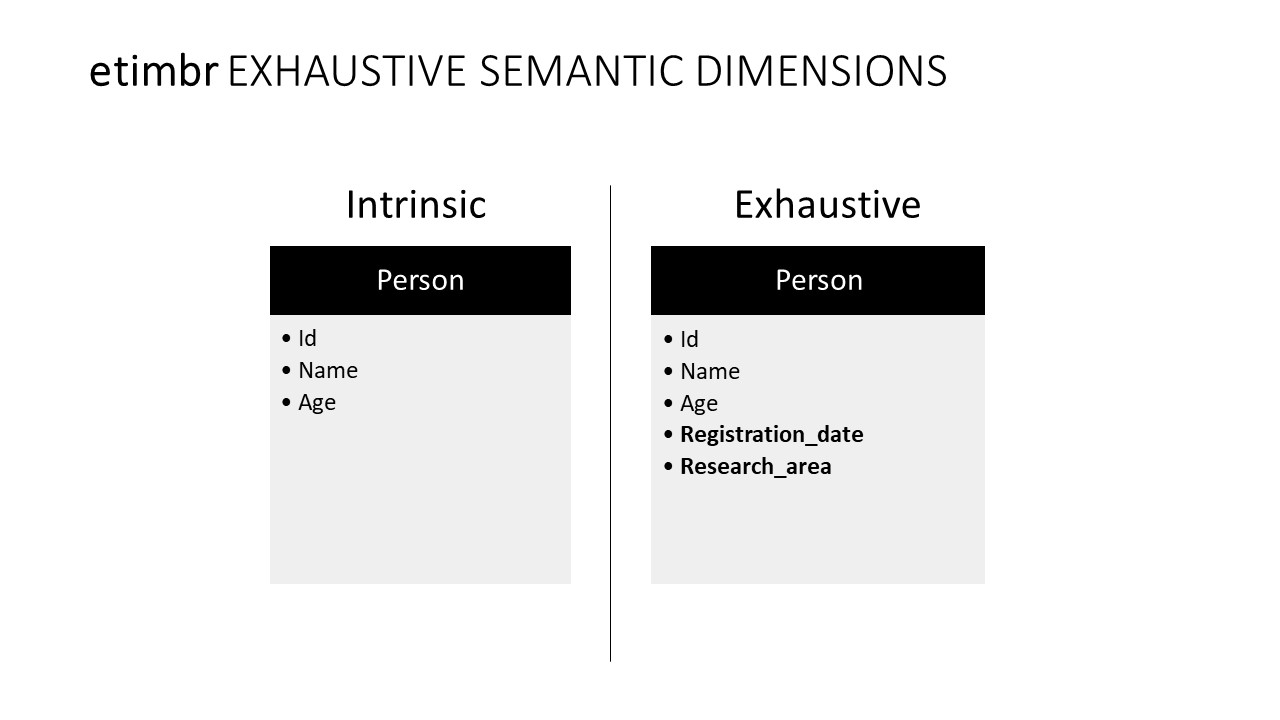
- timbr schema: Intrinsic definition - explicit ontology/relational mapping.
- etimbr schema: Exhaustive definition - timbr schema with implicitly derived properties of all sub-concepts.
- dtimbr schema: Dereferenced definition - timbr schema with the semantic relationships defined for all concepts.
- vtimbr schema: A schema that exposes views saved in a given ontology.
- gtimbr schema: A schema to run Graph Algorithms on the ontology concepts.
The gtimbr schema is additional and is not included in the basic Timbr license.
timbr Schema
The Intrinsic schema of the ontology allows you to query concepts as
tables and properties as columns.
The Timbr ontology starts with concept Thing as the root-base concept.
Everything (concept "Thing") in the ontology has two default properties:
entity_id: this is the unique instance id.
In RDF this is the unique subject URI.
In Relational modeling this is the primary key.
entity_type: this is the type (or types) of the instance.
In RDF this is the type of rdf:type.
In Relational modeling this is the type of the entity.
etimbr Schema
The Exhaustive schema extends timbr schema and allows you to query
derived properties of a concept.
This allows you to query high-level concepts with opportunistic columns
and reflection.
In our example, Person concept in the etimbr schema contains all the derived properties:
This also means that concept Thing in etimbr schema contains all the ontology properties:
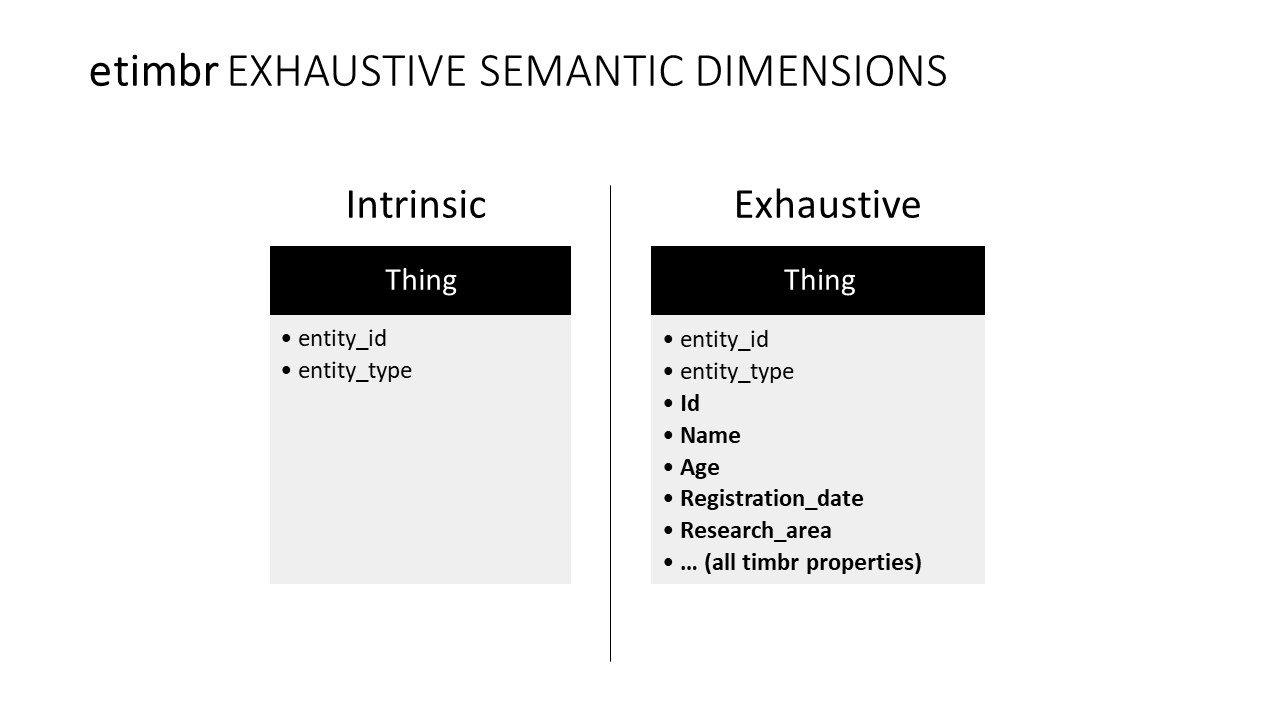
This allows you to query anything with any properties.
For example: Anything with a name that starts with T
SELECT entity_id, entity_type, name FROM etimbr.thing where name like 'T%'
dtimbr Schema
The Dereferenced schema extends etimbr schema and allows you to traverse the ontology as a graph. You can view and query all the relationships between concepts without the need to explicitly write joins.
In our example, Student concept in the dtimbr schema contains his relationships as properties:
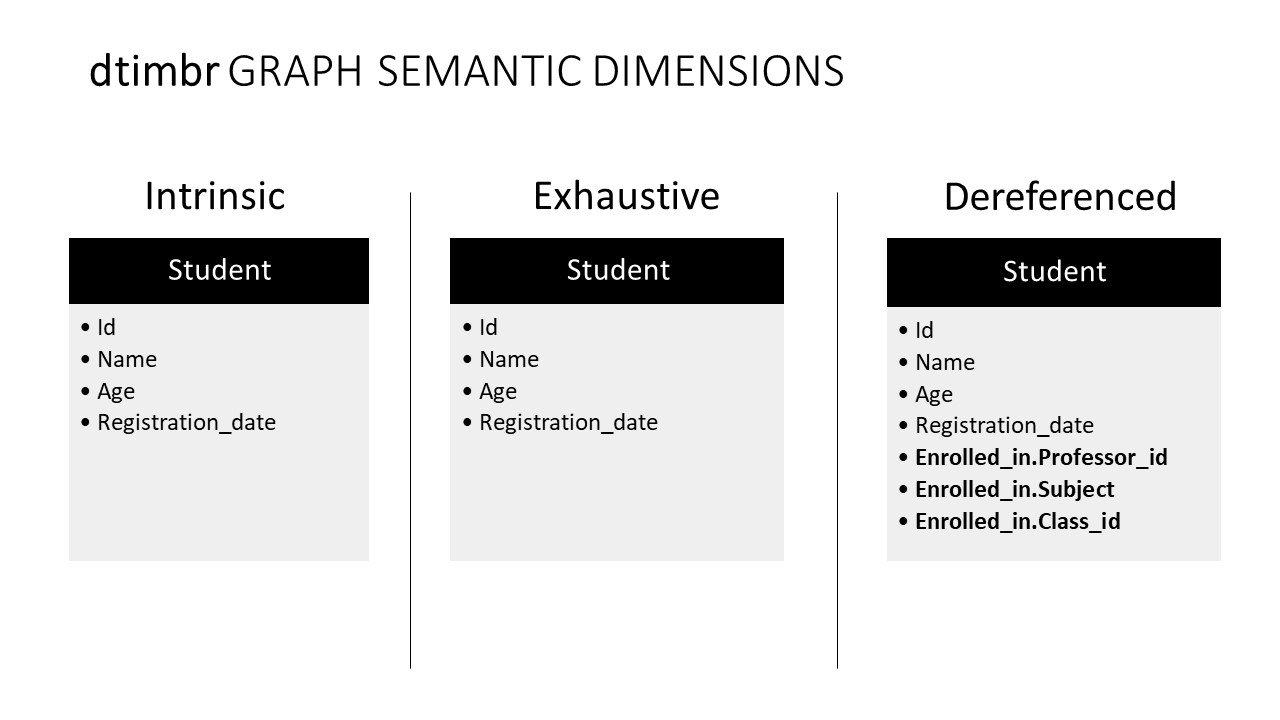
We see the relationship between concept Student and concept Class as a property `Enrolled_in`.
We can also see the reverse relationship direction with properties that
start with ~.
In the following example we see the Class concept in the dtimbr
schema:
We see the relationship between concept Class and concept
Professor as a property `Professor`.
We see the reverse relationship between concept Class and
concept Student as a property `~Enrolled_in.Student`.
In the following example we see the Professor concept in the dtimbr schema:
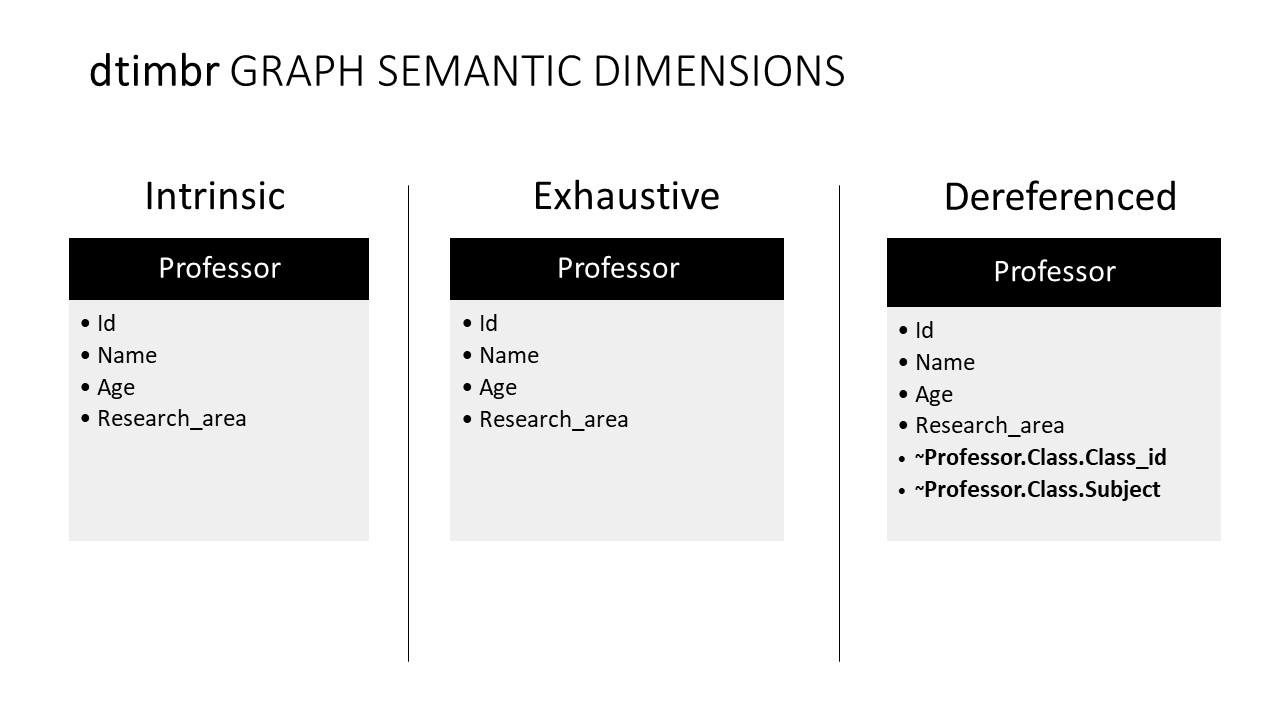
We see the reverse relationship between concept Professor and concept Class as a property `~Professor.Class`.
Timbr automatically joins concepts based on the path you select.
You can also continue traversing to other concepts by using `.`
For example: Give me all the professors that teach Student Sam
SELECT `Enrolled_in.[Professor].Name` from dtimbr.student where name = 'Sam'
In this example, we traverse from concept Student to concept Class to concept Professor
vtimbr Schema
The view schema exposes all the views created on top of a given ontology. You can view and query all the views using the vtimbr schema just like any other virtual table in Timbr. Views can be created using the timbr, etimbr, and dtimbr schemas, leveraging the inference and relationships of each within the view itself. Views in Timbr can also be created using the physical tables of the connected data source.
Timbr Concepts
Timbr's Ontology Explorer enables users to create, edit, explore, and query concepts that are mapped to the underlying data sources and represent business entities or metrics. Concepts can be modeled in various ways (as can be seen in the examples below), most of which include hierarchies. The hierarchies express levels of abstraction for an entity where the upper level concepts are more general and abstract and the lower you go through the hierarchy, you get more granular and specific classifications of the upper concepts. The trick to validate if a concept is indeed a sub-concept of another concept is to check if the Is-A relation is applicable. When the sub-concept Is-A upper concept, then the hierarchy is correct, and their inheritance of properties and relationships is valid. In cases where the sub-concept does not apply to the Is-A upper concept (semantically), then the hierarchy is semantically wrong.
For example, Adult Is-A Person, therefore, any property and relationship of the Person concept also applies to the Adult concept. You can still create unique properties or relationships for the Adult concept that do not necessarily apply to the Person concept, for example, a driver_license_number property that is not applicable to every Person, only to those who are Adults.
In order for the data to be filtered correctly to the sub-concepts from their upper concepts, defining the concepts' business logic (filter conditions) must be set as shown in the examples below.
There are two methods to create concepts in Timbr. For those who prefer to code, concepts can be created using SQL statements which can be found below. Otherwise, concepts can be created in a visual manner following a few steps without the use of code.
Creating Concepts
In these examples, you’ll find guided explanations demonstrating how to create concepts visually using the Ontology Explorer.
CREATING a CONCEPT in the Ontology Explorer:
Assuming the Concept we'd like to create is Person, which will inherit and be created from the root concept of the Ontology named thing.
- In the Ontology Explorer, Right click on the concept thing and choose + Child concept.
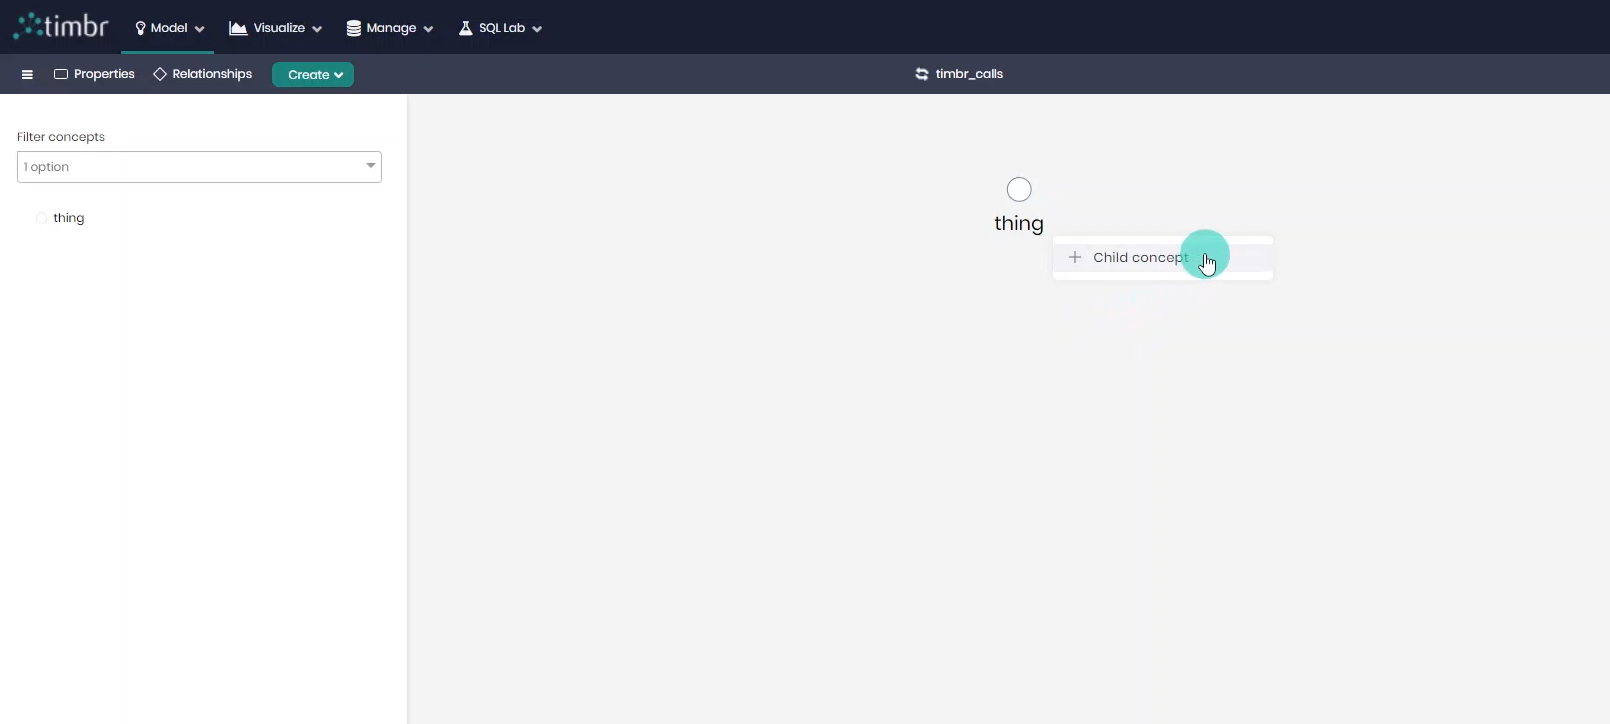
- Give the concept a name as well as an optional description as to what the concept contains.
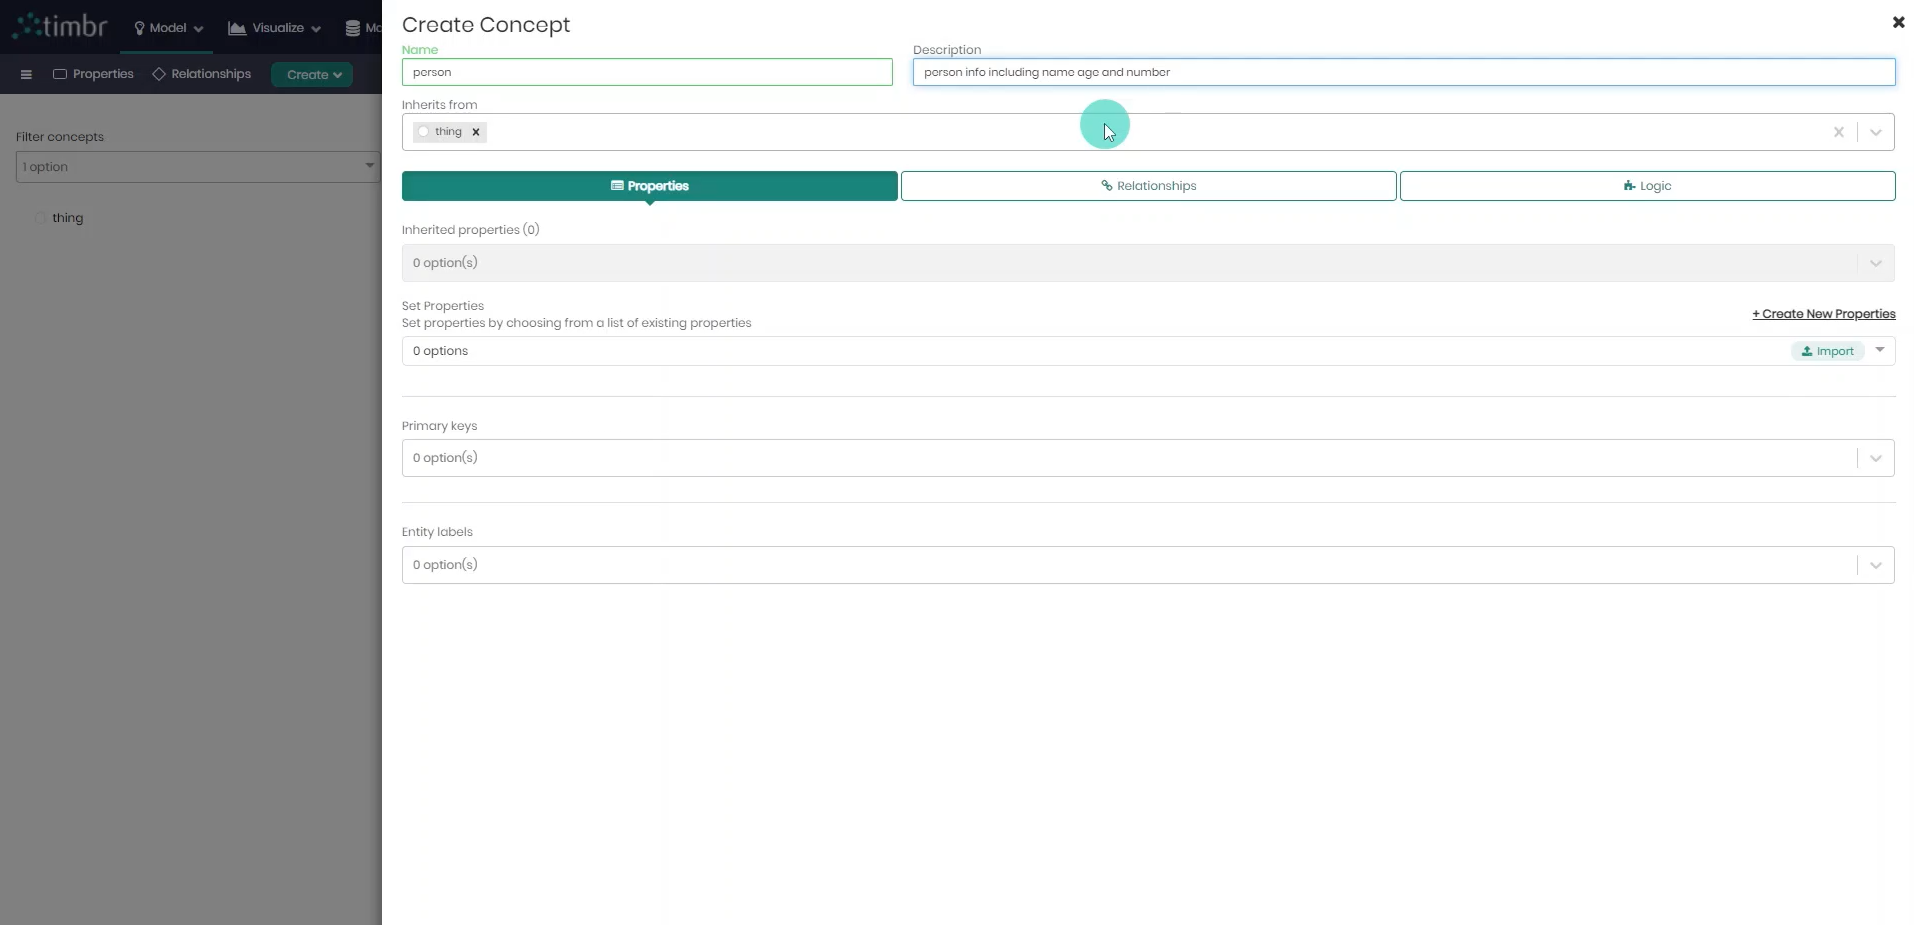
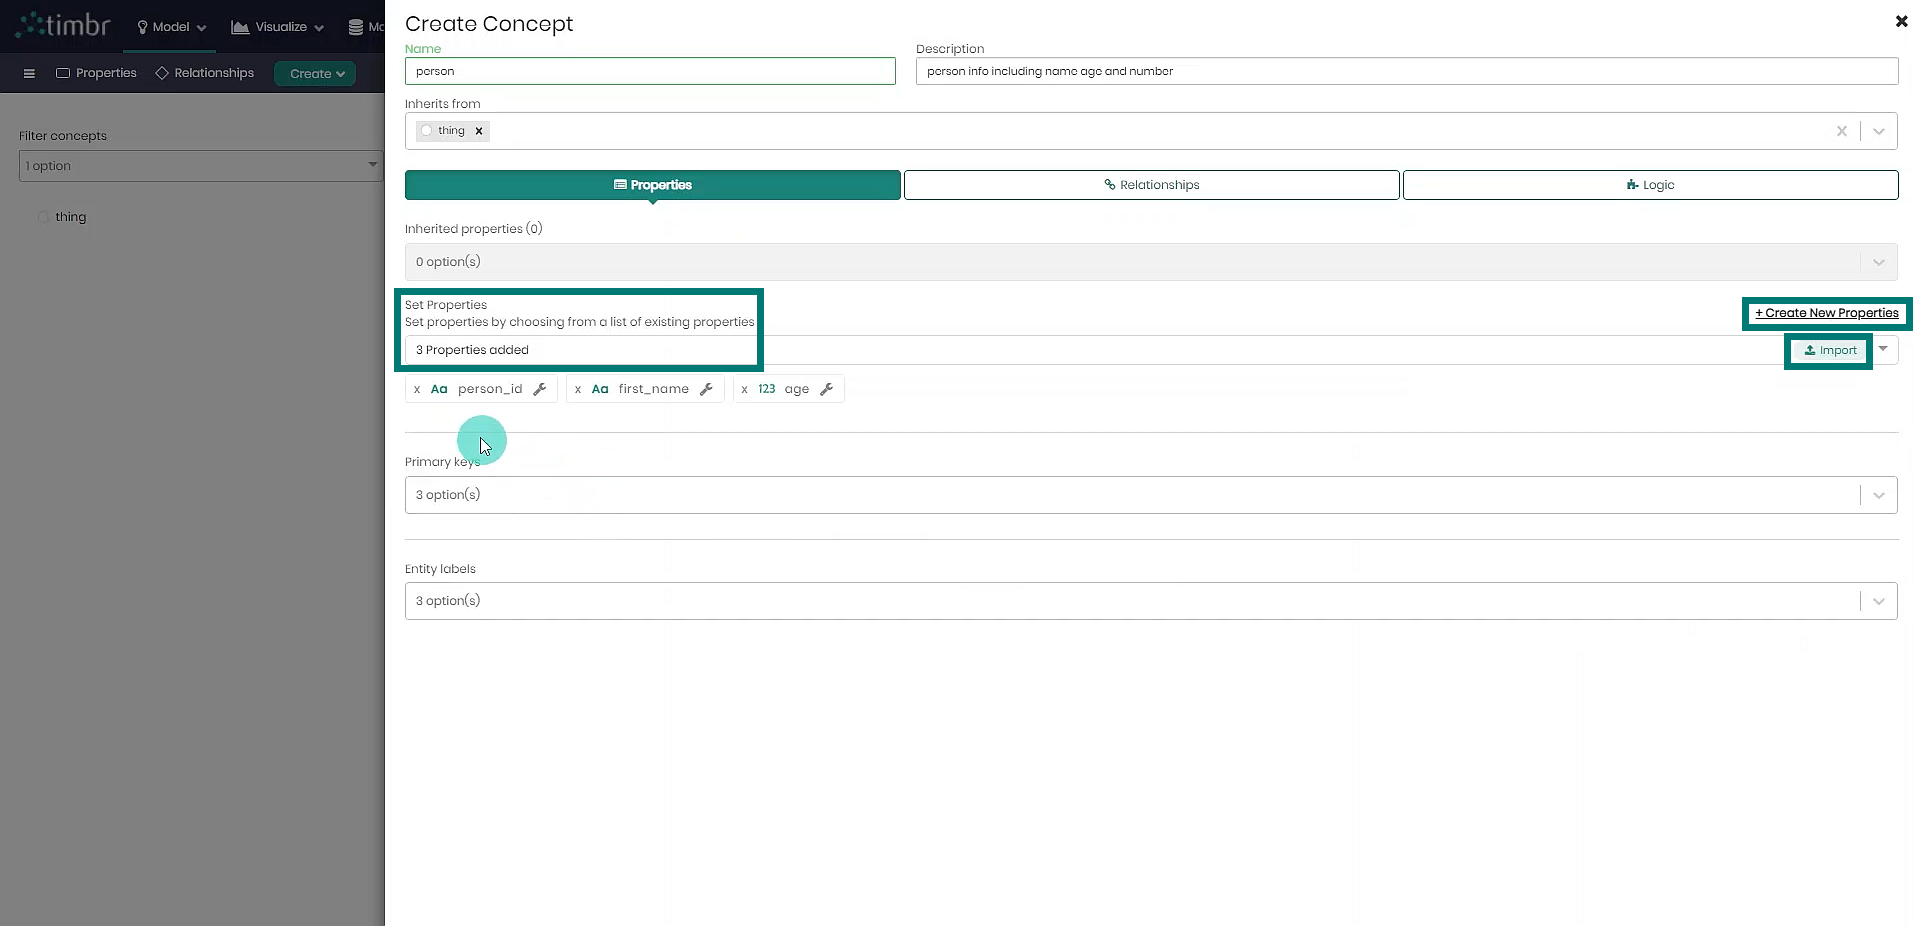
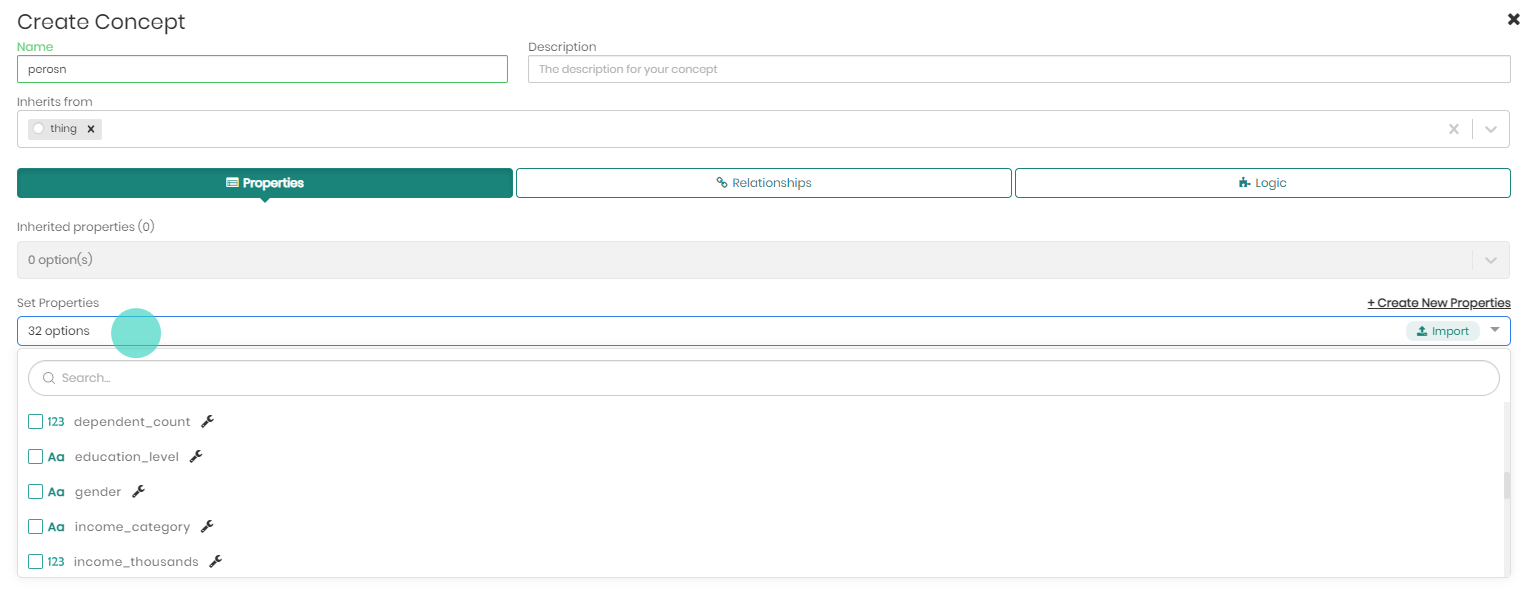
Properties can be added in the three following ways:
- Set Properties - Choose relevant properties from the list of properties that already exist in the knowledge graph from the dropdown menu.
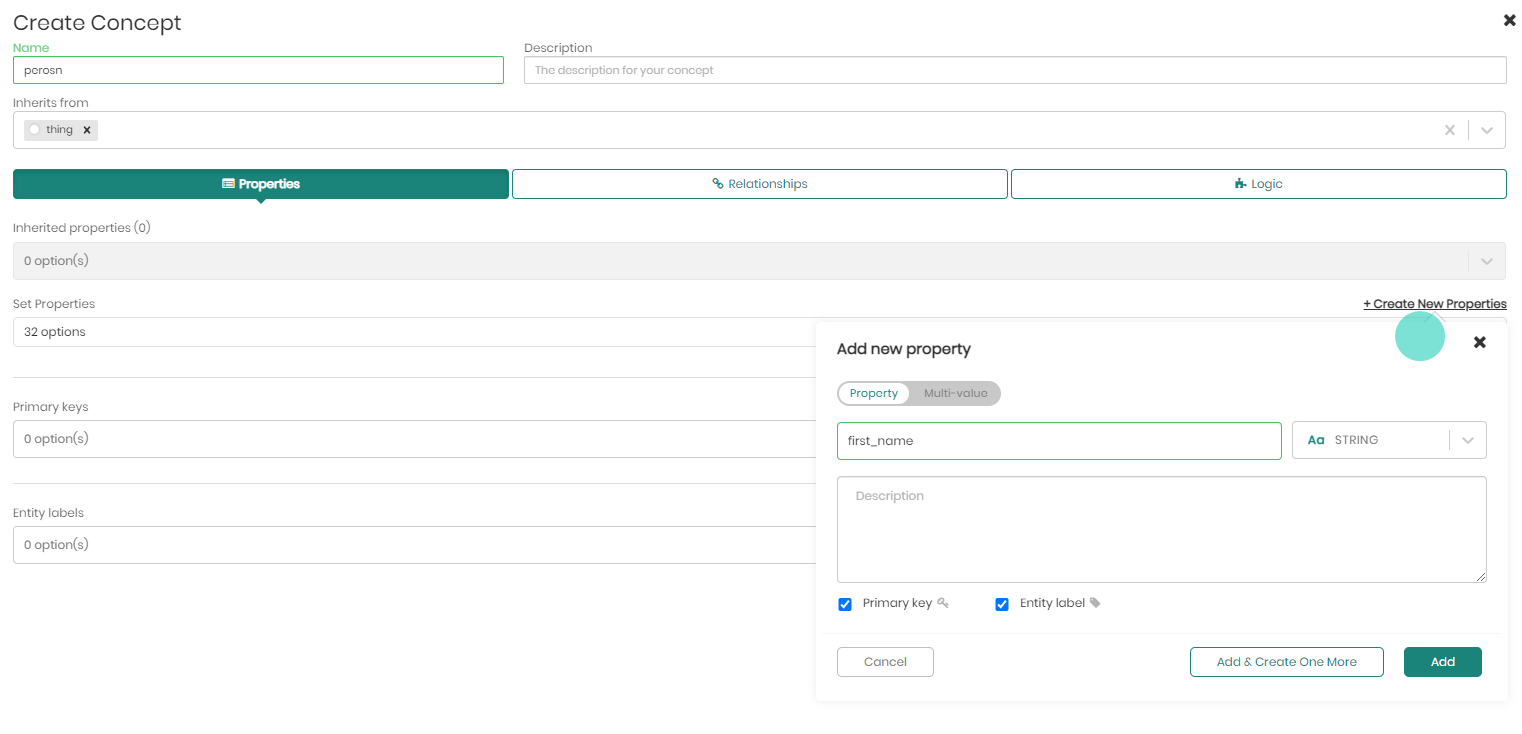
- Create New Properties - Create a new property from scratch, being either a regular property or changing the toggle for a multi-value property, then giving the property a name and data type, and choosing whether the new property should act as the concepts Primary Key or Entity Label.
If you choose to create a multi-value property, you will be required to create a multi-value mapping in order to map data to the property.
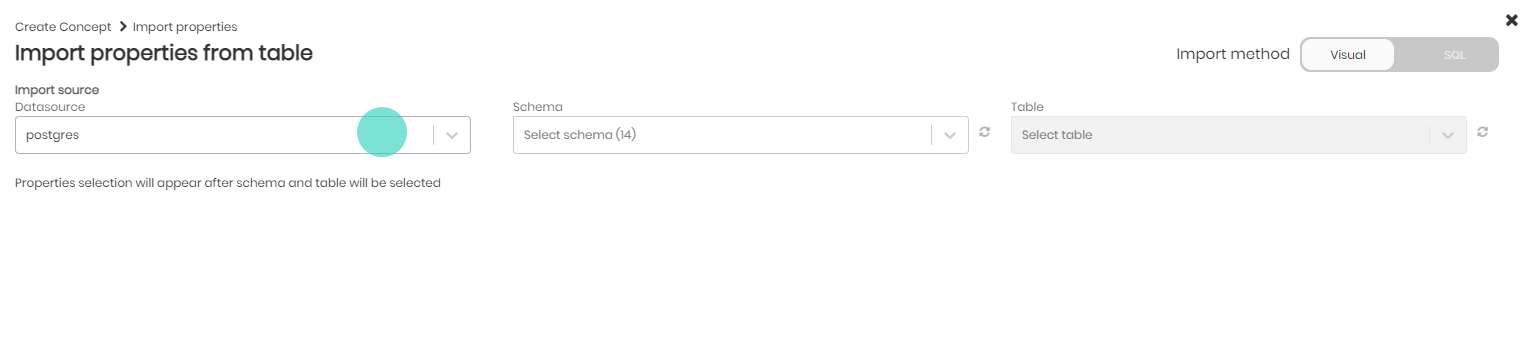
- Import - Import properties directly from a dataset.
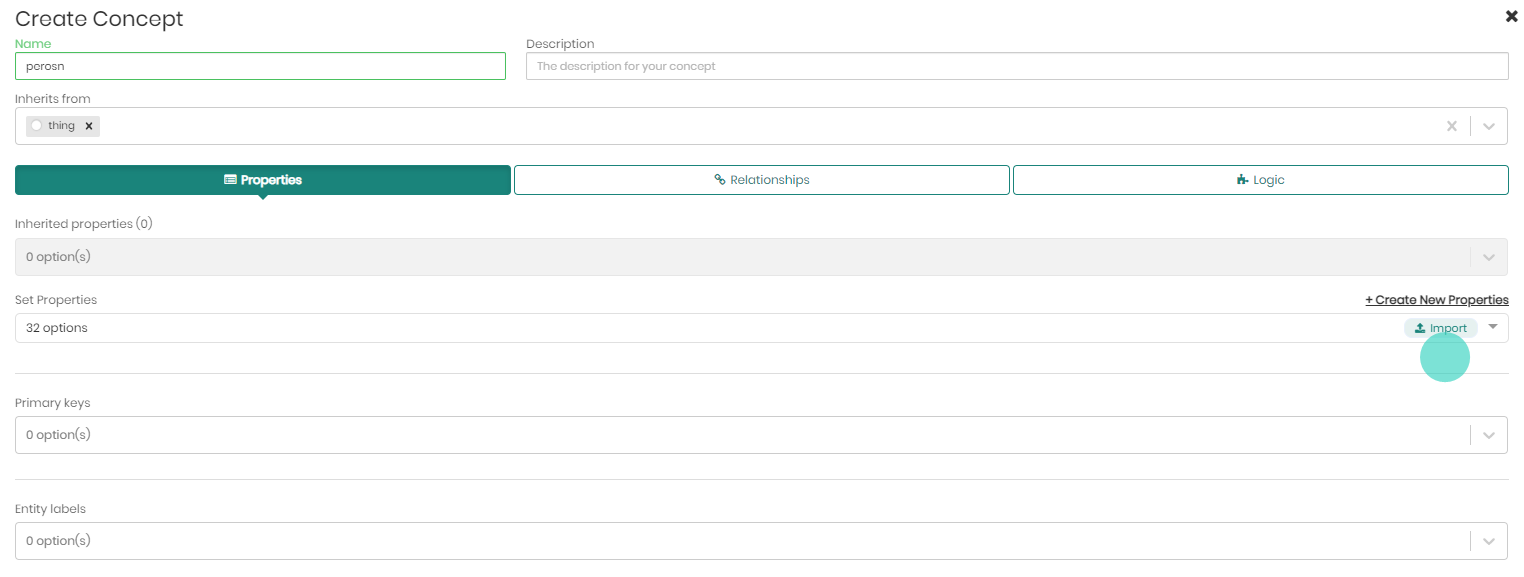
Once Import is clicked a window will appear asking to enter the Datasource, Schema and Table where are properties we'd like to import to our knowledge graph concept are currently at. The properties can also be added using SQL by switching to SQL on the top right toggle.
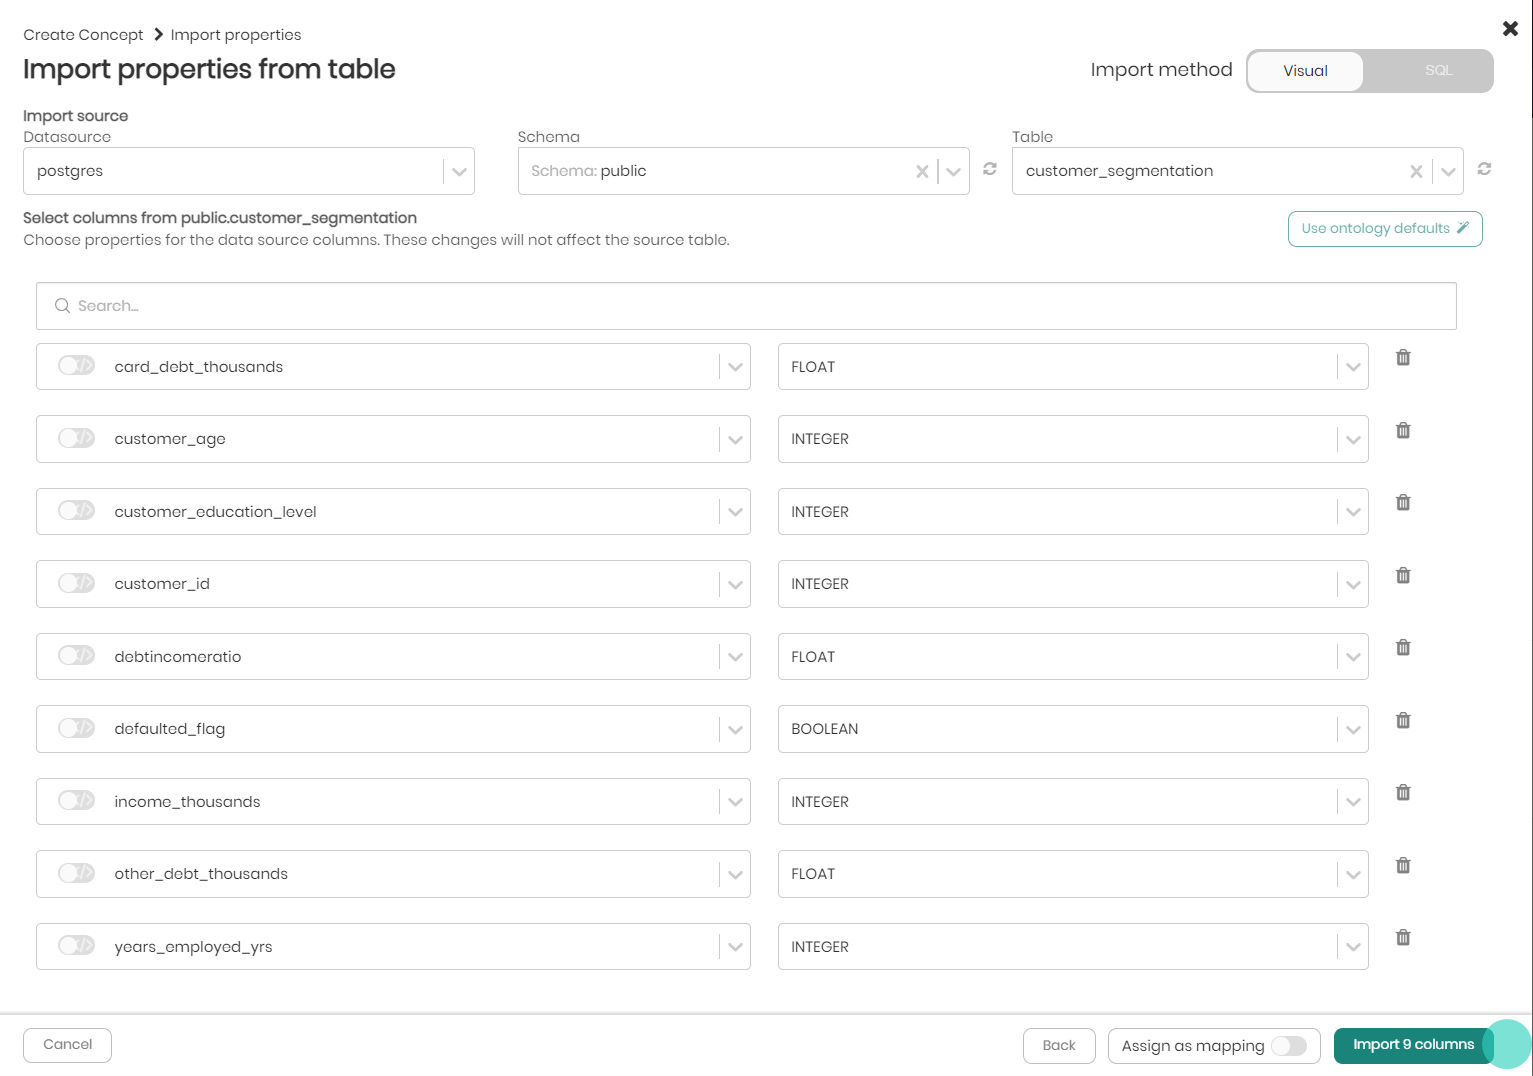
When the Datasource, Schema and Table are entered, the columns from the chosen table will appear and will be ready to be imported as properties of the concept. Any properties can be removed if we aren't interested in them. We can also edit the property names to give a better semantic meaning to the properties, or change the type of a property in case the original column type in the table doesn't fit our needs. In these cases, Timbr will automatically apply a CAST function on the original table column and correct the data type according to the type we choose in the model.
Once we are done editing the properties and are satisfied with them, Import Columns is clicked on the bottom right, in order to import the properties to the concept.
At any point we can easily edit our properties by clicking the wrench symbol next to the property we'd like to edit, we'll make our changes and save them.
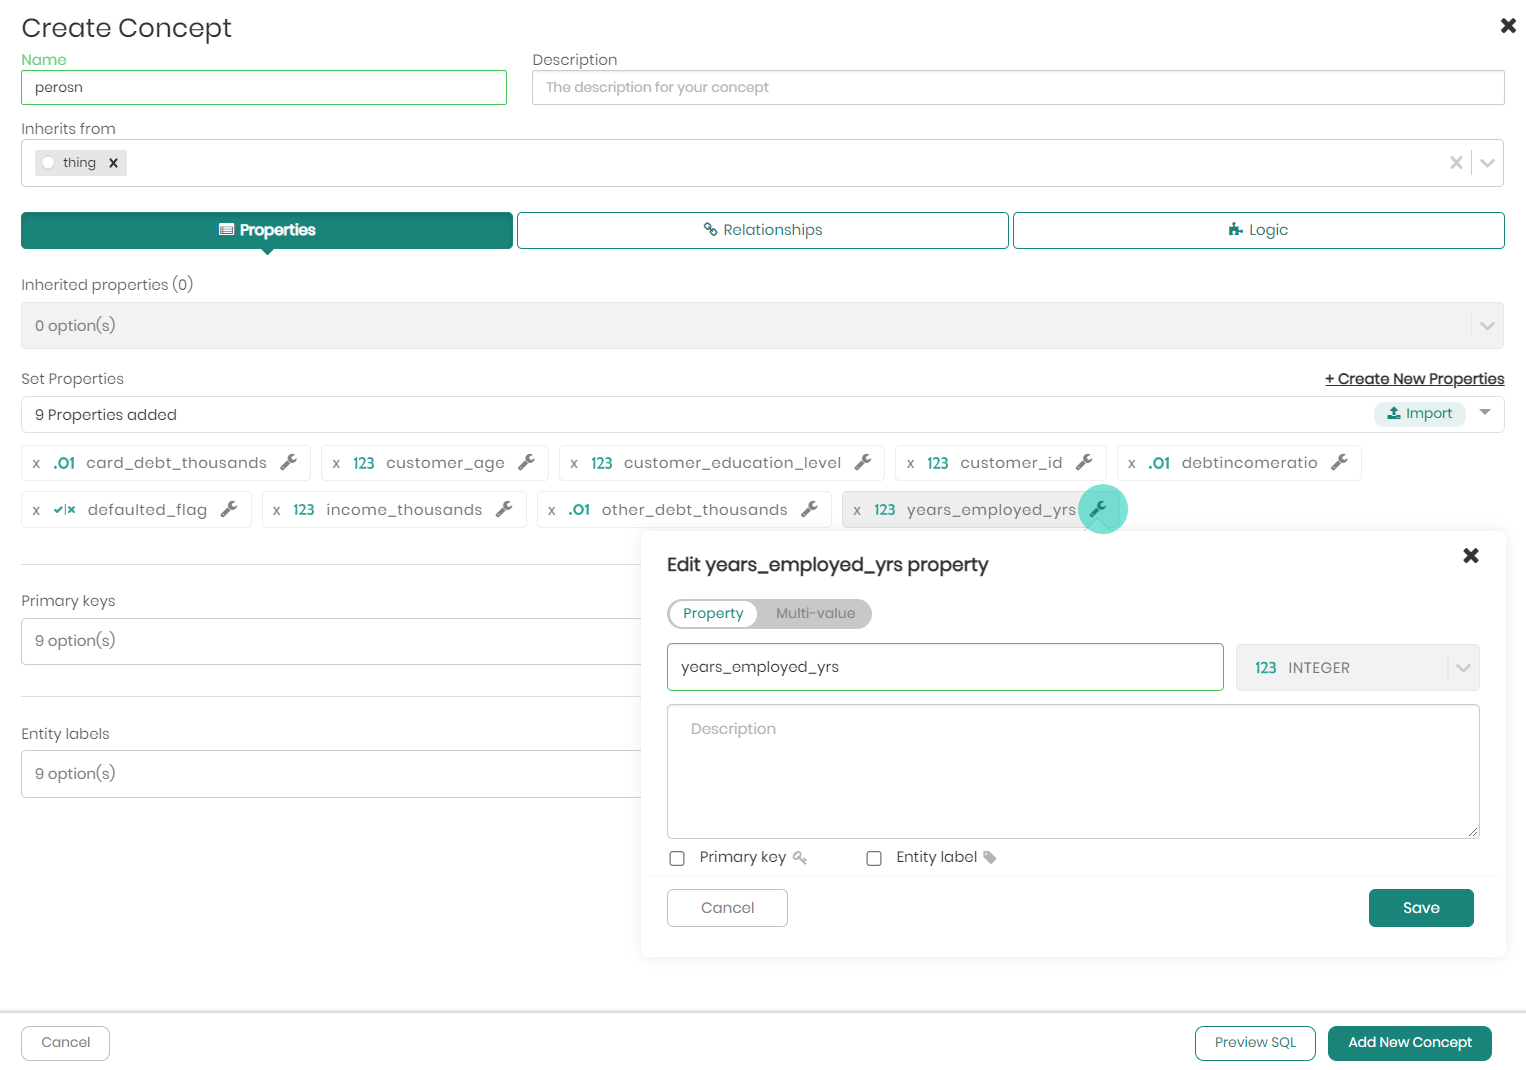
Choose a Primary Key and Entity Labels for the concept.
The Primary Key in Timbr which is a virtual primary key, acts as a unique identifier for the concept. This primary key ensures that there are no duplications in the data. Please note, that without a Primary Key data can't be mapped to the concept.
The Entity Labels in Timbr is the textual representation of the concept and determines how the concepts data will appear when exploring the concept as a graph.

- On the bottom right, click on Add New Concept to finalize the concept creation.
![]()
Creating Concepts using SQL
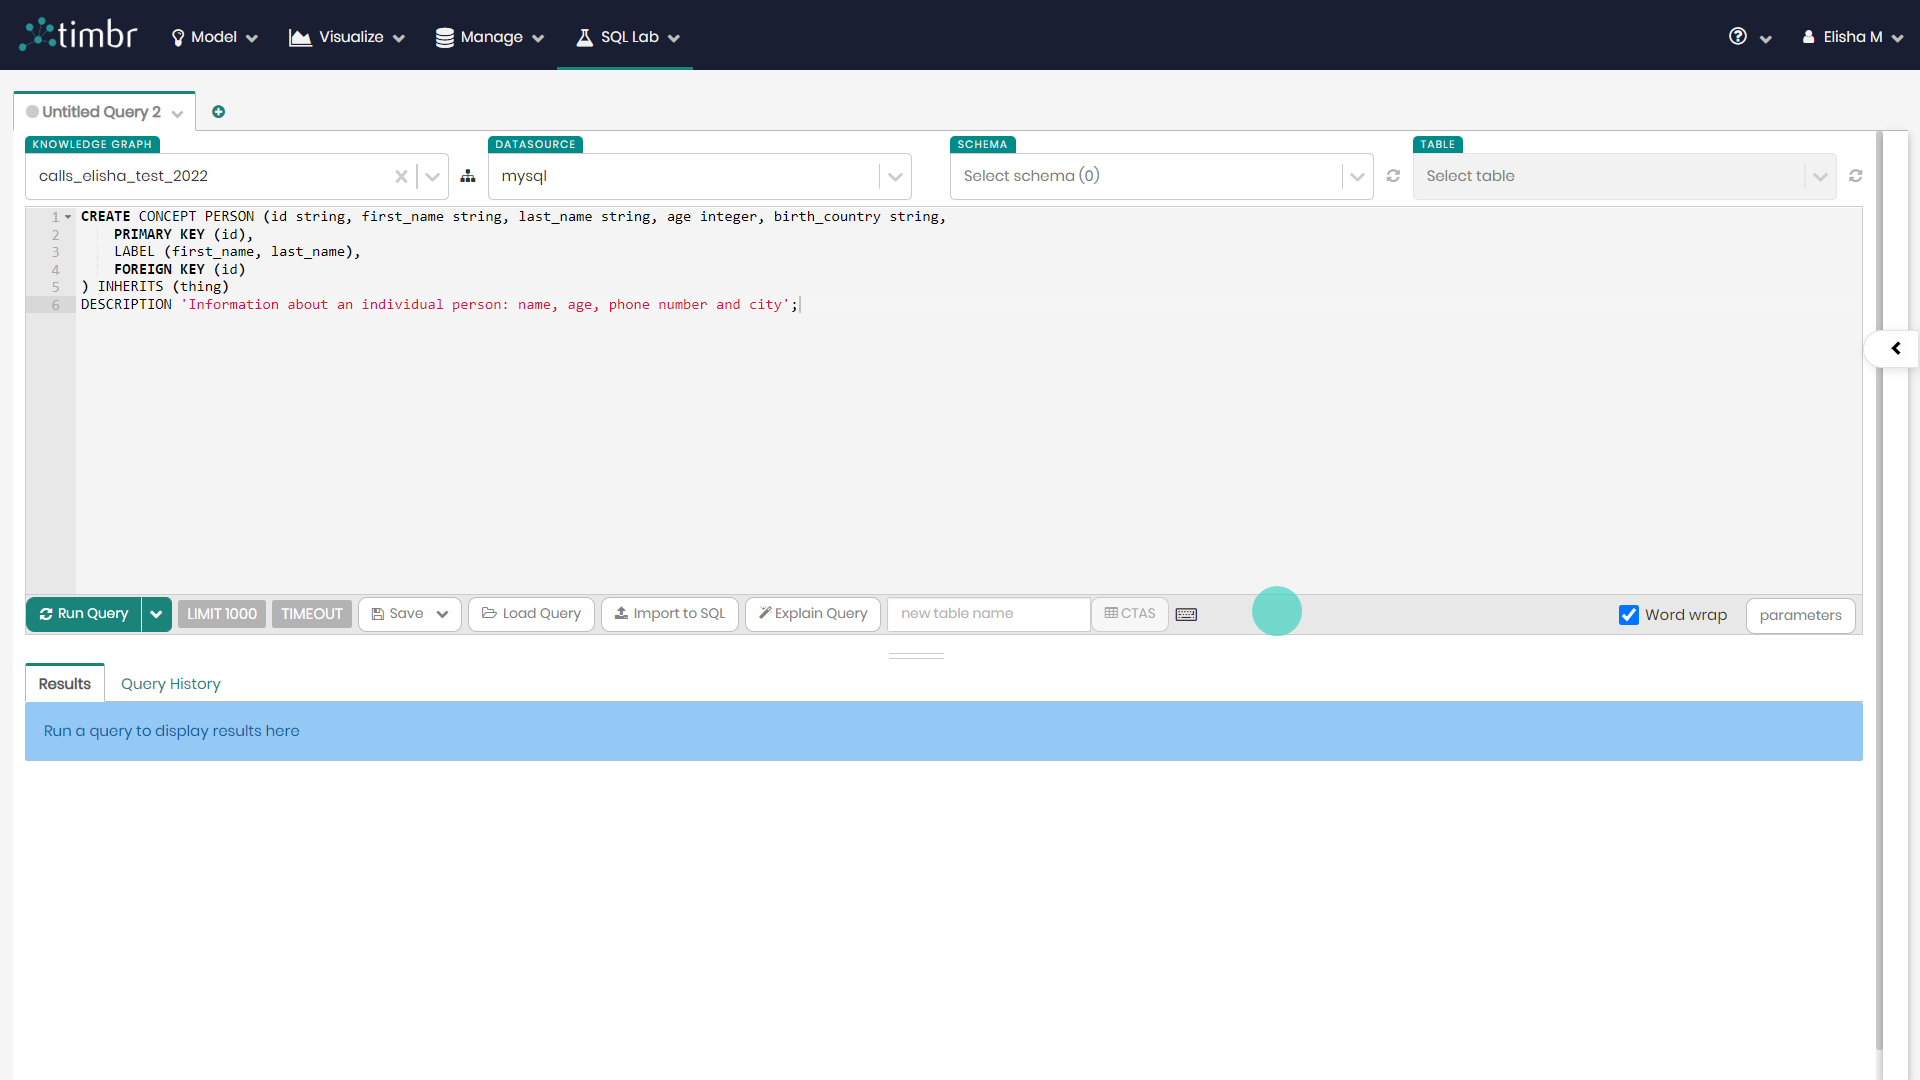
In addition to creating no-code concepts in the Ontology Explorer, you can also create them directly in the SQL Editor using SQL commands.
To create a new concept or a sub-concept, open the SQL Editor by clicking on SQL Lab in the top menu. Once in the SQL Editor, select the relevant knowledge graph and enter your CREATE CONCEPT statement.
For detailed SQL syntax and examples, see the Create Concept Commands in the SQL Reference.

Creating Sub-Concepts and Extending the Data Model
Concepts can be modeled in various ways, most of which include hierarchies. There are two main approaches for creating a hierarchy - top-down modeling and bottom-up modeling. The main difference depends on the data sources and which tables are mapped to the concepts.
When we have one table with all the information, the data is usually mapped to the upper-level concept and the entire hierarchy below it can be a set of classifications of the upper concept (while applying filters in each level to distinct the data from the one big table). On the other hand, when the data is scattered among different tables that refer to the same entity, the different tables would be mapped to the lower-level concepts and the upper-level concept will serve to UNION all the data to give a holistic and abstract view of the data.
Top-Down Modeling
Top-down modeling is where the upper-level concept contains the data mapping, and the sub-concepts inherit that data by applying filter conditions. Aside from the data inherited via the filter conditions and business logic, all the properties and relationships are also inherited from the upper concepts to their sub-concepts.
Top-down Modeling Example
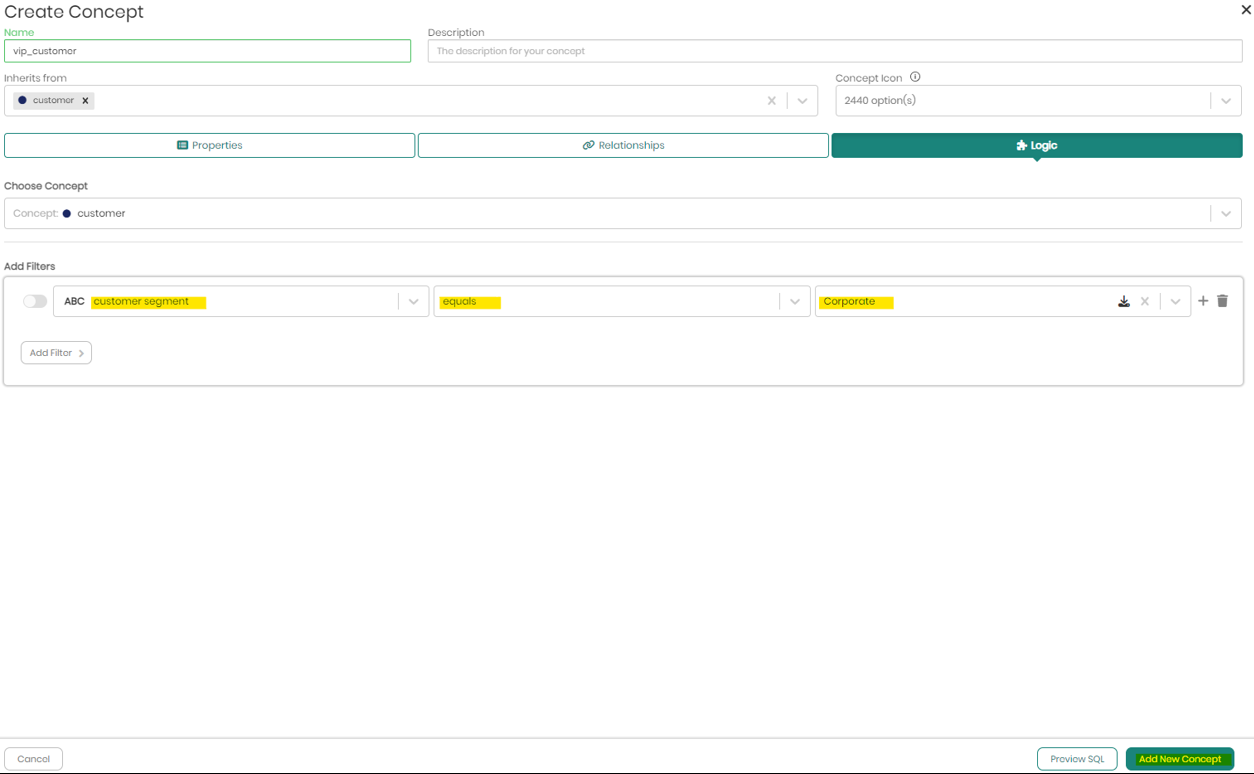
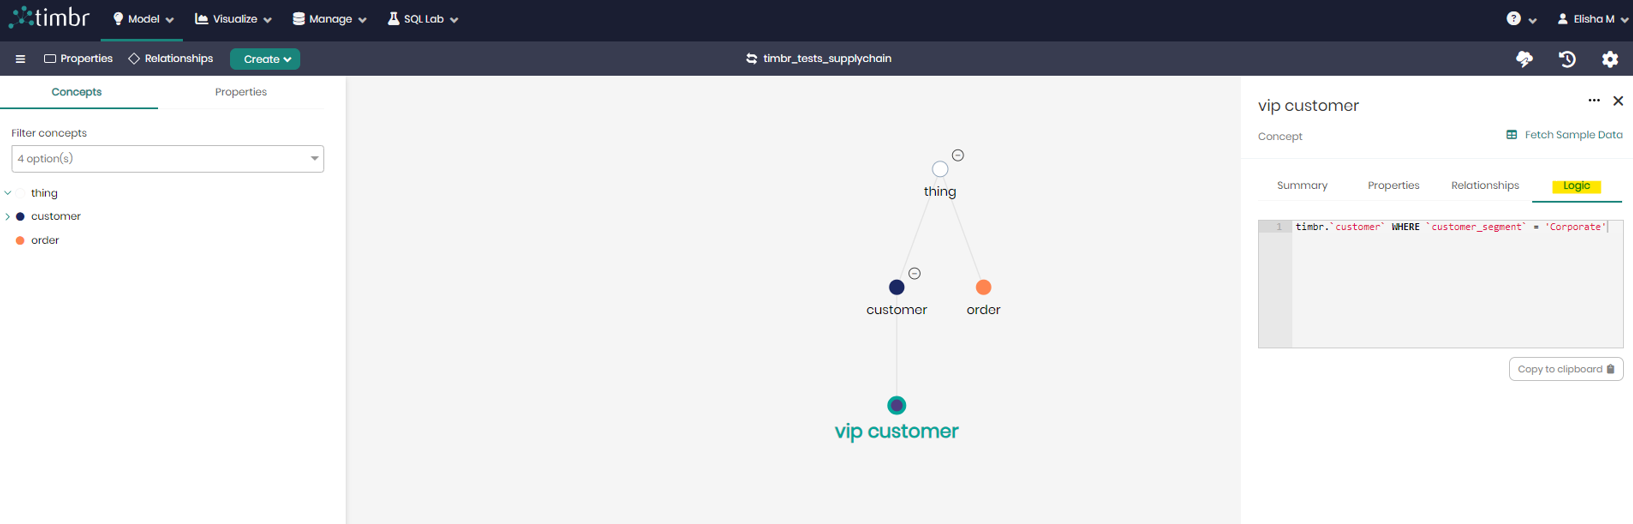
Assuming the model we’re working with has just two concepts, Customer and Order. The customer concept is mapped to a table of customers while the order concept is mapped to a table with all the data regarding the different orders placed by the customers.
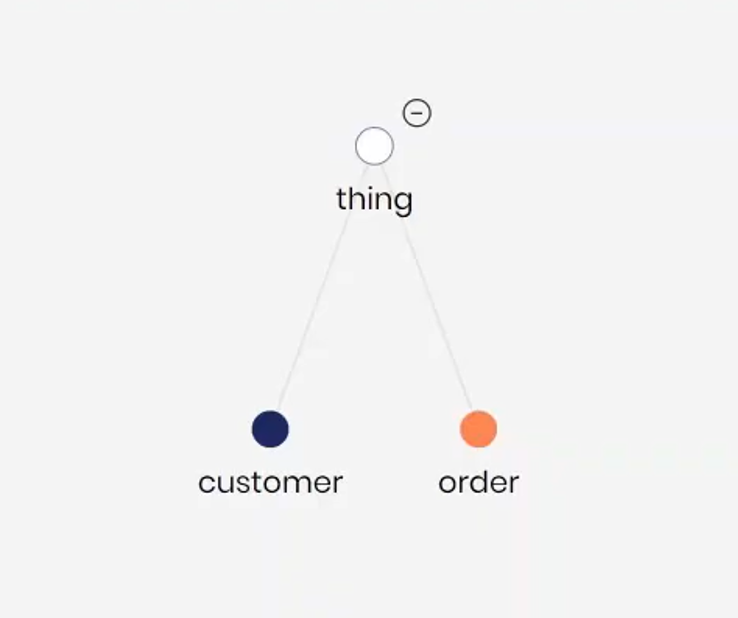
In this example we would like to create a sub-concept of customers classifying it by a specific type of customers, for example VIP customers, so that we can then query the VIP customers concept and only get filtered results about VIP customers. To do that, we can easily right-click on the customer concept and click to create a sub-concept. At this point the sub-concept inherits all the properties and relationships of the upper concept (customers) including its data mapping.
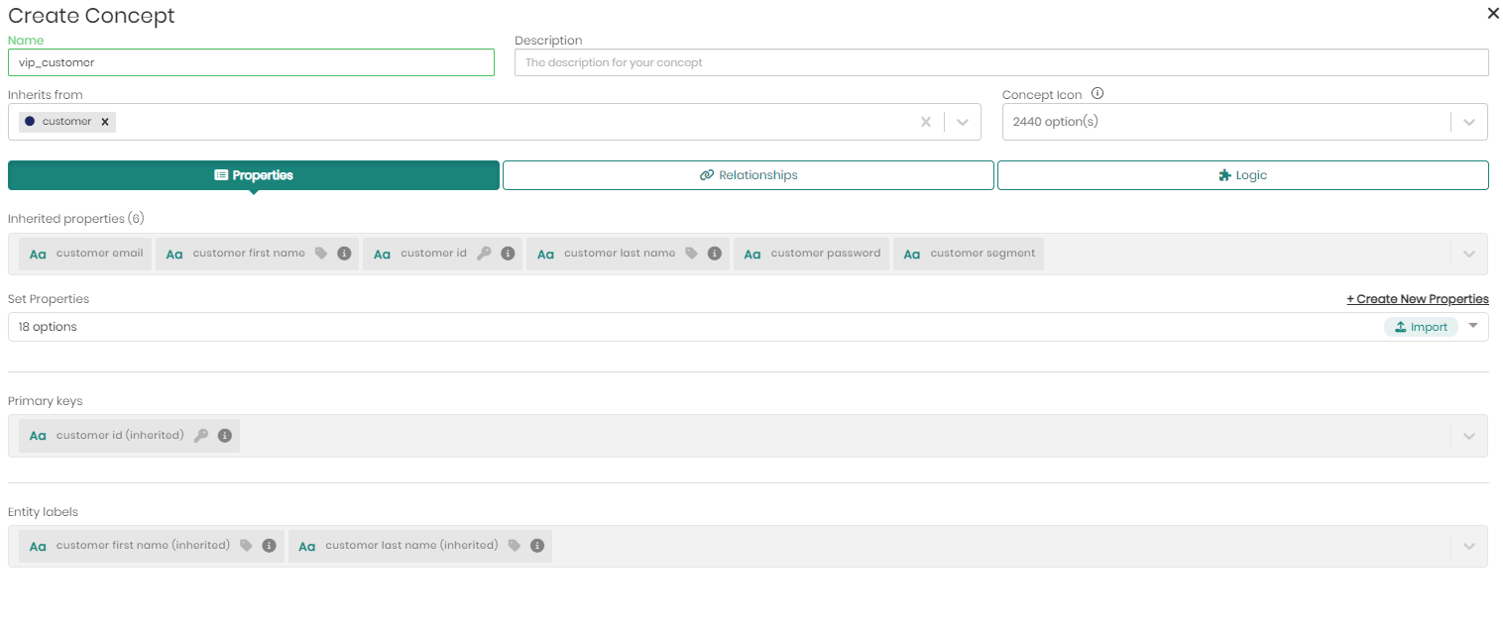
The only thing left to do is to add a logical rule specifying the filter condition to exclude all customers besides VIP customers. To do that we only need to click on the Logic tab in the create concept window and apply the filter either with the UI or using SQL statements which allow you to define more complex conditions.
Bottom-Up Modeling
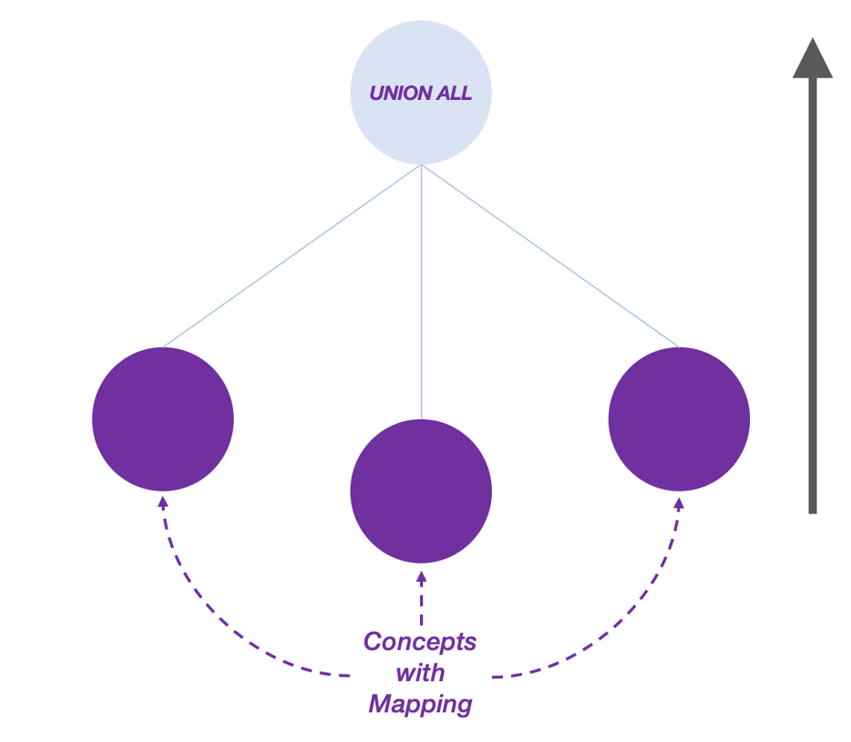
Bottom-up modeling means that the sub-concepts in a hierarchy will contain the data mappings, while the upper-level concept will be an abstract concept that was created to UNION the data from its sub-concepts and answer questions that disregard the unique information from each sub-concept, providing a unified representation of the data coming from all sub-concepts as if it were a single table. In order to query the abstract concept and receive the desired data, the relevant properties (shared among the sub-concepts) must be added to the upper concept.
Bottom-up Modeling Example
In this example we’ll describe a scenario where we have data from different sources regarding the same business entity. The model we’re working with in this example has just two concepts, Facebook ads & Google ads, and for the sake of the example, represent data about advertising campaigns as if it were coming from these two advertising platforms.
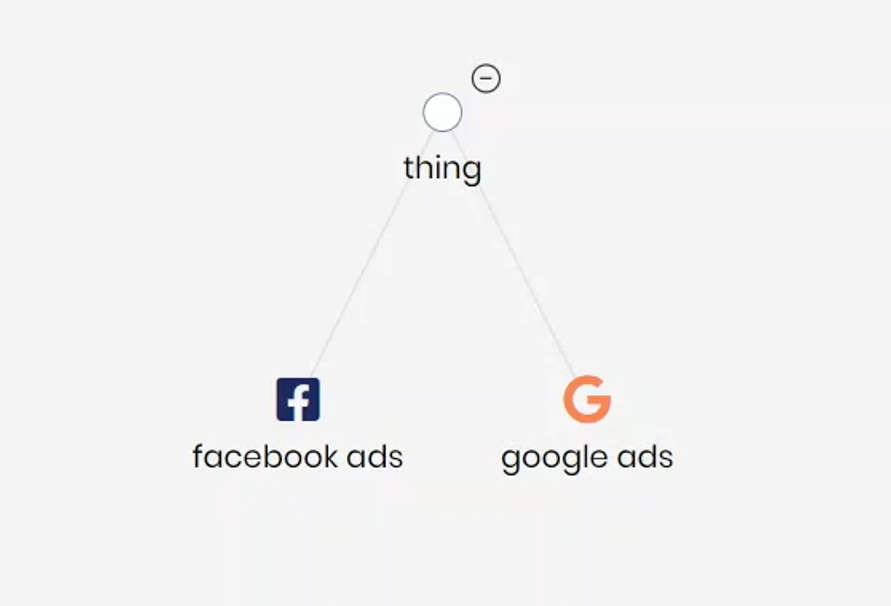
The chosen platforms used in this example are for demonstration purposes only. We could have just as easily called these concepts Twitter ads and LinkedIn ads or use any other business entity from any domain. In this example, each concept is mapped to the relevant table (regardless of if they are stored in the same database – for more information see Timbr virtualization) and both share some properties (table columns) that have the same semantic meaning, for example – campaign_id , campaign_name, ctr, impressions, etc.
To add an upper concept and create a hierarchy, we’ll create a new concept and only give it a name – ads.
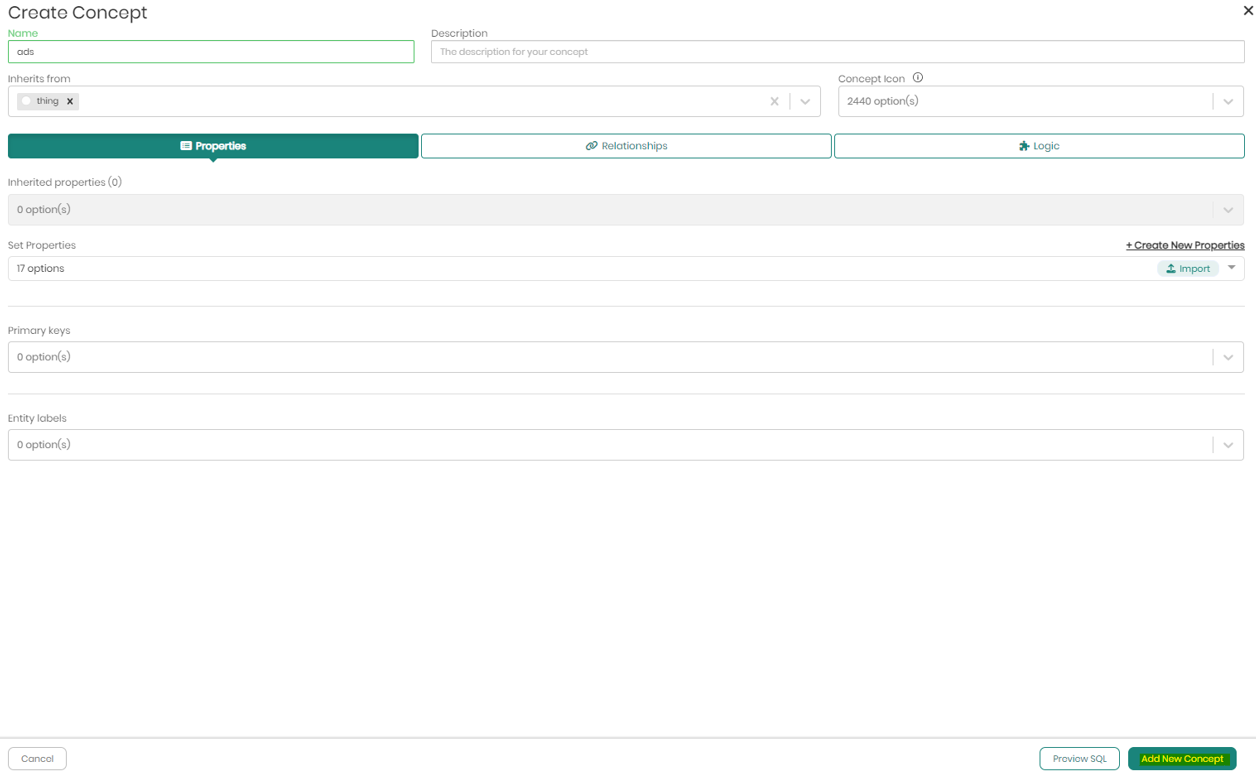
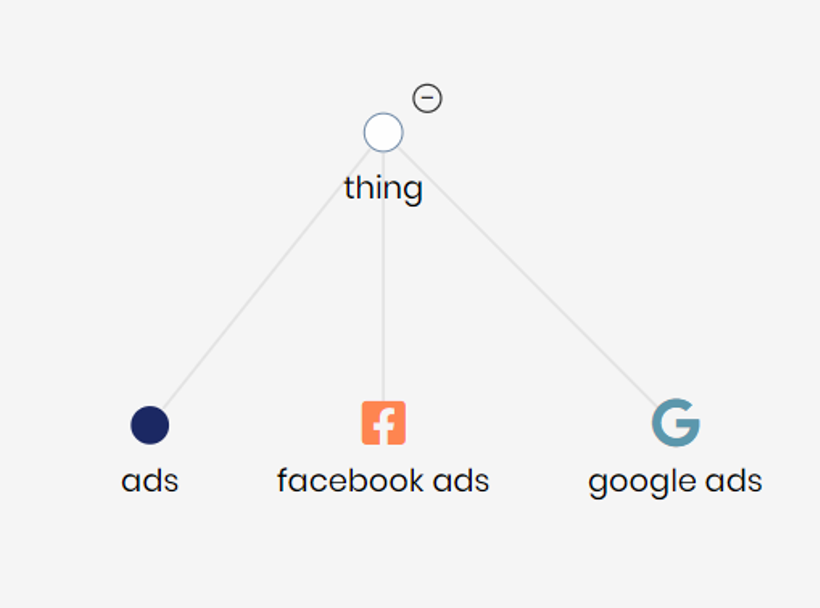
After saving the concept, we will edit each concept (Facebook ads & Google ads) and change the hierarchy of both to inherit from the new ads concept instead of thing (the default top concept where all level-1 concepts inherit from).
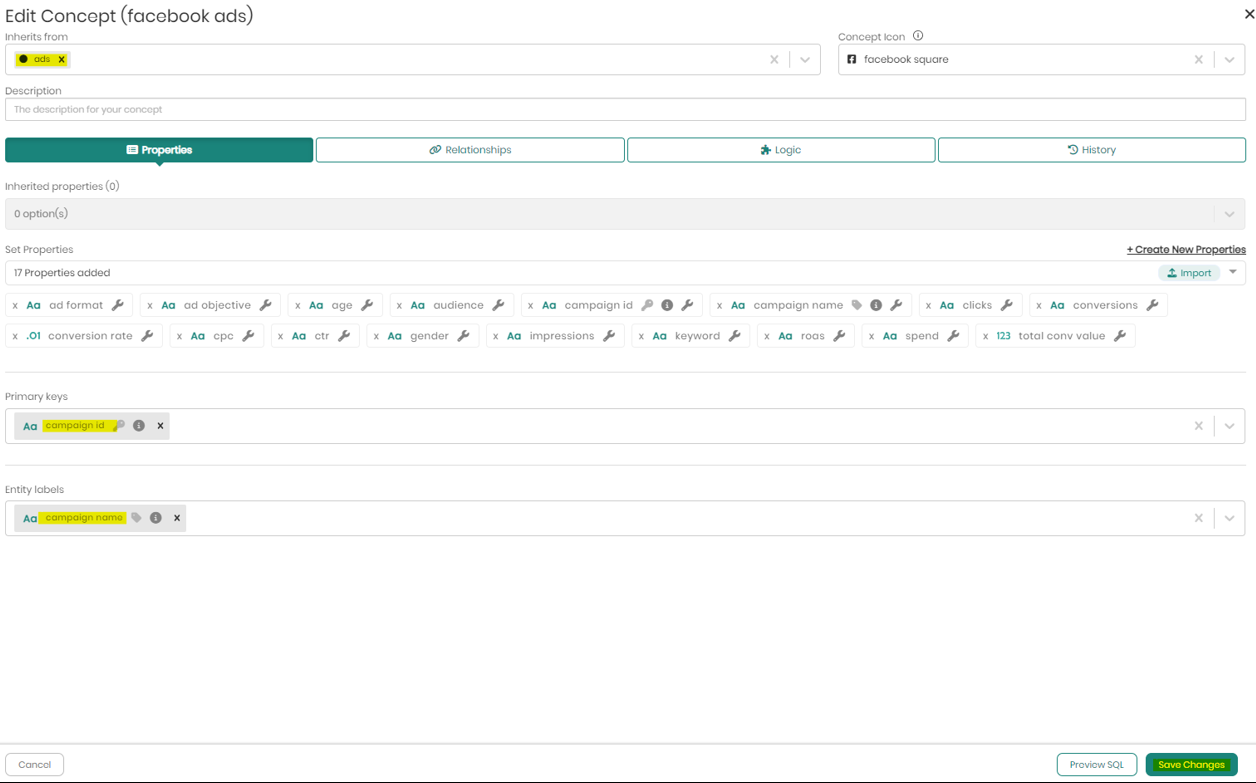
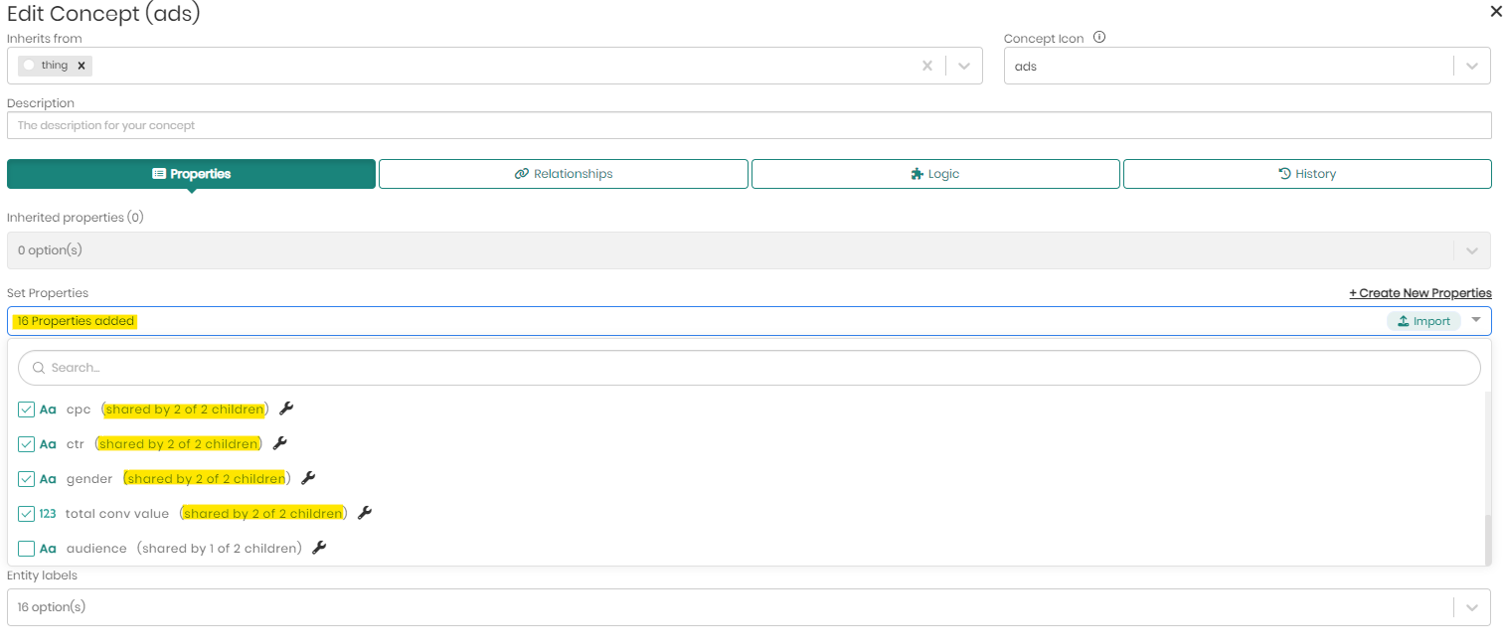
After changing the hierarchy, we will edit the ads concept and click on the properties drop-down to choose all the shared properties among his sub-concepts. When done, we will select a primary key that is also shared among the sub-concepts. We also suggest to select an entity label that is shared among them.
When finished, we can query the ads concept and get the information from both Facebook ads and Google ads in a single result set without specifying any UNION statement as if the combined data was mapped to the ads concept.
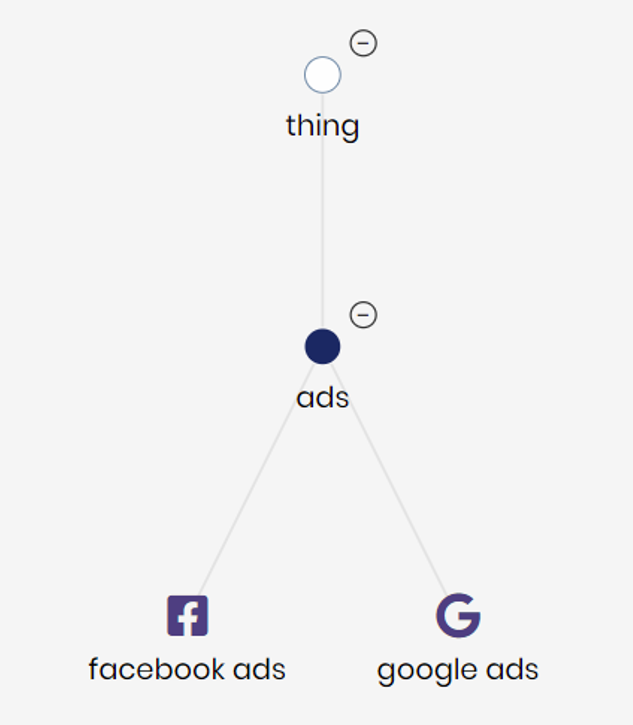
Any new property we will add to the ads concept, will be immediately inherited by the sub-concepts. In this modeling method the data mapping to the properties occurs in the sub-concepts, so adding a new property that doesn’t already exist in the sub-concepts below, will result in NULL values when querying the ads concept, unless we edit the existing data mapping and match a new column or calculation/function to the new property.
Just like in a top-down modeling hierarchy, relationships are also inherited by the sub-concepts, so any relationships we will add to the ads concept will also exist in his sub-concepts and can later be utilized in the queries.
Creating Sub-Concepts with Business Rules
Assuming the Sub-Concept we'd like to create with Business Logic is Adult, which will inherit and be created from its parent concept in the Ontology named Person.
When a concept is created from a parent concept in the Ontology, the child concept inherits all its properties and realtionships from its parent concept.
- In the Ontology Explorer, right click on the concept Person, hover over Create and select Child concept.

- Give the concept a name as well as an optional description as to what the concept contains.

- As the properties, relationships, primary key and entity labels of the concept inherit from the parent concept Person, go ahead and skip straight to defining the concepts business logic by clicking on the Logic tab. Please note that adding additional properties and relationships unique to the concept can also be added if desired.
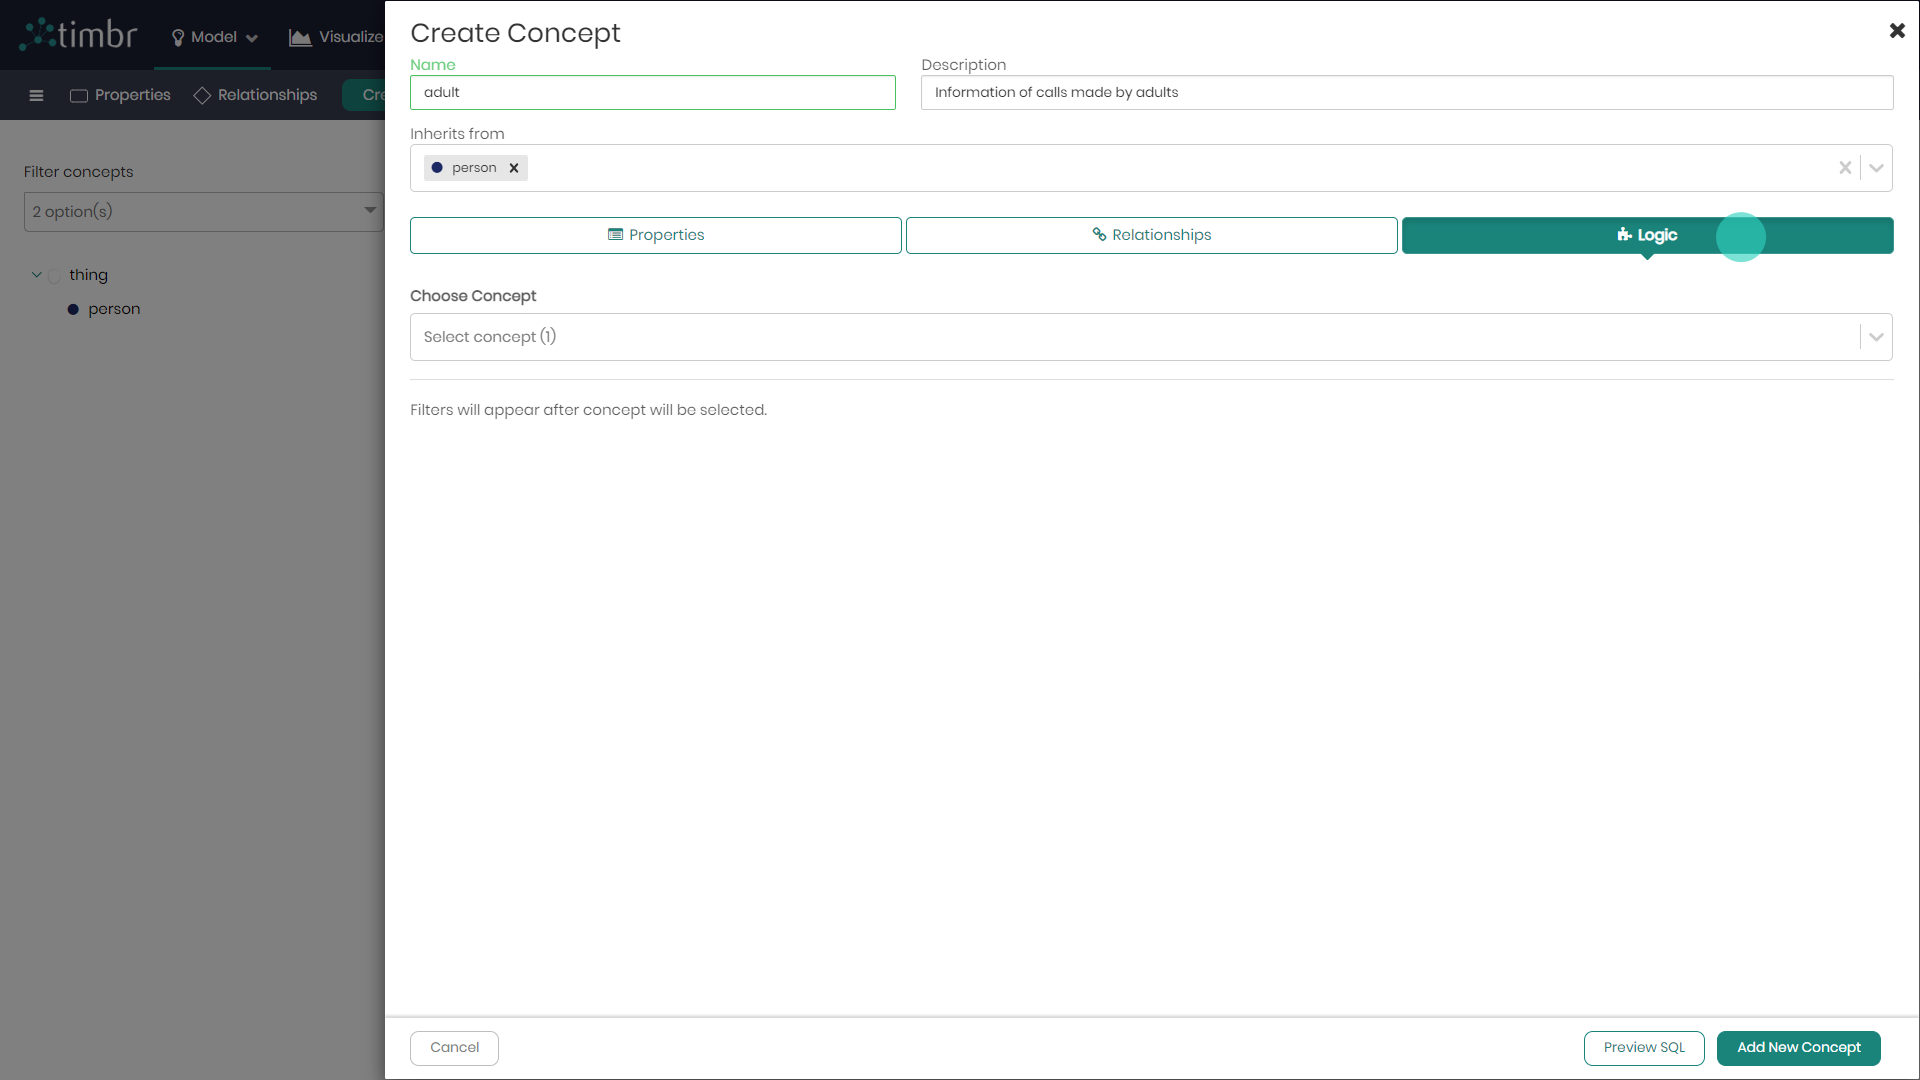
- Choose a concept in this case person as that will be the concept, we apply our conditions on for concept adult.
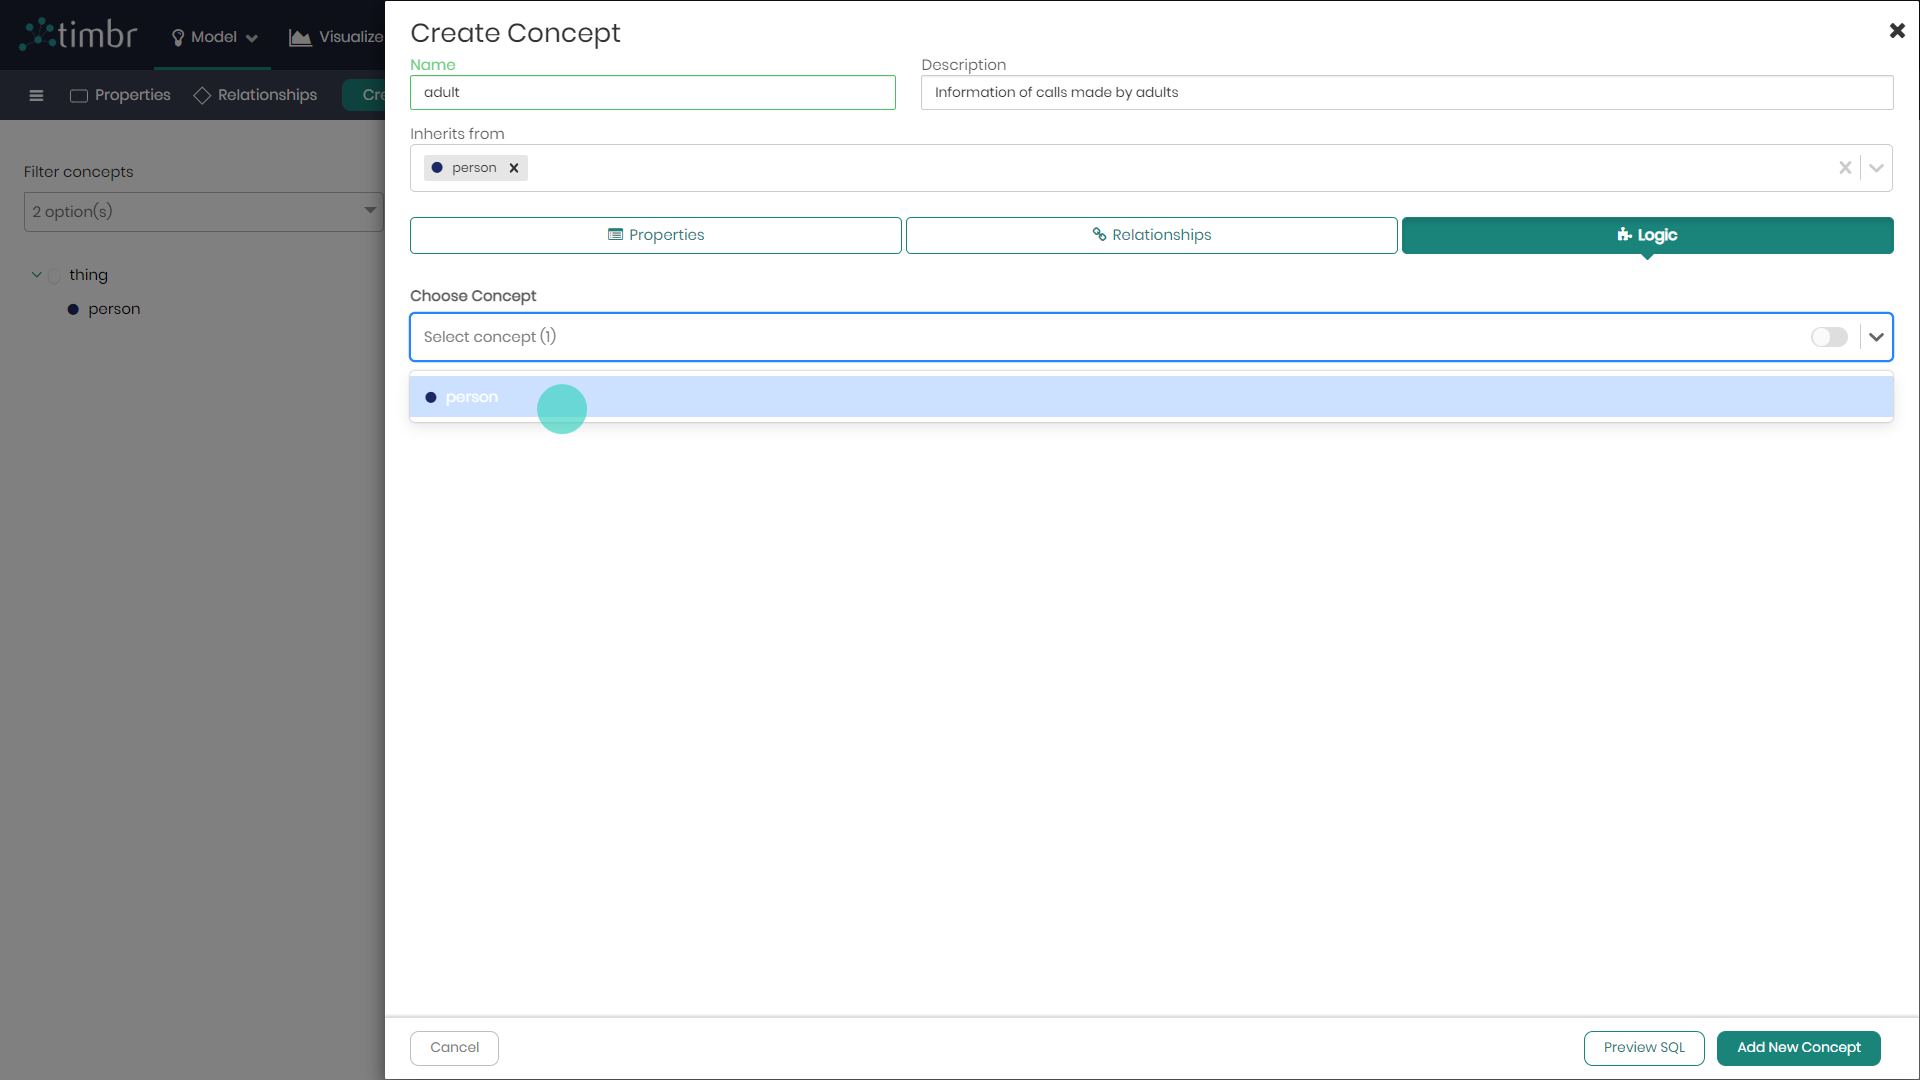
- Click on Add Filter and define the logic for the concept.

- Assuming you would like to define the business logic stating that adults are individuals 18 years or older, choose the property age is equal or greater than the value 18.

Notice that there is no limit to the number of business logic filters you can add to a concept. If you would like to add more filters, you can simply click on the plus to the right of each logic and choose if the logic being added should be an AND or OR statement. To the right of each concept, you can also delete a filter by clicking on the Trash can logo.
In addition to the visual dropdowns for defining the logic of the concept, you can click on the toggle to the left of each logic filter and choose to define the logic manually, doing so using SQL by clicking on Edit in popover which will now appear on the right of the selected logic.
- When you've finished defining the concepts logic, on the bottom right, click on Add New Concept to finalize the concept creation.
![]()
Creating Sub-Concepts with Logic Using Relationships
In addition to defining business rules based on a concept's own properties, Timbr allows you to create sub-concepts using relationships to other concepts in the ontology. This enables more advanced rule-based reasoning, where logic can be applied not just to a concept's direct attributes but also to its connected entities. In this section, we will demonstrate how to create a sub-concept using a relationship.
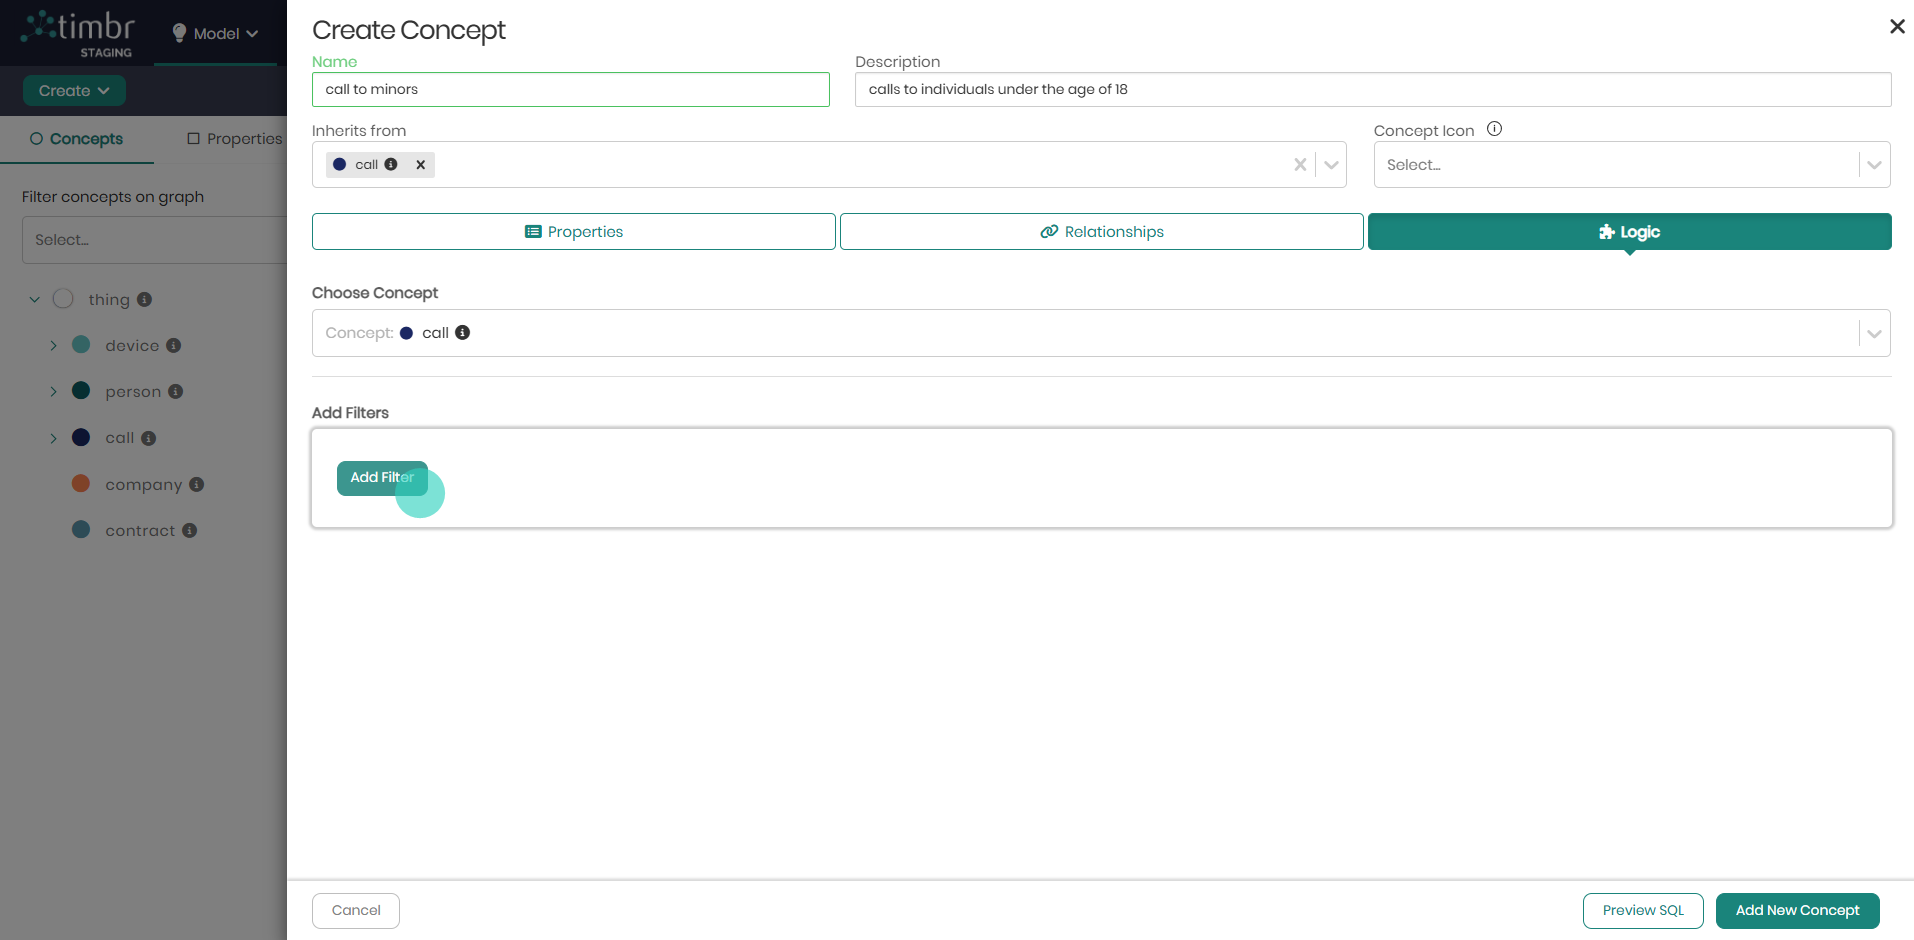
Assuming the Sub-Concept we'd like to create with with Logic Using Relationships is call to minor, which will inherit and be created from its parent concept in the Ontology named call.
When a concept is created from a parent concept in the Ontology, the child concept inherits all its properties and realtionships from its parent concept.
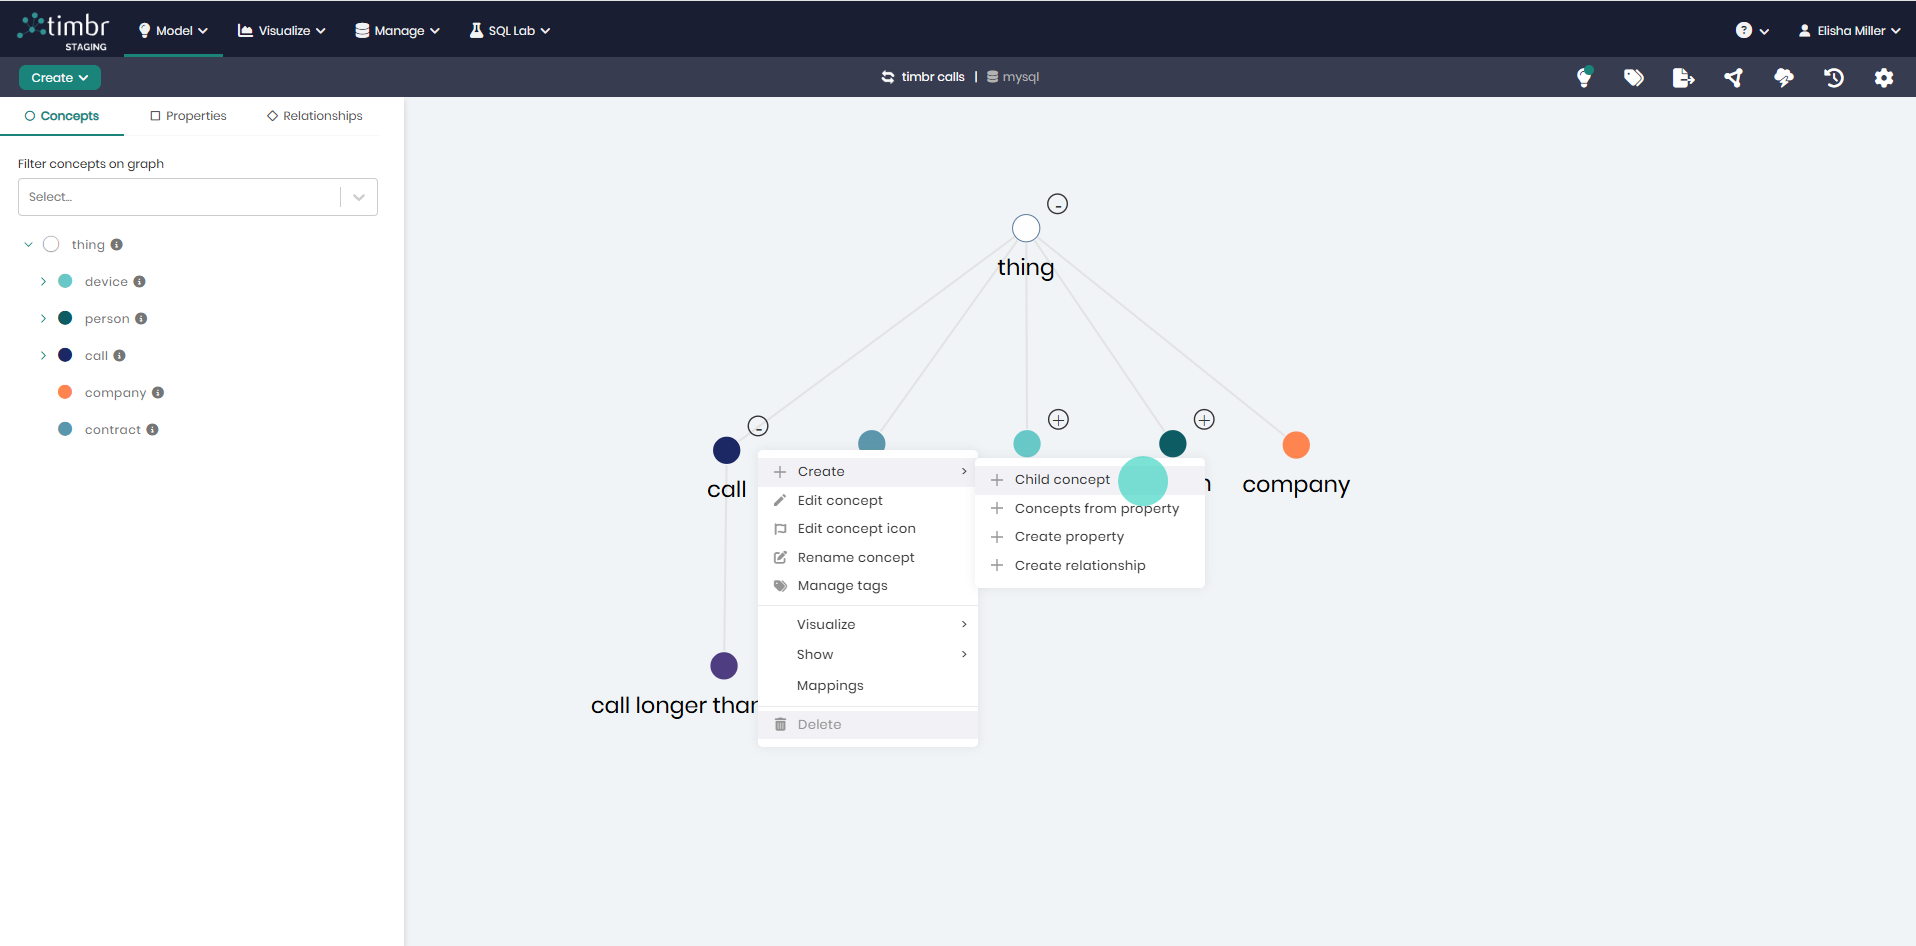
Step 1: Create a Sub-Concept from the Parent Concept
In the Ontology Explorer, right-click on the concept Call, hover over Create, and select Child Concept.
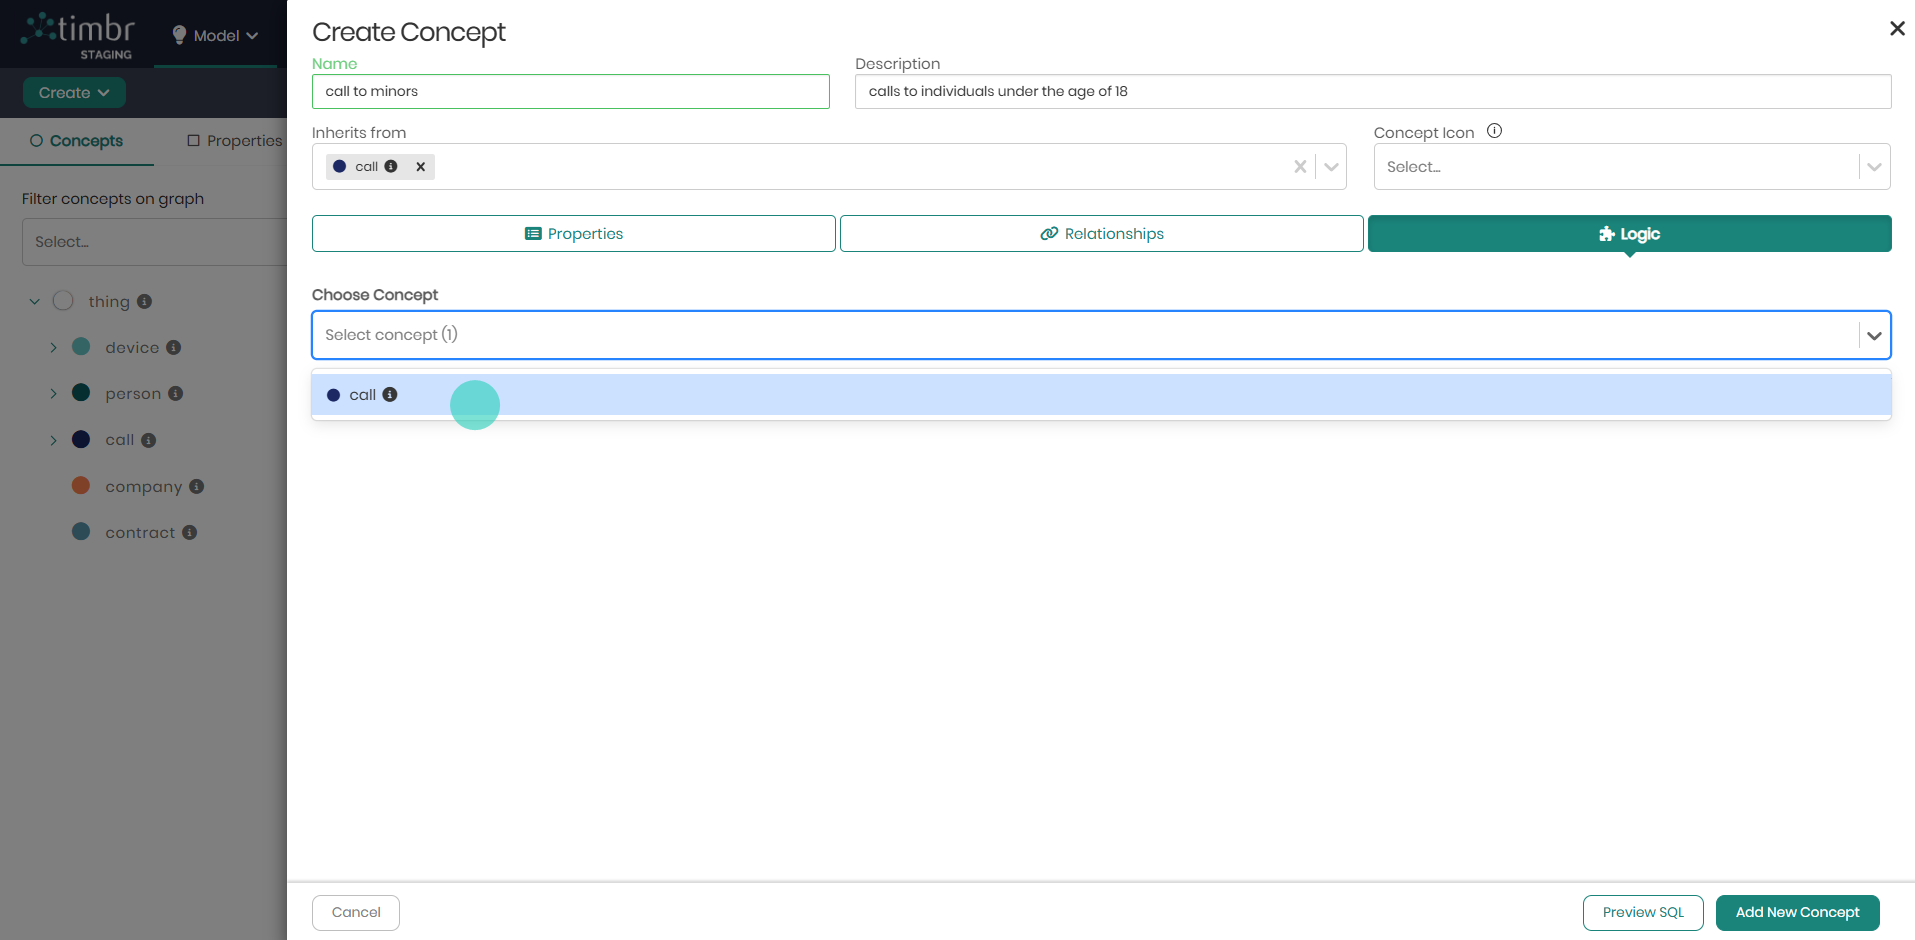
Step 2: Define the Sub-Concept's Name
In the Create Concept window that appears:
- Name the concept Call to Minors
- Add a description explaining what the concept represents (Optional)
As the properties, relationships, primary key and entity labels of the concept inherit from the parent concept call, go ahead and skip straight to defining the concepts business logic by clicking on the Logic tab. Please note that adding additional properties and relationships unique to the concept can also be added if desired.

Step 3: Select the Base Concept for the Business Logic
In the Logic tab, select Call as the base concept. This means the business logic will be applied to the Call dataset, and the new concept Call to Minors will only include records that meet the defined conditions.
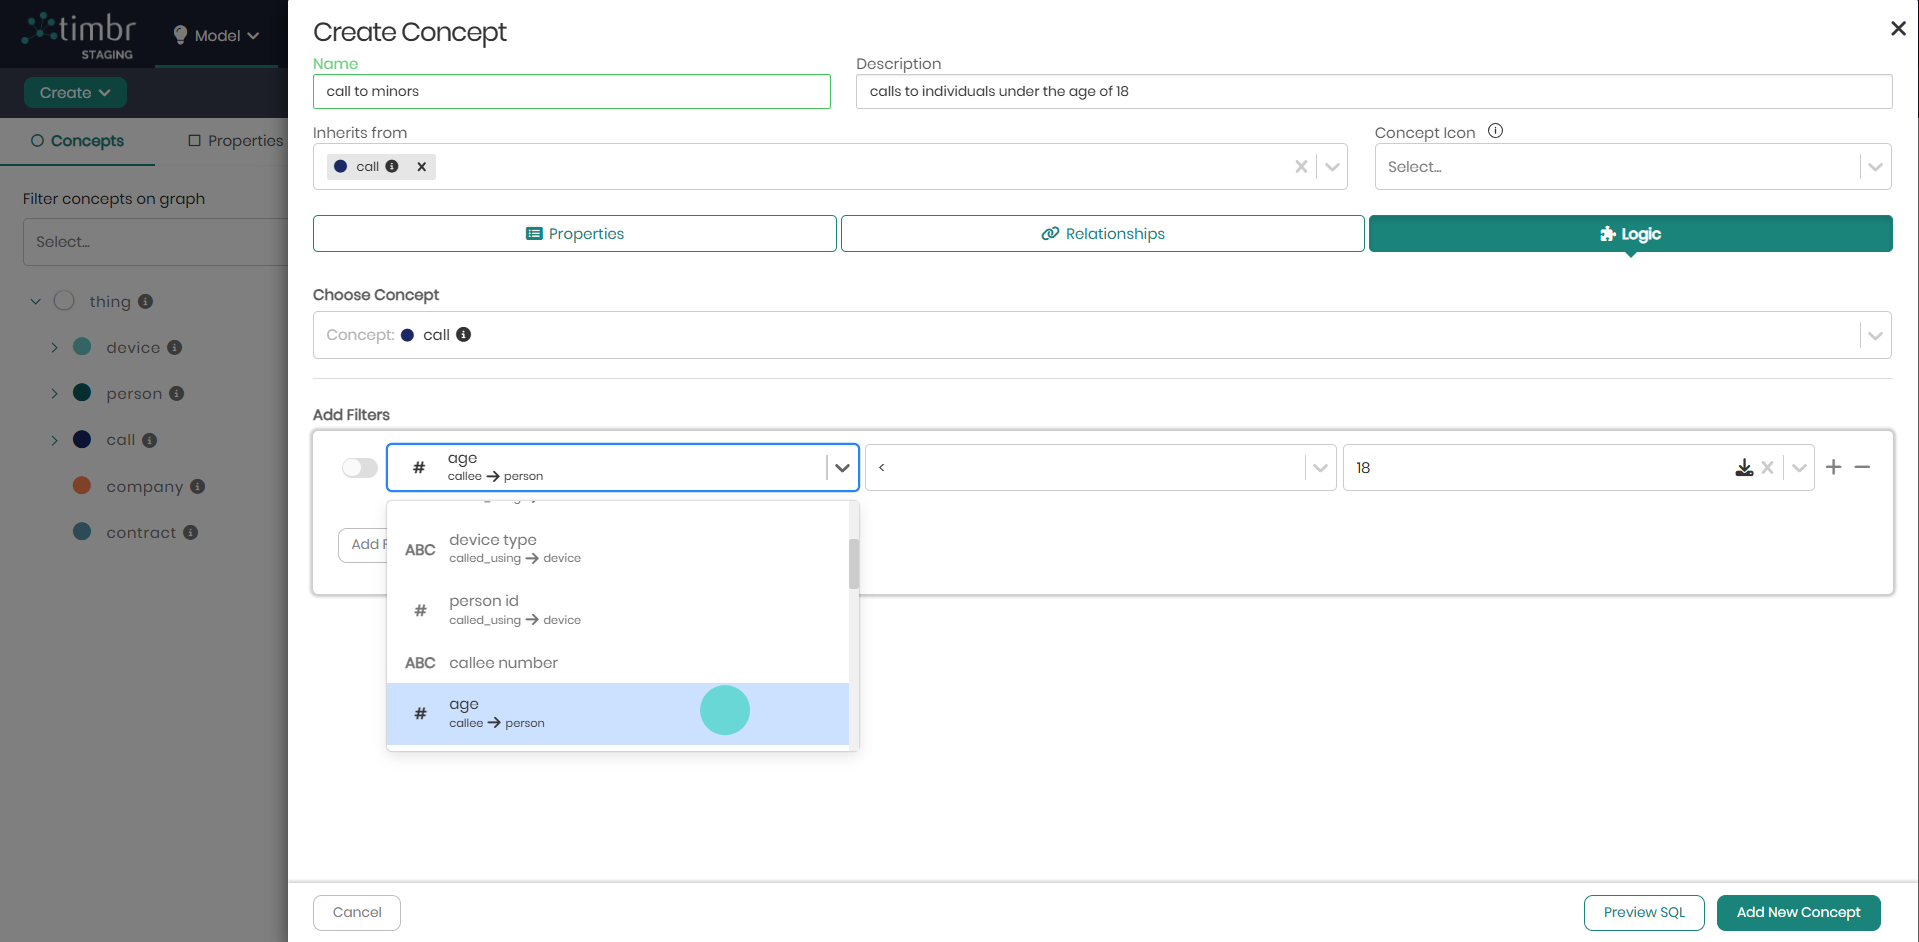
Step 4: Add a Filter to Define the Business Logic
Click on Add Filter to begin defining the logic for the concept.
Step 5: Apply the Relationship-Based Condition
Since we want to filter calls where the callee is a minor, we:
- Select the Age property via the callee relationship, which connects the Call concept to the Person concept
- Define the condition: Age < 18
Unlike standard filters that apply to a concept's direct properties, this condition traverses the ontology relationship, enabling logic based on connected entities.
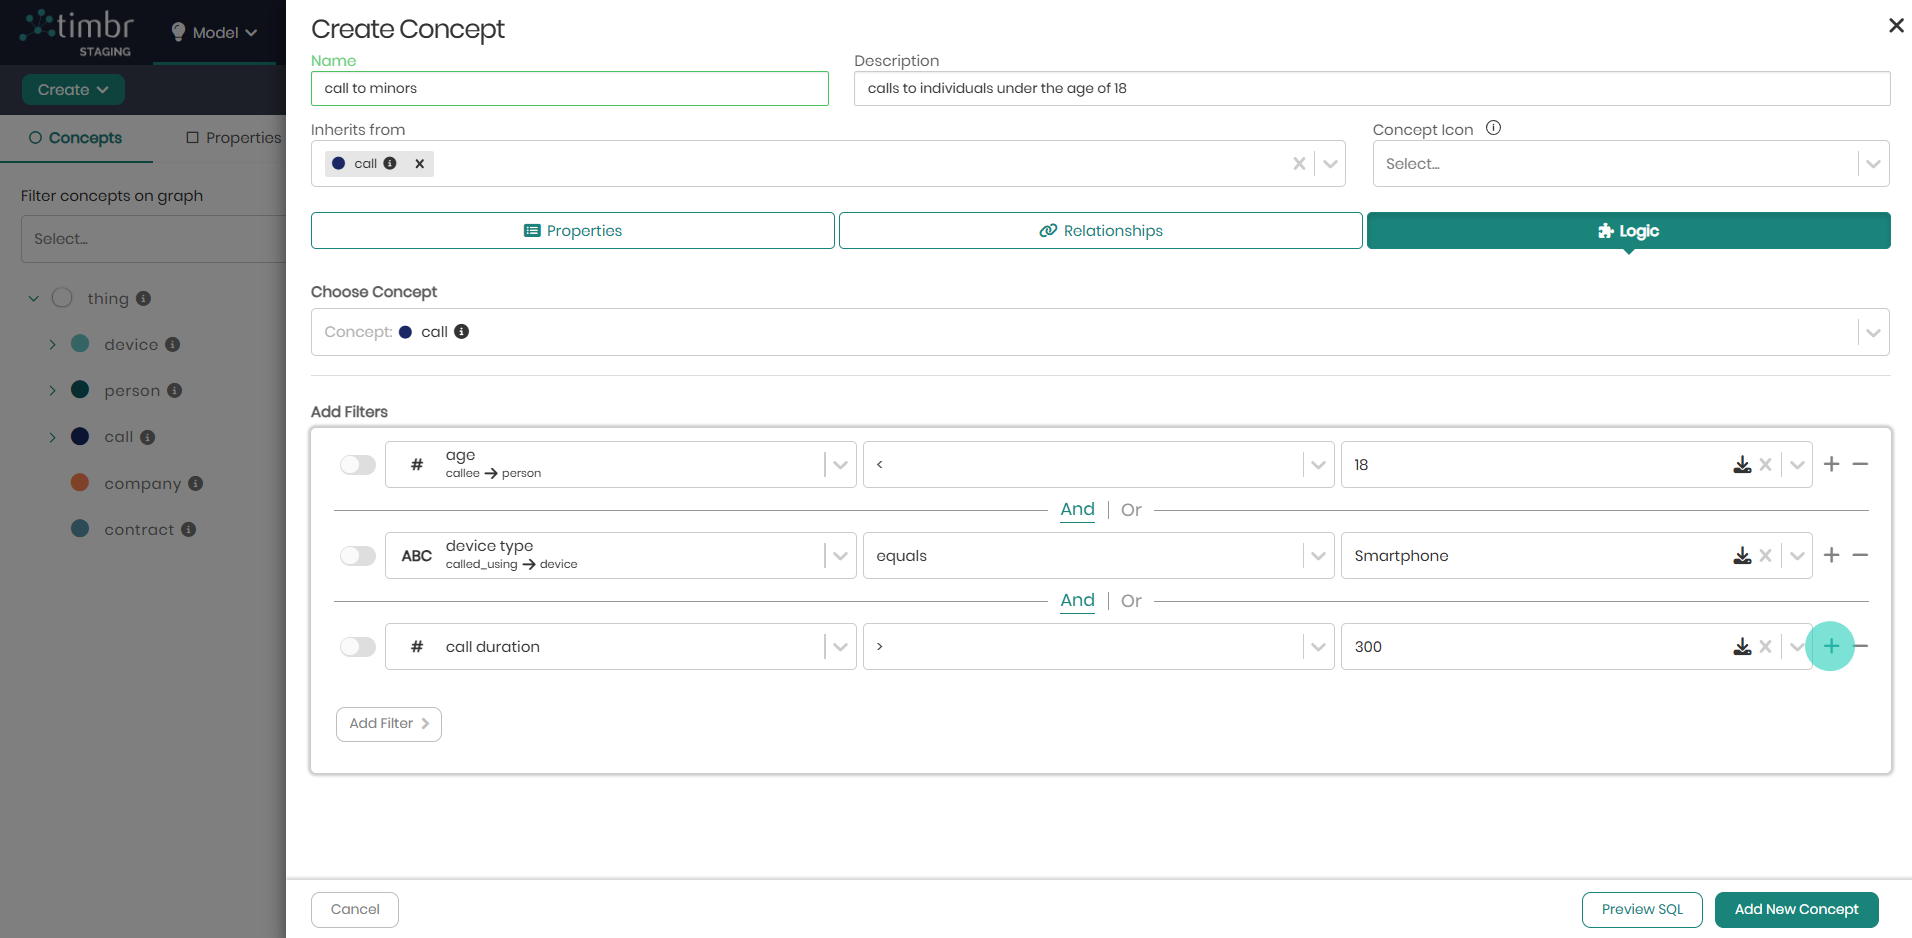
Step 6: Customize, Combine, or Edit Rules
At this stage, you can further refine your logic with the following options:
- Adding More Filters: Click on the "+" icon to add additional logic conditions using AND or OR.
- Deleting Filters: Click on the "-" icon to remove a filter.
- Manual SQL Editing: Click the toggle to the left of a logic filter to manually refine the rule in SQL. Then, click Edit in popover (which appears on the right) to modify the condition directly.
This flexibility allows for more advanced rule-based reasoning within the ontology.
Step 7: Finalize the Concept
Once the logic is defined, click Add New Concept at the bottom right to finalize the creation. The new Call to Minors concept will now be available for querying, automatically filtering call records where the callee is under 18.
![]()
Creating Relationships
Semantic relationships in Timbr represent relationships between two concepts that express a specific type of relationship. The relationships are matched based on the property of each concept.
Timbr enables various relationships such as One-to-Many, Many-to-Many, and Transitive relationships. Users can combine Transitive relationships with one of the two options.
In the following examples, you’ll find a guided explanation demonstrating the creation of relationships between two concepts visually in the Ontology Explorer and using SQL statements in the SQL Editor.
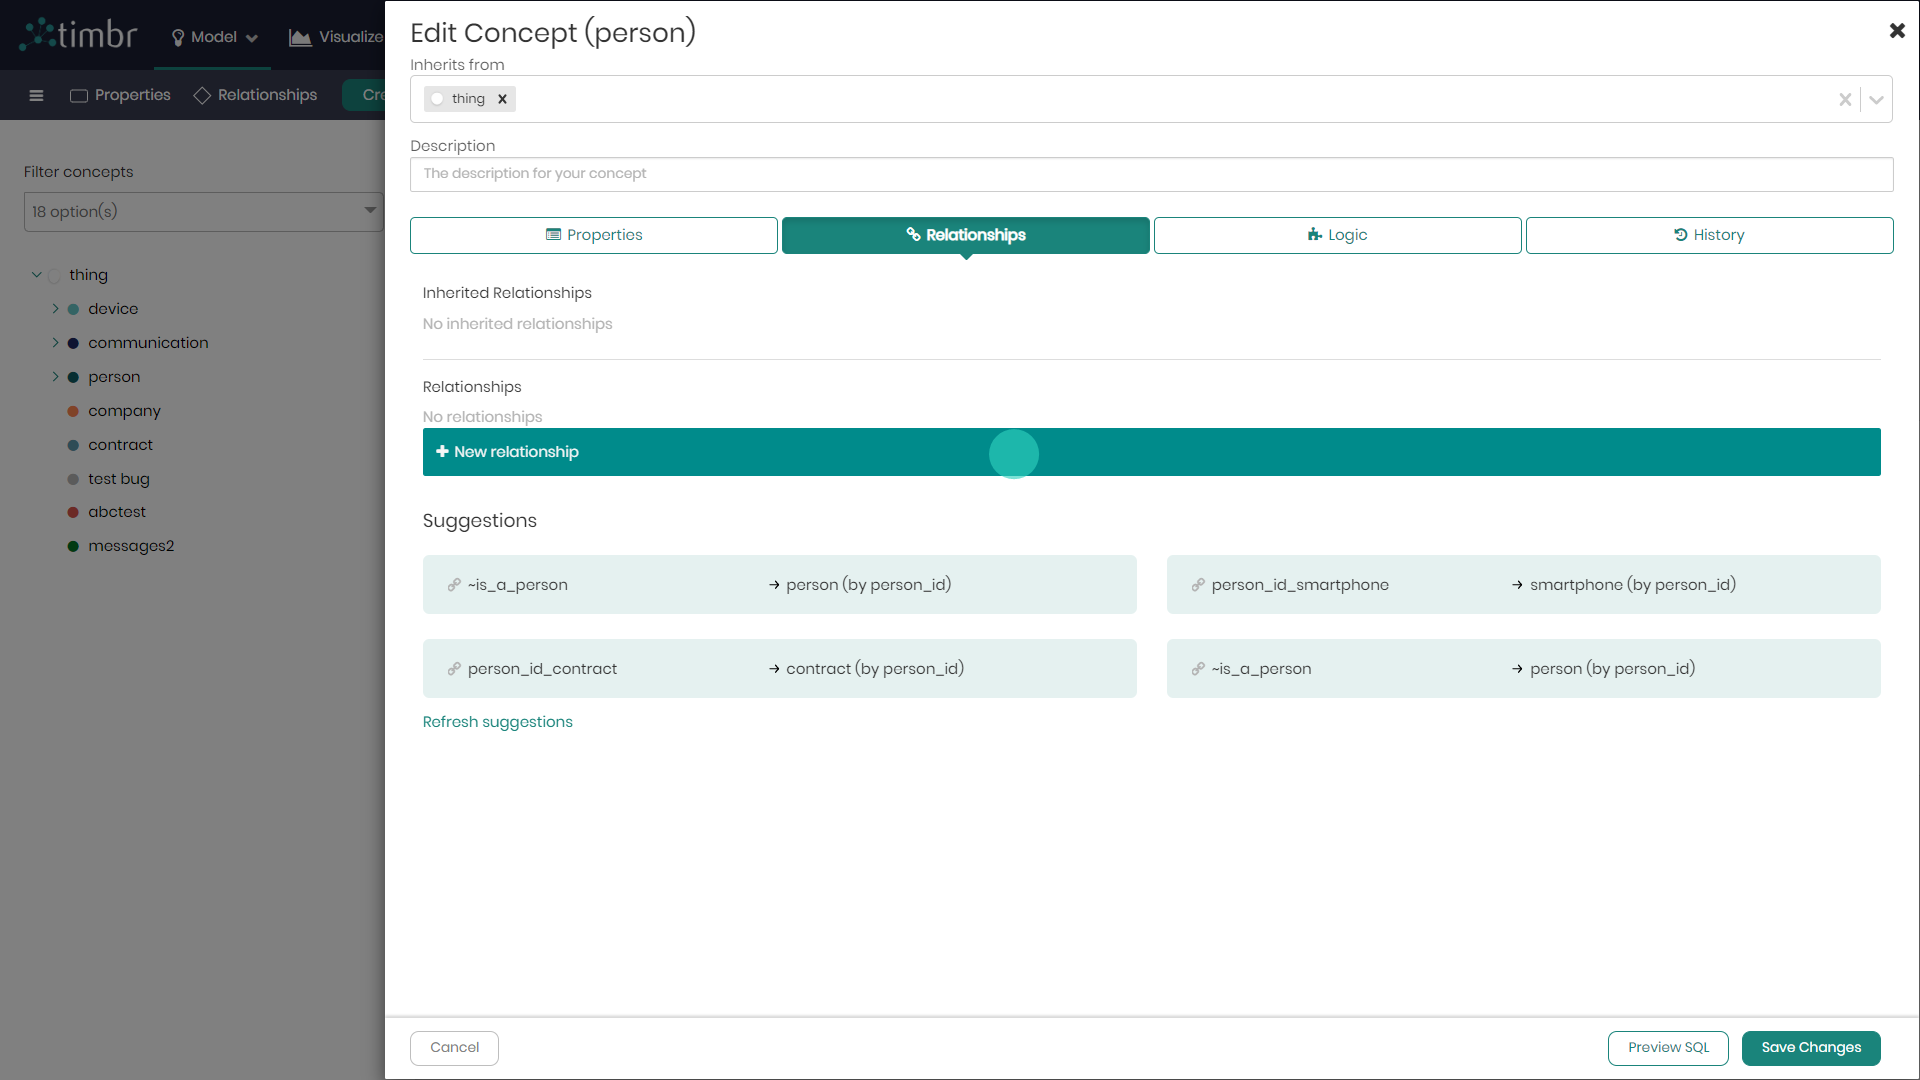
Creating a Relationship between concept Person and concept Country in the Ontology Explorer:
Assuming we'd like to create a relationship connecting Concept Person to concept country.
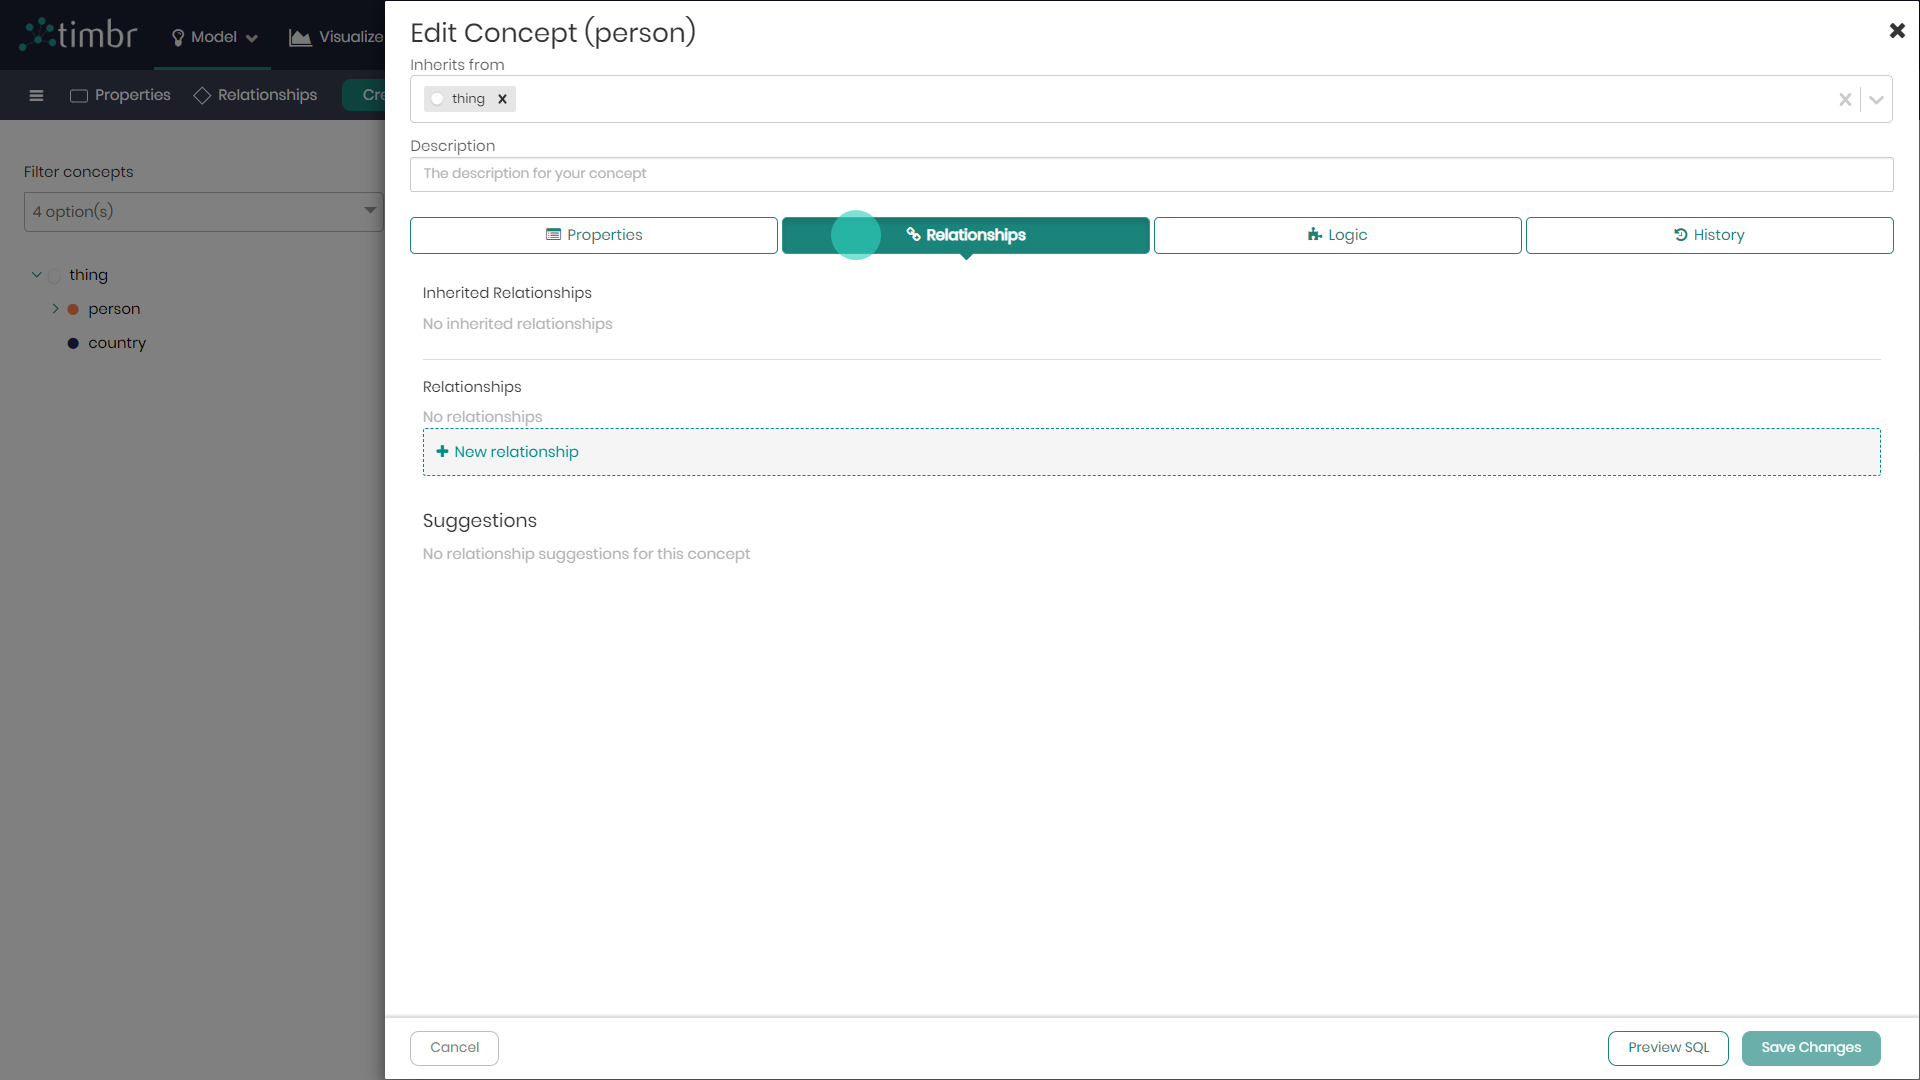
- In the Ontology Explorer, Right click on the concept Person and select Edit concept.

- In the edit concept window that appears, click on the Relationships tab.
- Click on + New Relationship to define the new realtionship. Notice that Timbr offers suggestions below to automatically create relationships based on the different entities in the knowledge graph.
- In the window that appears, notice that Timbr enables users to create different types of relationships, whether it be one-to-many relationships, many to many, or even transitive relationships. Once the realtionship type is chosen, give the realtionship a direct name describing the context of this direct relationship between a Person and a Country. Next name the inverse relationship, looking back from concept Country to concept Person.
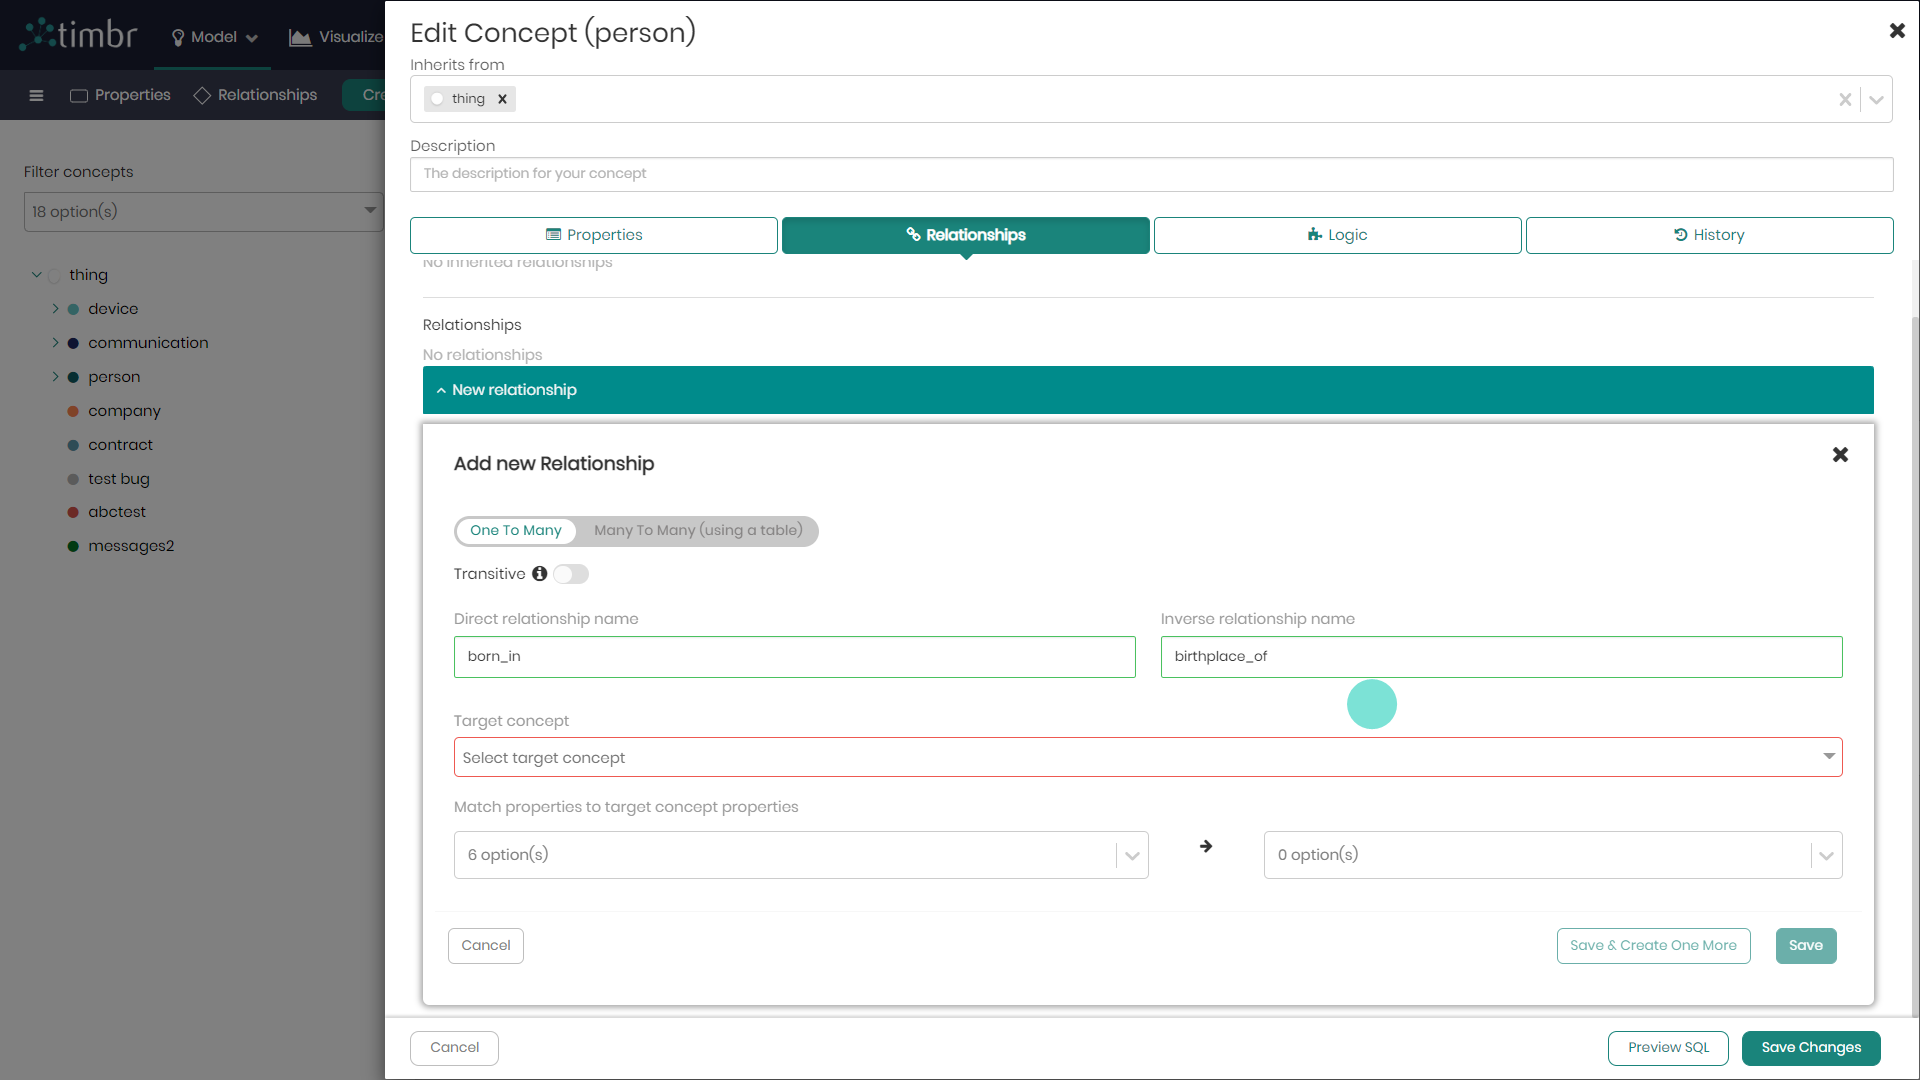
- Choose the target concept to connect to, in this example Country.
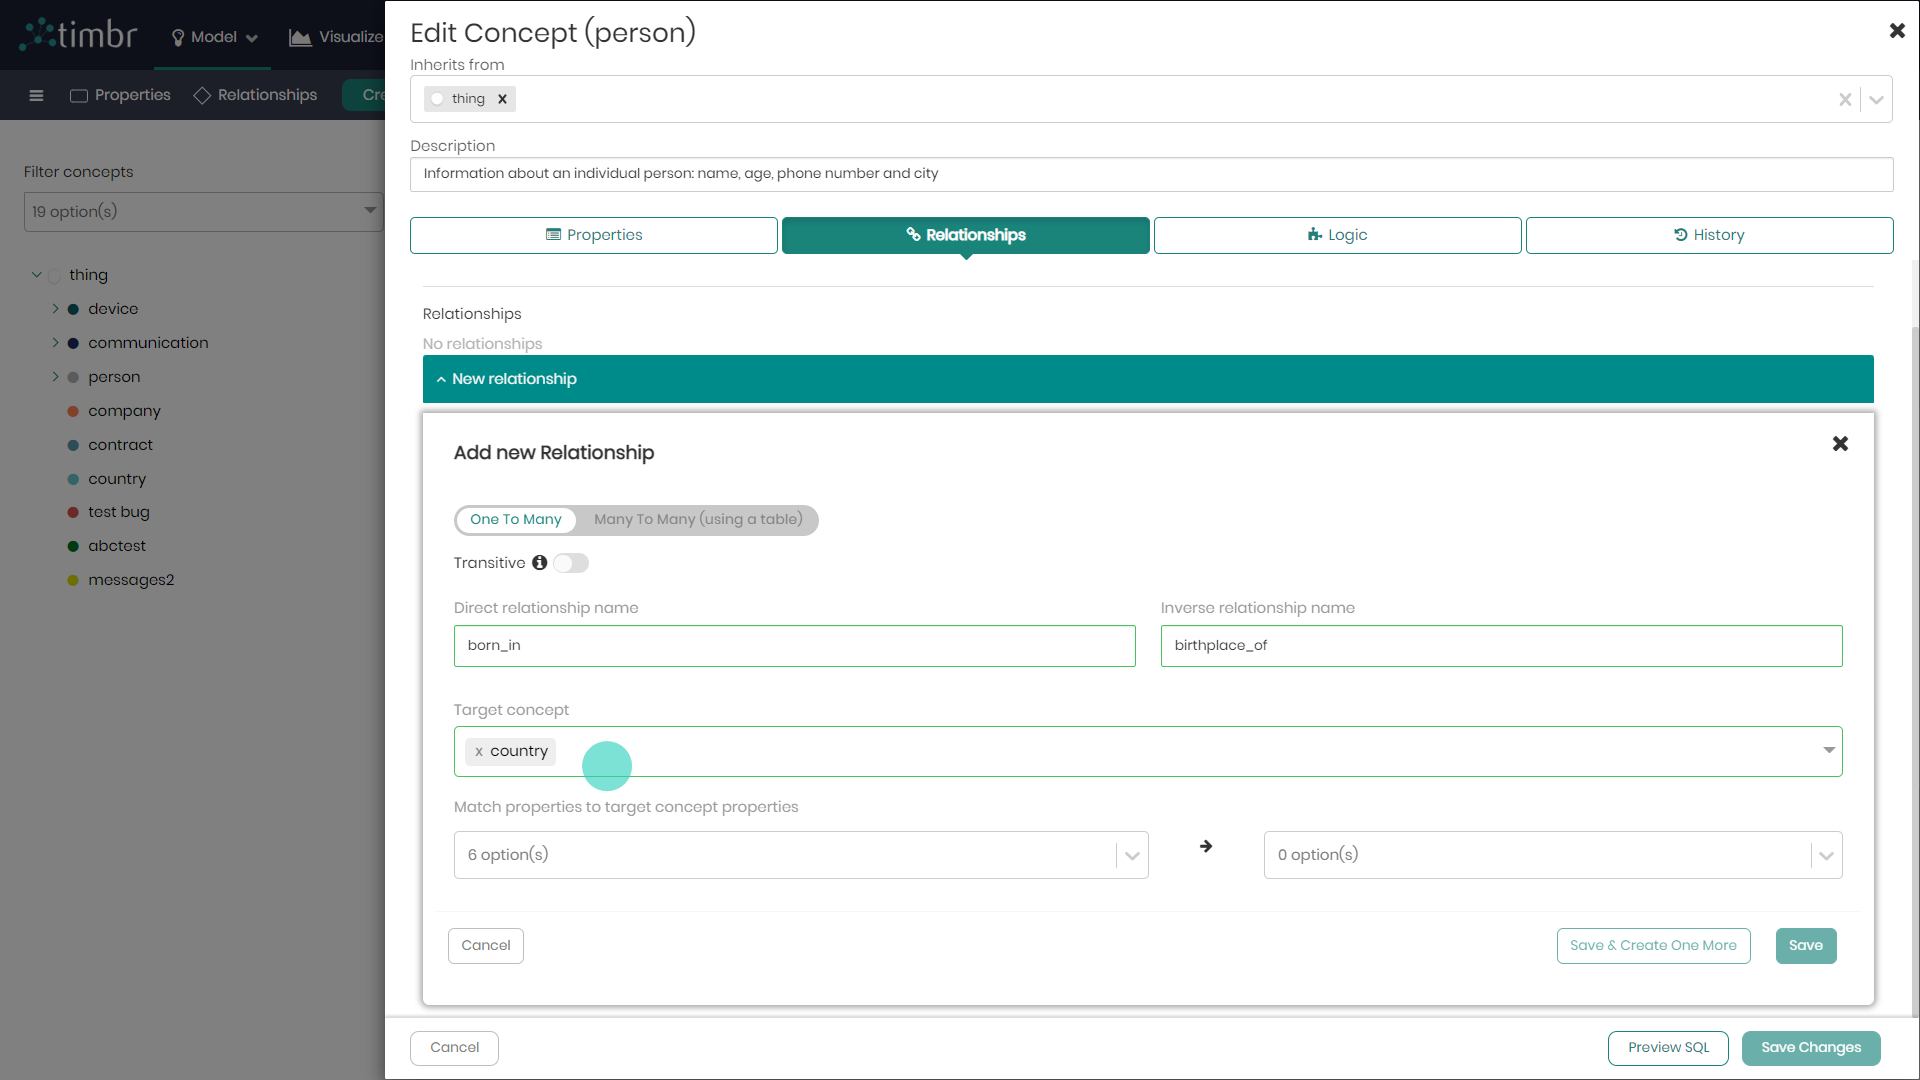
- Match properties on which this relationship will be based on, matching a property from Person to match with a property from Country.
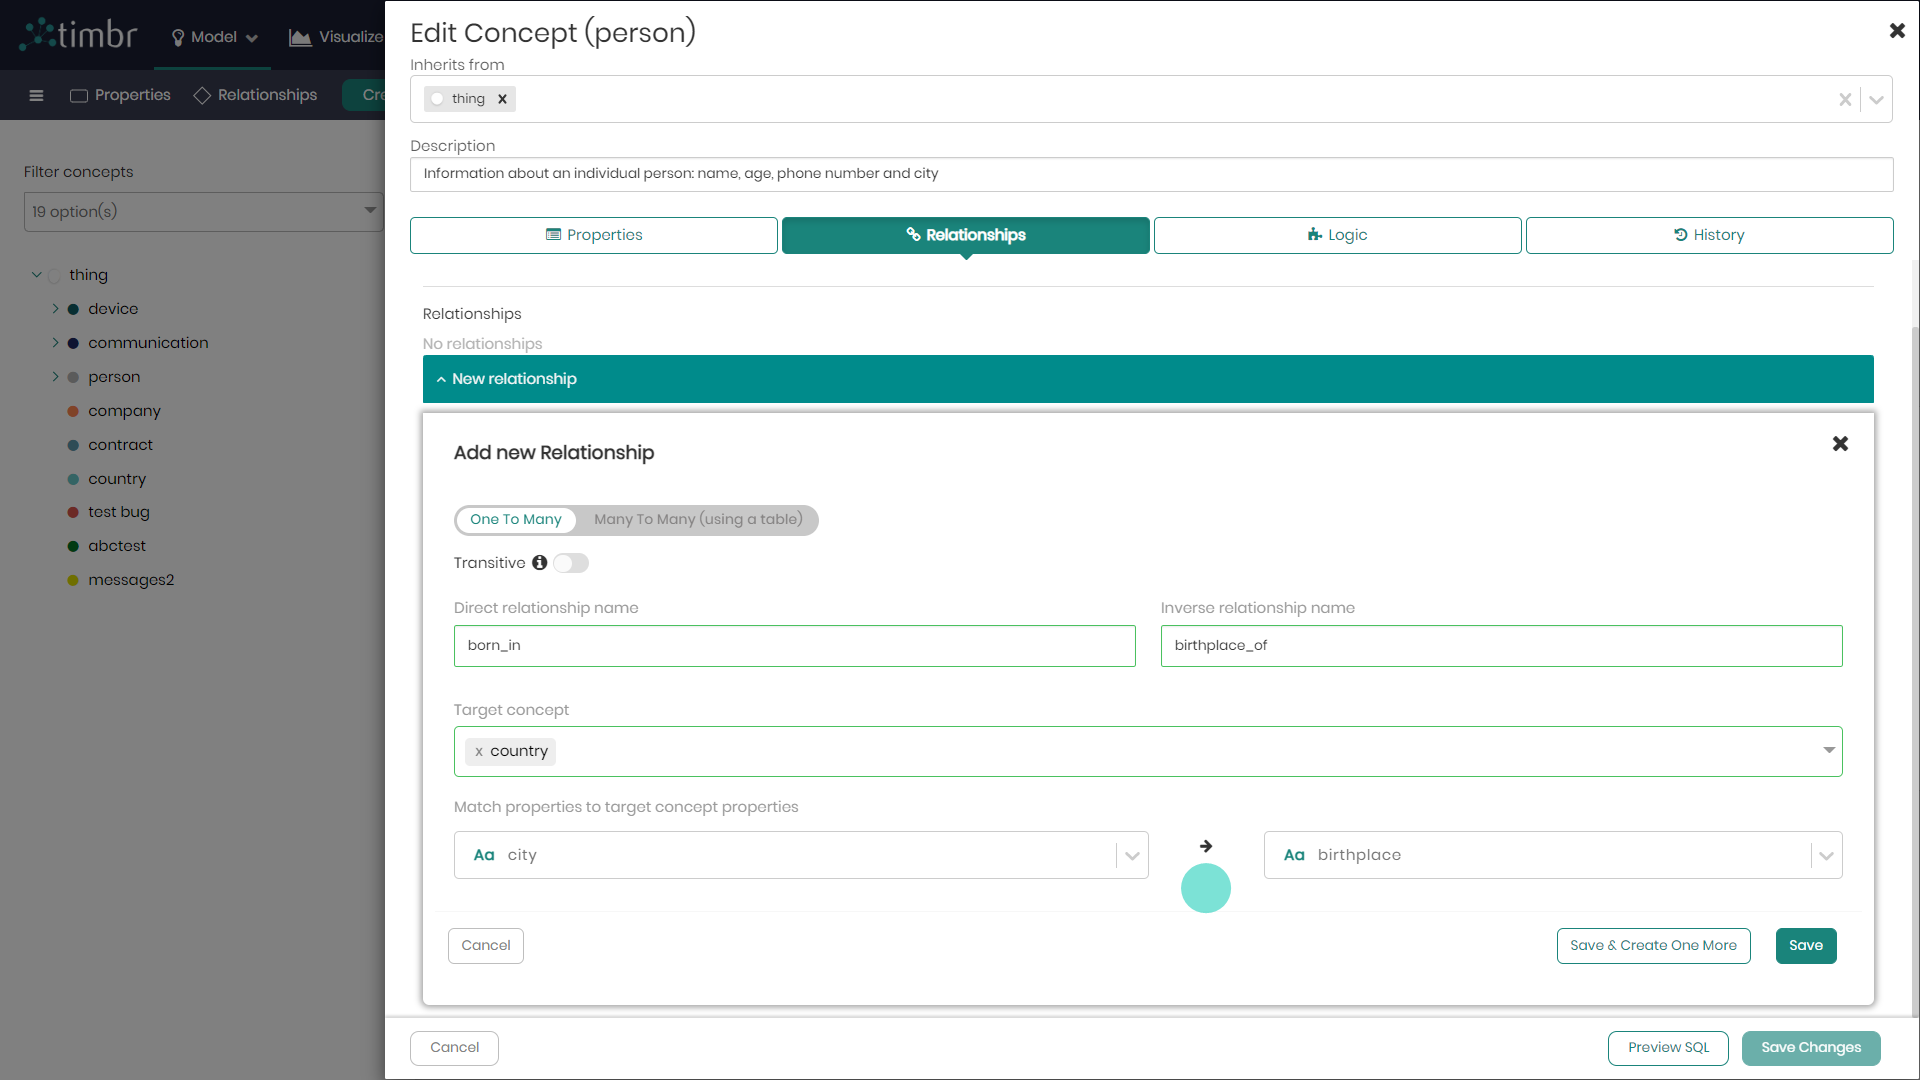
- On the bottom right, click on Save to save the relationship created, and click on Save changes to save the changes made in the edit concept window.
SQL Example of a Person concept with id and city properties and a foreign key to the Country concept:
-- CREATE Country CONCEPT
CREATE CONCEPT Country (id string, name string, city string, primary key(id), label(name))

-- CREATE Person CONCEPT
CREATE CONCEPT Person (id string, city string,
    constraint livesInCity foreign key (city) references city(id))
Timbr CREATE Many-to-Many Relationship Syntax
-- CREATE many-to-many relationship from calls concept to person concept through device concept
    CREATE OR REPLACE MAPPING `map_call_called_with_device` (
        CONSTRAINT `called_with_device`
            FOREIGN KEY (`person_id`)
            REFERENCES `person`(`person_id`),
        CONSTRAINT `got_called_by_device`
            FOREIGN KEY (`device_id`)
            REFERENCES `call`(`device_id`)
    ) AS
        SELECT `device_id` AS `device_id`,
            `person_id` AS `person_id`
        FROM `calls`.`devices`;
Timbr CREATE Multi-Value Relationship Syntax
-- CREATE multi-value relationship using person CONCEPT
CREATE OR REPLACE MAPPING `map_person_device` (`device_id` BIGINT,
    FOREIGN KEY (`person_id`)
    REFERENCES `person`(`person_id`)
) AS
    SELECT `person_id` AS `person_id`,
        `device_id` AS `device_id`
    FROM `calls`.`devices`
Timbr CREATE CONCEPT With Transitive Relationship Syntax
CREATE OR REPLACE CONCEPT `<concept_name>` (`<property_name>` <property_type>,
    PRIMARY KEY(`<property_name>`),
    LABEL(`<property_name>`),
    CONSTRAINT `<relationship_name>`
        FOREIGN KEY (`<property_name>`)
        REFERENCES `target_concept` (`<target_concept_property>`)
        INVERSEOF `<inverse_relationship_name>`
        TRANSITIVE (<transitive_depth>)
) INHERITS (`<inherits_from_concept>`)
DESCRIPTION '<concept_description>';
Creating Mappings
Mappings are used to define a path between the physical tables to the virtual ontology concepts, properties (in case of a Multi-Value property), or relationships (in case of a Many-to-Many relationship).
A table or multiple tables can be mapped to a concept or multiple concepts based on data structure and requirements.
There are three different types of mappings a user can create in Timbr. Each mapping type correspond to a different element in the ontology. The available mapping types are:
- Concept Mapping - A mapping from a datasource, or a number of datasources to a concept in the ontology
- Many-to-many relationship mapping - A mapping from a datasource to a many-to-many relationship defined in the ontology
- Multi-value property mapping - A mapping from a datasource to a multi-value property defined in the ontology.
In cases where the concept being mapped to has one or more sub-concepts (children), or if you intend to create sub-concepts, be aware that you don't need to set another mapping in the hierarchy for the sub-concepts since they inherit the mapping of the upper-level (parent) concept automatically. Setting a mapping for both upper level concepts as well as their children concepts, will result in a duplication of the data.
For more information and examples read here.
Creating Concept Mapping
In these examples you’ll find a guided explanation demonstrating the creation of a mapping to a concept visually in Timbr’s Ontology Explorer.
Assuming we'd like to create a mapping to the concept Person in the Ontology Explorer. Mappings can also be performed in Timbr's Data Mapper component.
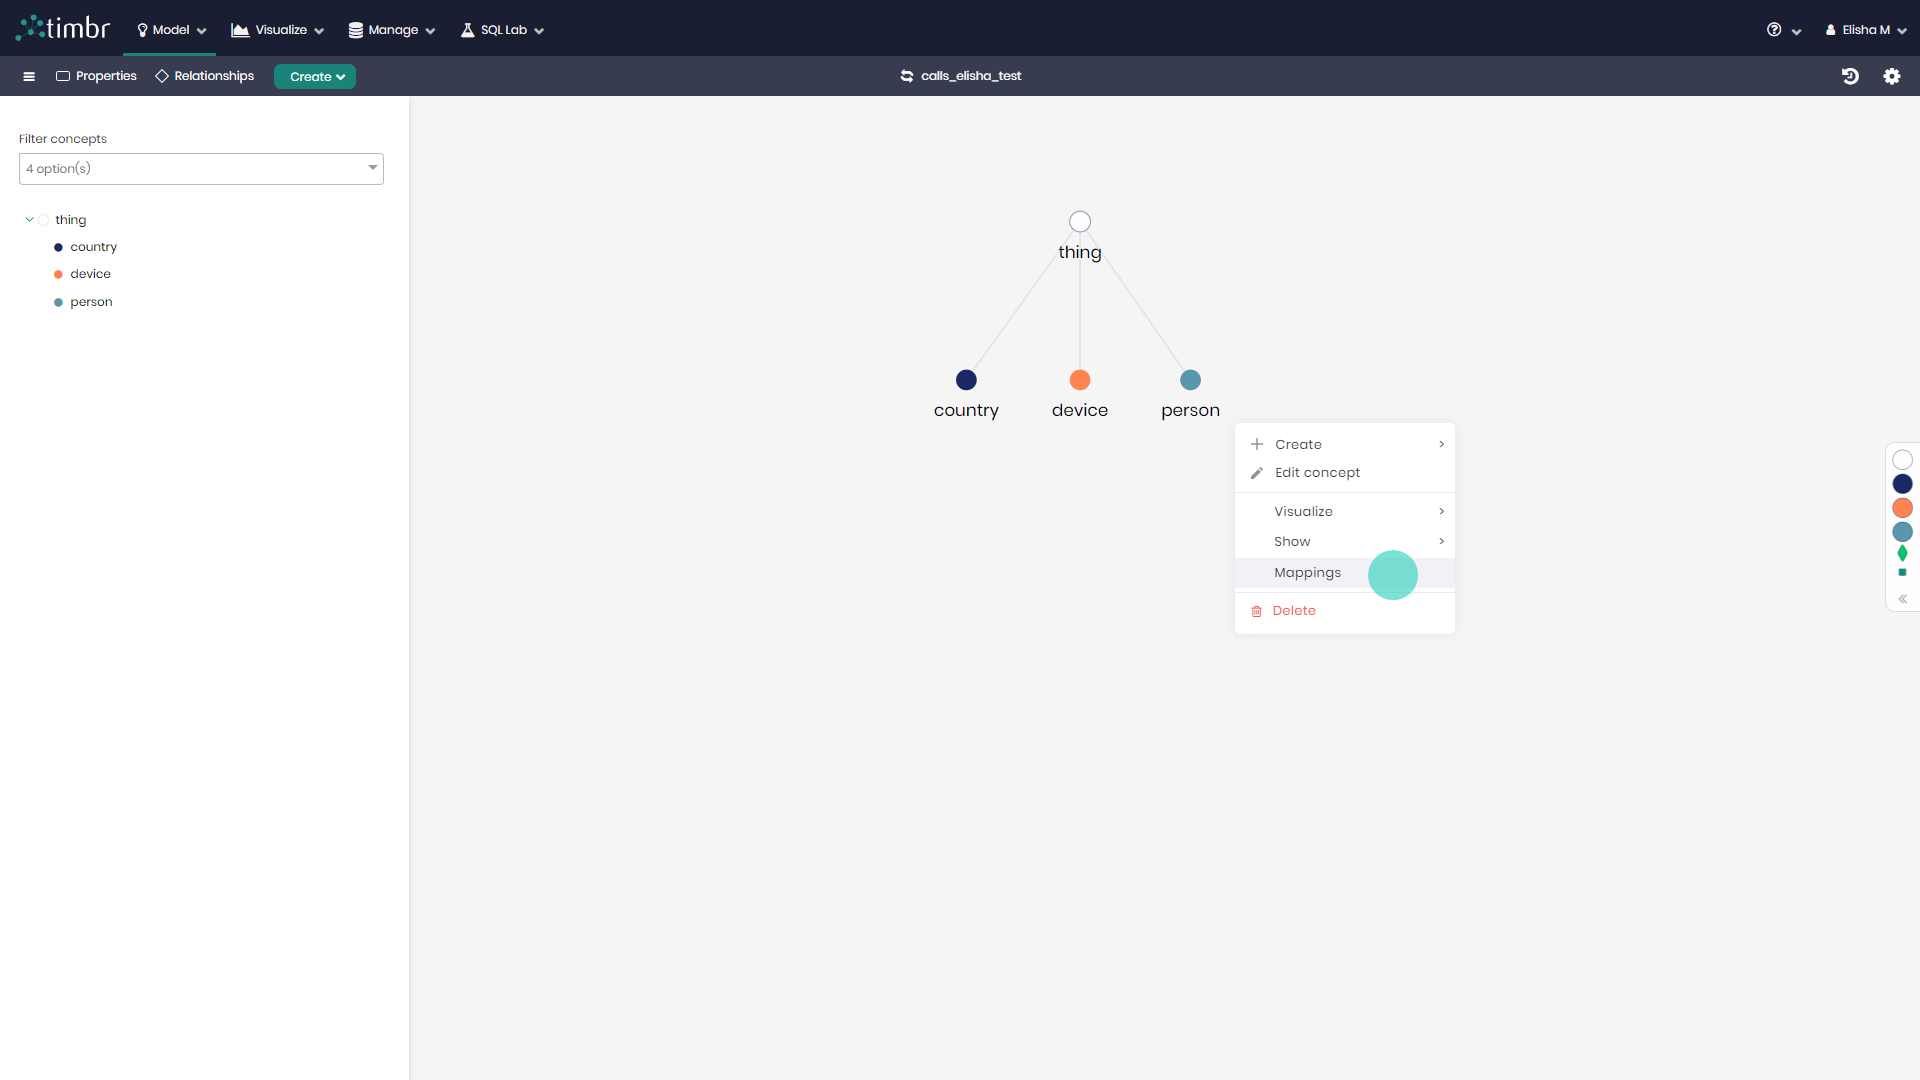
- In the Ontology Explorer, right click on the concept Person and select Mappings.
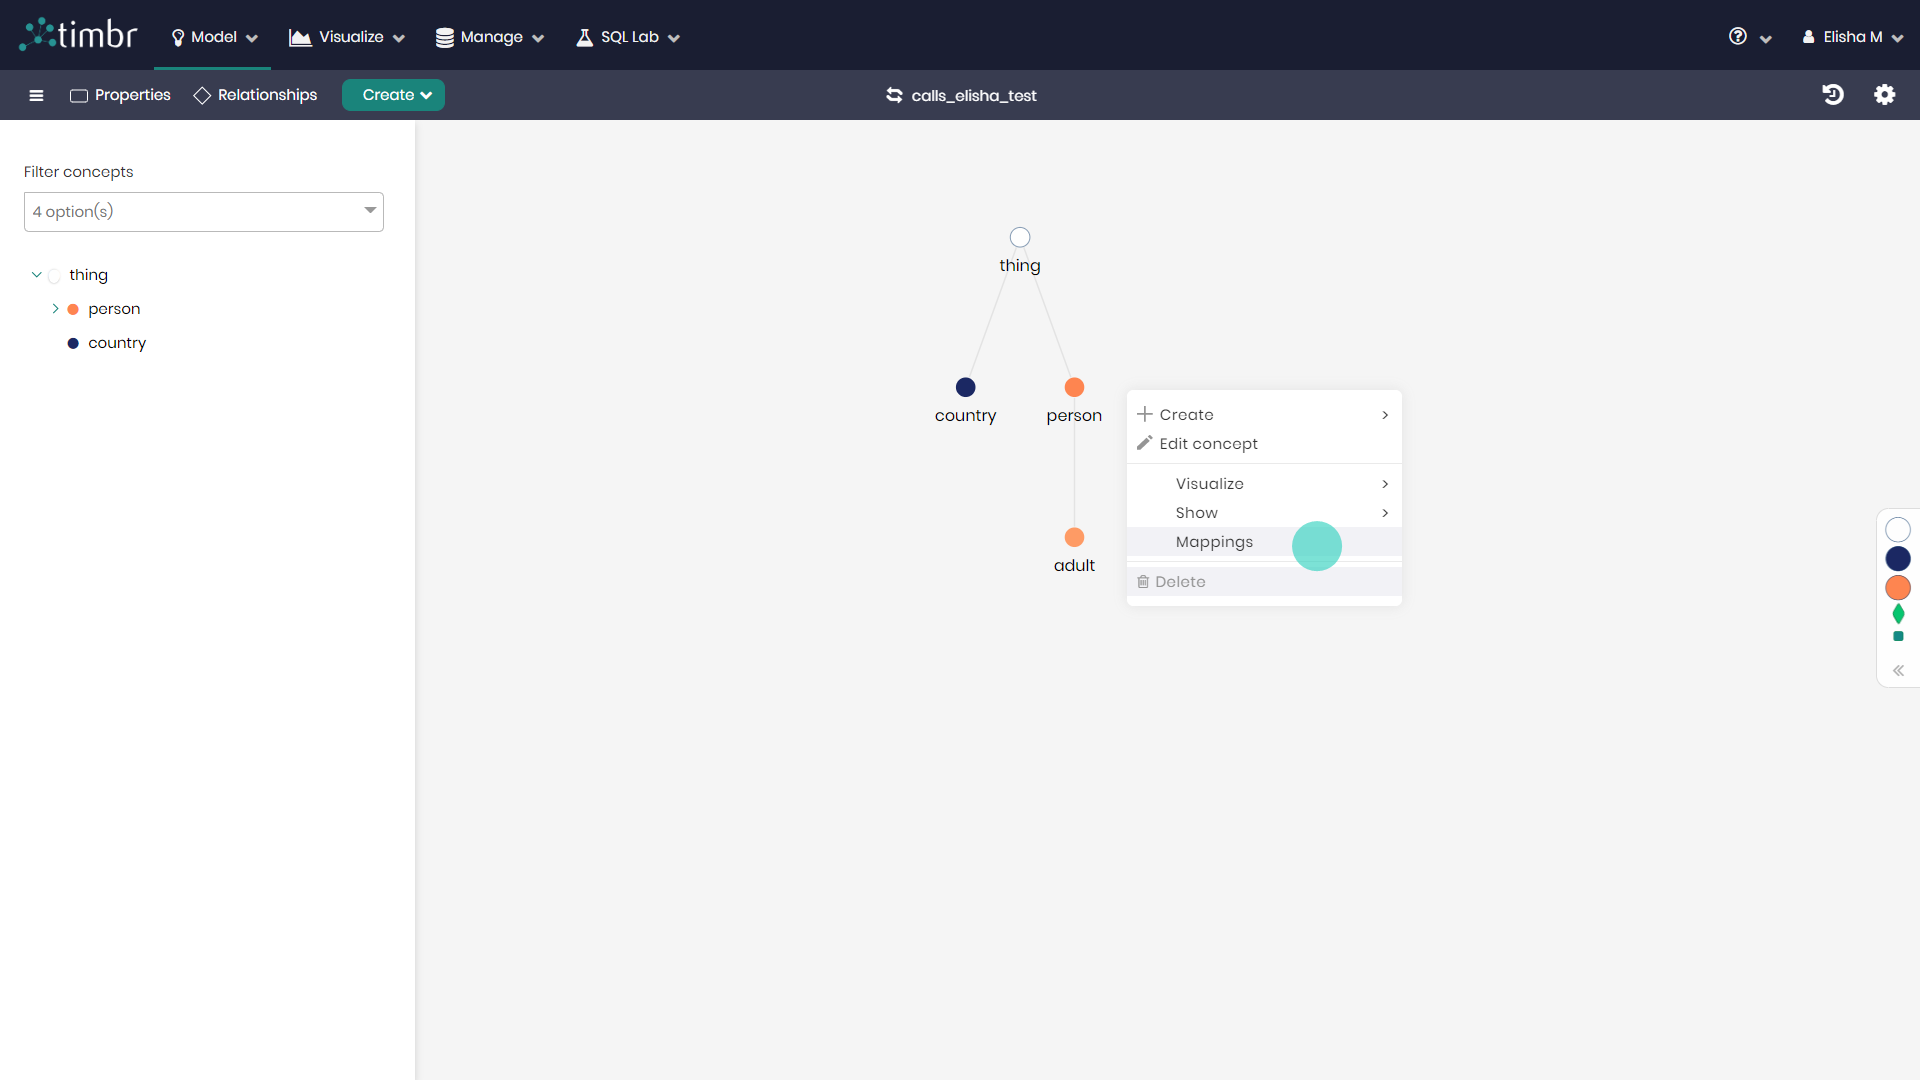
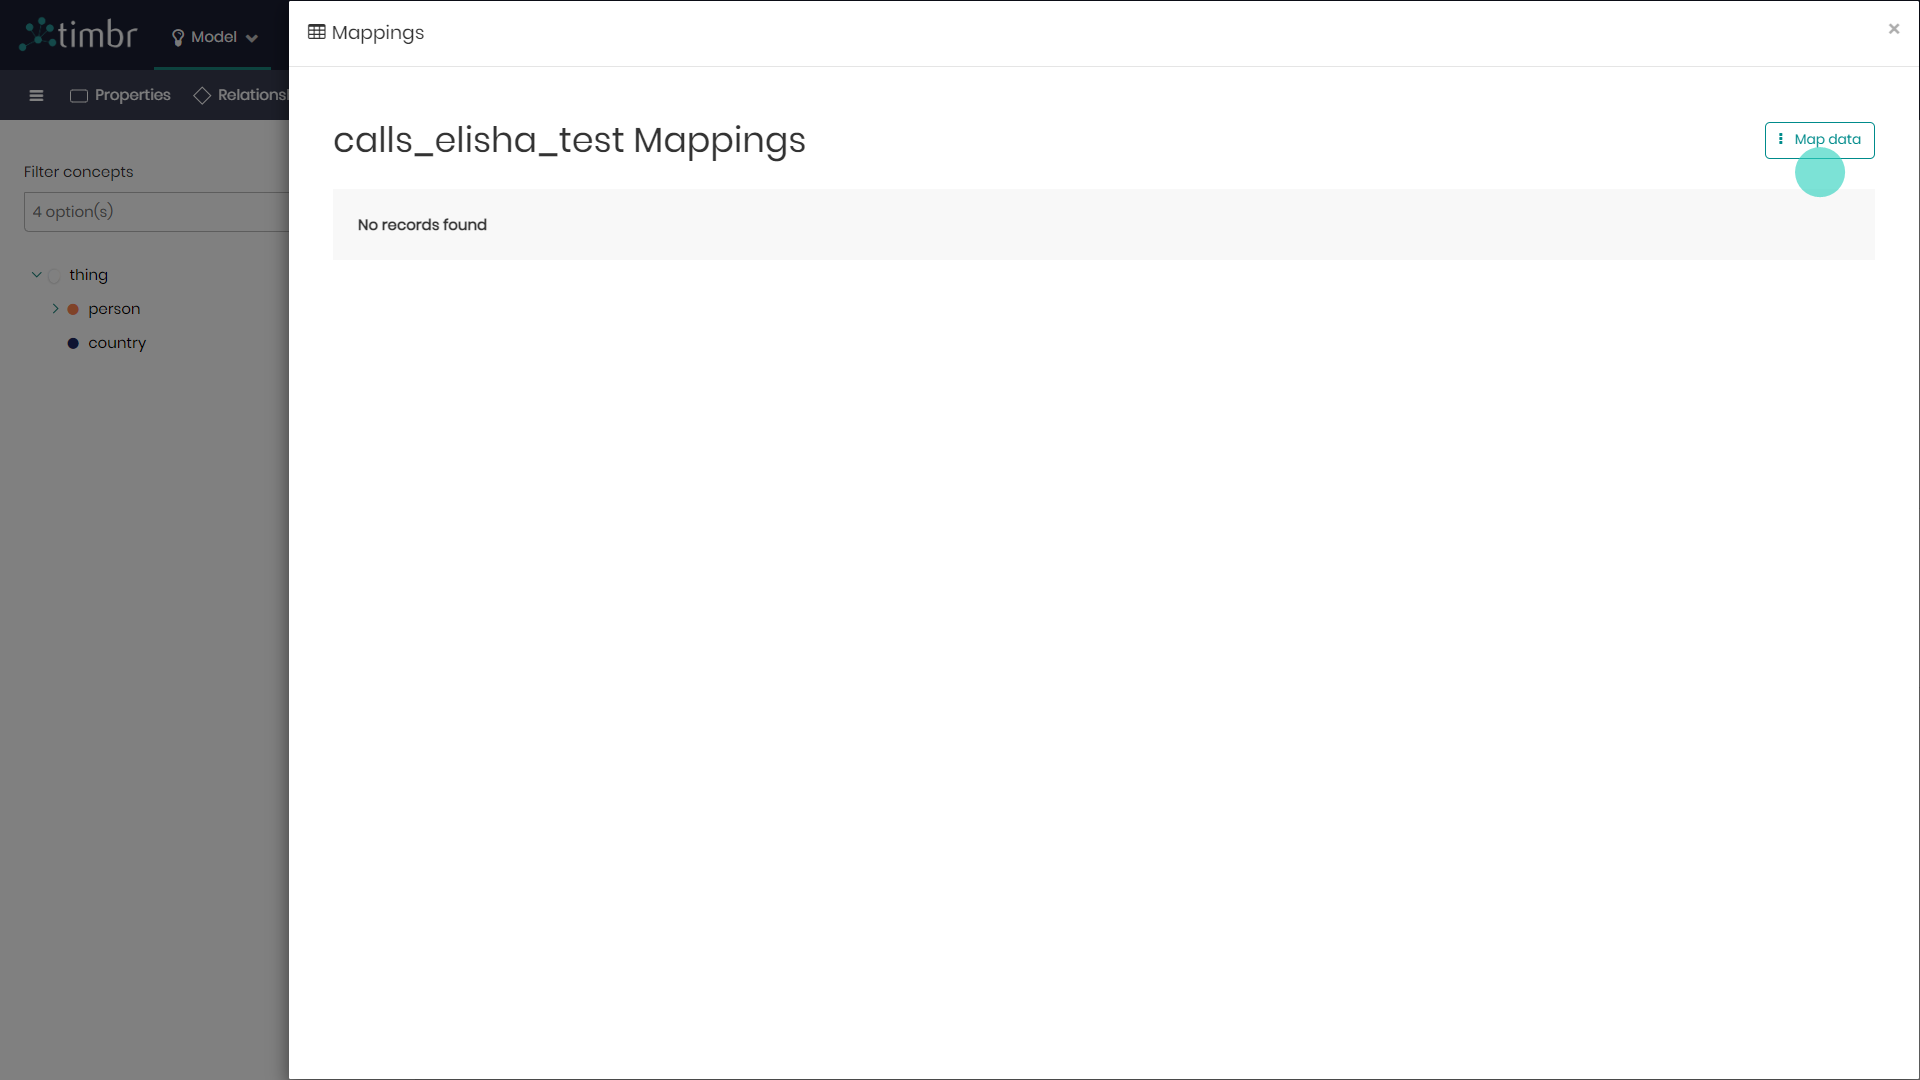
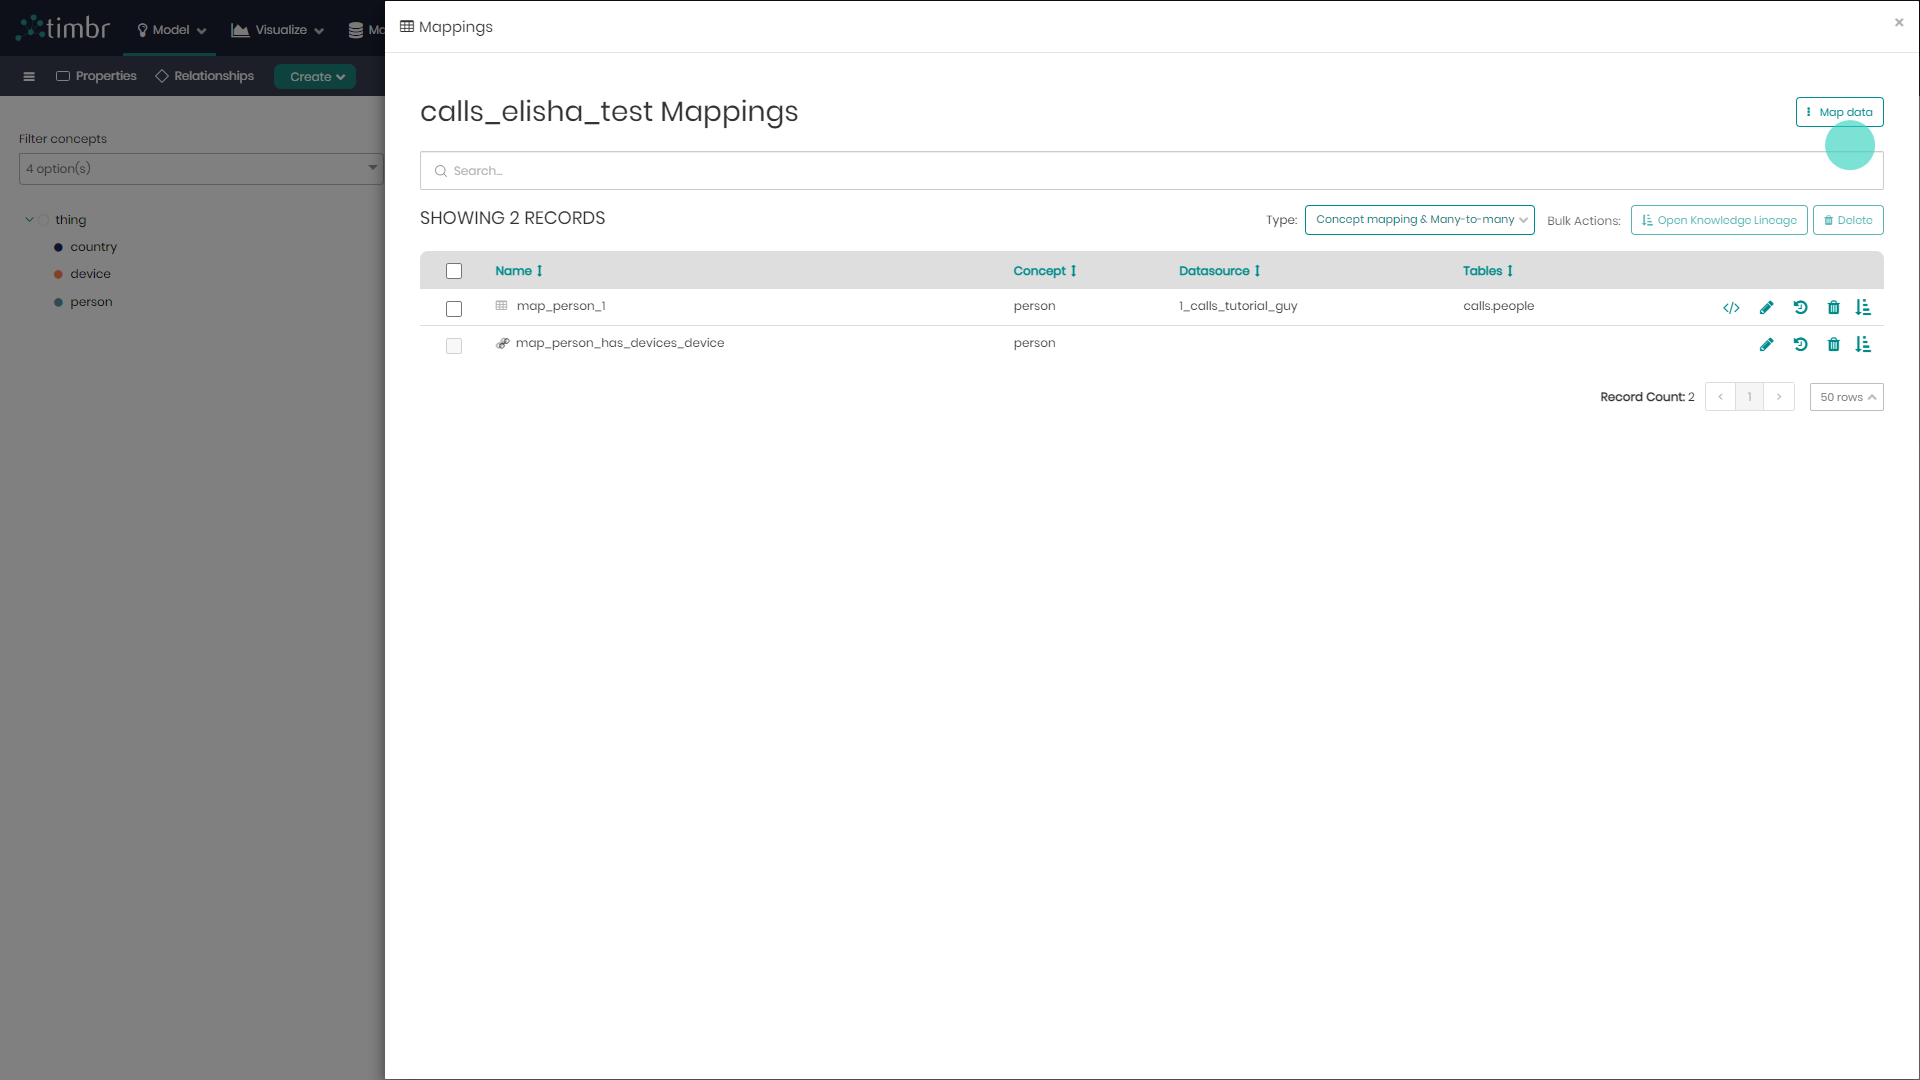
- In the window that appears on the top right click on Map data.
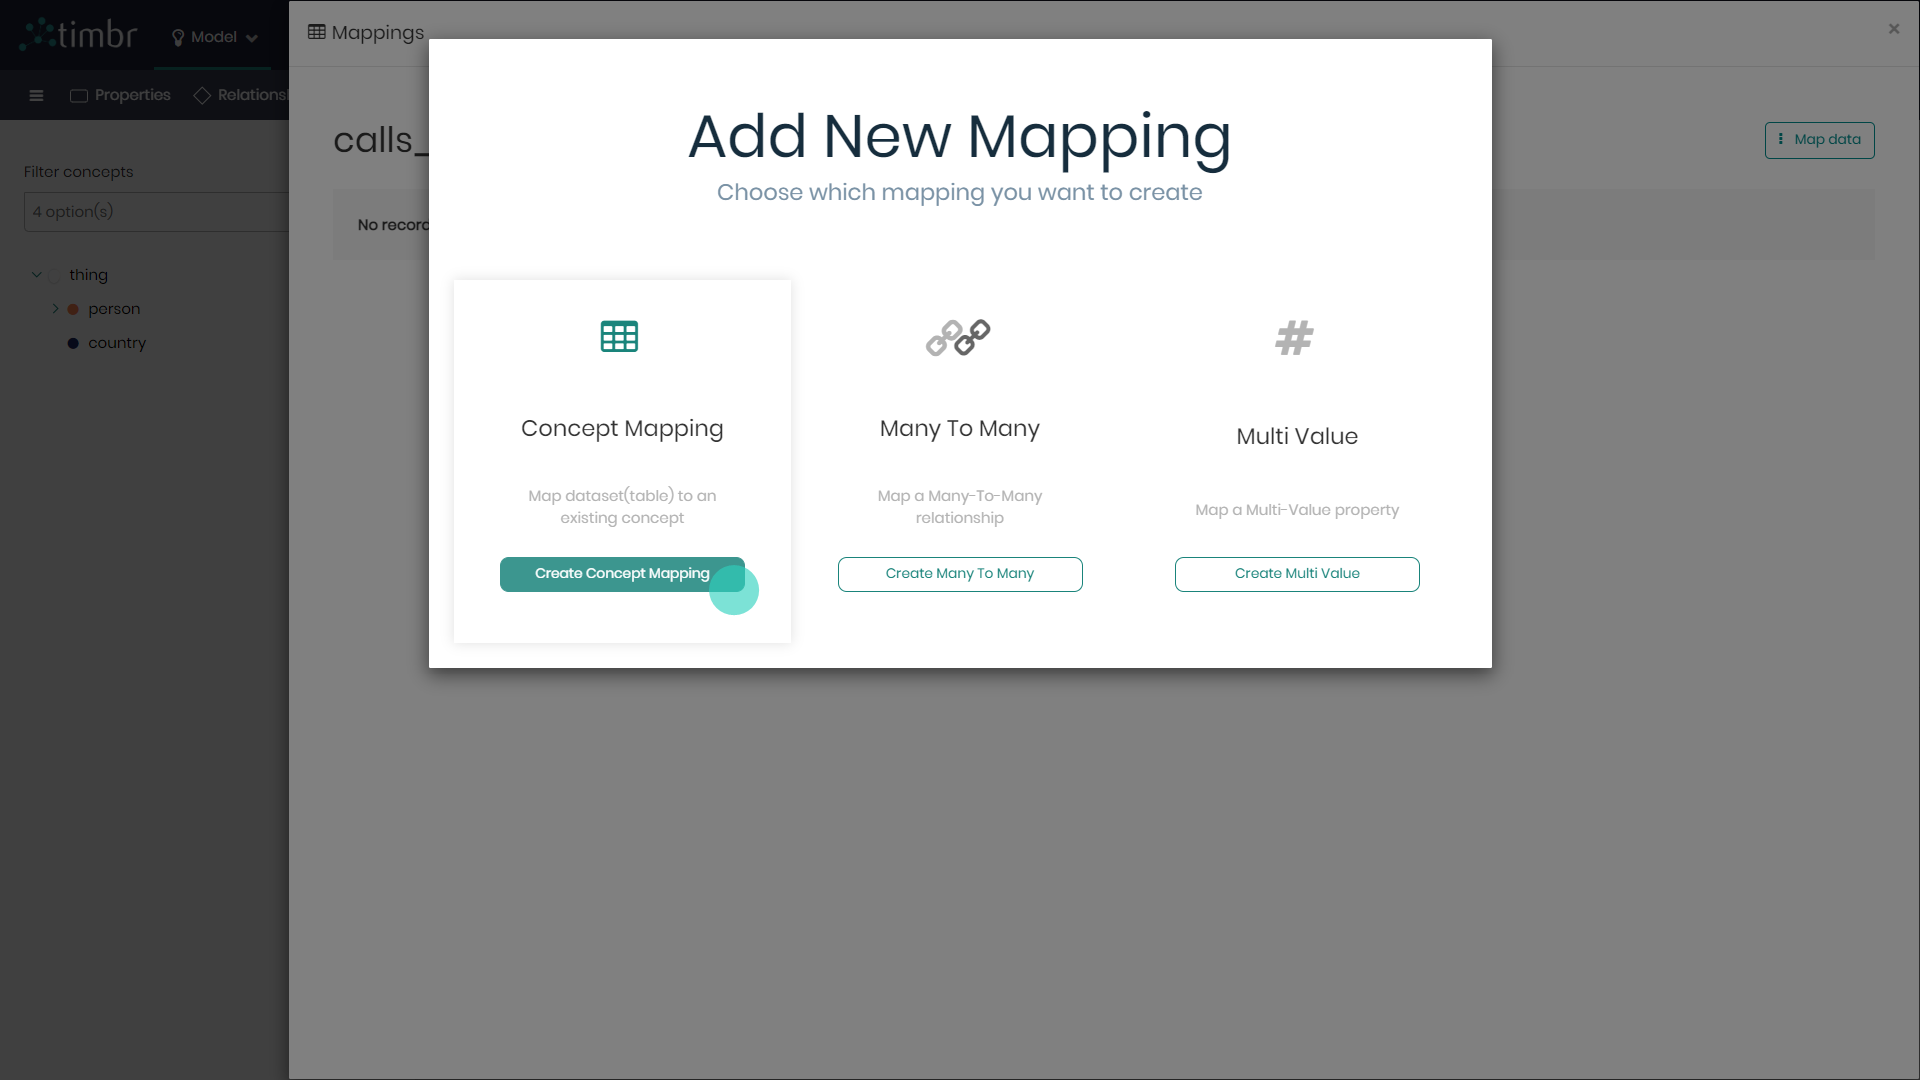
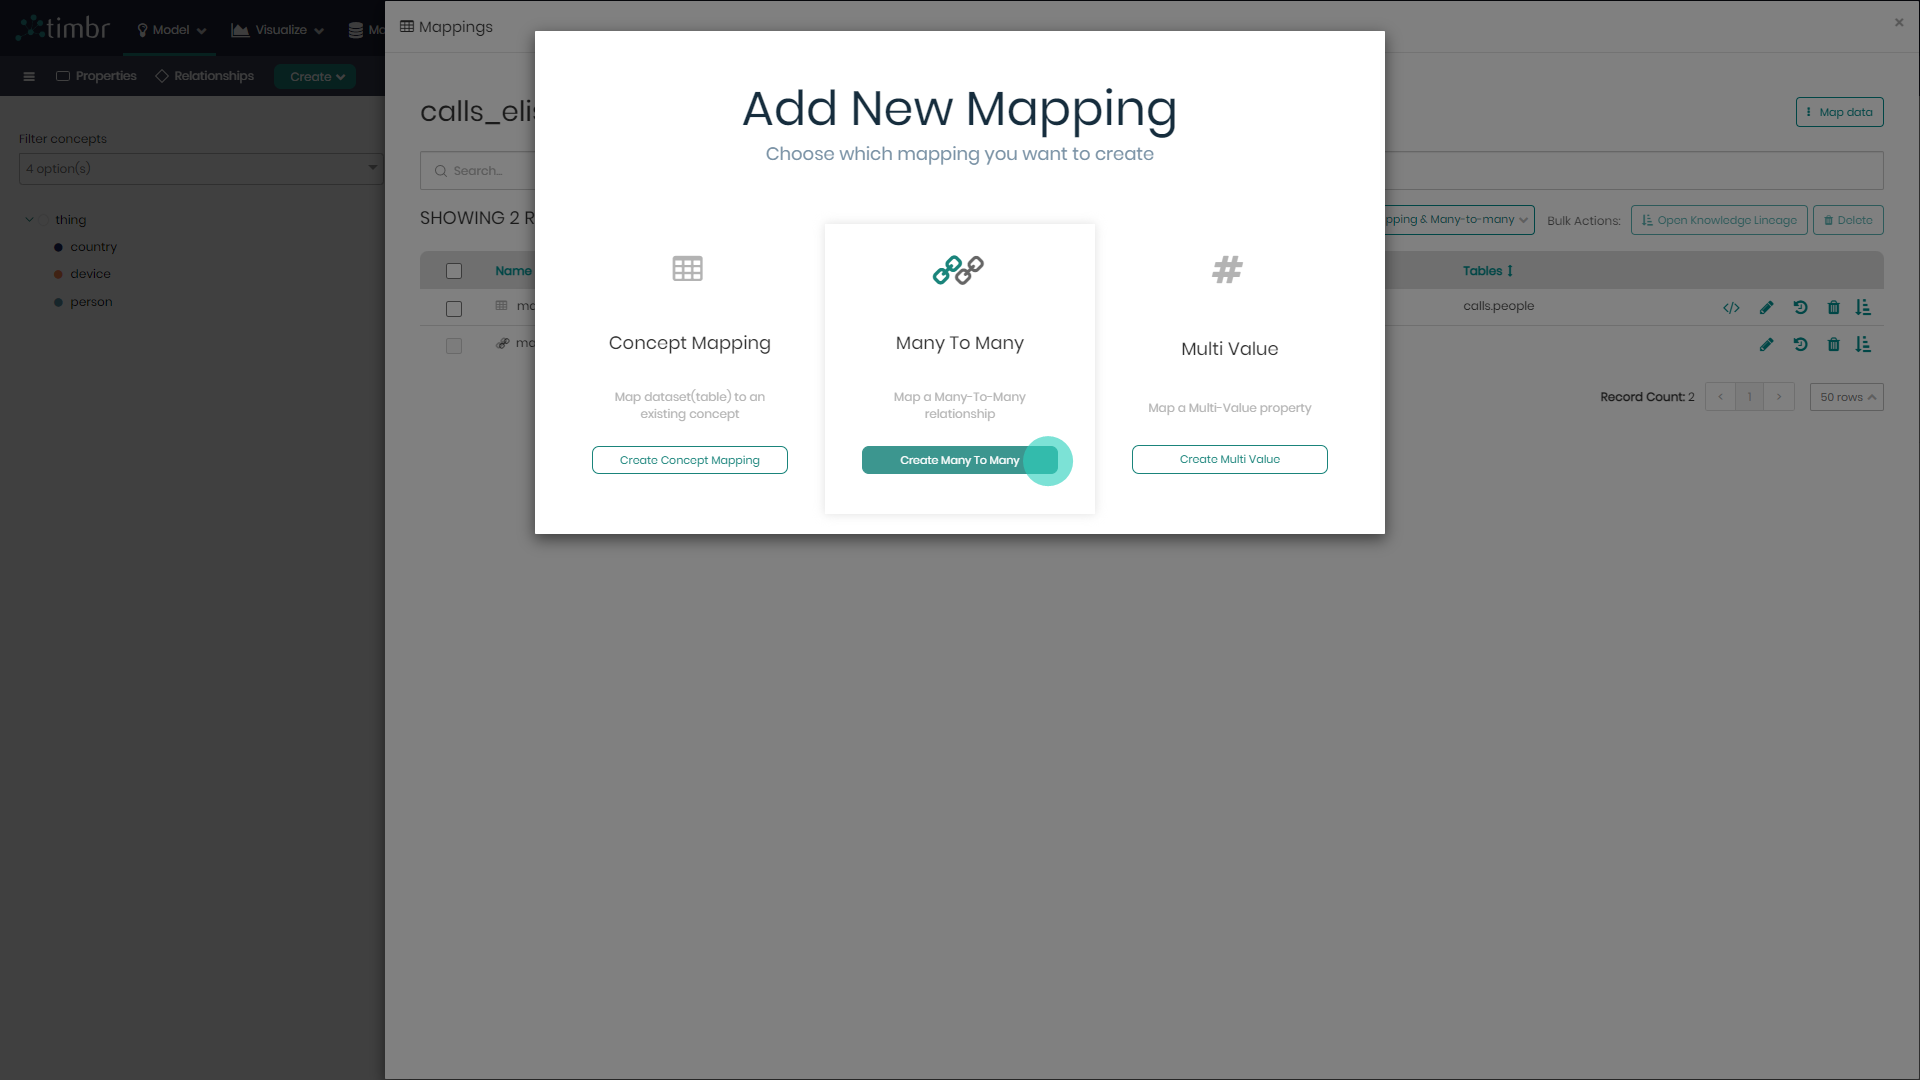
- Timbr will now offer users to create a Concept Mapping, Many To Many and Multi Value mappings. In this example select the Concept Mapping.
4. Select the Datasource and Schema where the data is stored. Once chosen the tables of the schema will appear on the right. Notice that Timbr notifies you regarding which tables have already been mapped, and which tables have not yet been mapped. In addition, on the top right, users can choose the Mapping method and decide whether to continue mapping Visually, or perhaps to map using SQL. In this example the mapping will follow the Visual method.
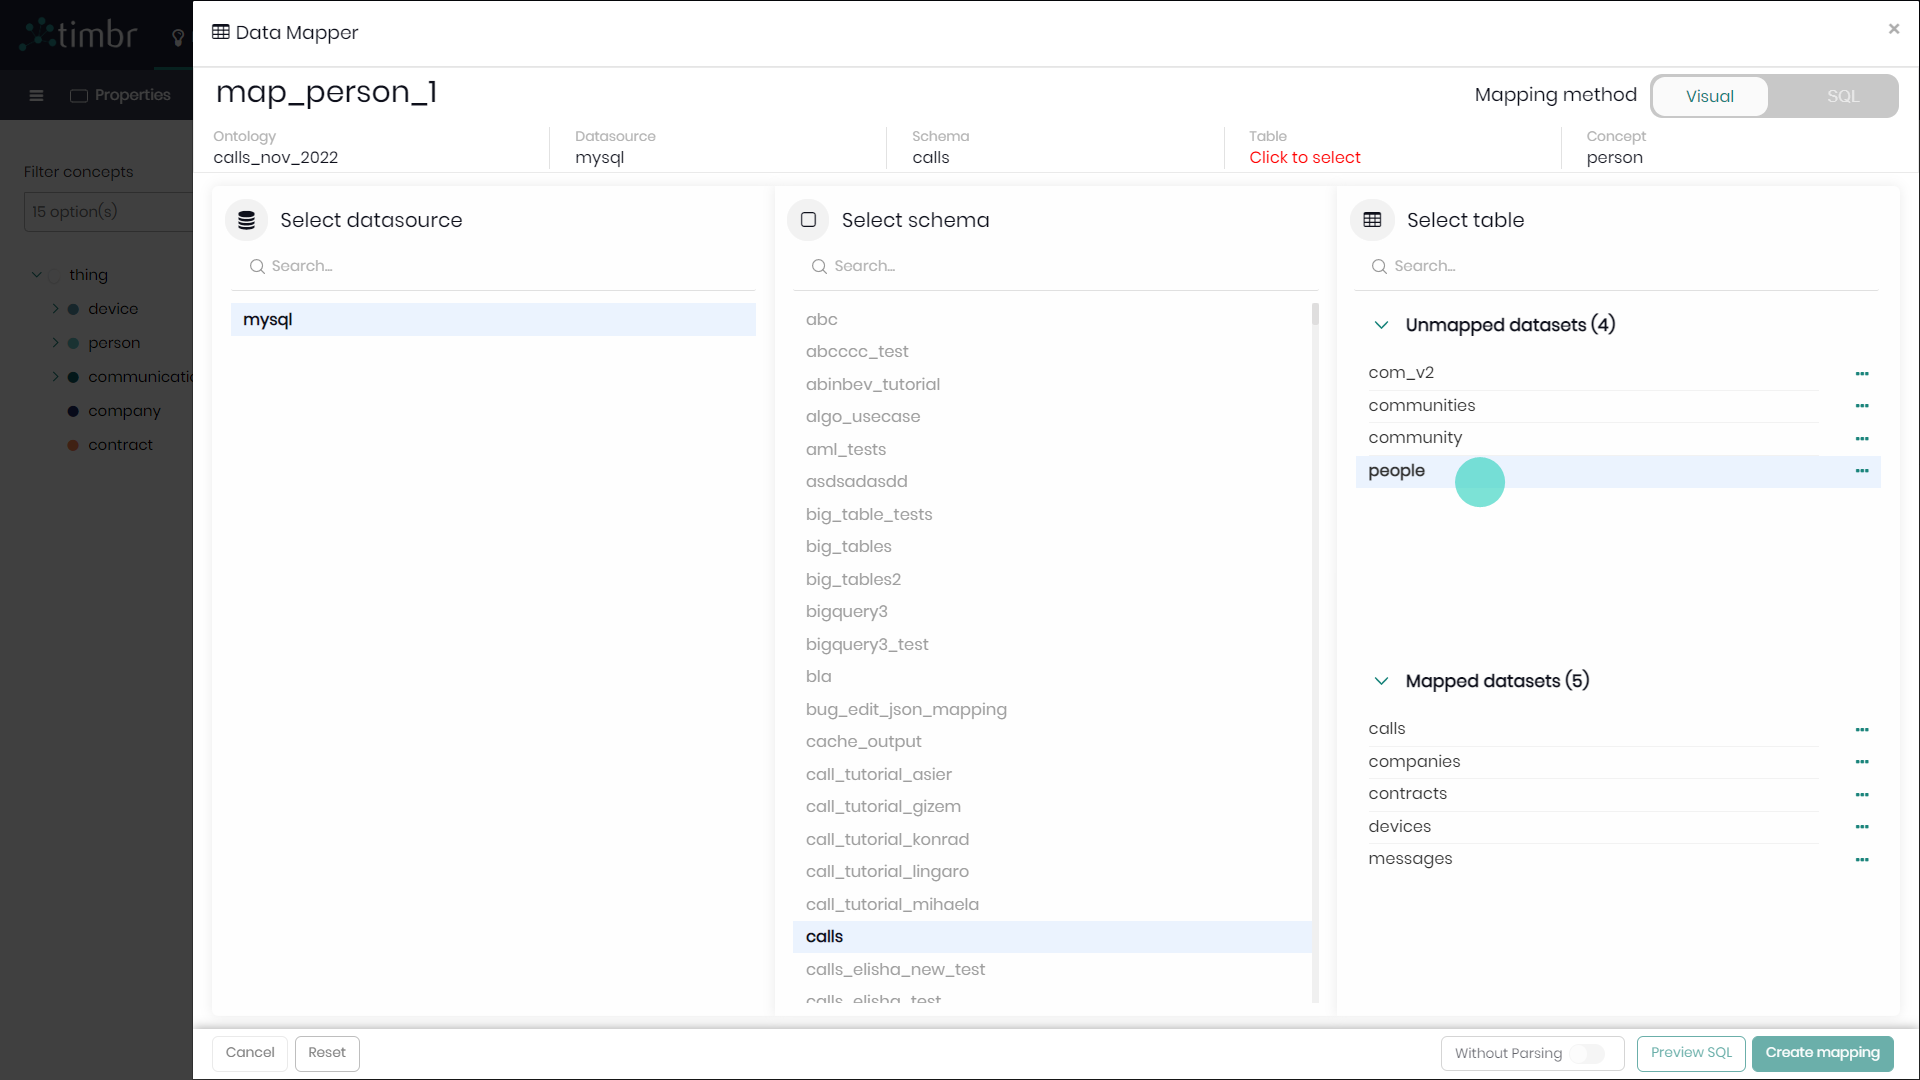
- Choose the desired table you wish to map to the concept. In this case the people table to the Person concept.
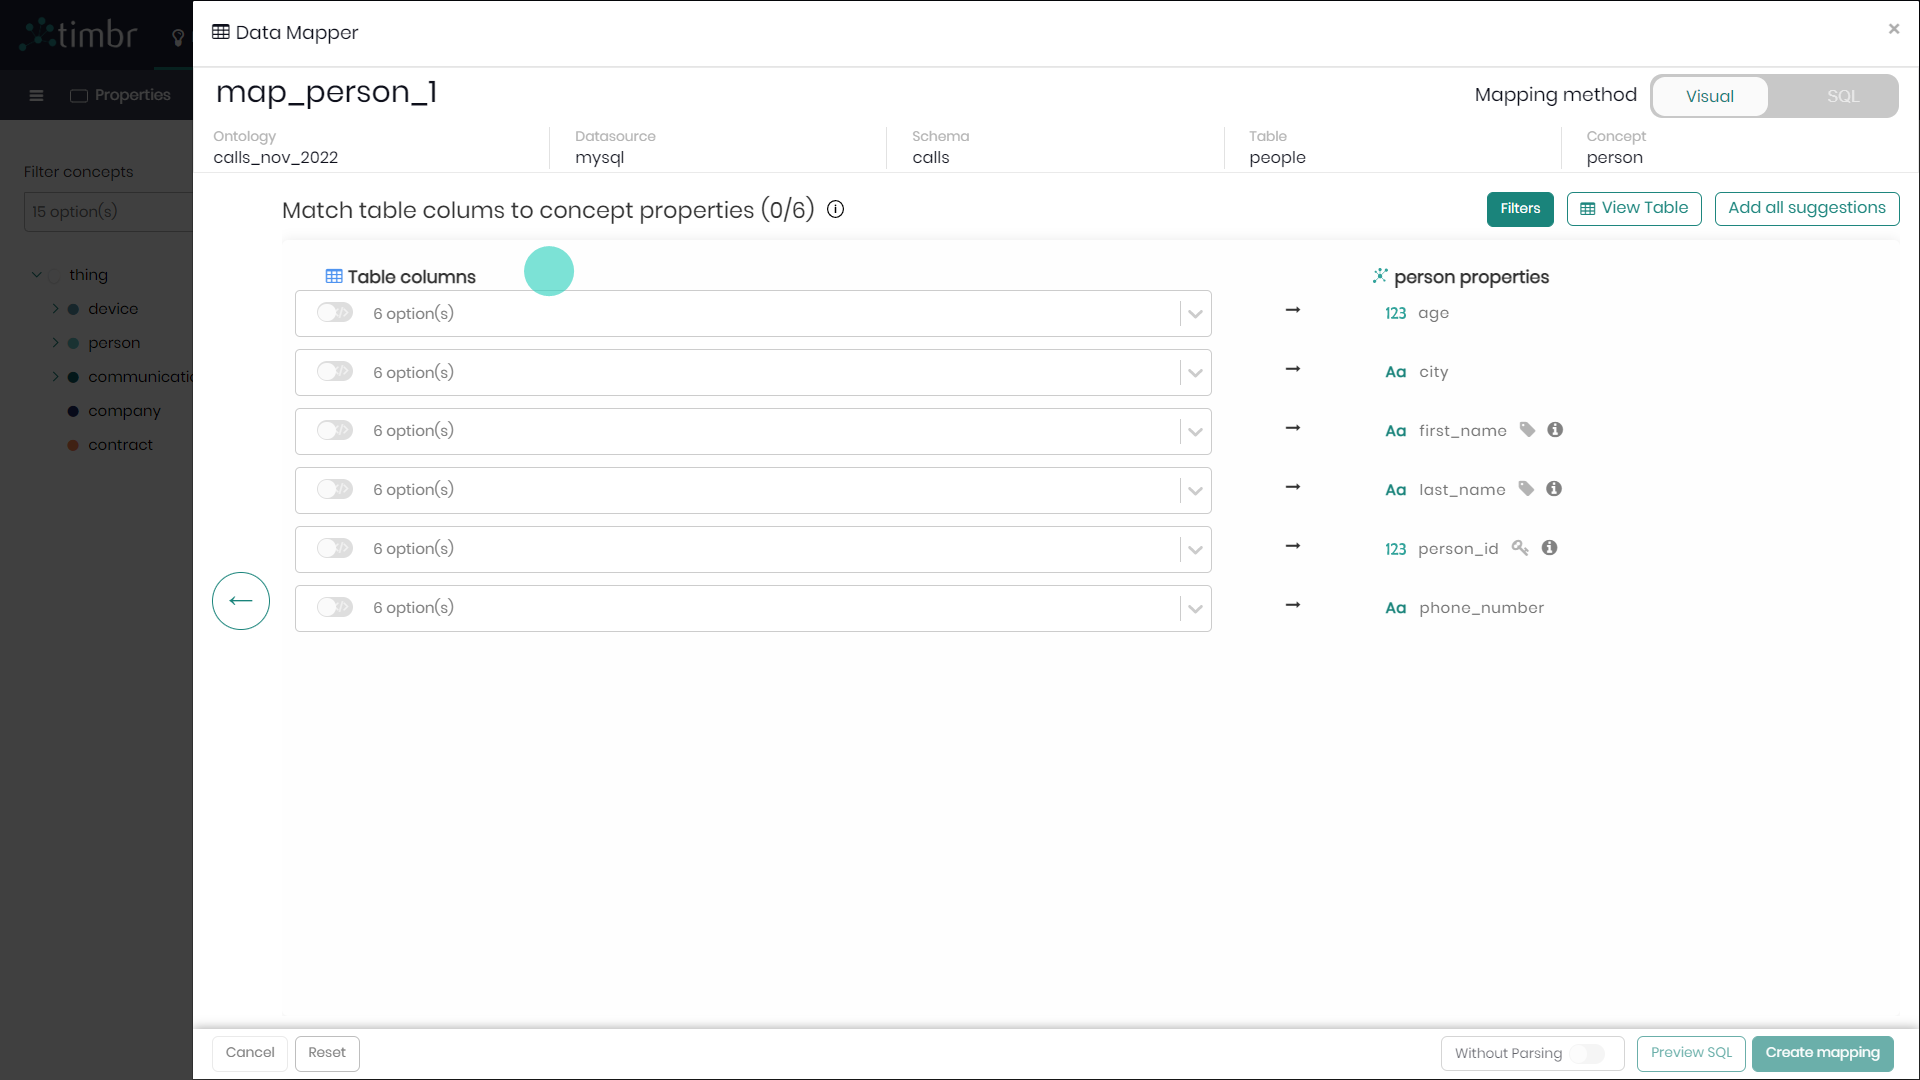
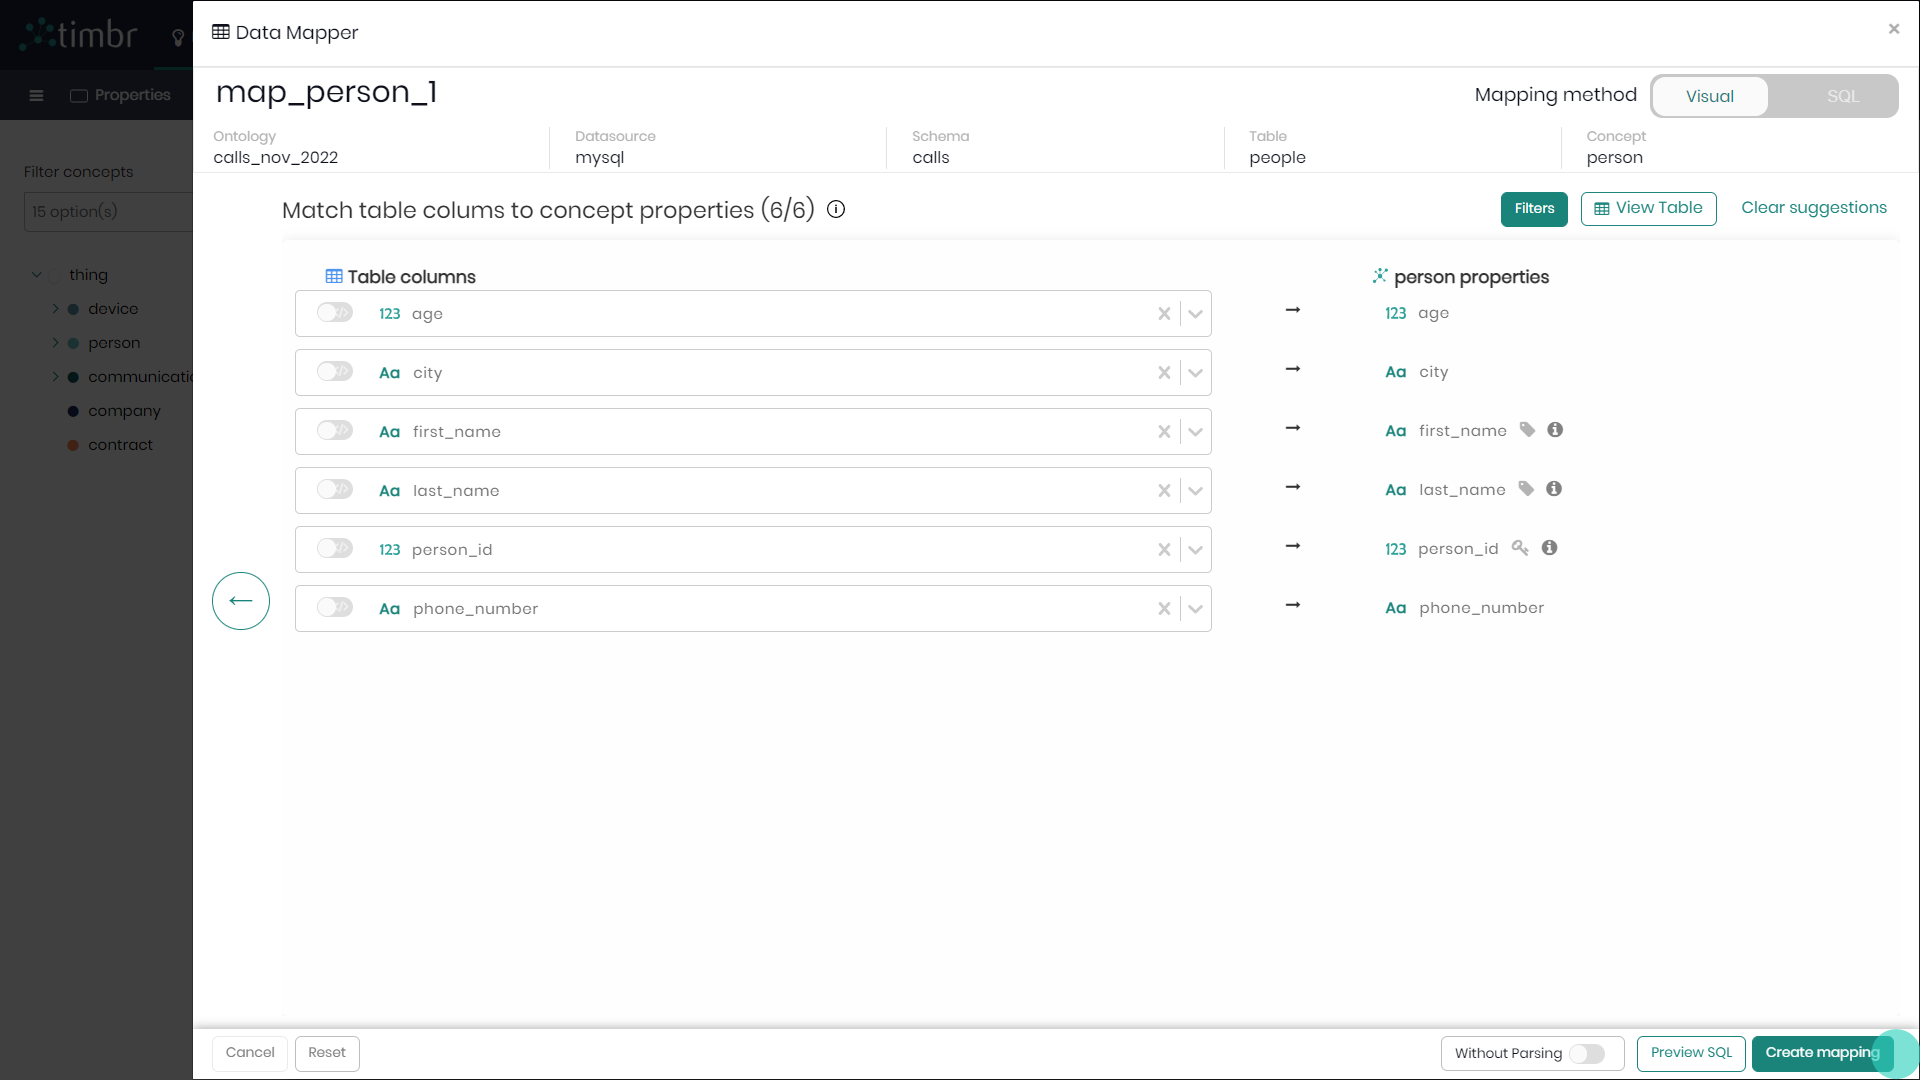
- Match the column names from the datasource to the concept properties. The matching can be done either manually choosing the properties one by one, where Timbr will perform automatic CAST suggestions when the property type is different from the column type, or instead the matching can be done automatically by Timbr by clicking on Add all suggestions on the top right of the screen. If matching is done automatically, it's worth checking to see that all the matches have been matched as intended.

At this stage before saving and creating the mapping, users can decide to click on filters in case they want to clean or apply rules on the original data that's being mapped.
- When matching and cleaning of the data is complete, on the bottom right, click on Create mapping to save and create the new mapping.
Creating Many-to-Many Relationship Mapping
Many-to-many relationships represent a relationship between two concepts using an intermediary table to connect them. This relationship is usually used when one data value from one table, for example -
Imagine you have two concepts: customer and product, each one has mapping to different tables in your data. Conceptually, a customer can buy more than one product, and a product can be bought by different customers. You also have another table named customers_products which represents which customers purchased which products, this table is not mapped to any concept in the knowledge graph.
So in Timbr we can create a many-to-many relationship in the customer concept named purchased to the target concept product. If we look at it from the product concept perspective, the relationship can be defined as purchased_by when the target concept is customer.
After we defined the relationship in the Ontology Explorer or in SQL, we can use the customers_products table as the mapping between the customer and purchased concepts as defined by the relationships of purchased andpurchased_by.
In the example below, you’ll find a guided explanation of creating a Many-to-Many relationship visually in Timbr’s Ontology Explorer.
Assuming we have already created a Many-To-Many Relationship between concept Person and concept Device, and we'd like to create a Many-To-Many mapping to the relationship in the Ontology Explorer.
This Mapping can also be performed in Timbr's Data Mapper component.
- In the Ontology Explorer, right click on the concept Person and select Mappings.
- In the window that appears on the top right click on Map data.
- Timbr will now offer users to create a Concept Mapping, Many To Many and Multi Value mappings. In this example select the Many To Many Mapping.
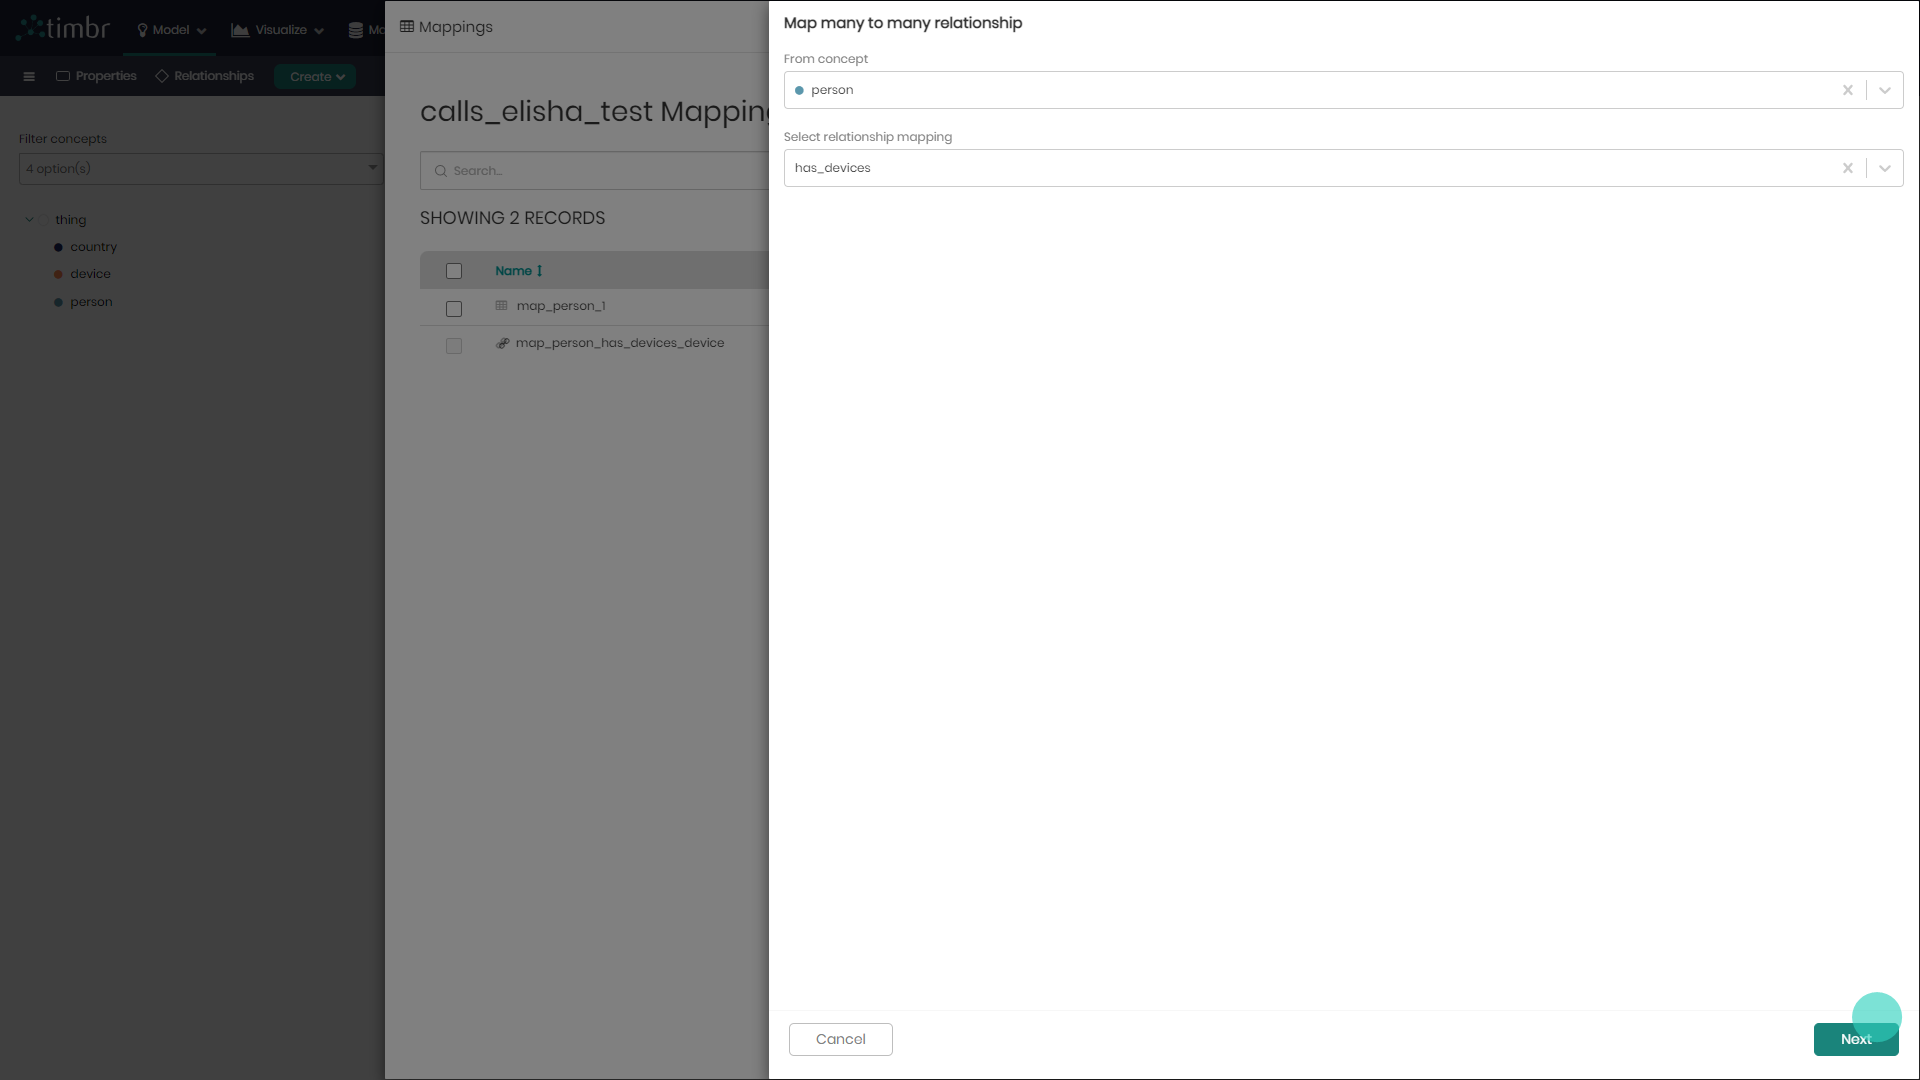
- In the window that appears, select the concept from which the relationship is coming from, in this case, concept Person. Next, select the Many To Many Relationship that was created earlier, and finally, click Next on the bottom right of the window.
- In the window that appears, you can edit the Direct and Inverse realtionship names, as well as the name of the Many To Many Relationship. Below that, you can see the source concept that the relationship was built on, in this case Concept Person.

- In the same window under the Target Schema and Table section, choose the Datasource, Schema and Table that contains the data that you want to map to your Many To Many Relationship, which will connect concepts Person and Device.
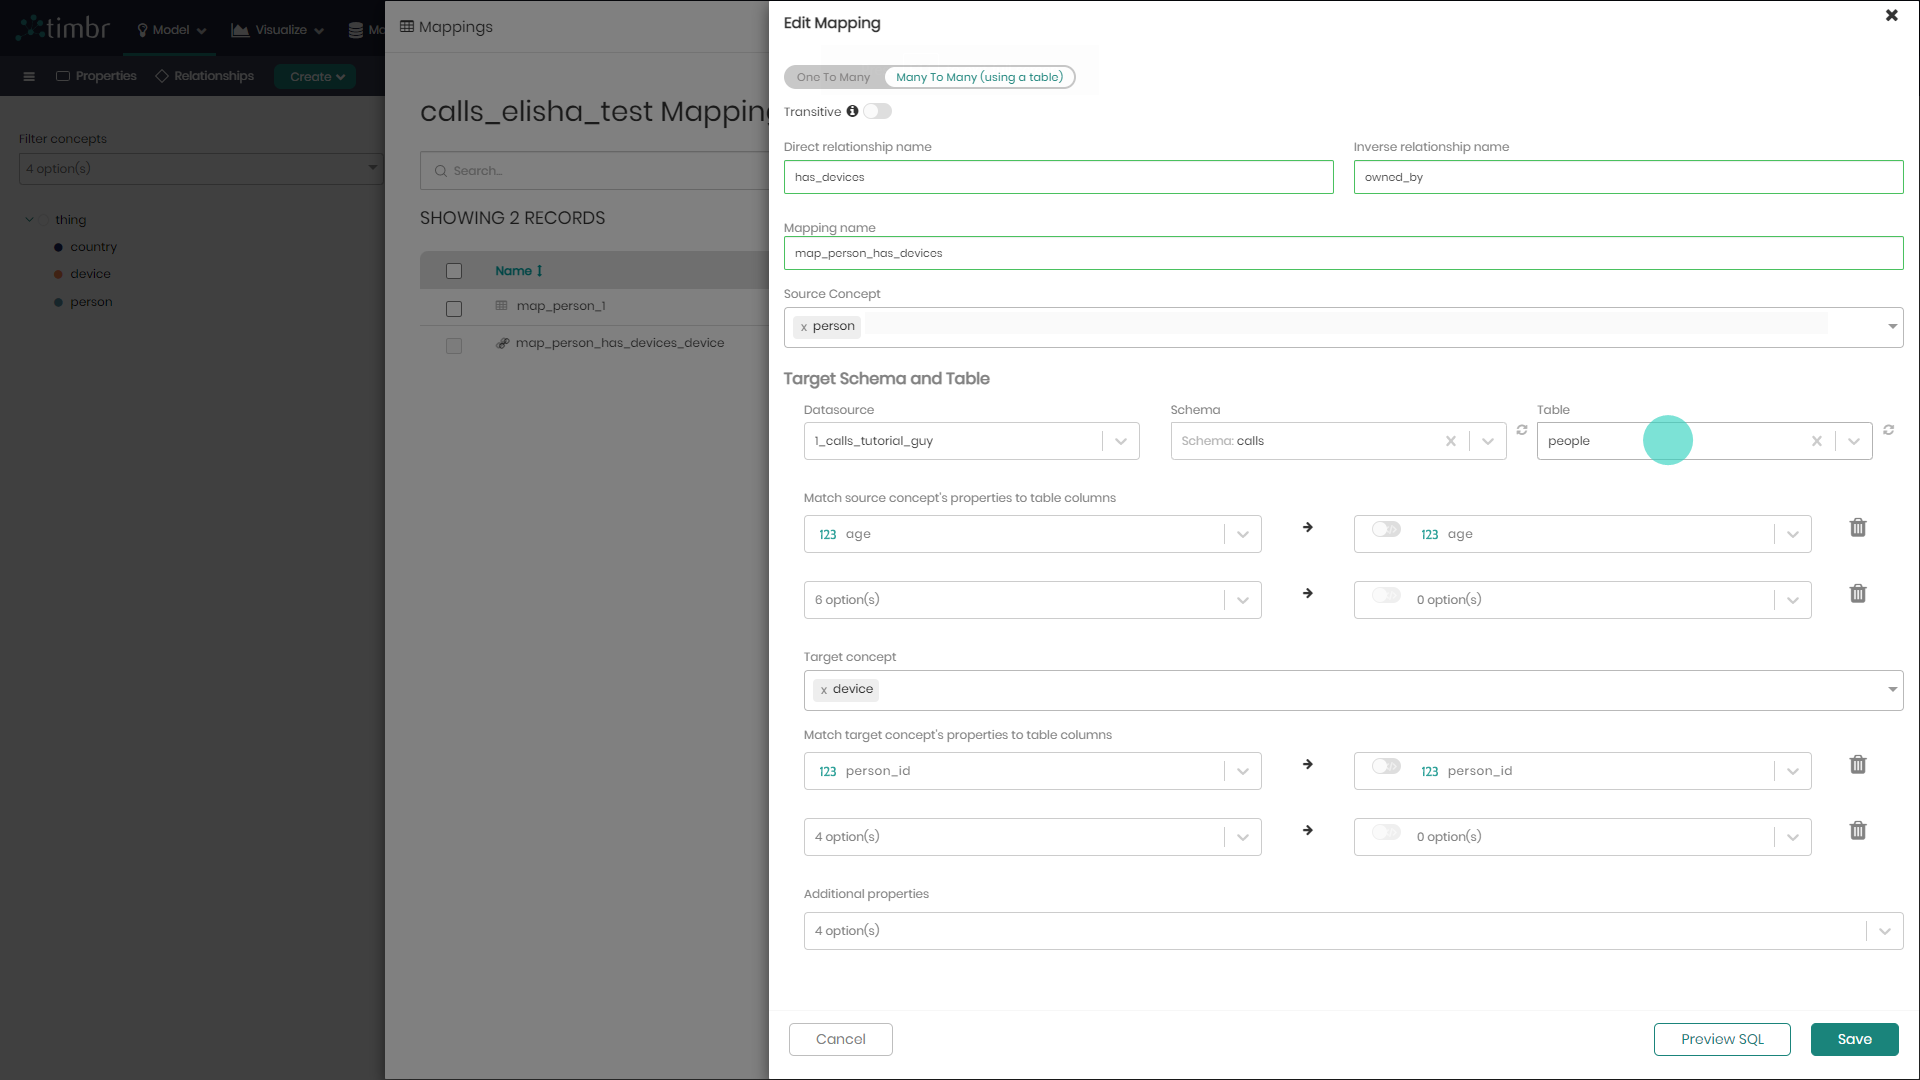
- Next, match your source concepts property to the equivalent column in the table you chose, in this case matching property phone number with the column phone number. Now do the same for your target concept Device below, matching Person Id with the chosen table column Person Id. When done click Save to save the mapping.
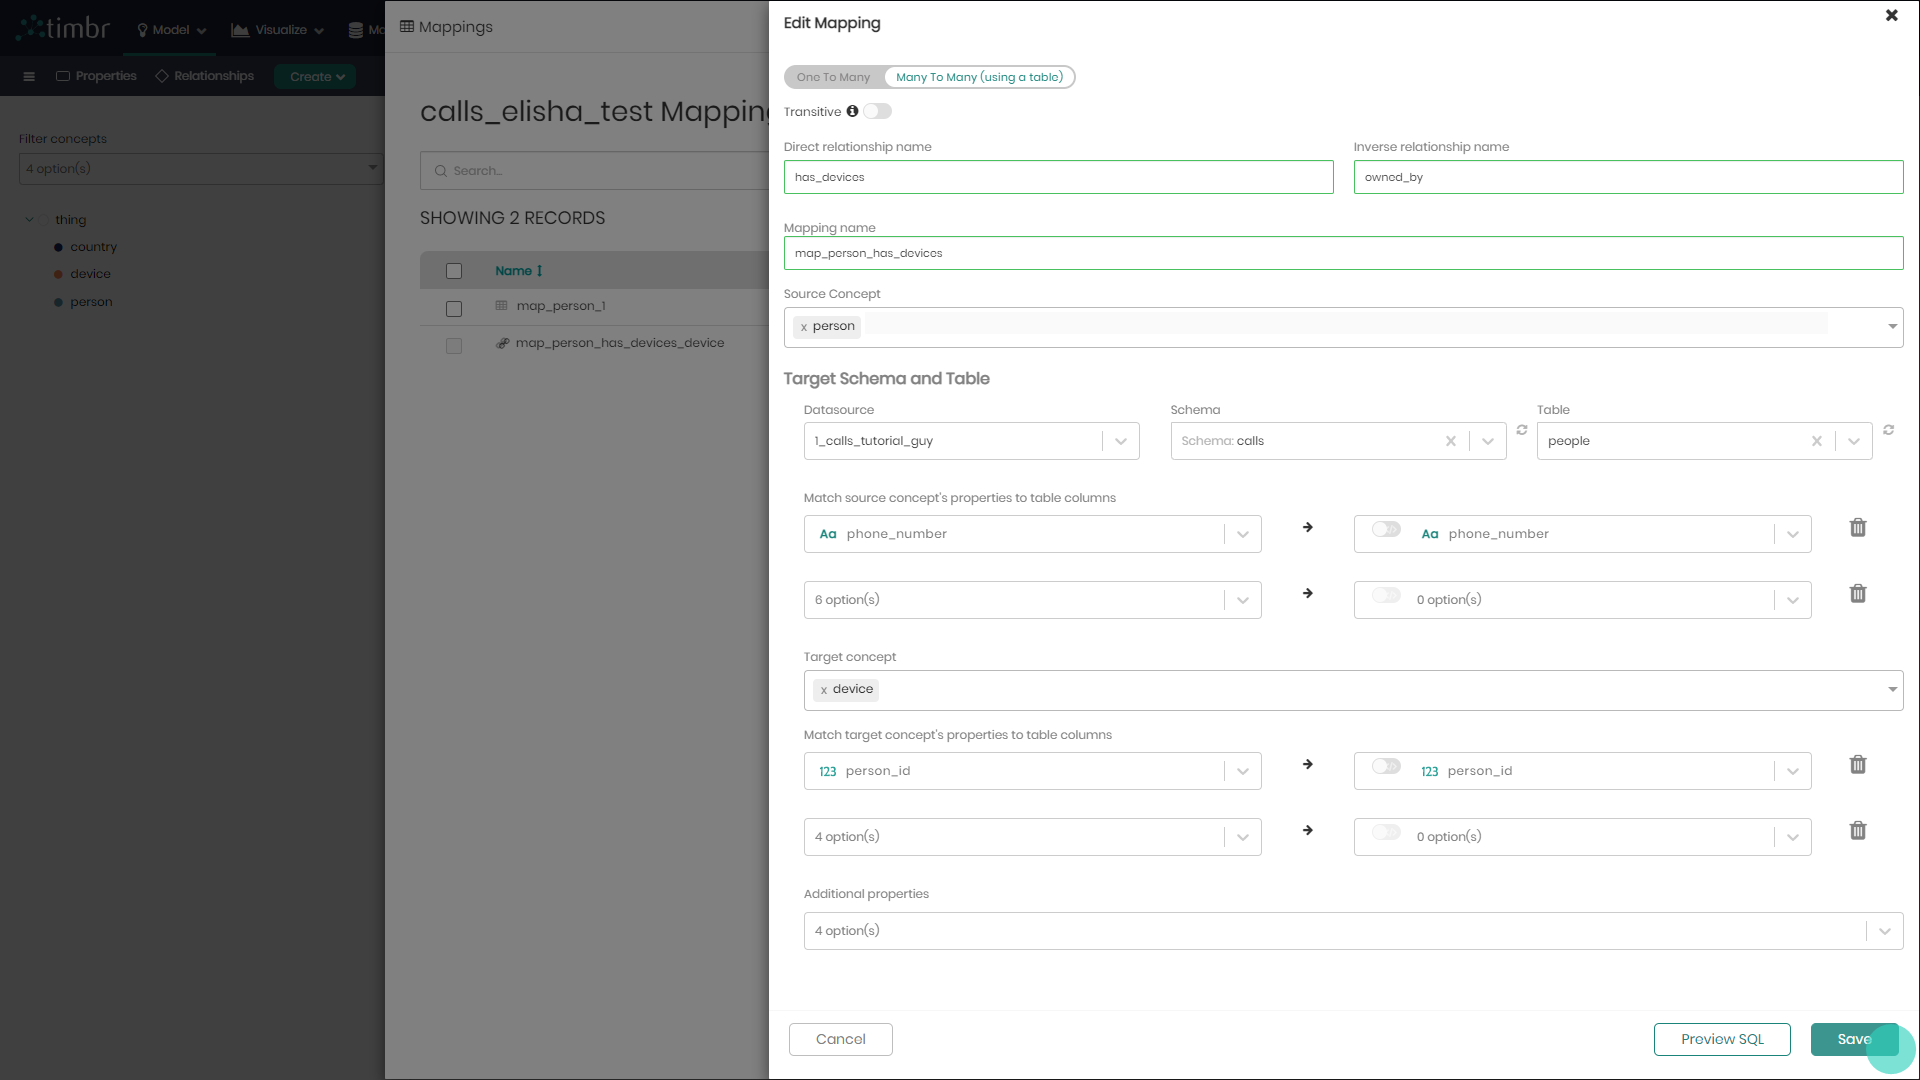
Notice that at this stage before saving the mapping, if you want, you can add additional properties to the relationship on the bottom of the screen.
Creating Multi-Value Property Mapping
A property can be defined as a Multi-Value property. Multi-value properties have more than one data value representing that property, for example – email address. If we had a concept named customer and that concept had a property named email representing email addresses, we could set that property as a multi-value property since conceptually, a customer can have multiple email addresses.
Creating and mapping a multi-value property are two separate actions.
In the example above you will need to have a table with at least 2 columns, one representing the identifier of a customer (like a primary key or foreign key), and one representing the values for the email addresses
In the example below, you’ll find a guided explanation showing how to visually create a multi-value property mapping in Timbr’s Ontology Explorer.
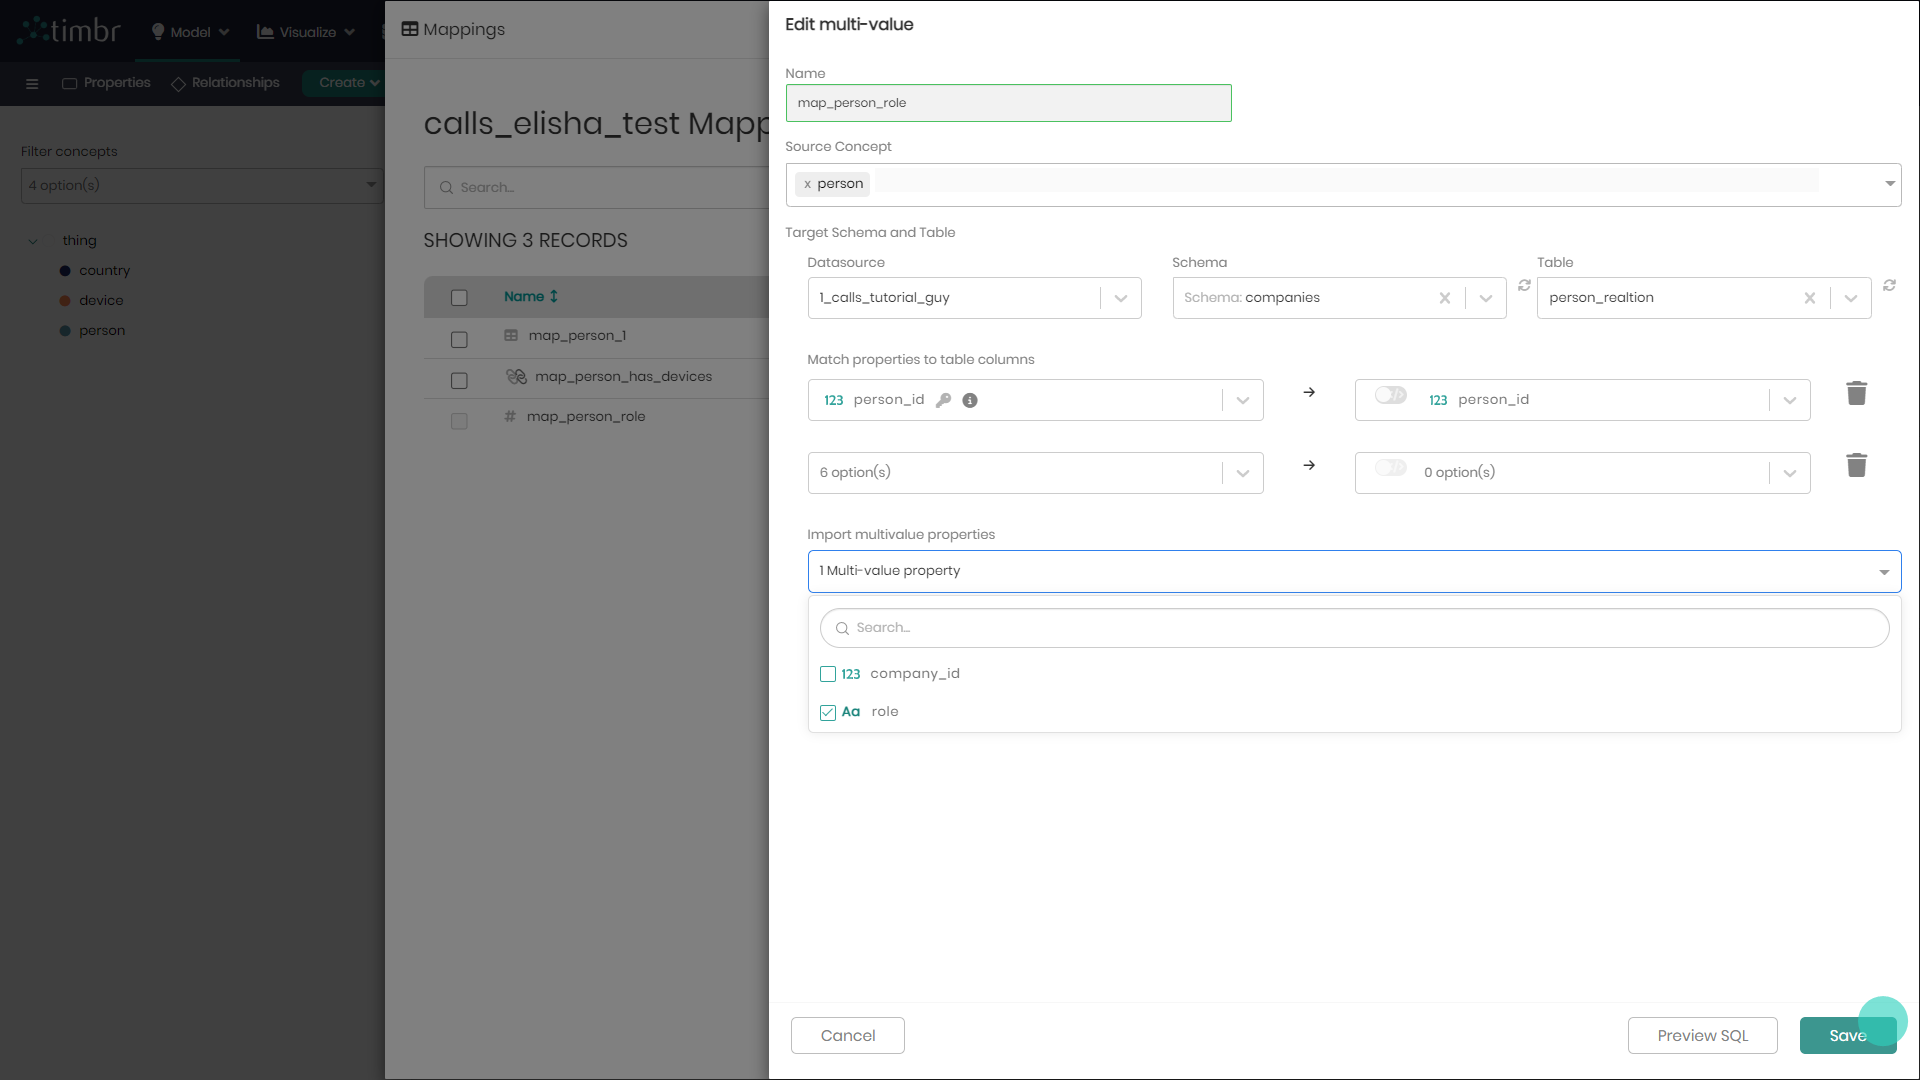
Assuming we have already created a multi-value property for concept Person named role, and we'd like to create a multi-value mapping to that property in the Ontology Explorer.
This Mapping can also be performed in Timbr's Data Mapper component.
- In the Ontology Explorer, right click on the concept Person and select Mappings.
- In the window that appears on the top right click on Map data.
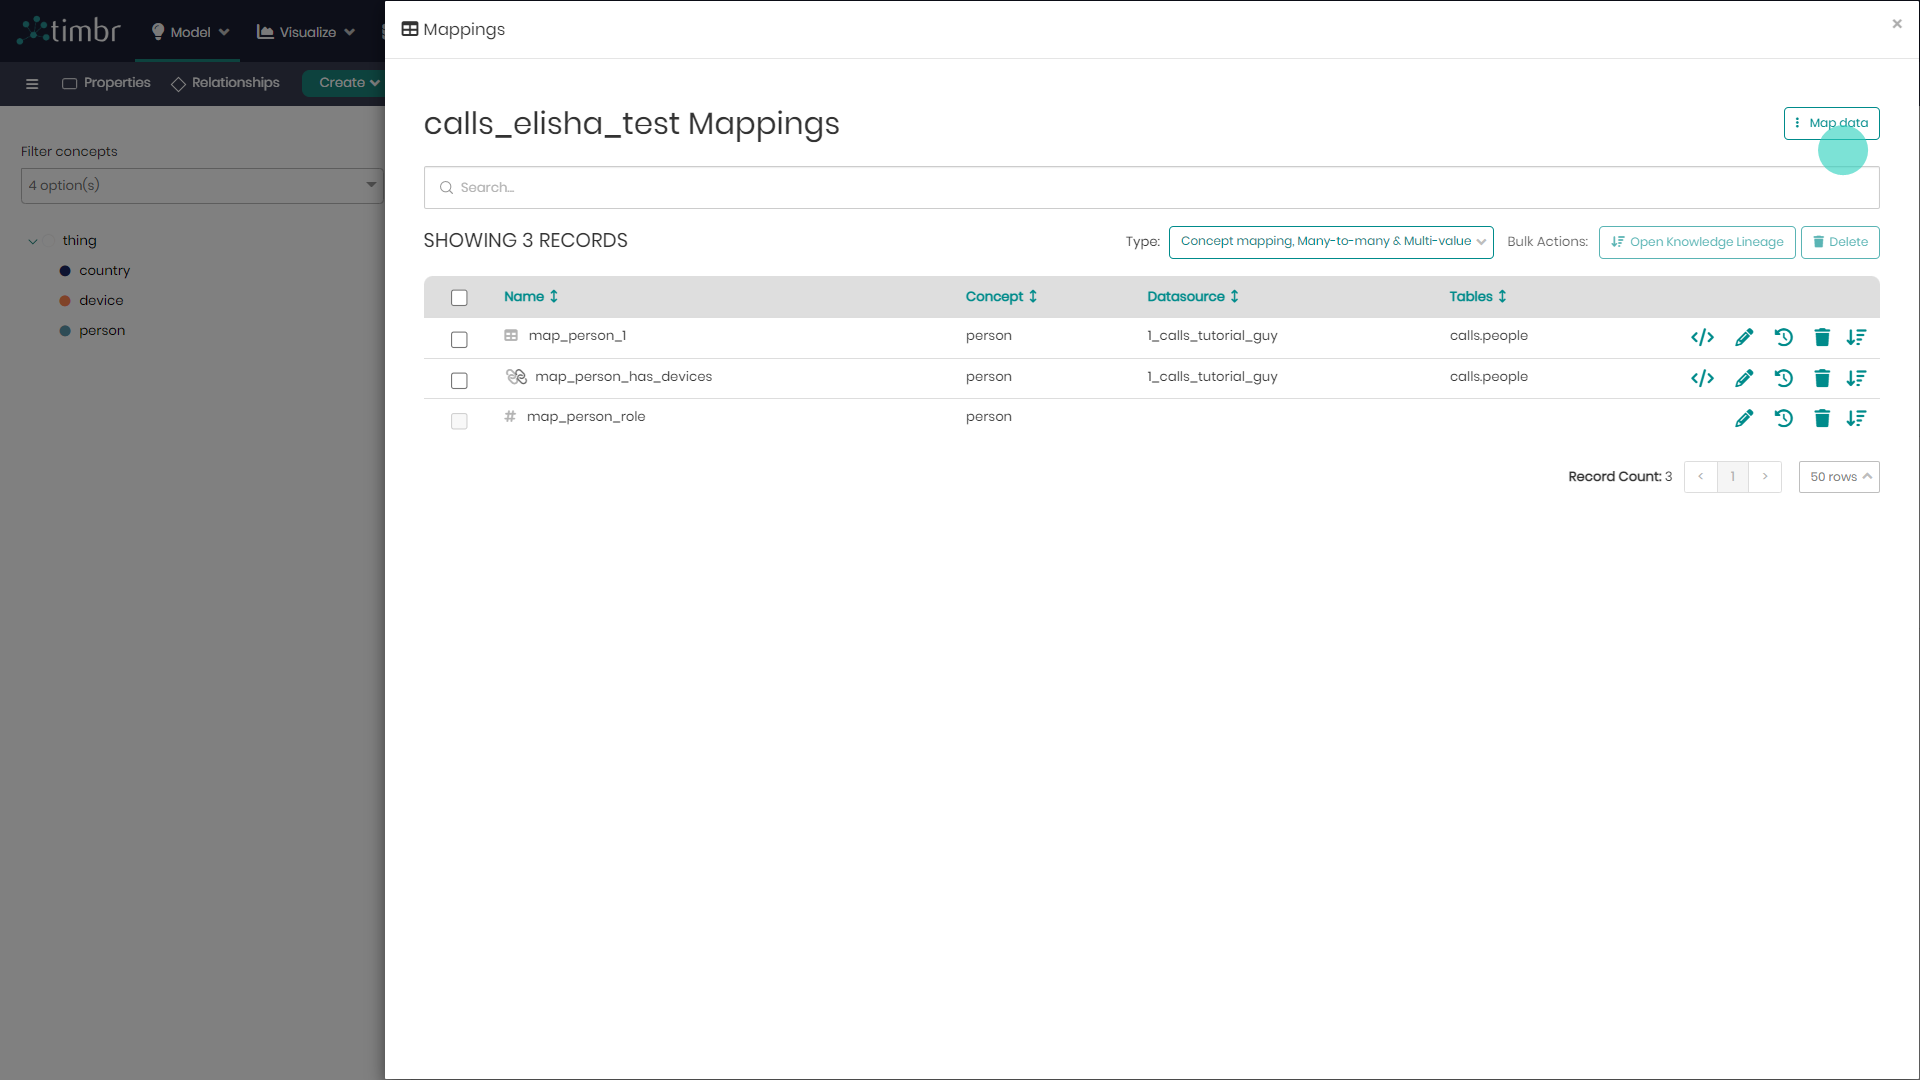
- Timbr will now offer users to create a Concept Mapping, Many To Many and Multi Value mappings. In this example select the Multi Value.

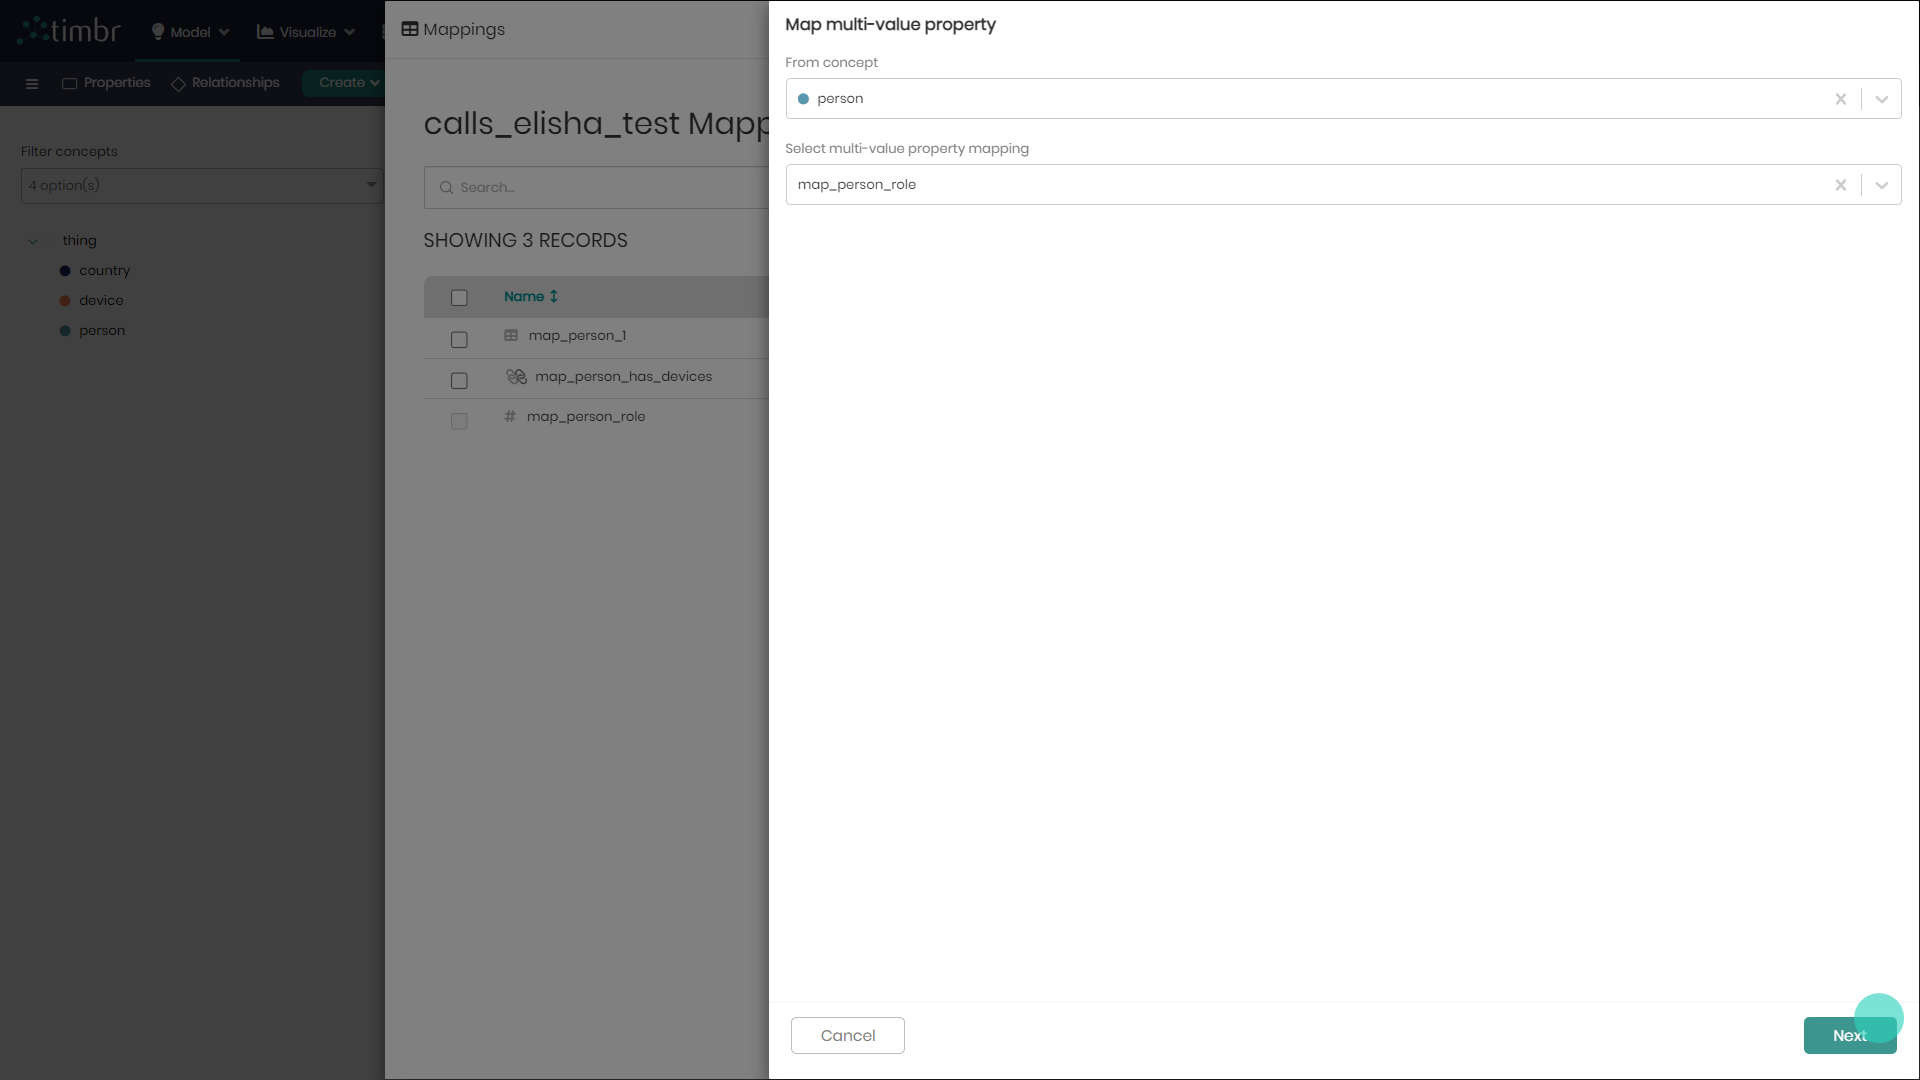
- In the window that appears, select the concept which contains the multi value property, in this case, concept Person. Next, select the multi value property mapping assigned to the property you intend to map to. Finally, click Next on the bottom right of the window.
- In the window that appears, under the Target Schema and Table section, choose the Datasource, Schema and Table that contains the data that you want to map to your multi-value property.
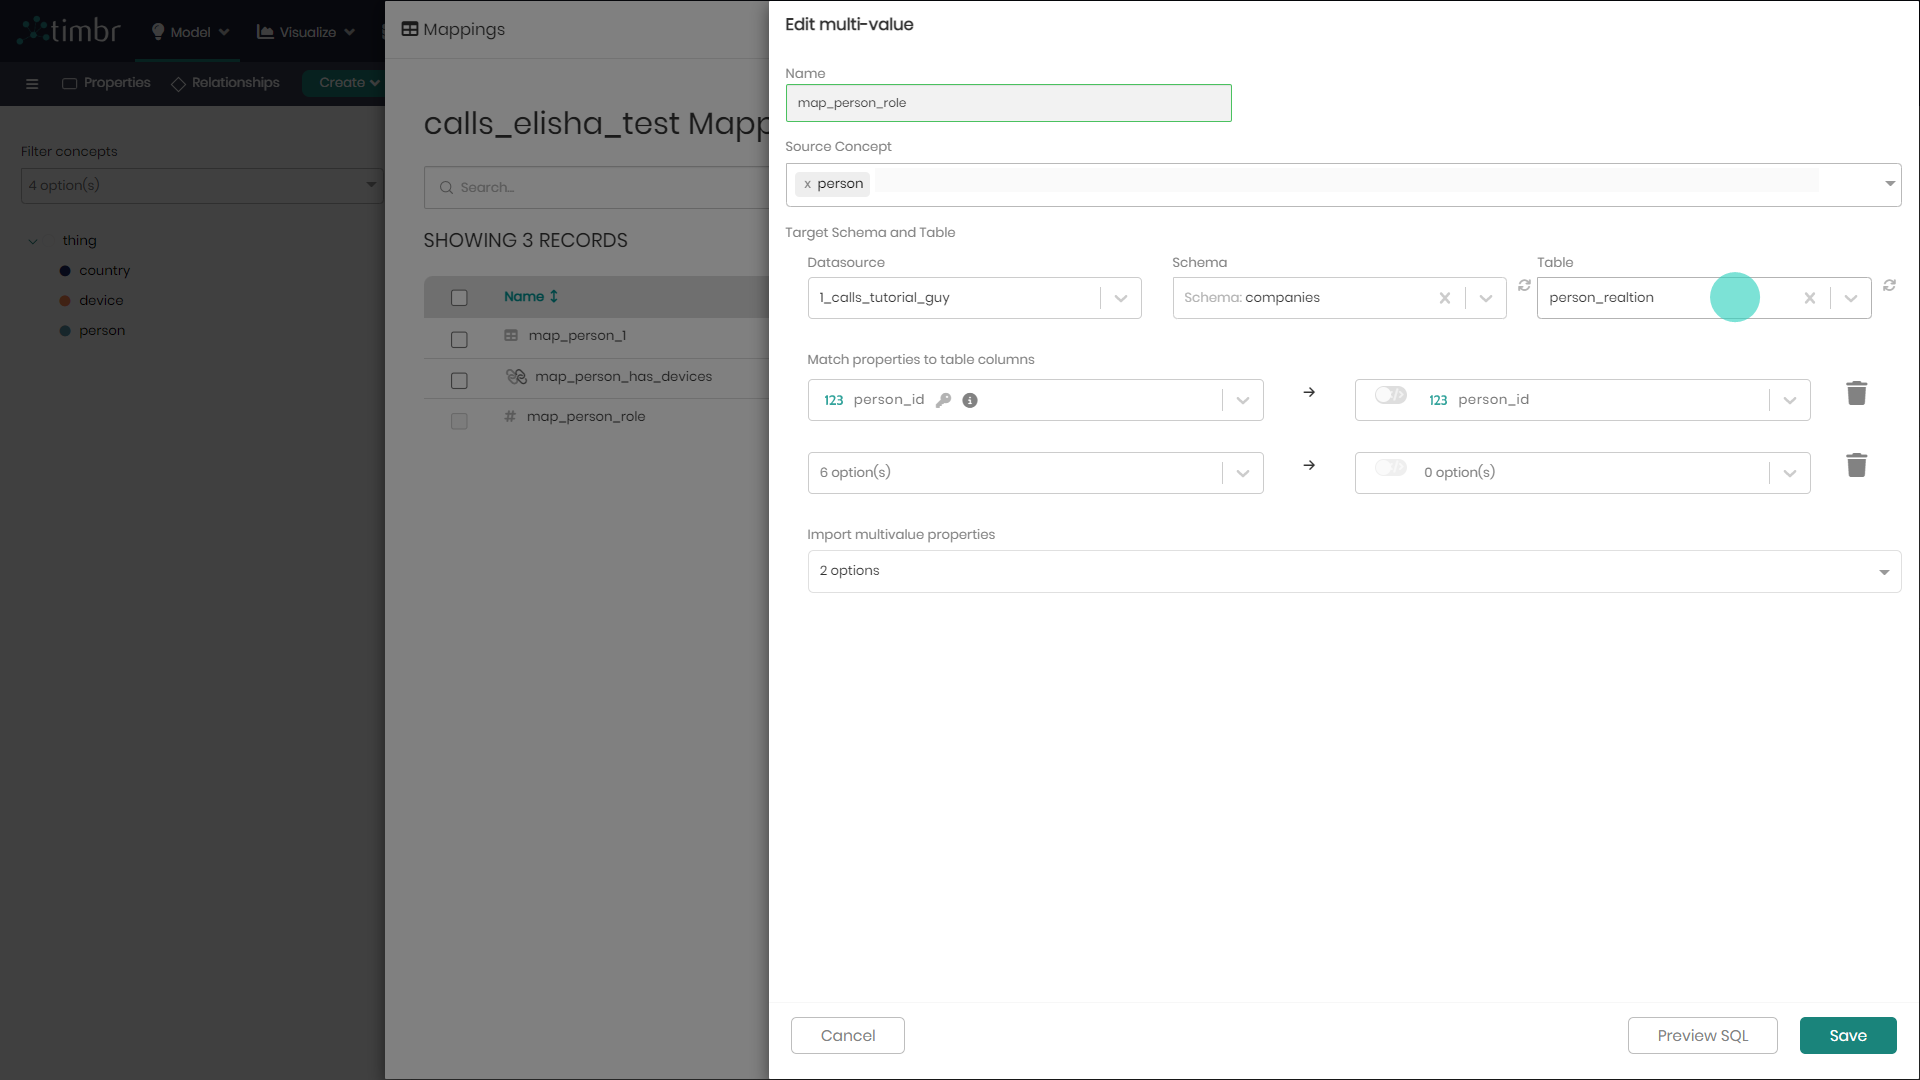
- Next, match your source concepts property to the equivalent column in the table you chose, in this case matching property person_id with the column person_id.
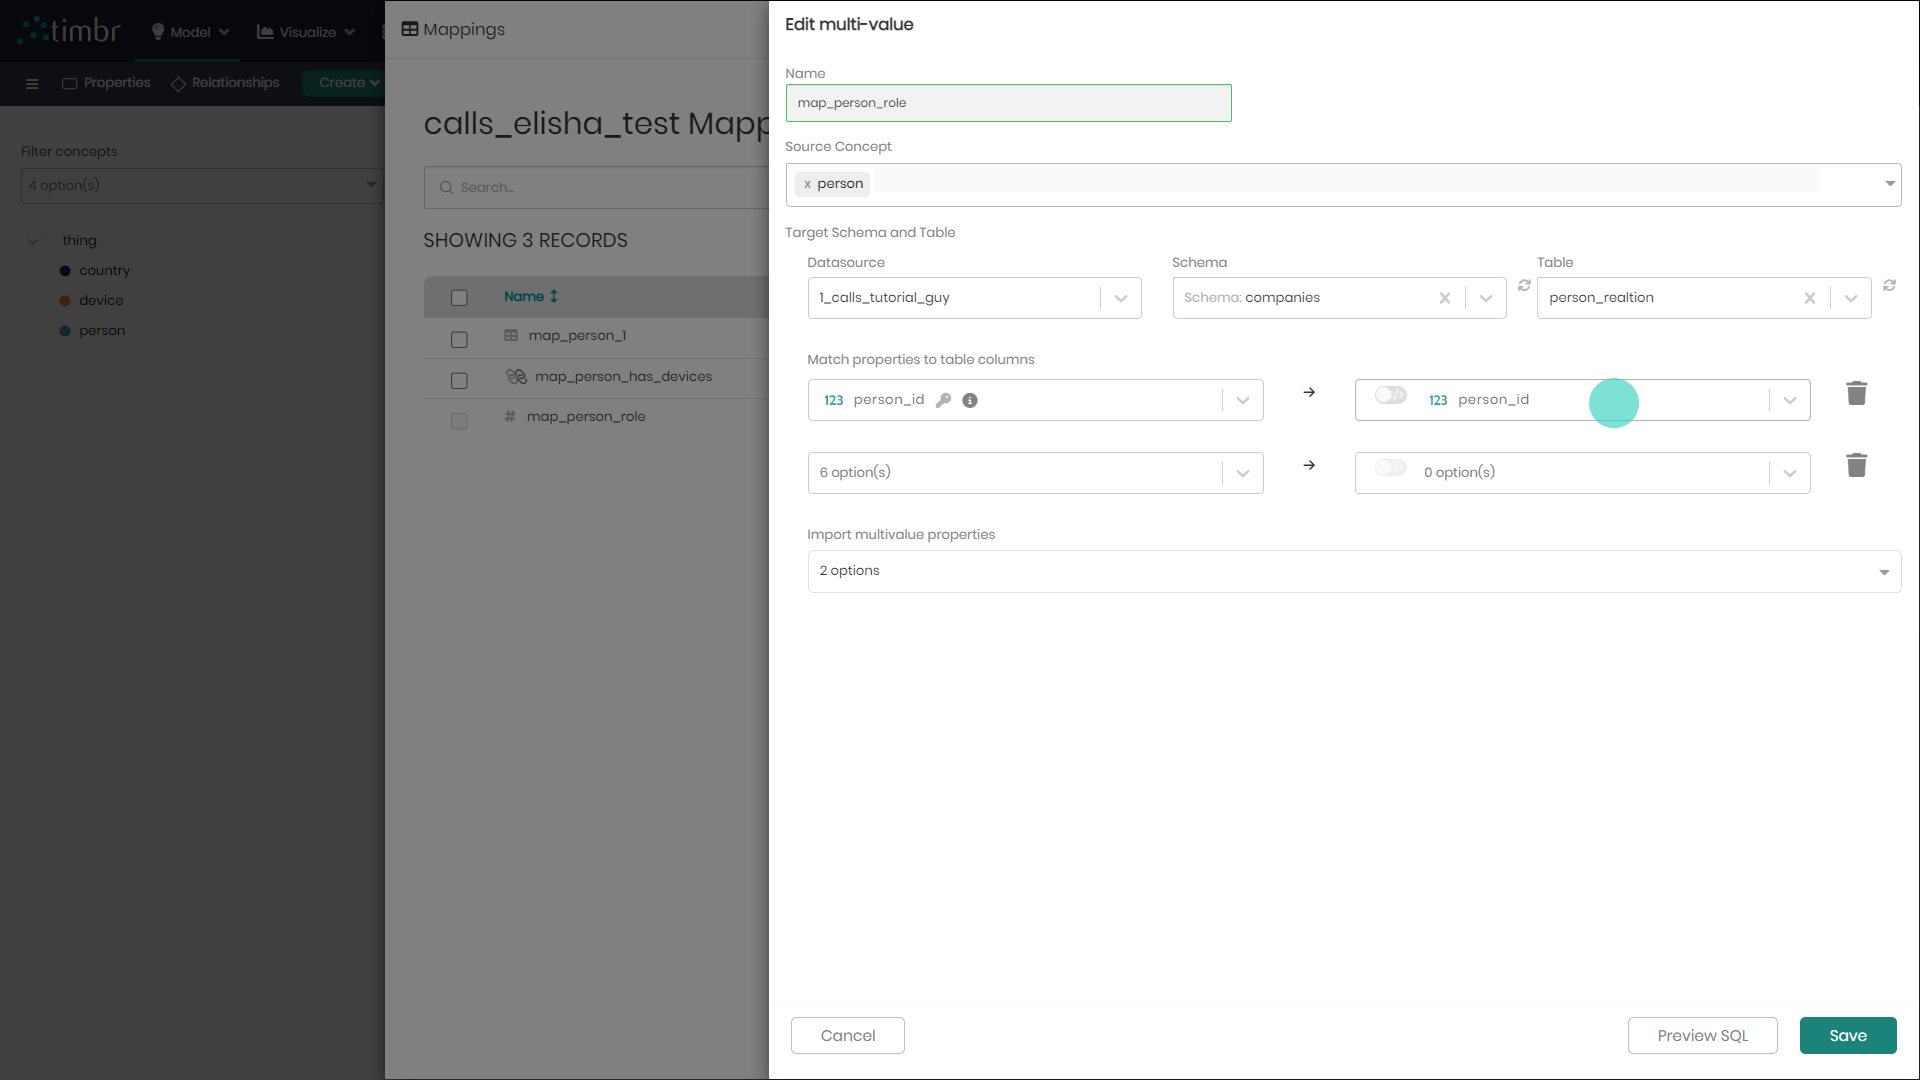
- Finally, import the the multi-value property you are intrested in mapping to. When done click Save to save the mapping.
Creating Mappings using SQL
Mappings are used to define a path between the physical tables to the virtual ontology concepts, properties (in case of a Multi-Value property), or relationships (in case of a Many-to-Many relationship). A table or multiple tables can be mapped to a concept or multiple concepts based on data structure and requirements.
In these examples, you’ll find a guided explanation demonstrating the creation of a mapping to a concept using SQL statements in Timbr’s SQL Editor.
Either in the SQL Editor or by changing the mapping method to SQL in the ontolgy explorer, choose the relavent knowledge graph and enter your SQL create mapping statement.
Timbr CREATE MAPPING Syntax in SQL
CREATE OR REPLACE MAPPING <mapping_name>
INTO (<target_concept>) [USING <datasource_name>] [WITHOUT PARSING]
AS <mapping_query>
<> - Mandatory
[] - Optional
The USING <datasource_name> optional arguement in the SQL statement refer to which datasource will the mapping run in
If the WITHOUT PARSING optional arguement is set, then Timbr will not parse the SQL statement of the mapping and it will push it down to the datasource as-is.
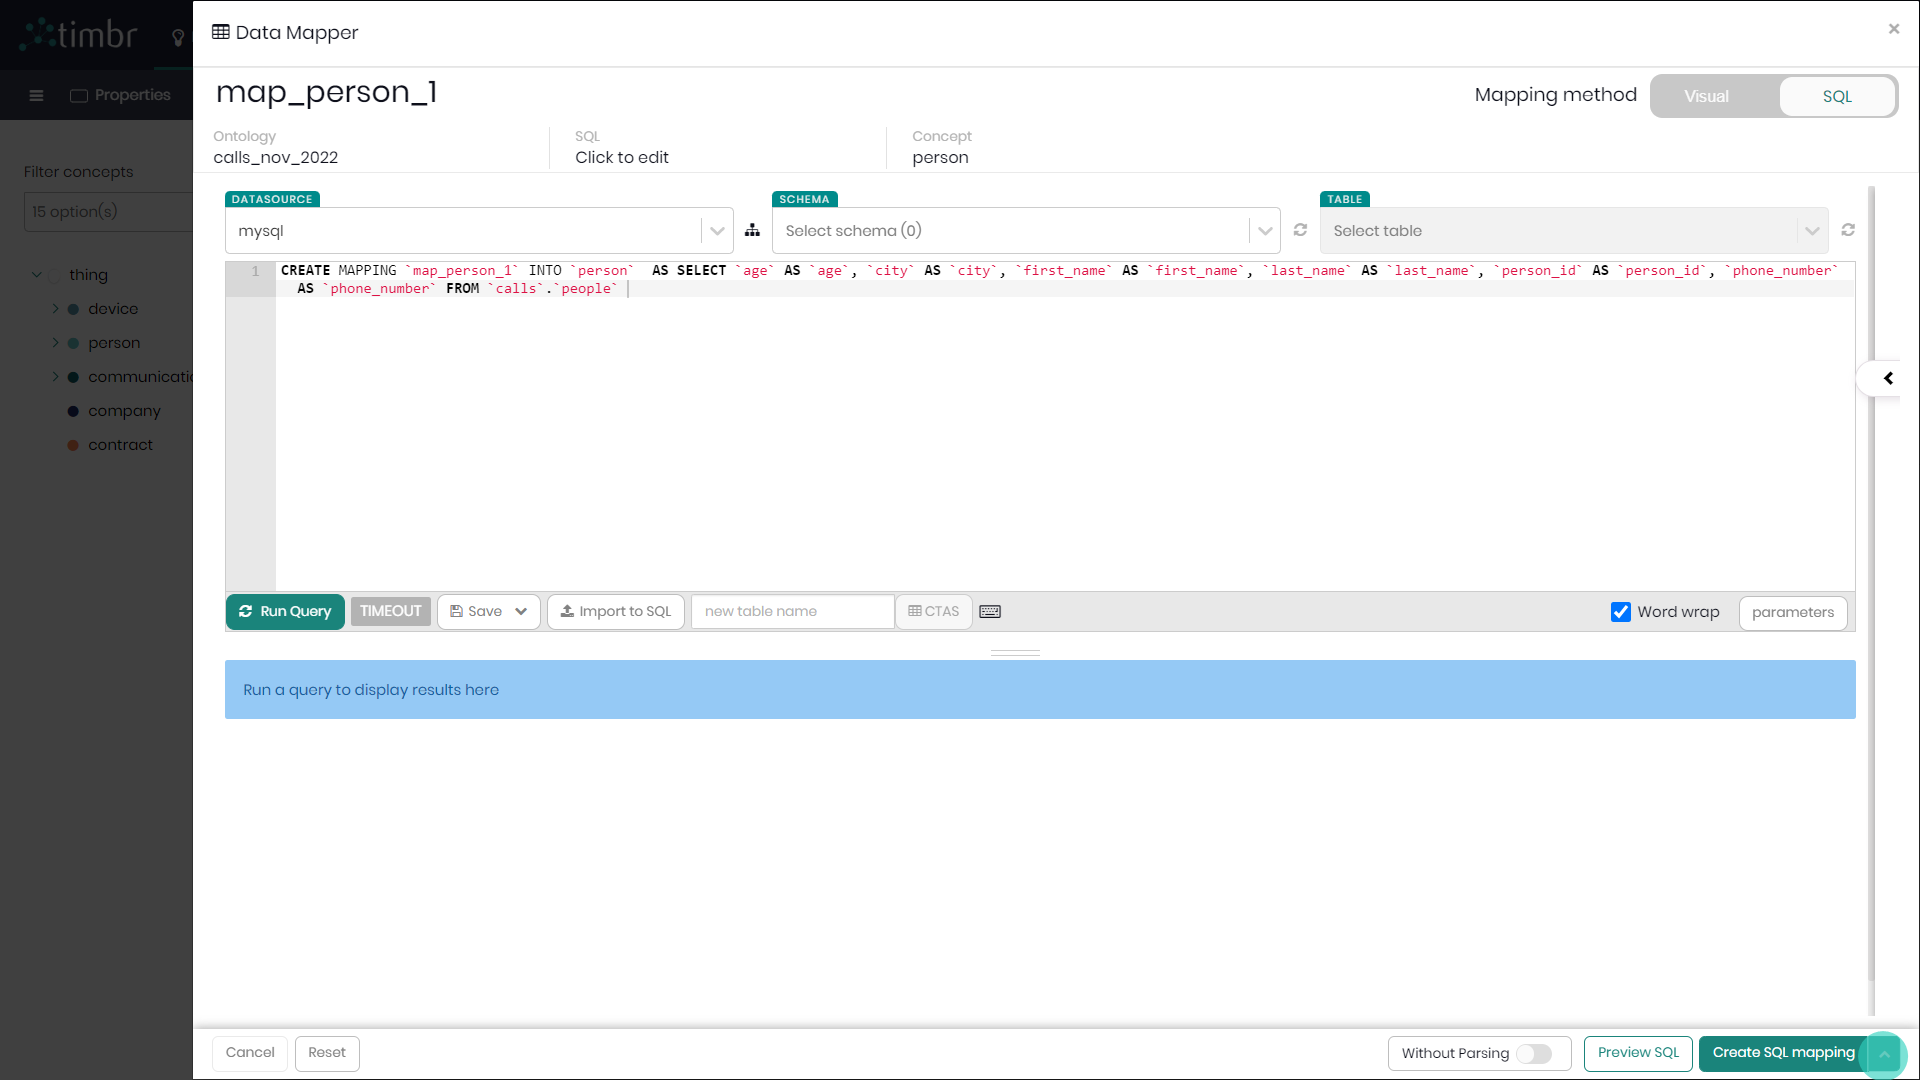
Example Timbr CREATE MAPPING Example in SQL
CREATE MAPPING map_person
INTO (person) USING mysql
AS
    SELECT person_id as id,
        firstname as first_name,
        lastname as last_name,
        age as age,
        birth_country as birth_country
    FROM mydatabase.persons_table
Drop Mapping
Drop mapping is performed when users would like to drop a mapping having it deleted from the knowldge graph.
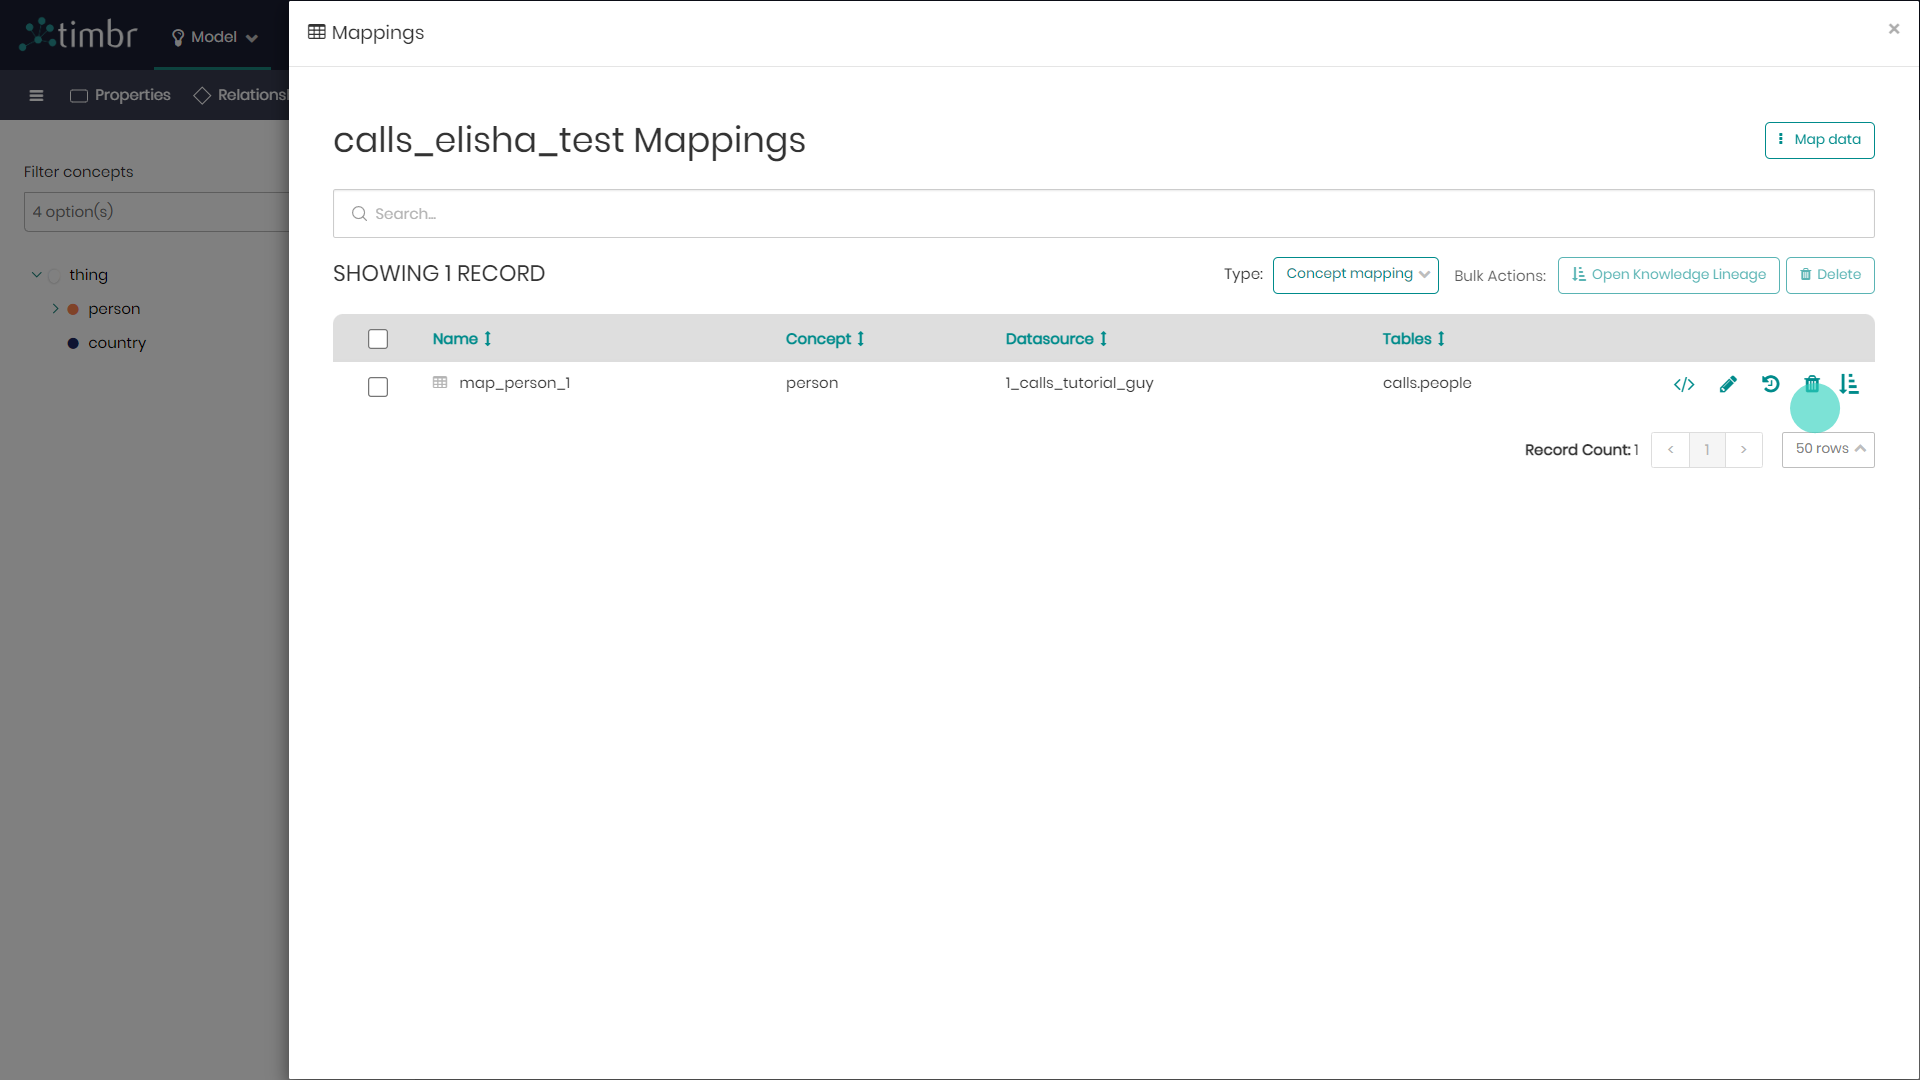
Assuming we'd like to drop the mapping of the concept Person in the ontology Explorer.
- In the Ontology Explorer, right click on the concept Person and select Mappings.
- In the window that appears on the right side next to the mapping you intend to drop click on the Trash can logo to drop the mapping.
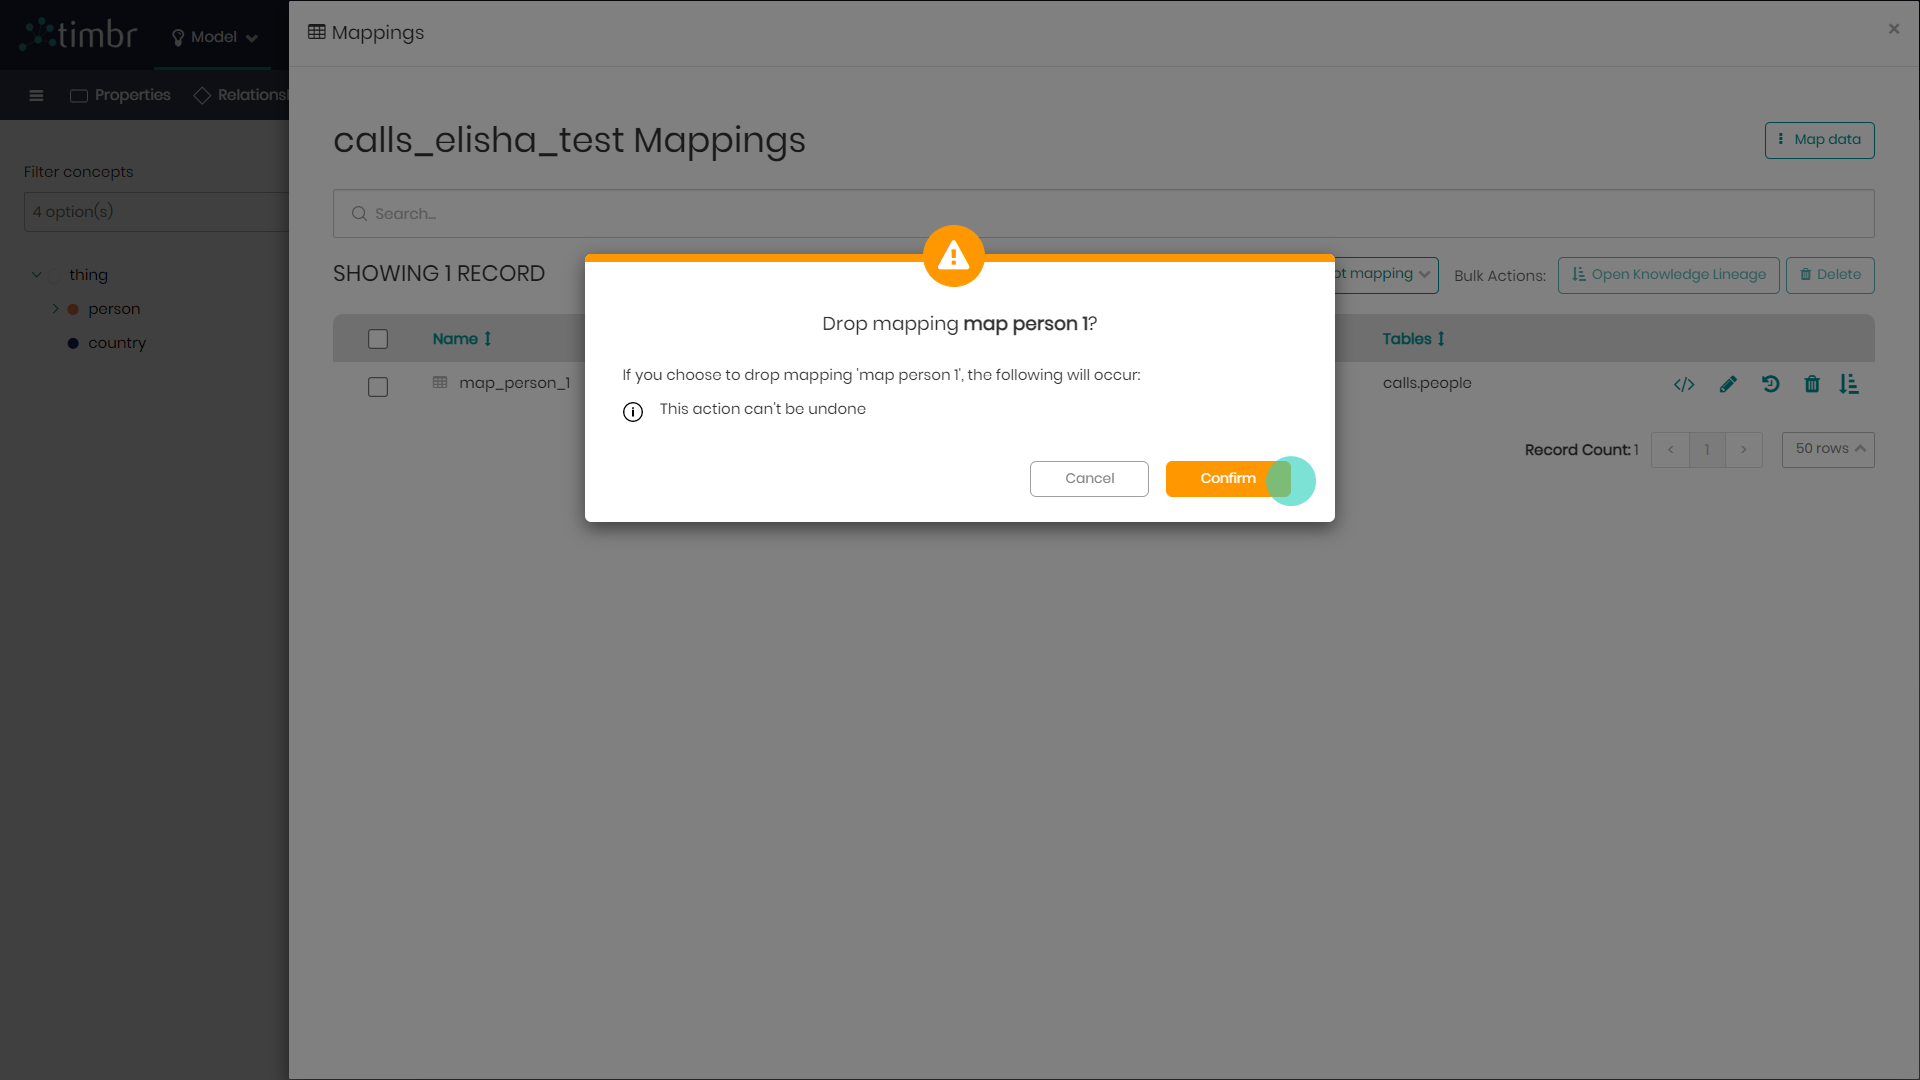
- In the warning message that appears, Click Confirm to confirm the dropping of the mapping. Once clicked the mapping will no longer exist in the knowledge graph.
Timbr DROP MAPPING Syntax in SQL
DROP MAPPING <mapping_name>
Drop Concept
Drop concept is performed when users would like to drop a concept altogether.
Assuming we'd like to drop the concept Person in the ontology Explorer.
Notice that a concept can't be droped if it has children concepts inheriting from it.
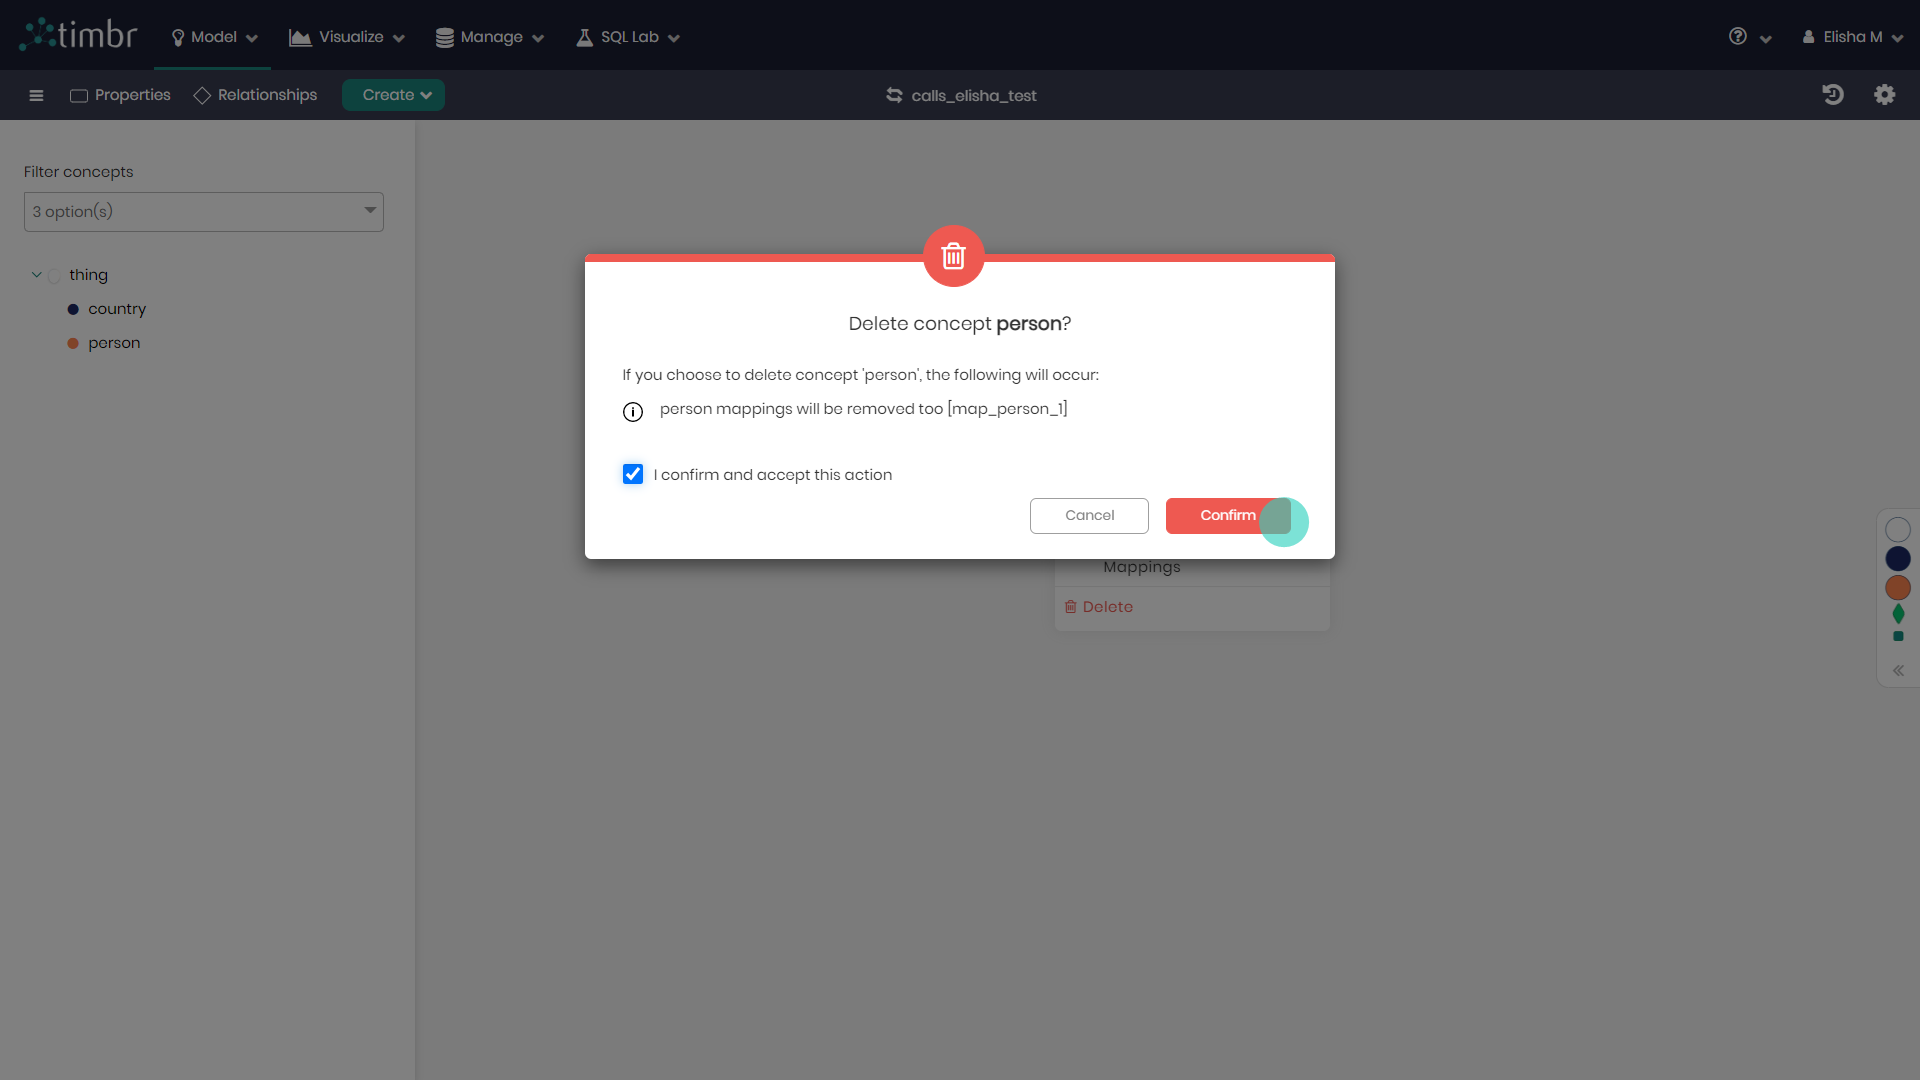
- In the Ontology Explorer, right click on the concept Person and select Delete.
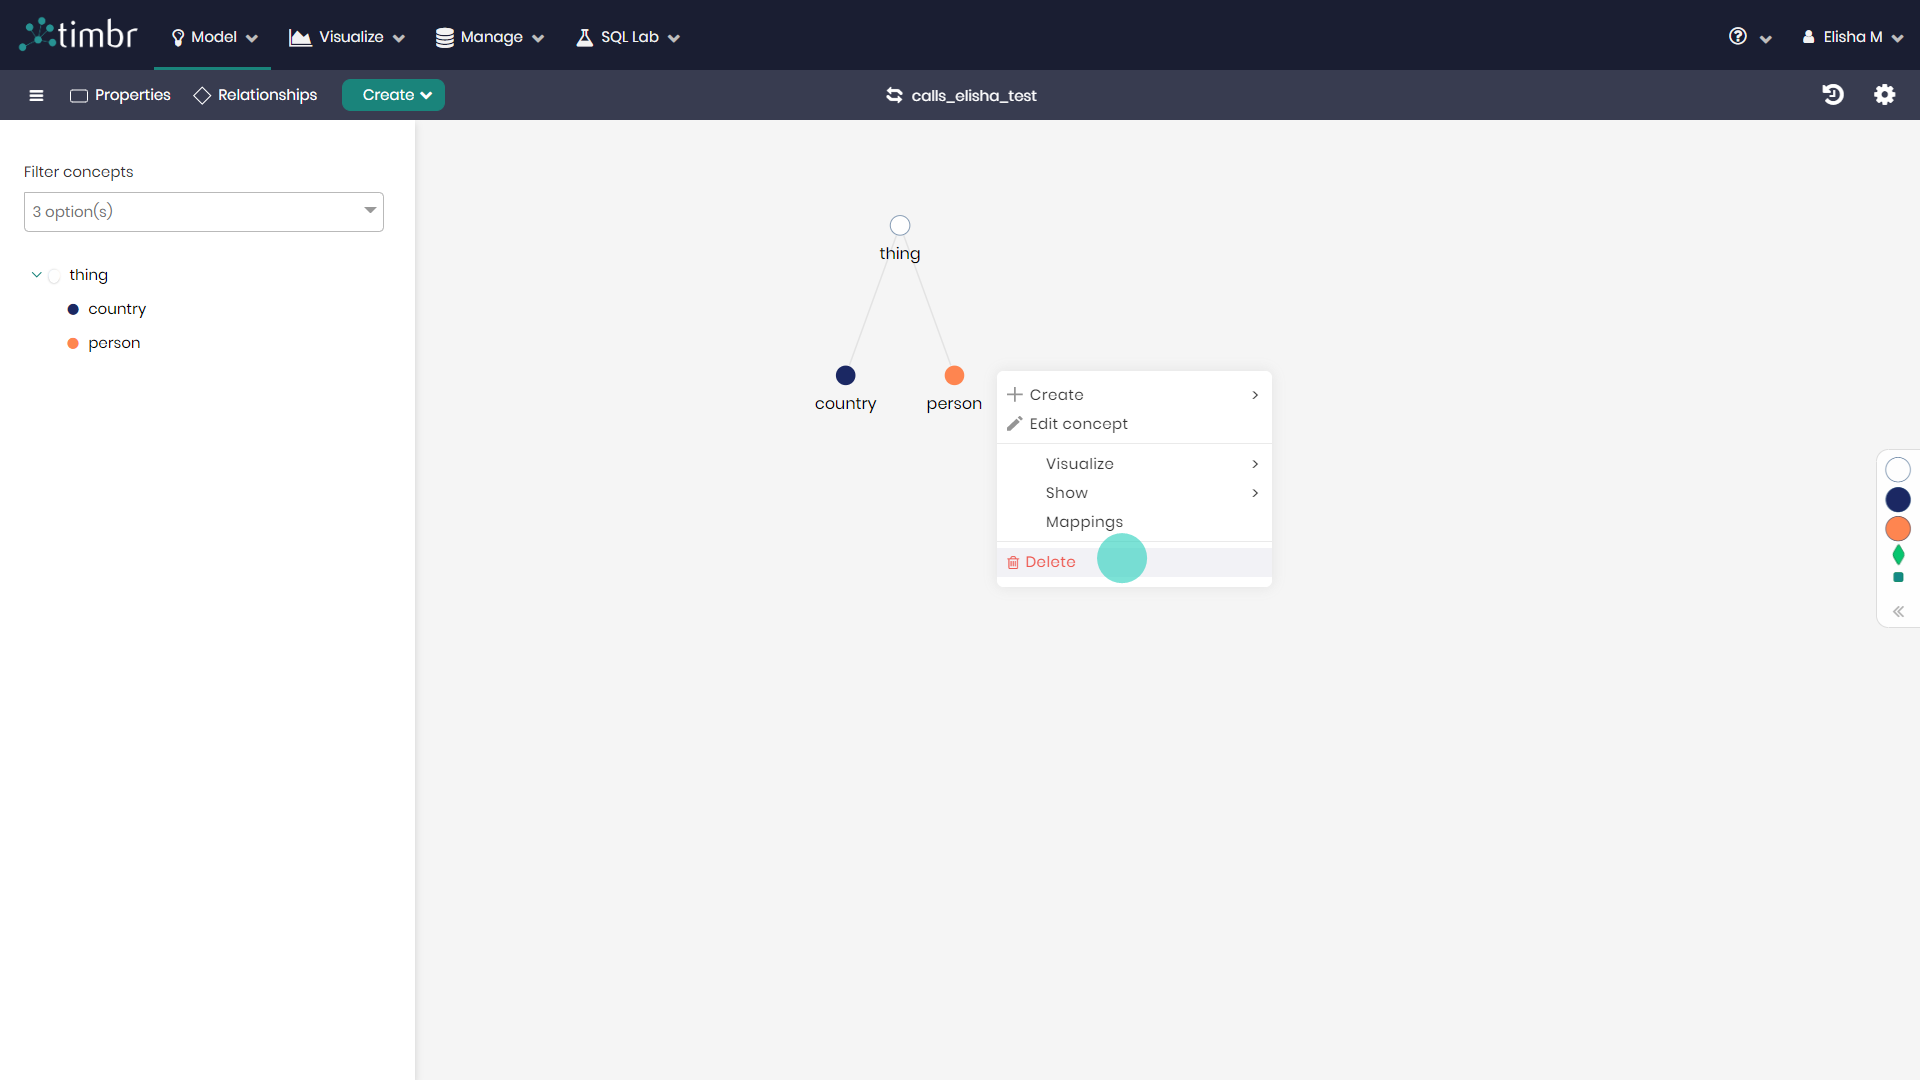
- In the warning message that appears, Click to Confirm the dropping of the concept. Once clicked the concept will no longer exist in the knowledge graph.
Timbr DROP CONCEPT Syntax
DROP CONCEPT <concept_name>
Automatic Modeling from Database
Concepts can be created individually and tables can be mapped to those concepts no-code in the Ontology Explorer, as shown above in creating concepts and mappings visually.
Below, you’ll find a guided explanation demonstrating how to perform no-code automatic modeling from a Database in a bulk fashion. This will enable you to create an entire data model including data mappings in just a few simple steps using the Ontology Explorer.
This method can be used both on a brand-new model as well as on an existing model that you'd like to add to.
Creating Telecommunications Model in bulk from datasource
Assuming We'd like to generate a brand new telecommunications data model from the root concept of the Ontology named thing.
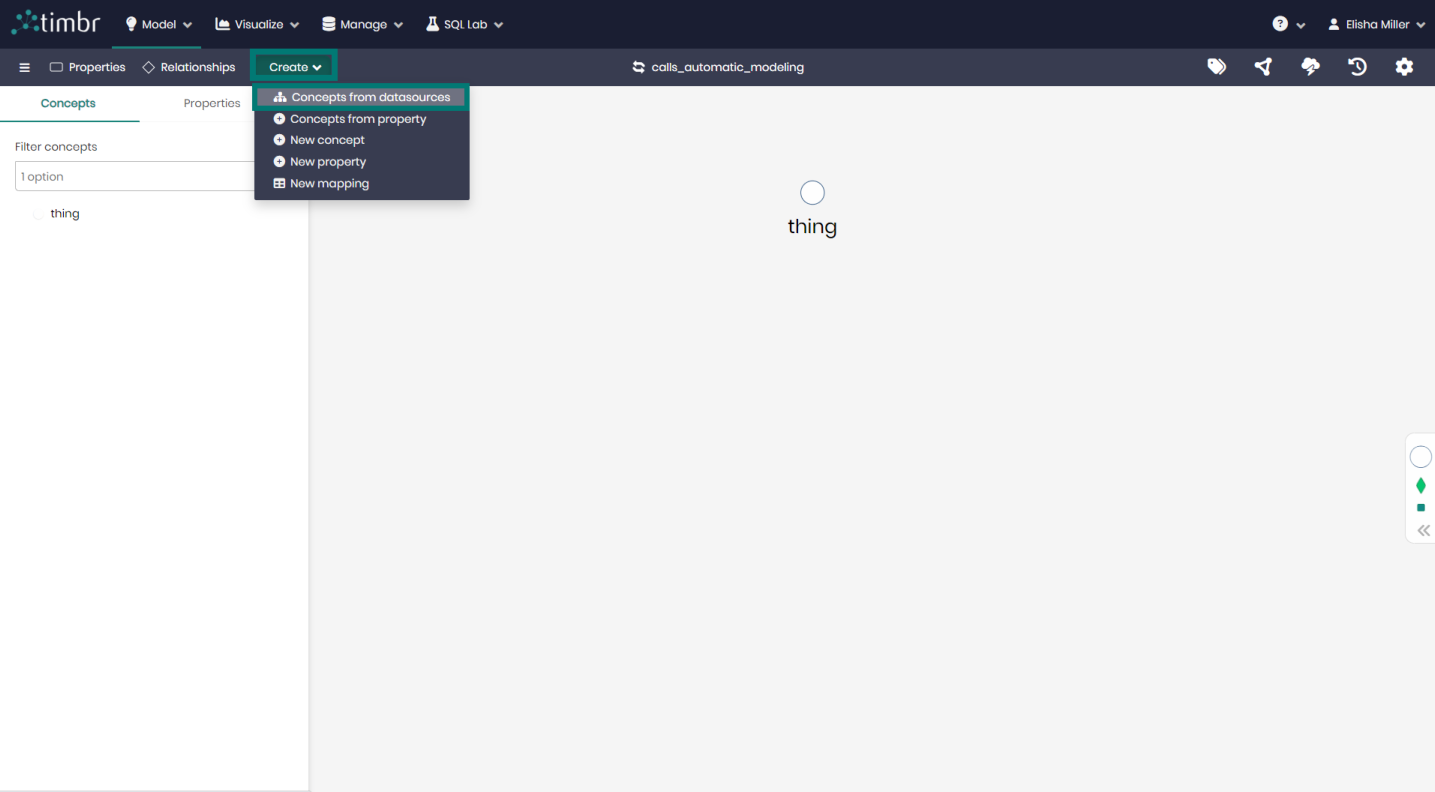
- In the Ontology Explorer, click on Create and choose Concepts from datasources.
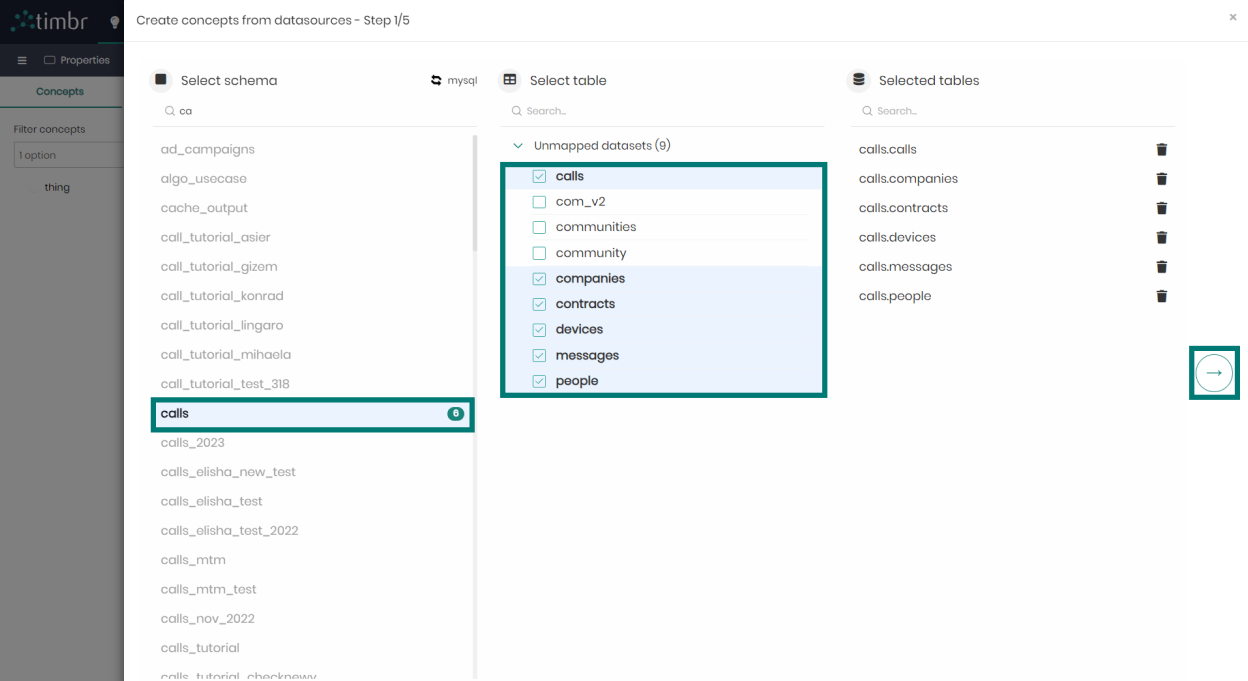
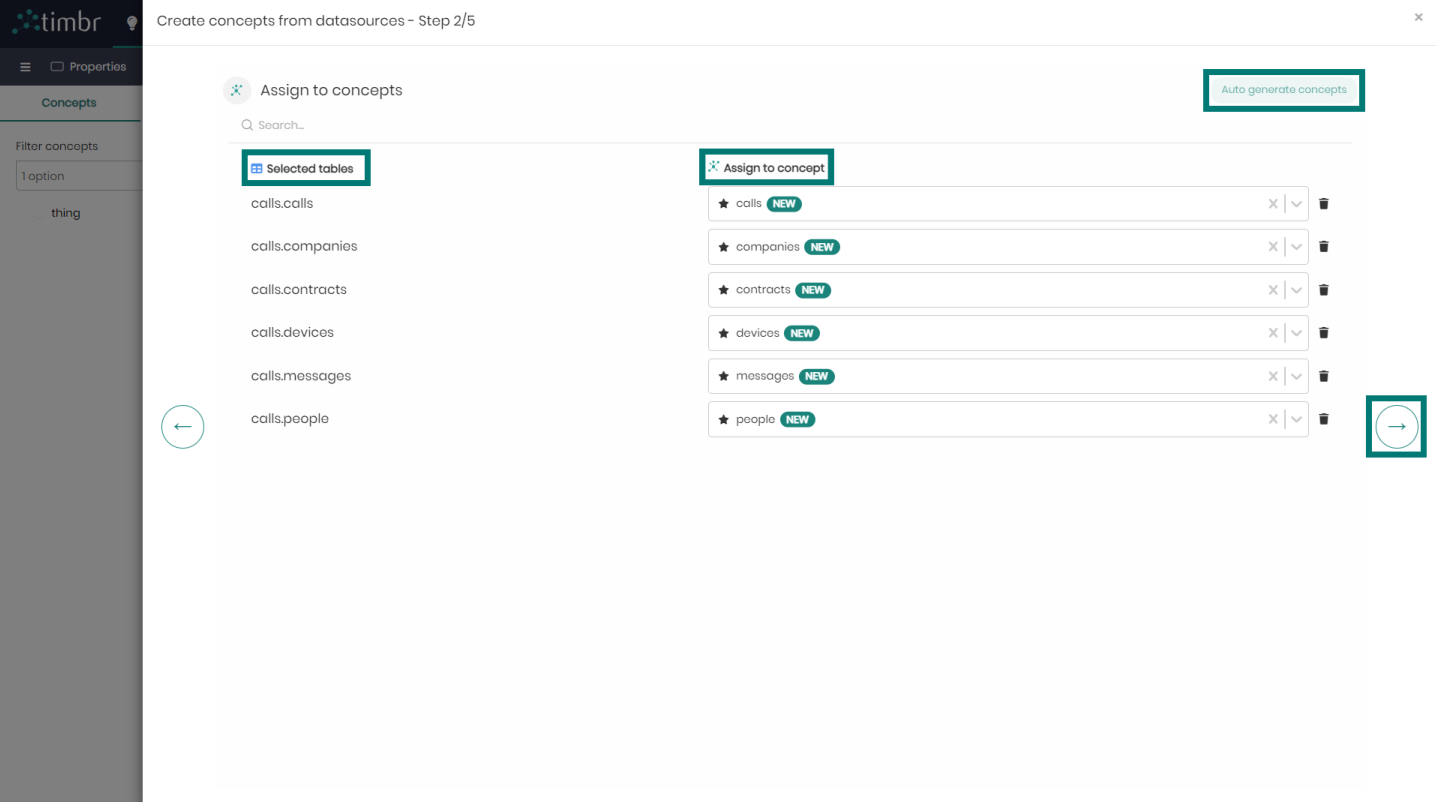
- In the concept creation wizard that appears, select the schemas and tables from the datasource you'd like to use to create the concepts and mappings. When selected click on the arrow to the right to continue to the next step.
- Match between your chosen tables to the corresponding concepts of your data model. You may click on Auto generate concepts to have Timbr assign the concept names for you, or you may add them manually yourself. In cases where you are adding to an existing model, you may choose existing concepts from the concept dropdowns.
When concepts are assigned click on the arrow to the right to continue on to step 3.
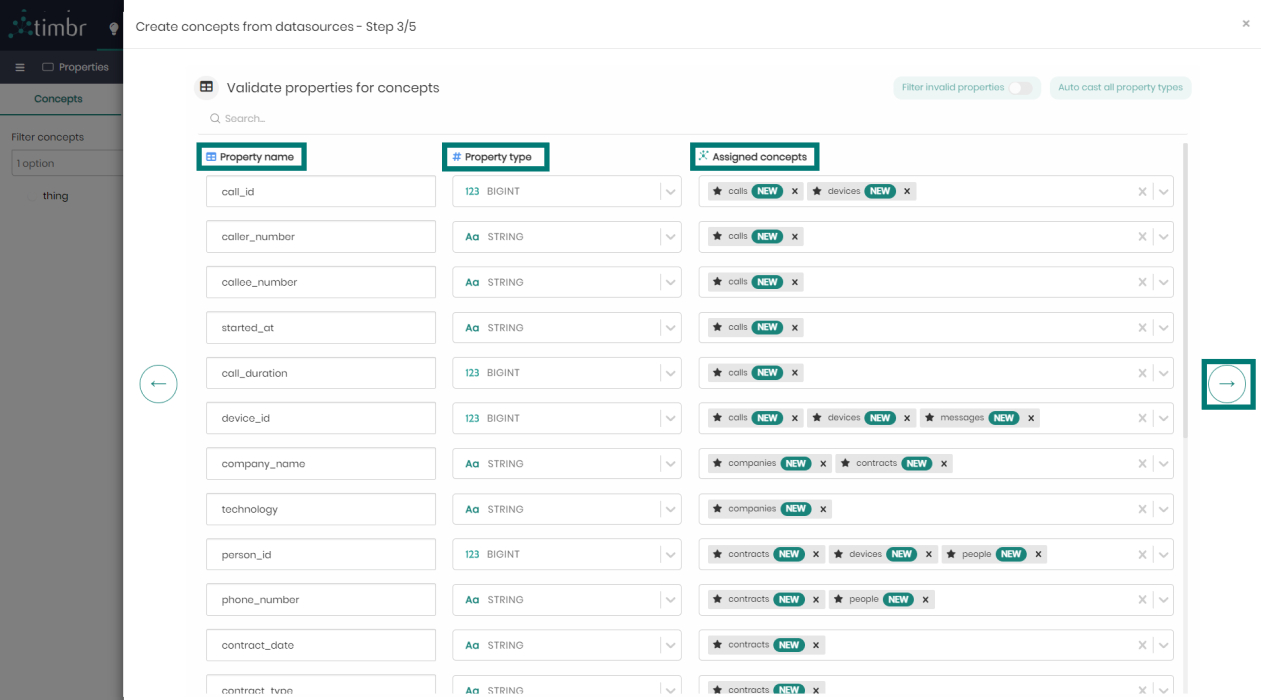
- In this step, you may edit and validate the properties of your concepts. This includes the property name, property type, and concepts that contain the property. Each property represents a column from a table that you chose earlier.
When ready click on the arrow to the right to continue to the next step.
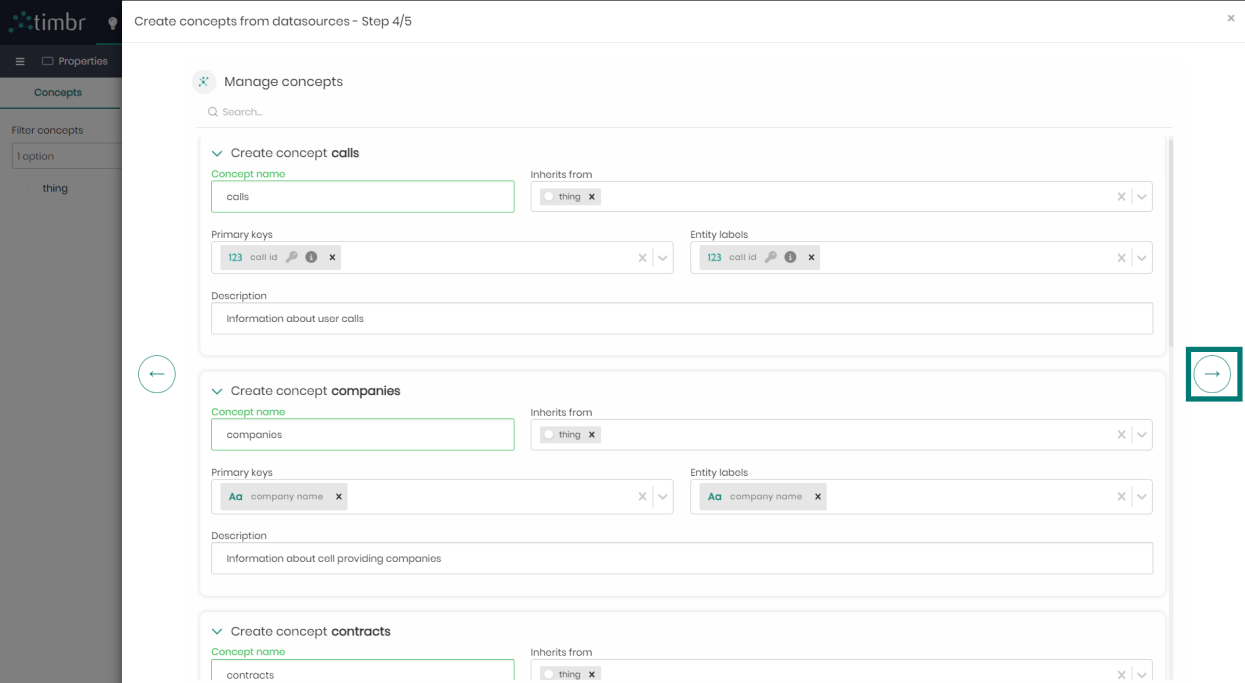
- In this step, you may edit the concepts’ additional settings like the inheritance, primary key, entity label, add a description if relevant, and change the concept name in case you missed it in the previous steps.
When validated click on the arrow to the right to continue to the last step.
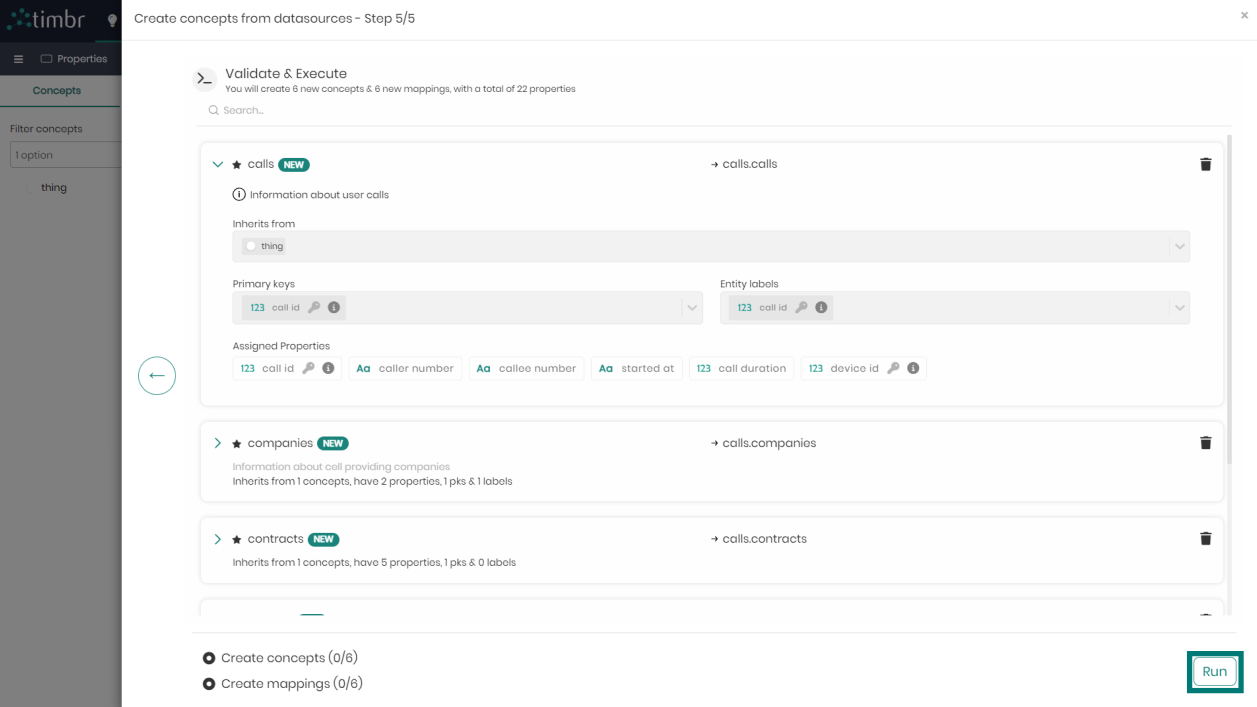
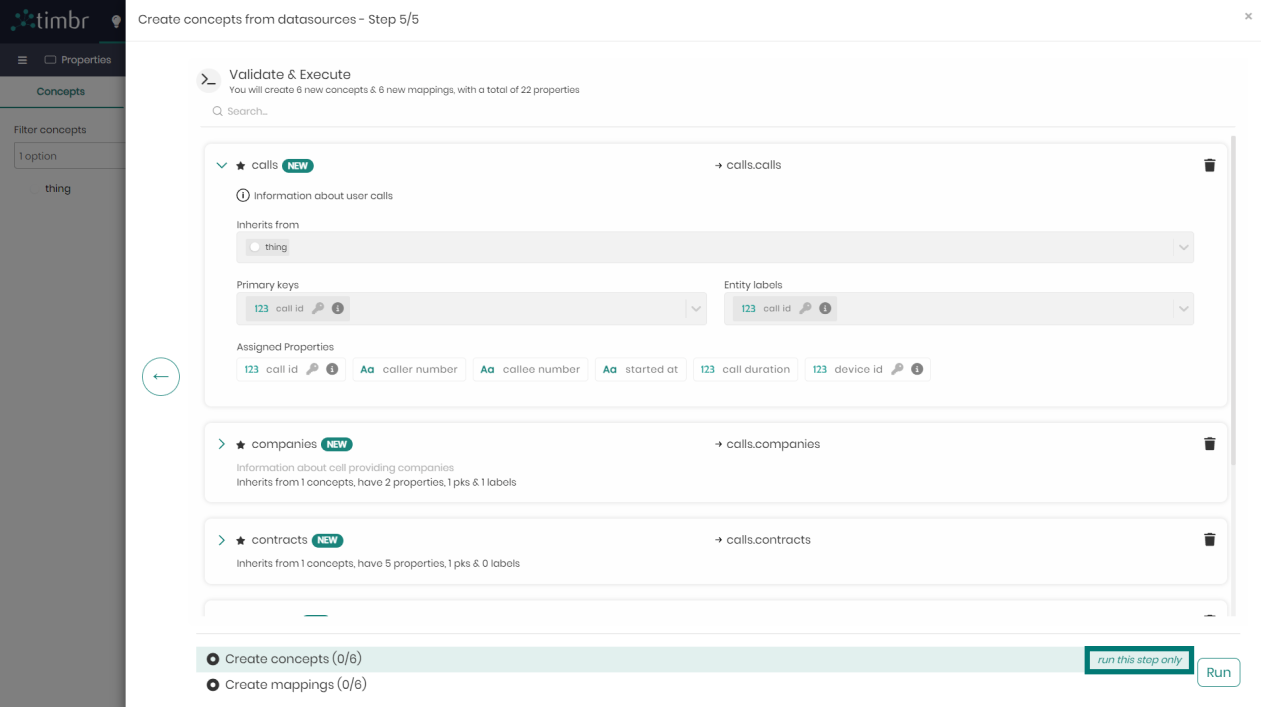
- In the final step, you can see an overview of what you are about to generate. Above you can see the number of concepts you are about to create, including the number of mappings and total properties in your model. When clicking on a concept dropdown you will see exactly what table is assigned to the concept, who the concept inherits from, what the primary key and entity label of the concept are, and what properties are assigned to the concept. If you'd like to make any changes you can click on the arrow to the left to return to the previous steps. You may also delete any concept you'd like by clicking on the trash can to the right of the concept.
When you're ready, click on RUN to generate your concepts and data mappings.
Before clicking on Run and generating the model with your concepts and mappings, you may also choose to run only the concept creations without the data mappings, or instead, run just the data mappings without the concept creations (in cases where you are working on an existing model that has existing concepts to choose from).
To perform this, all you need to do is either hover over the Create concepts or the Create mappings, and to the right of either one you hovered over, click on run this step only.
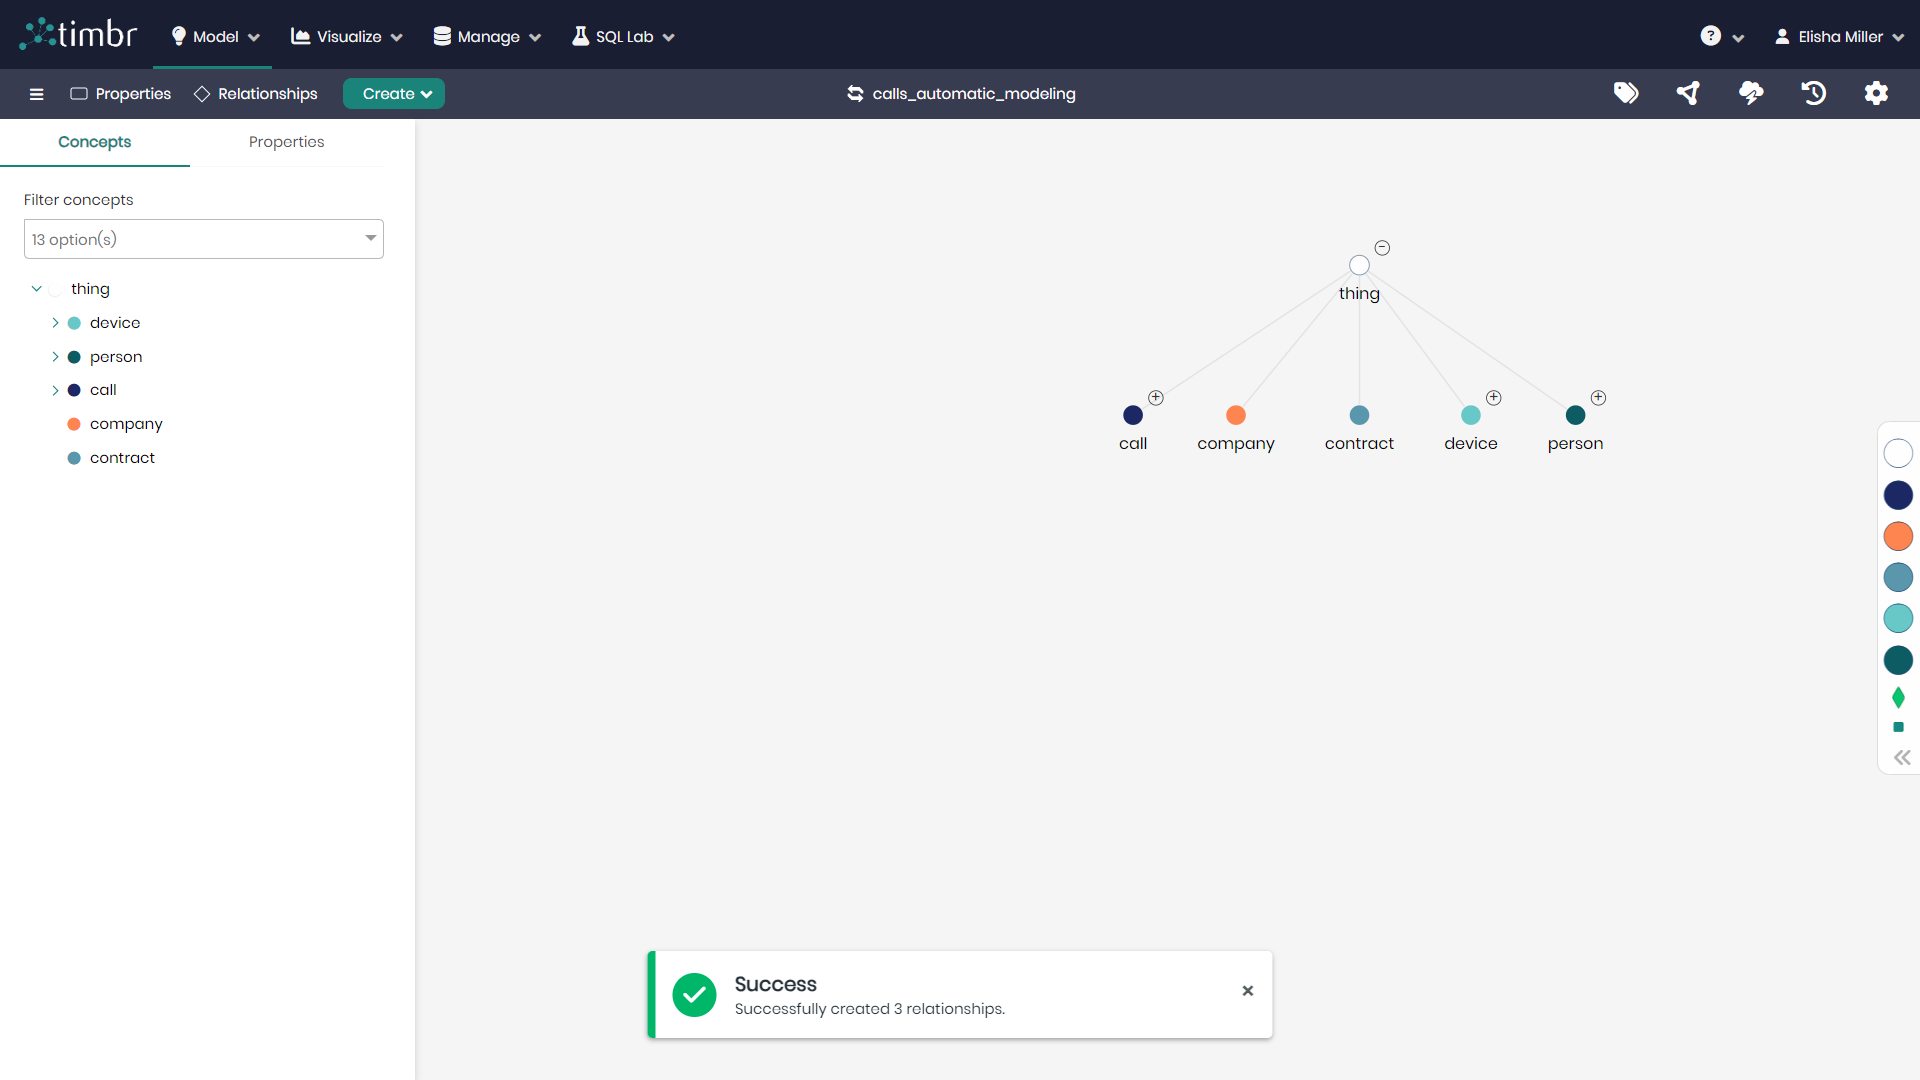
Once Run has been clicked, Timbr will generate the model which can take a few seconds, where you will then see the following message:
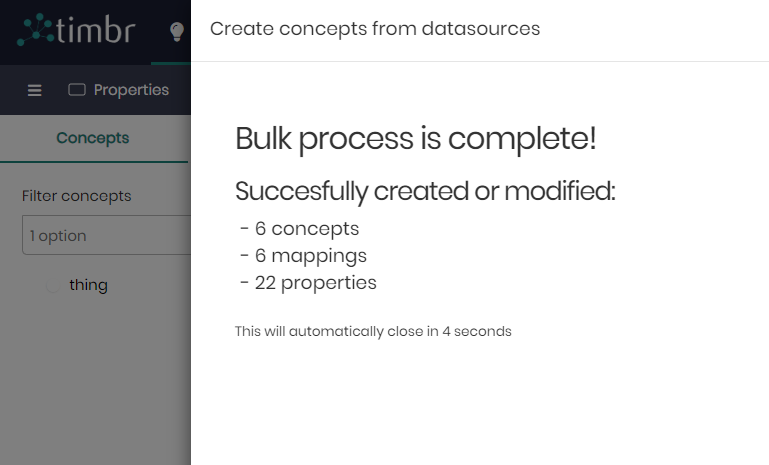
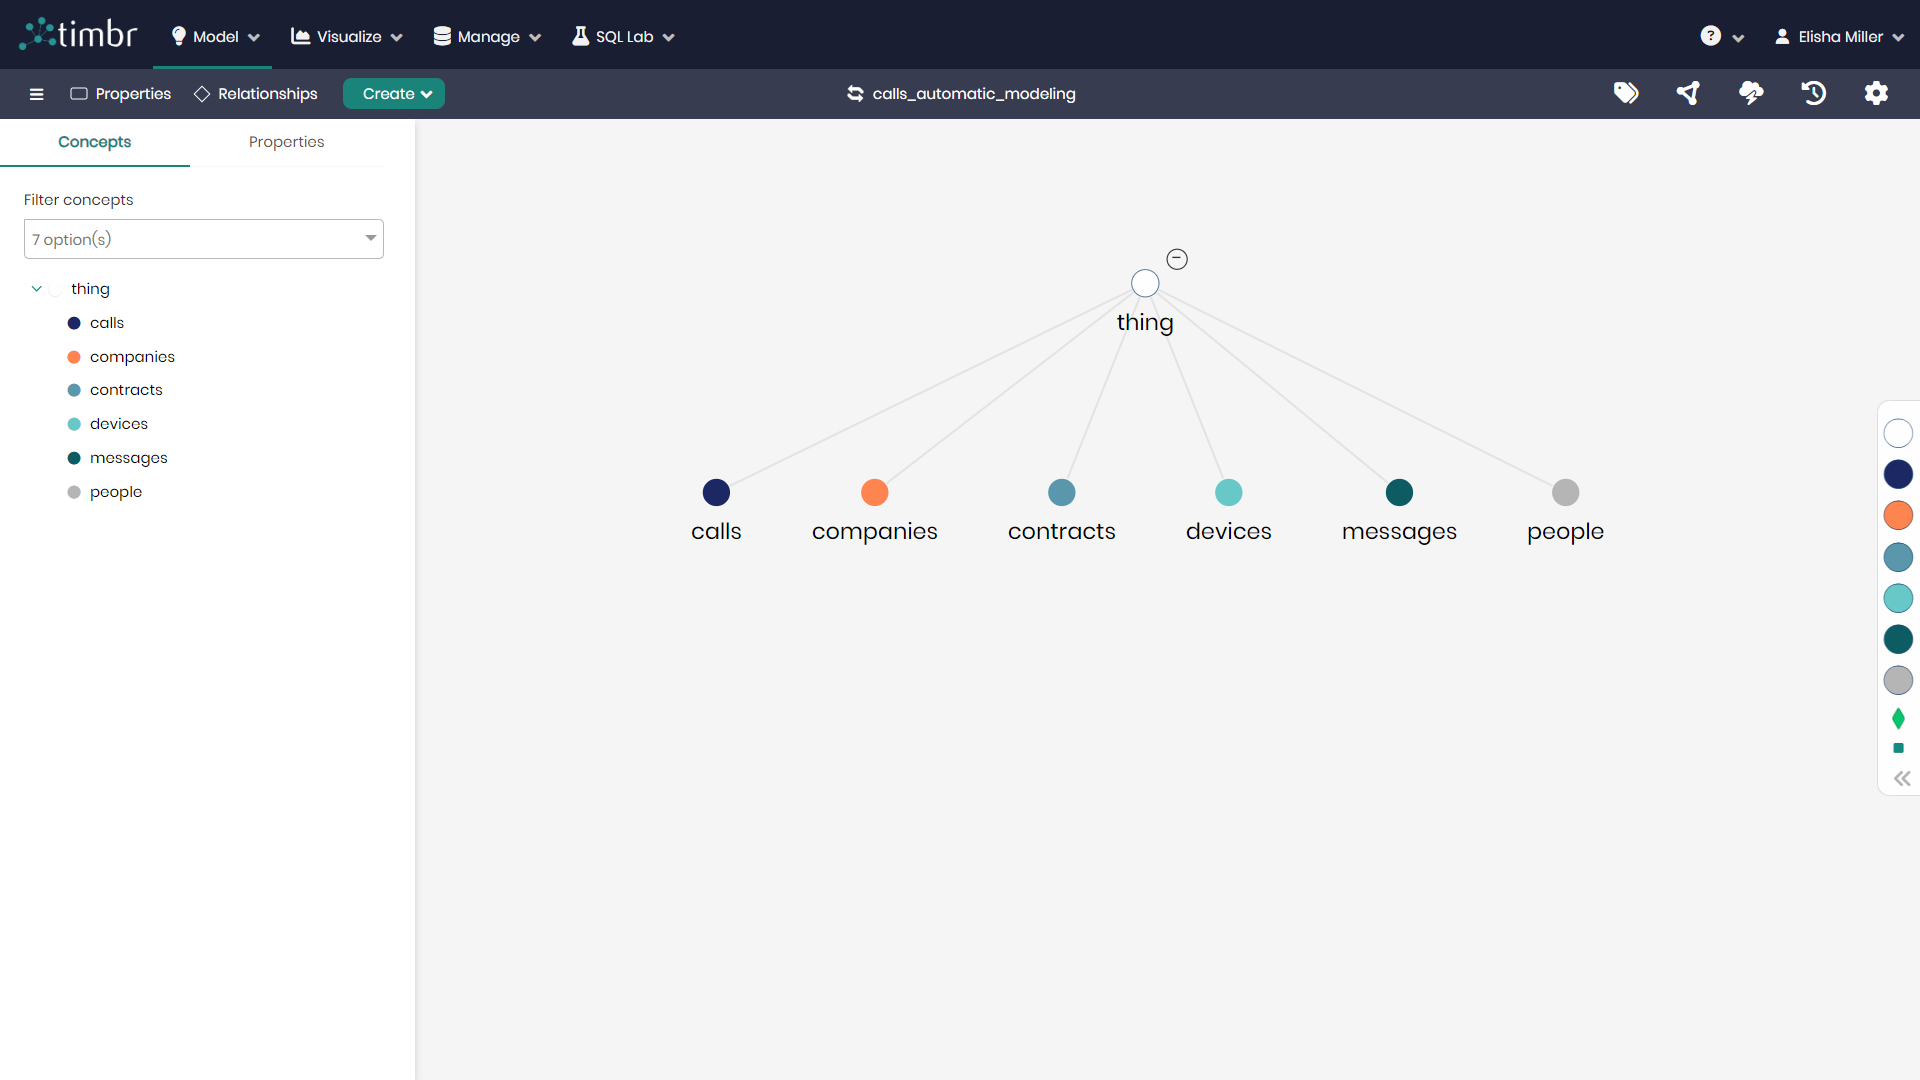
After a few additional seconds, your model will appear with all the chosen concepts, properties, and mappings you selected.
Creating Relationships in Bulk
Semantic relationships in Timbr represent relationships between two concepts that express a specific type of relationship. The relationships are matched based on the property of each concept.
Timbr enables various relationships such as One-to-Many, Many-to-Many, and Transitive relationships. Users can combine Transitive relationships with one of the two options.
In the section of Creating Relationships that can be found above, is a guided explanation demonstrating the creation of relationships between two concepts visually doing so one at a time.
In the following examples, you’ll find a guided explanation demonstrating the creation of relationships between two concepts visually in the Ontology Explorer doing so in a bulk fashion.
Creating Relationships in bulk between concepts in a telecommunications data model using the Ontology Explorer:
Assuming we'd like to create multiple relationships to connect various Concepts in a telecommunications data model.
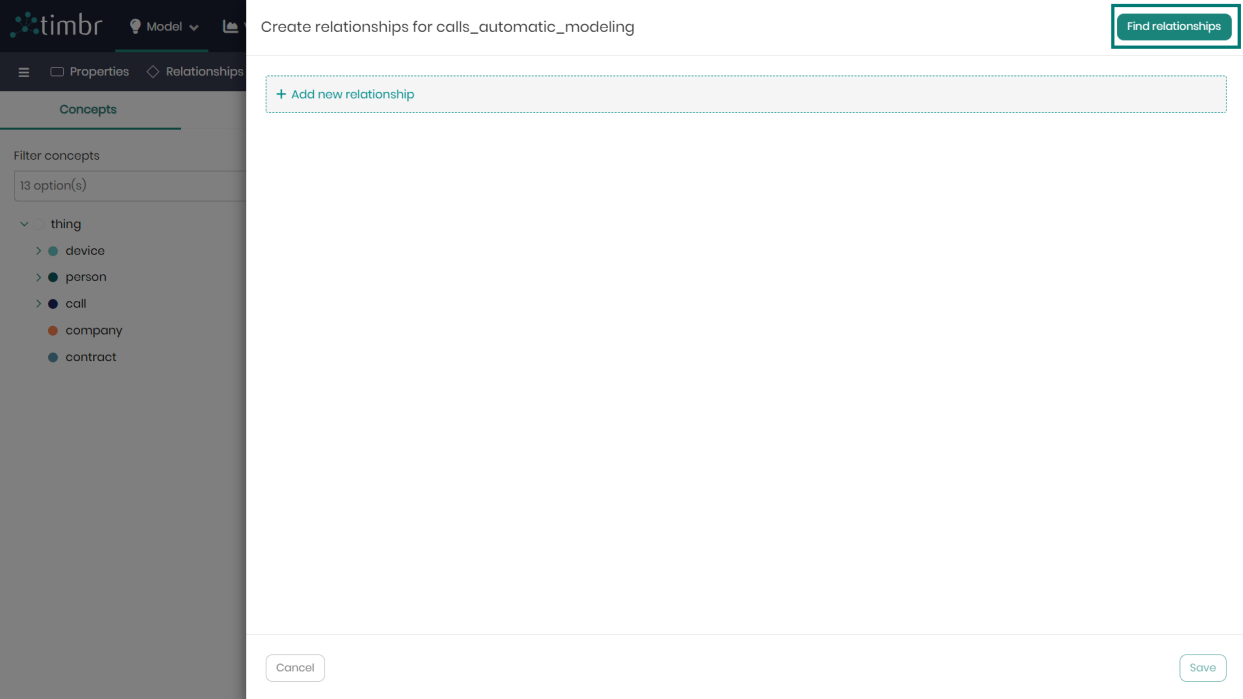
- In the Ontology Explorer, click on Create and choose Relationships
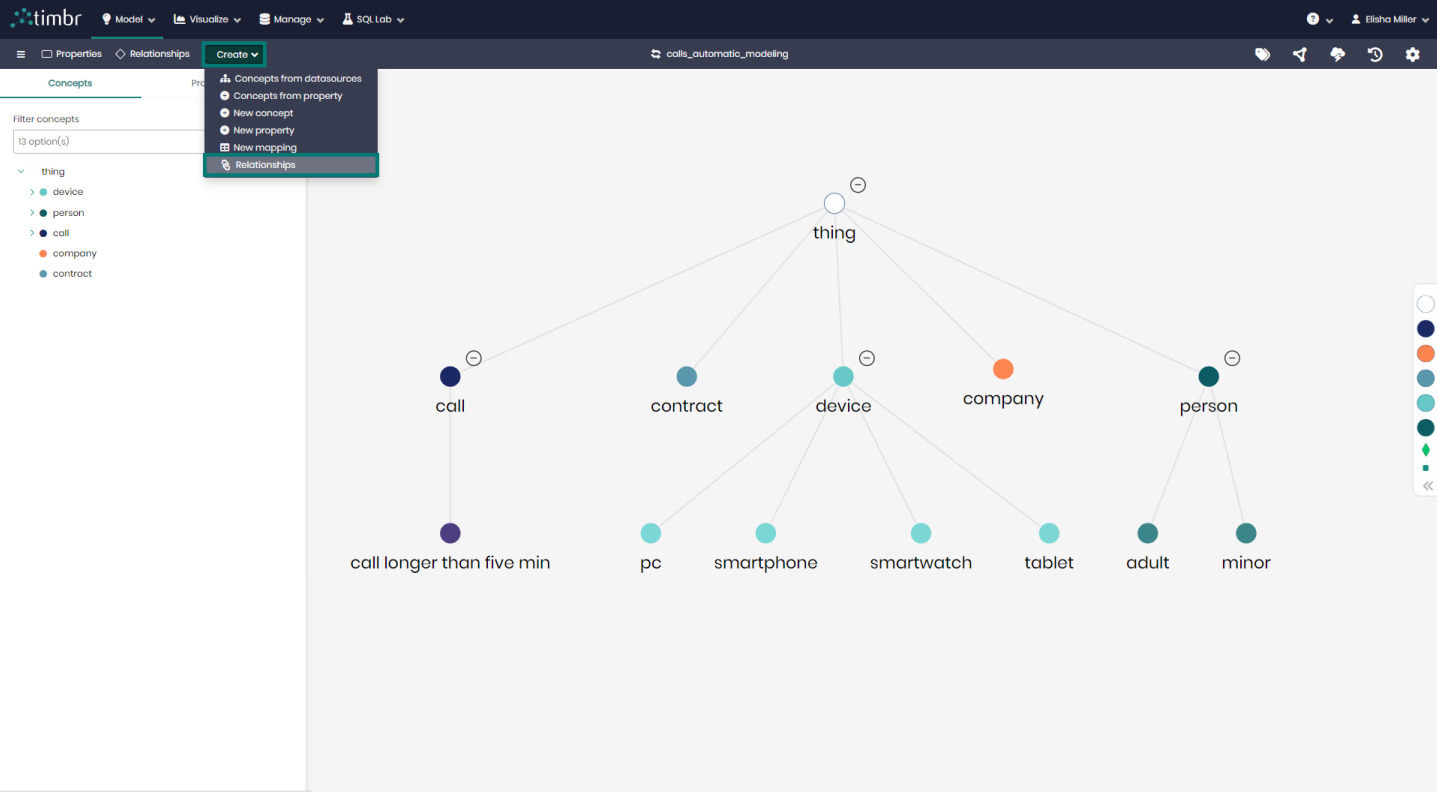
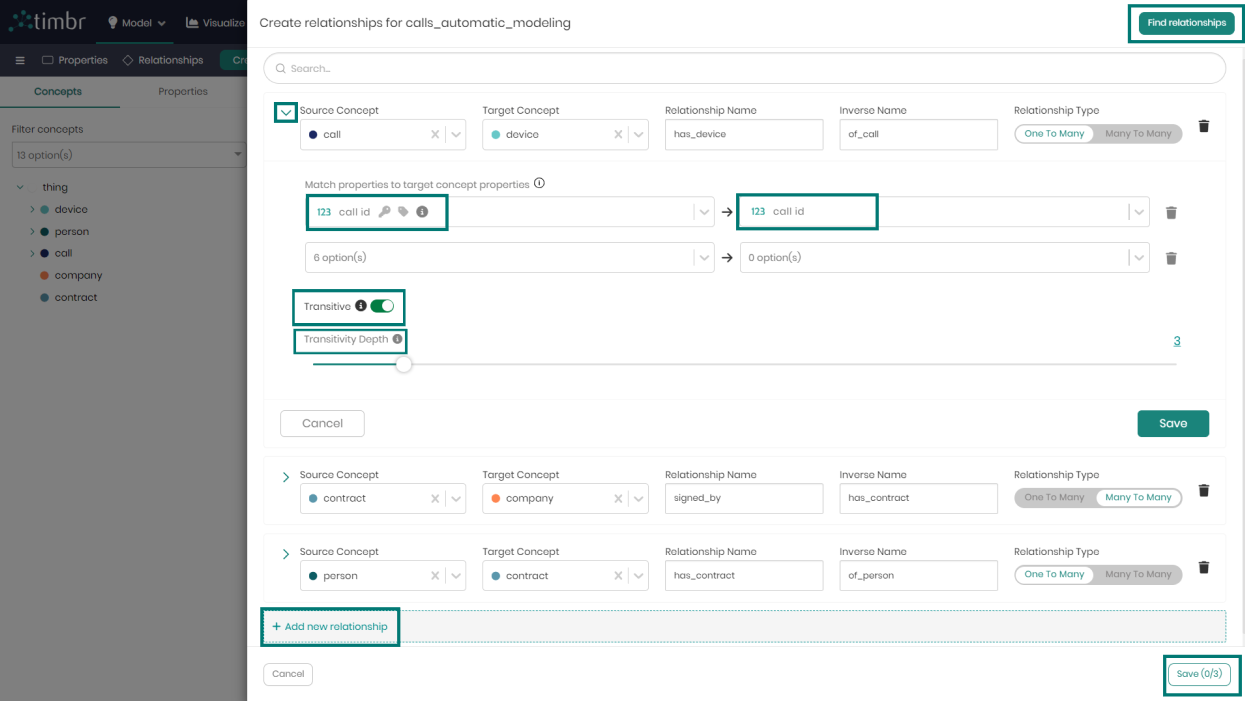
- In the relationship creation wizard that appears, you can select + Add new relationship to create a single relationship you have in mind between two concepts. If you'd like to create relationships in bulk, click on Find relationships on the top right.
- In the window that appears, you can select from the list of relationships available, and when done click on Add suggestions. You can notice that the first column represents the source concept in the relationship, the middle column represents the relationship name, and the third and final column represents the target concept in the relationship.
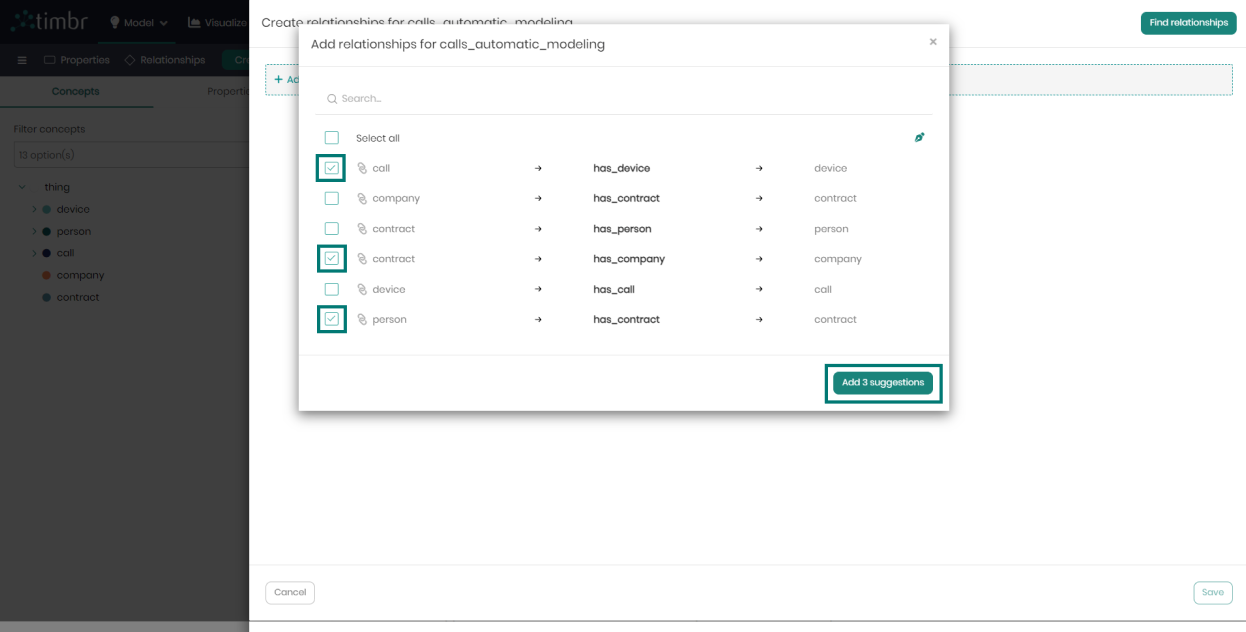
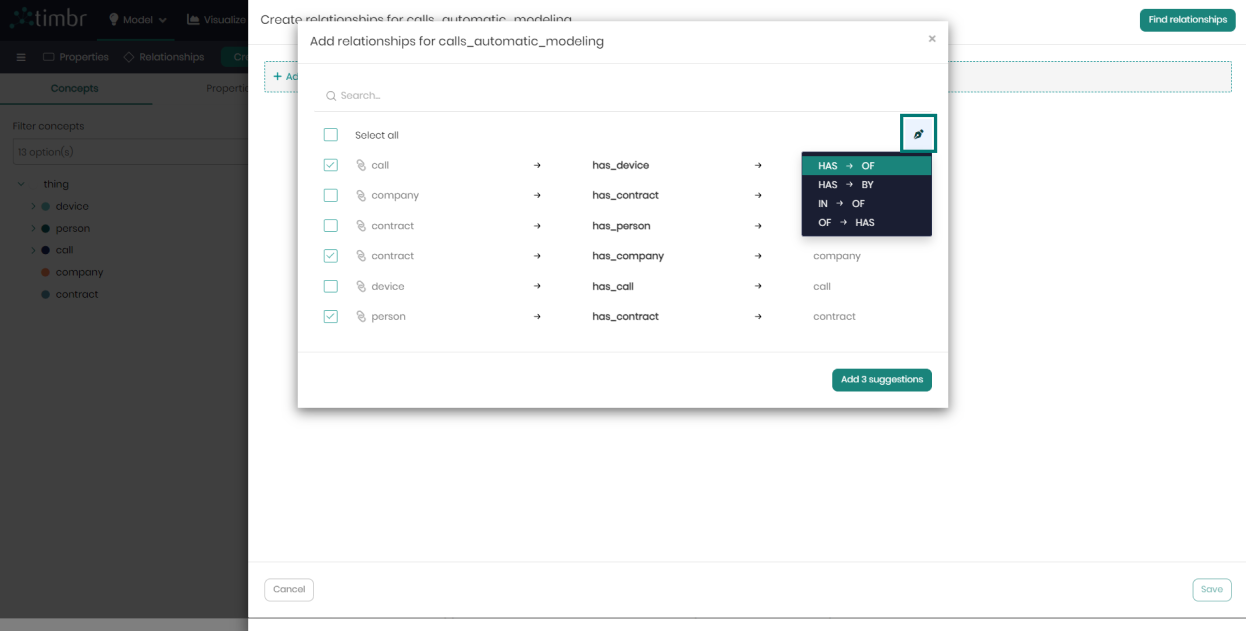
You may change the terminology used in the relationship names based on your needs by clicking on the icon placed on the top right.
- In the next window, you can save the relationships as-is by clicking on Save on the bottom right, or instead, you can edit the concept and relationship names. You can also change the relationship type from the default One-to-many to either Many-to-many or even Transitive if needed. If you'd like to delete a relationship you may click on the trash can icon to the right of the relationship.
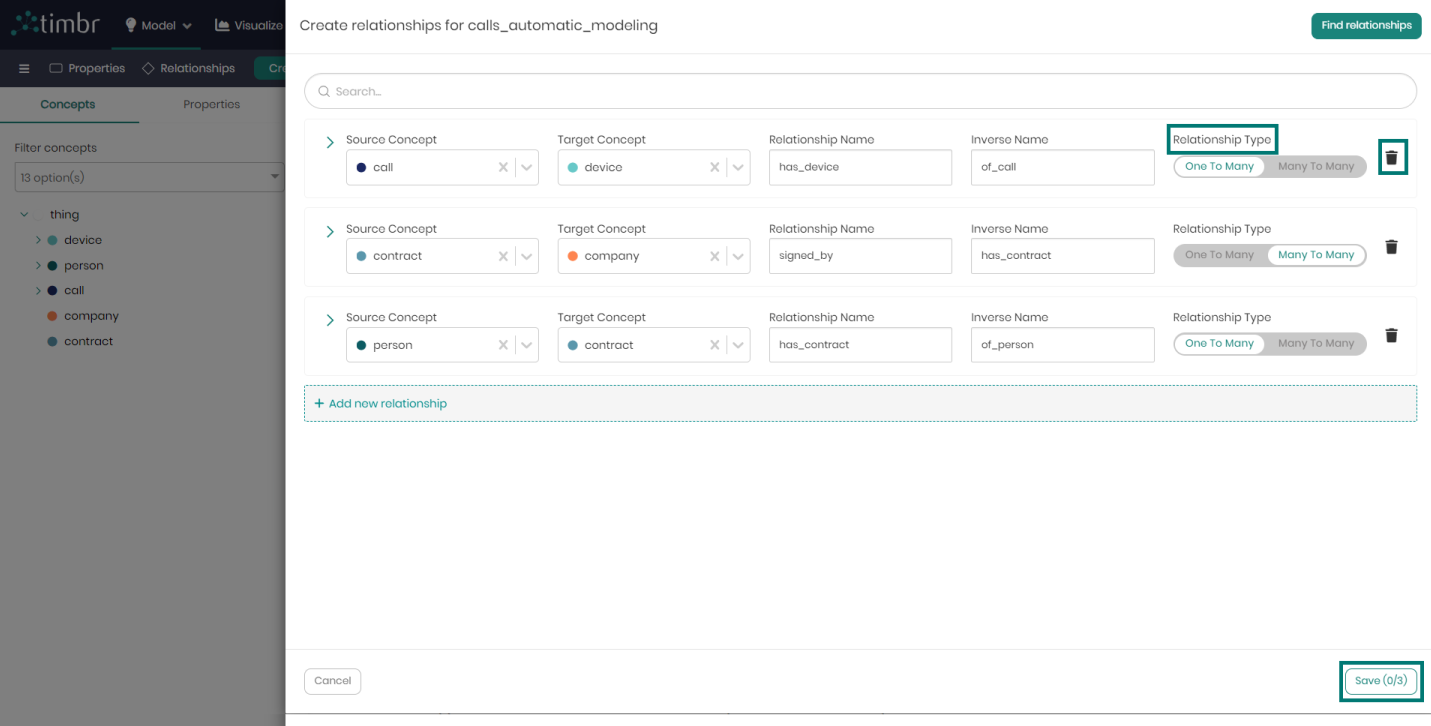
- Click on the arrow to open each relationship in order to match the properties between the source concept and the target concept. To the left in the default One-to-many relationship, you will find the dropdown belonging to the source concept, while on the right you will find the dropdown belonging to the target concept. When choosing a Many-to-many relationship you will need to fill out the matching properties as well as the intermediary table.
Beneath the matched properties you will find the ability to add the transitive relationship, as well as determine the transitivity depth. At any point, you may either click on +Add new relationship in order to add a single new relationship, or you can click on Find relationships on the top right to choose more relationships from the list you saw in the previous window. When finished matching the properties in each relationship, click on Save to generate your new relationships.
Once Run has been clicked, Timbr will generate the relationships which can take a few seconds, where you will then see your model with all the chosen relationships: